As you use Teams to chat with colleagues, you may find your “recent”chats include several entries with almost the same list of people. And now you’re clicking between groups with someone’s name to find the right group chat. Don’t! You can rename group chats to make it easier to find a specific conversation.
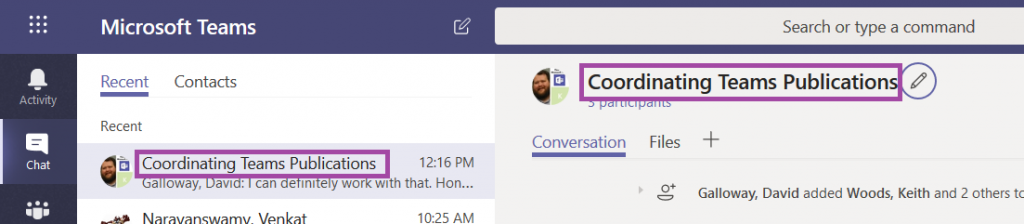
Within the group chat, click on the little pencil next to the participant names.
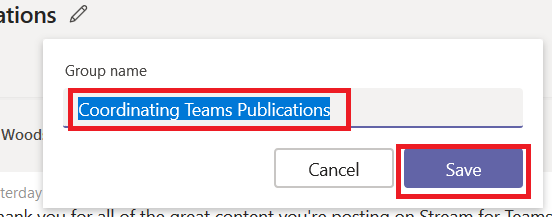
You will have an edit dialogue where you can add a group name – this is displayed to the other participants so select the name accordingly 😊 Click ‘Save’.
The conversation is now listed with the name you’ve supplied. Should you want to remove the name, simply click the pencil again and delete the name. Save a blank name, and the conversation will be titled with the participants again.
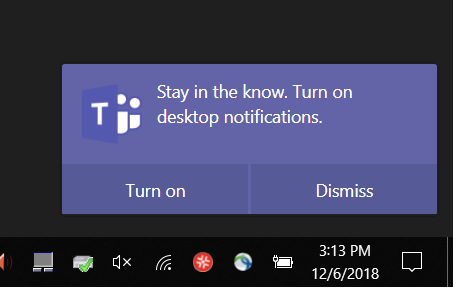
The *one* disadvantage of using Teams in a web browser was not getting notifications for new activity, but the Teams web site now supports desktop notifications. Next time you log into Teams in a web browser, you’ll be asked if you want to turn on desktop notifications – click “Turn on”.
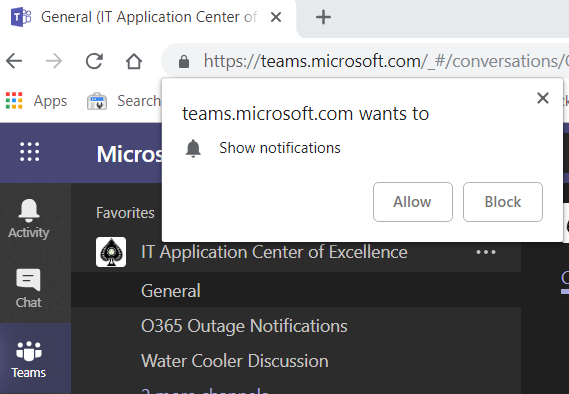
You may see an additional browser prompt asking you to confirm you wish to grant the Teams website the right to show notifications –click Allow.
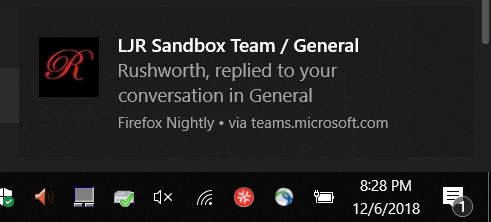
If you have Windows 10 notifications enabled, you will now get notifications in the lower right-hand corner of your screen and the Windows notification panel.
You will get notifications even if you’ve disabled desktop notifications.When you are on the Teams tab, you’ll see notifications in the lower right-hand corner of the browser.
And when you are not on the Teams tab, you’ll see a number indicating the number of new notifications that have been sent.
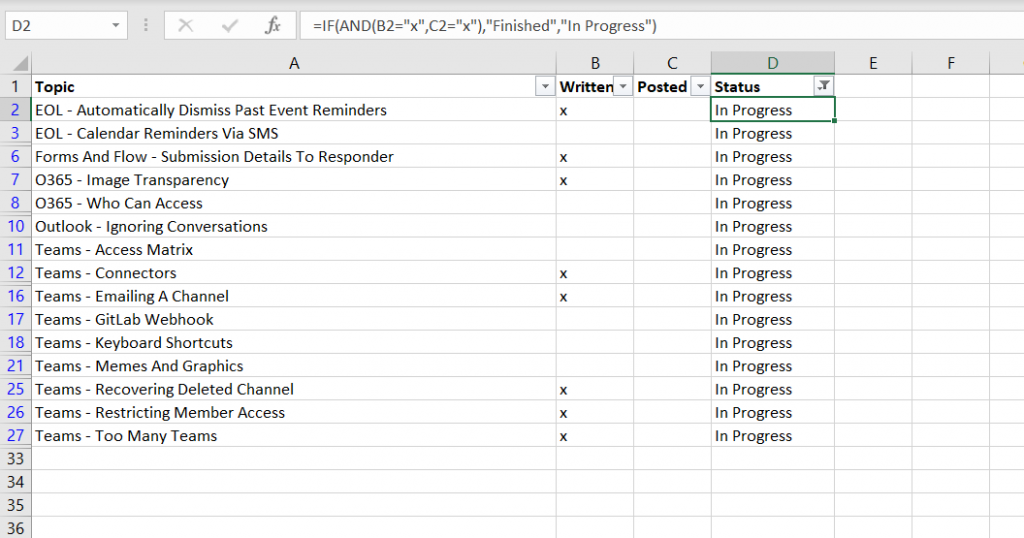
I have been writing a lot of “did you know” articles as part of our Microsoft Teams reintroduction, and I have an Excel file that lists topics for which we want articles. To avoid posting the same article twice (or worse, writing the same article twice!), I mark off when the article is written and posted. With a long list, though, it is difficult to identify which articles still need to be posted (yeah, I know I’m not apt to have posted an article that hasn’t been written so I could have just used a filter on the ‘Posted’ column … but there are plenty of cases where a simple filter does not suffice). Sometime you can build an advanced filter that isolates the specific data you need, but there’s an easier way — the Excel IF function.
In my spreadsheet, I
added a column, named “Status”. The “IF” function displays different
text when the test evaluates to TRUE and FALSE: if(B2=”x”,”Written”,”Not written”) displays “Written” in all of the rows where column B has an x, and “Not written” in the remaining columns.
In
conjunction with IF, I can use the Boolean AND function to display
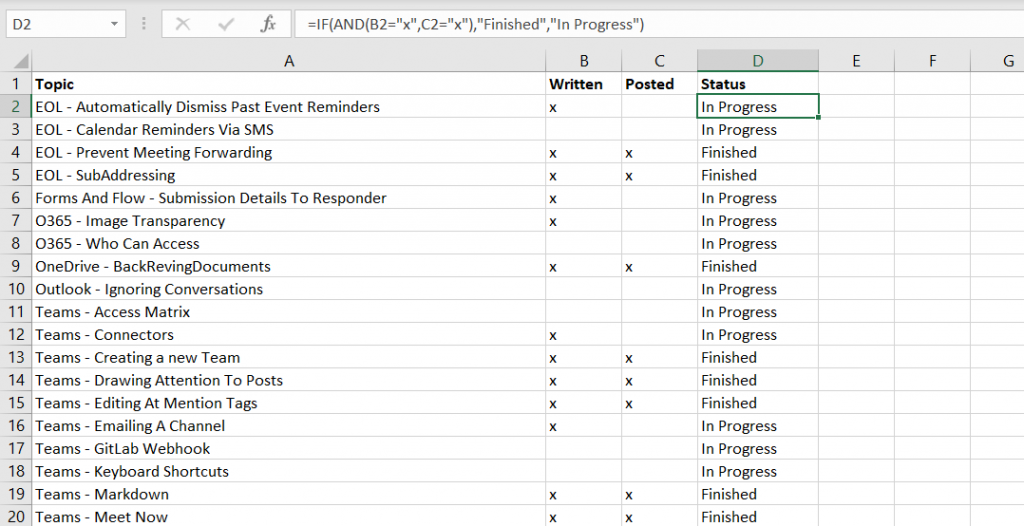
“Finished” in any row where both columns B and C contain an X: =IF(AND(B2=”x”,C2=”x”),”Finished”,”In Progress”)
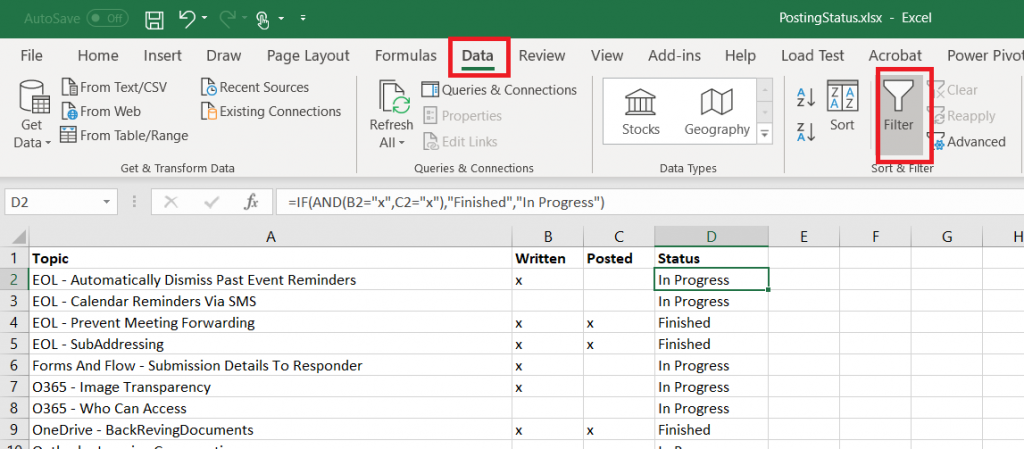
The content of the Status cells can be used as a filter. On the “Data” tab, select “Filter”.
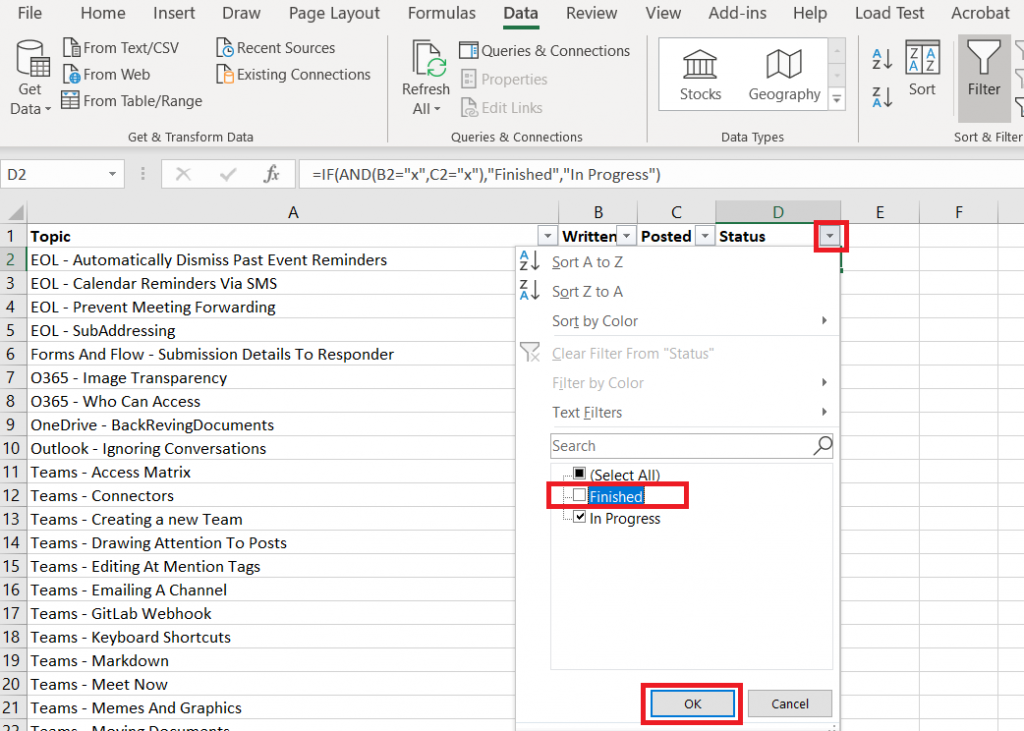
Click the drop-down menu on the “Status” column, deselect whatever values you do not wish to display, then click “OK”.
Voila! Now I see only the articles where the status is not “Finished”.
I frequently collaborate on documents with a small group of people – not that I don’t want everyone’s input, but starting a discussion with thirty people and a blank sheet of paper can become a cat-herding endeavor. I start drafting a document with a small group of people and then present the mostly finished information to a larger team for final review. I do not want to keep track of different versions of the document spread across multiple Teams! Fortunately, you can move documents between Teams.
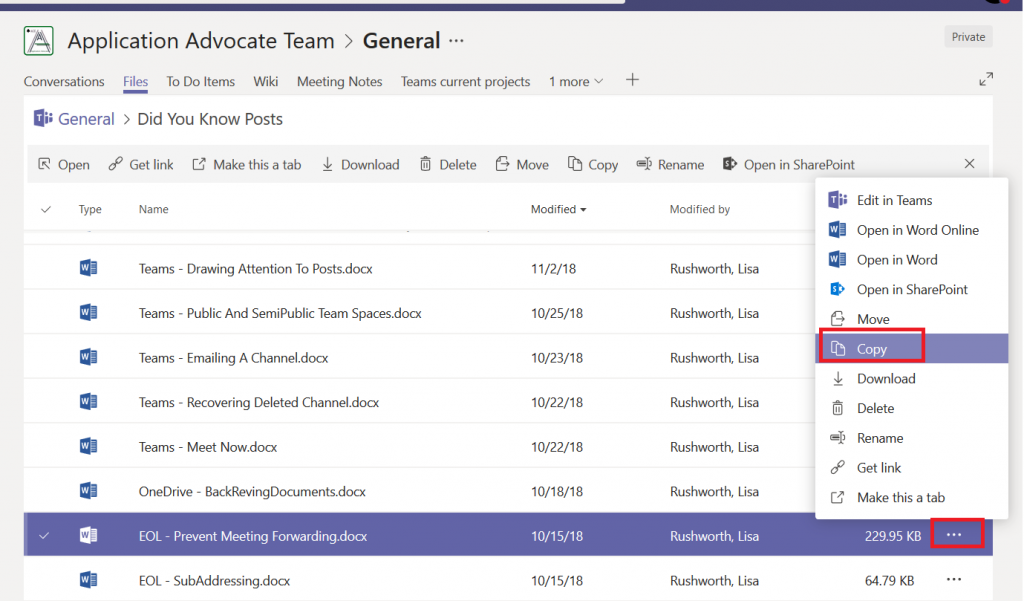
Find the document that you want to move. Click the not-quite-a-hamburger menu to the right of the document listing. Then select either “Move” or “Copy”.
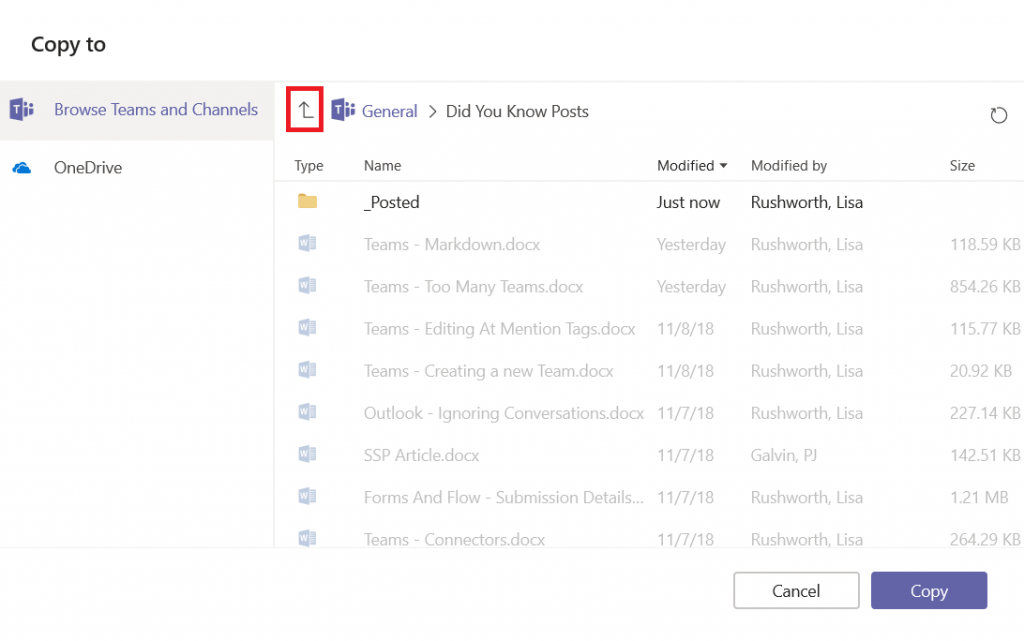
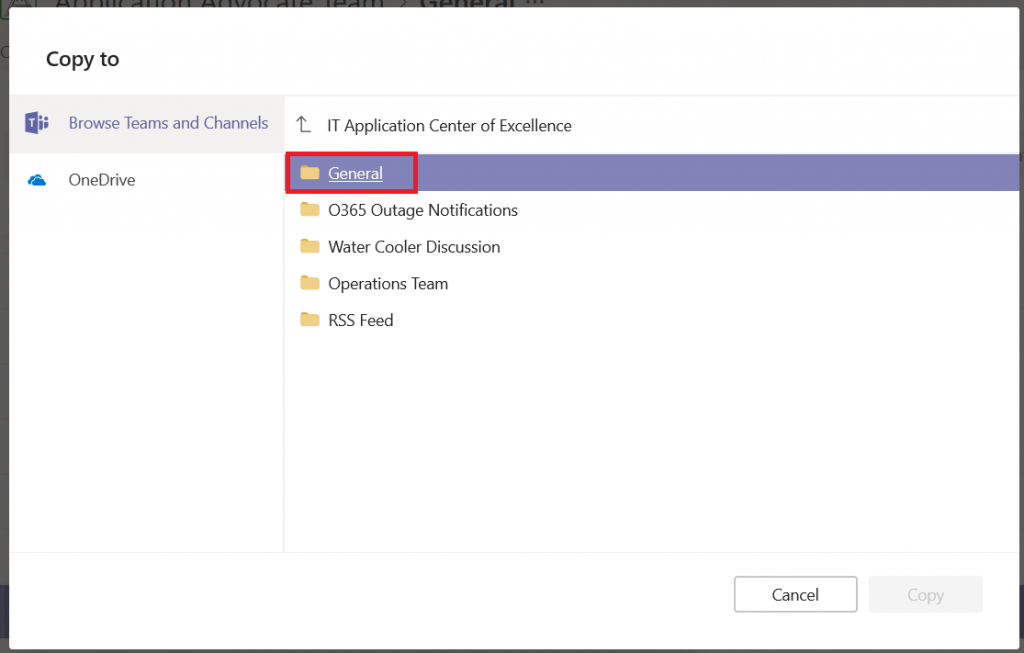
A “Copy/Move To” dialogue will open, allowing you to select where you want to document to appear. You can navigate the folder structure within the channel’s file space or click this arrow to move outside of the channel’s file space.
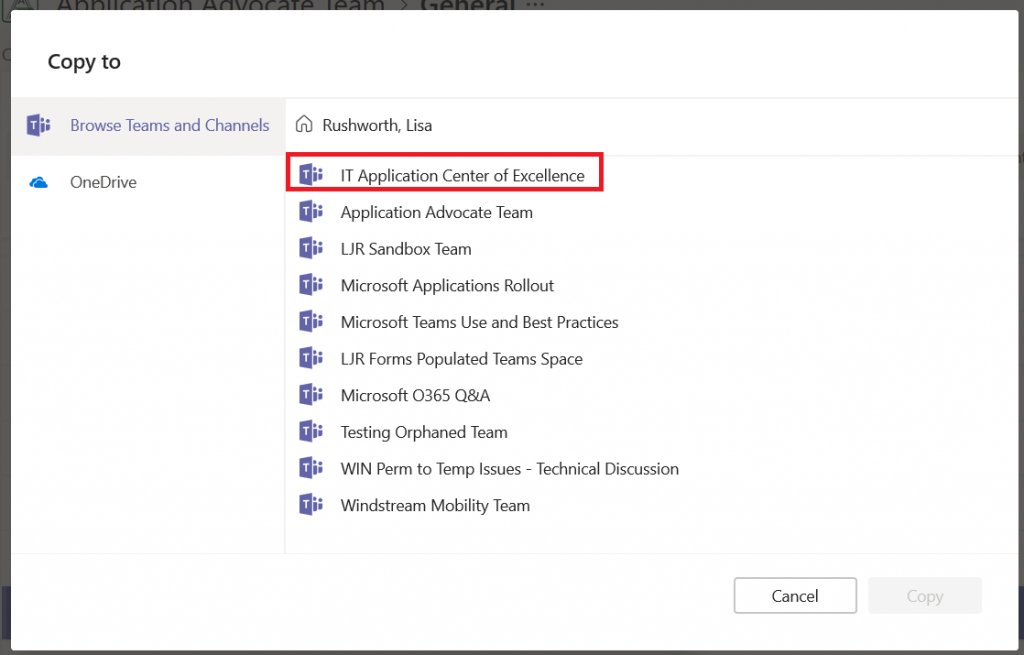
Clicking the arrow once will bring show the channels within the team. Clicking it a second time will display all your Teams. Click on the team into which you want to move the document.
Select the channel in the new team where the document will appear.
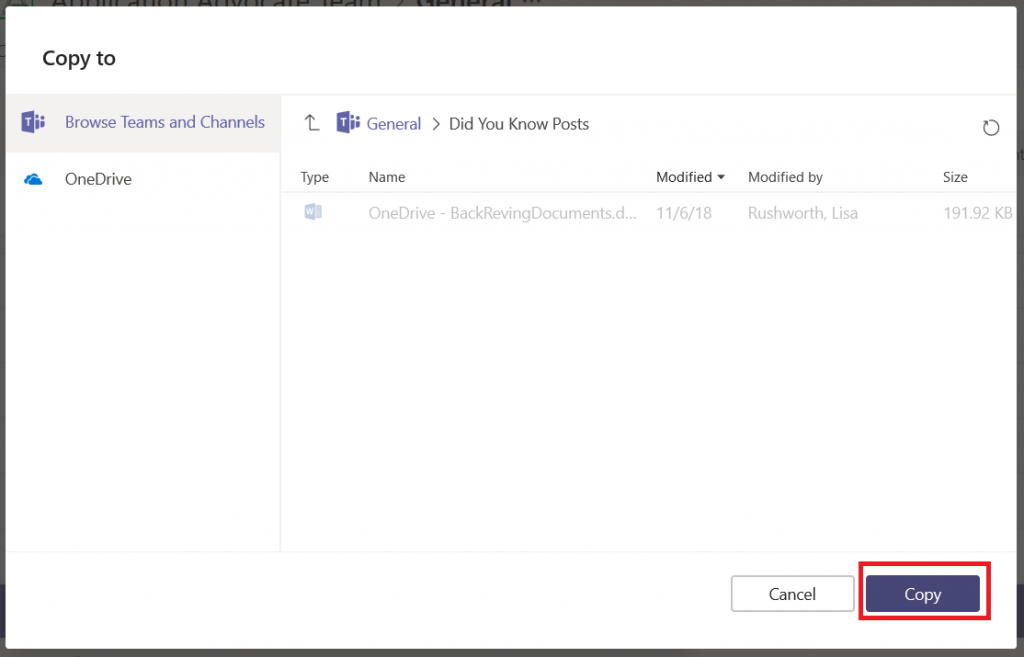
If there is a folder structure within that channel’s file
space, select the folder path you want. When you’re in the right place, click “Copy”
or “Move”.
Do you have a two-foot-high stack of papers on the desk behind you? Does your whiteboard contain information that isn’t quite ready to be broadcast? Or maybe you are working from the aeroport and your camera is facing the main terminal hallway – all of those people running past can be distracting. Video meetings humanize participants, but what’s behind you isn’t always something you want to share with others. When you join a scheduled Teams meeting, you can use a video filter to blur all of that stuff.
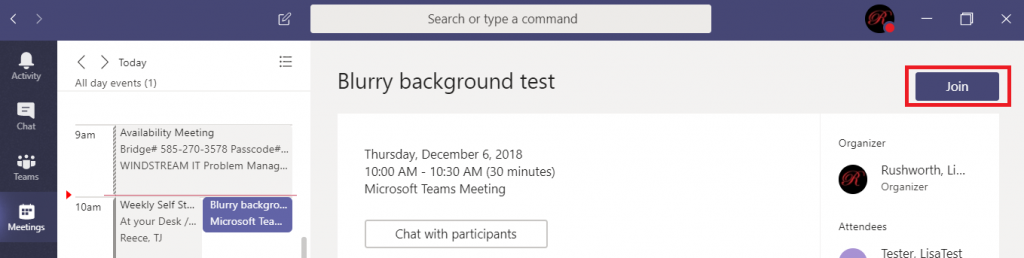
Click to join a meeting.
Click the slider next to the video camera to join the
meeting with video.
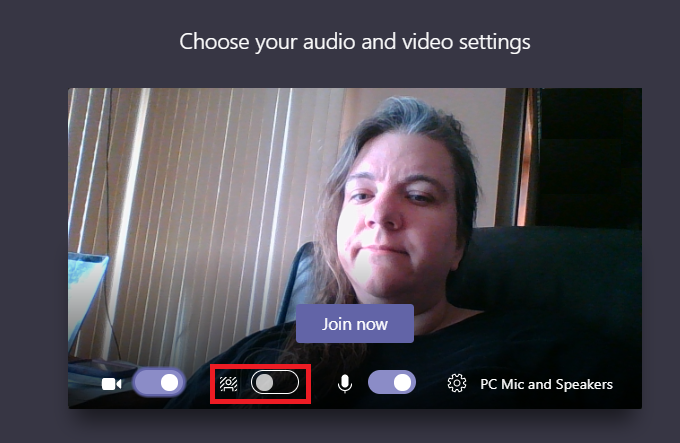
You will see a video preview. Click the middle slider to activate
the background blurring filter.
The video preview shows the changes. If the blur
sufficiently obfuscates whatever you didn’t want to show, click ‘Join now’ and
join the meeting. If your desk still looks a mess … move your stuff 😊
The blur effect is not applied to things the filter considers to be in the “foreground”
… so you might be able to achieve
more blurring by pushing an object farther from the camera.
From one way of looking at it, legislative moves to limit the power of incoming administrations are brilliant (I mean, it sucks beyond the telling of things but still). I’m losing the majority, dump money into local races and gain the power to reorganize voting districts so I still win. I *still* manage to lose even in my gerrymandered districts, redefine what the elected government can actually do while I’m still in power. You can find yourself screwed over by your own rules — see: Scott Walker but if you’re losing voters … it’s a decent gambit.
It also, short term, addresses a concern I see because compromise is no longer a thing. If we cannot agree on some middle ground, regulations are going to vacillate between extremes as the side in power flips. So we get 4 years of fuck the environment, who needs to publicize accounting nonsense we know your books are right, drill baby drill, hey food producers – inspect yourselves and fill out this form if you find a violation otherwise we’ll assume it’s all good man. Followed by four years of umm, I wanted to breathe that air, remember Enron. How about Deep Water Horizon? Upton Sinclair? How was that hospital visit after your last bowl of romaine? It’s expensive for companies to change processes and re-engineer to meet the new laws on short time-frames like that. So I get rid of all of those pesky regulations, then legislatively change it so the next dude cannot change those regulations without a 2/3 majority vote during a full solar eclipse. Boon to business, since they can actually change their processes/products without fearing a complete rework two years out.
Problem I see, though, is that these moves are predicated on the a priori assumption that Americans will keep playing the game no matter how many dirty moves each team makes. My daughter likes to play games I call “Anya wins” — where the rules of the game change during play to ensure whatever she did beats me. Even knowing that she’s a five year old kid and having fun … it’s not a lot of fun to play Anya wins unless you get to be the Anya. How long can we sustain a peaceful transfer of power when those leaving play ‘we win, you lose’?
Adding a Planner board to Teams spaces is a great way to manage tasks within a group or for a project, but it can be a little difficult as an individual to keep track of tasks scattered across various Teams. Microsoft Teams also provides a view of your tasks.
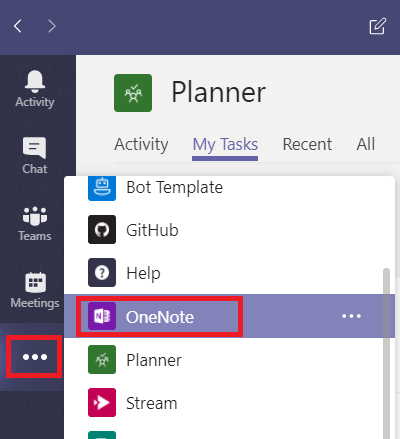
Click on “More apps” on the left-hand toolbar and select “Planner”
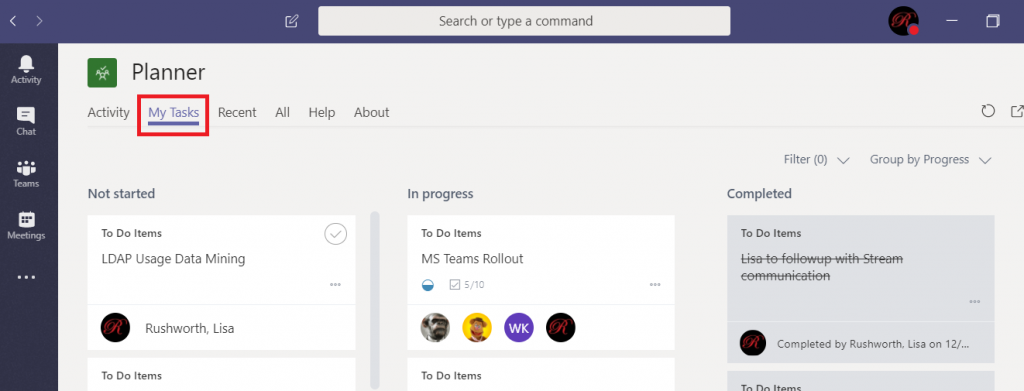
Click on “My Tasks”. You will see tasks in any Planner board that have been assigned to you. You can edit task content, change labels, and change the completion status from within this view.
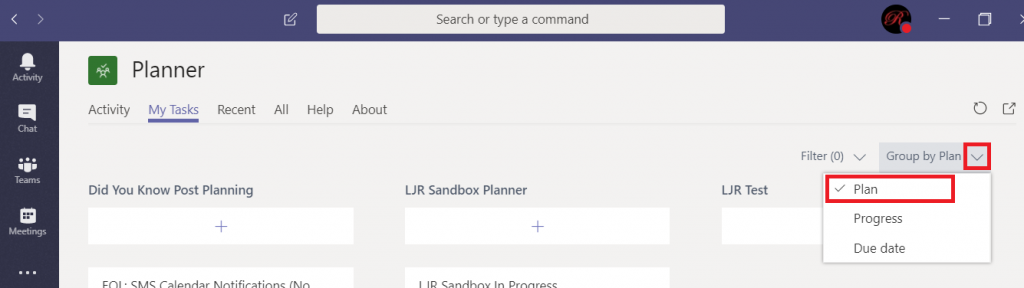
Although you can edit most of the Task details, you cannot drag it between buckets on the Planner board. To do that, you need to open the containing Planner board. Currently, there’s no way to navigate directly to the Planner board from within this view. You can click the inverted caret next to “Group by …” and select “Plan” to see the name of the Planner board that contains your task. You can then find the board on https://tasks.office.com
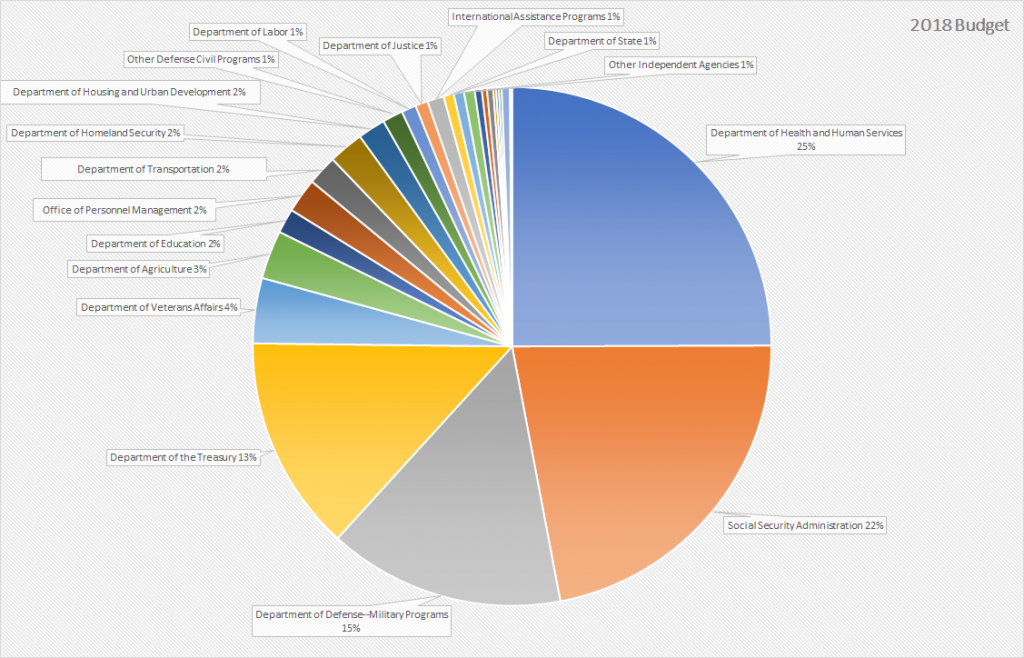
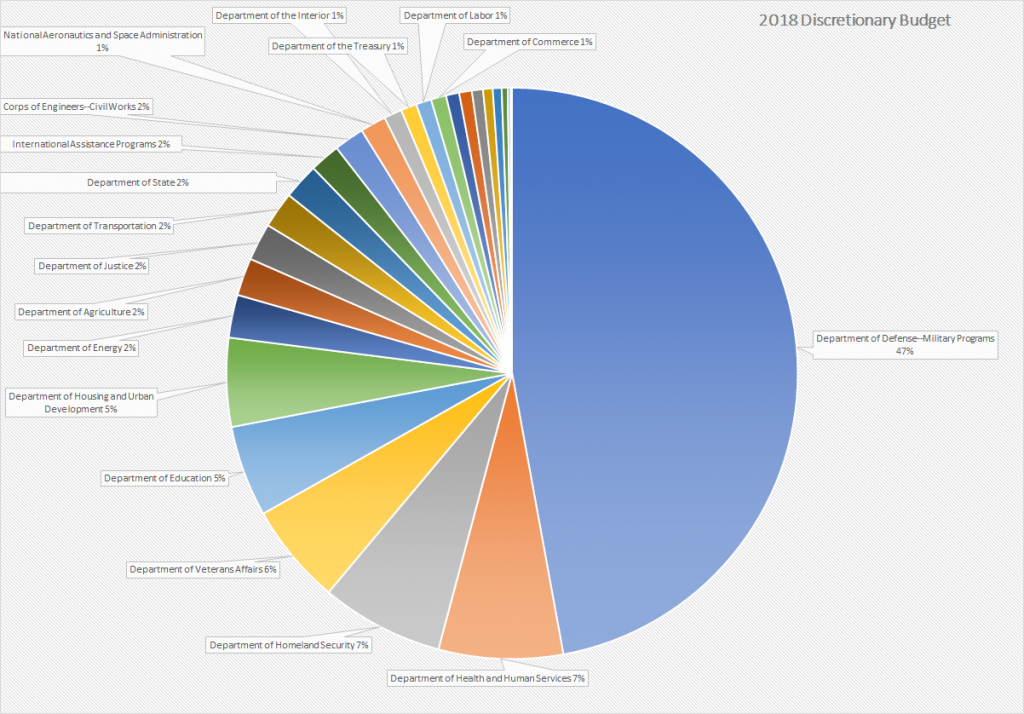
Here’s the latest pie charts of how the federal government spends its money. Again, there’s discretionary spending — spending from appropriation bills and the full budget which includes spending for things like Social Security, Medicare, and Medicaid which vary depending on the number of recipients and how much each recipient is being paid. This doesn’t mean the non-discretionary components couldn’t be changed — there’s been discussion of means testing Social Security payments and Medicare eligibility — but these changes are generally considered politically untenable (would you vote for the guy who just reduced your SS cheque because you happened to have a pension or money saved in a retirement account?).
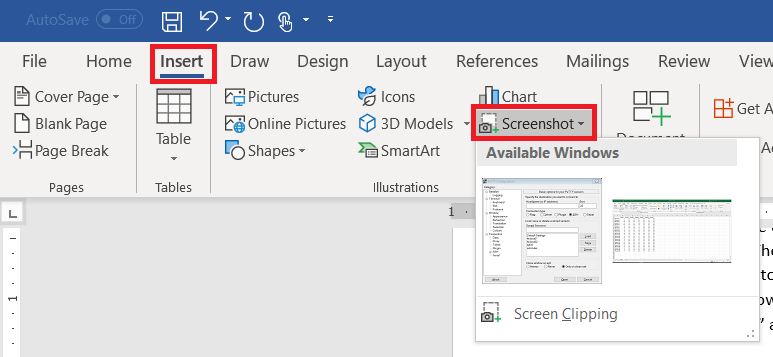
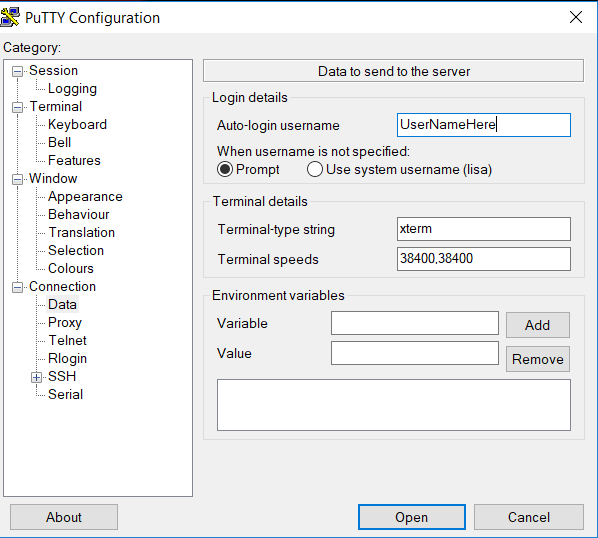
You’ve encountered some odd error in an application and need to send IT support a picture. Or you’rewriting documentation. There are lots of reasons you need a picture of your computer screen. You can hit the “Print Screen” button on your keyboard (even hold Alt and hit print-screen to isolate the image to the active window). But did you know Microsoft Office programs can do that for you? On the ribbon bar, select “Insert” and locate “Screenshot”
Click on one of the “Available Windows”, and an image of the window will be inserted into your Word document, Excel spreadsheet, Outlook e-mail, or PowerPoint presentation.
Use the “Screen Clipping”selection to grab part of a window. Minimize all of your Windows. Bring up the Window of which you want an image. Now bring up the Office document into which you want the image inserted. Use Insert => Screenprint => Screen Clipping, and wait a minute. Your Office document will be minimized, your screen will get washed out, and you’ll have a cross-hair instead of a mouse pointer. Click and drag to draw a rectangle around something. When you release the mouse, whatever is in that rectangle will be pasted into your Office document.
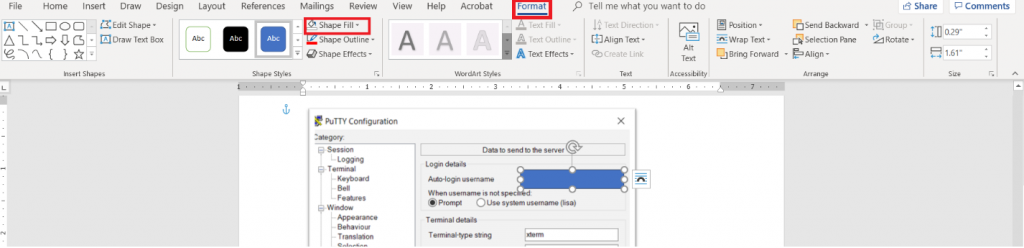
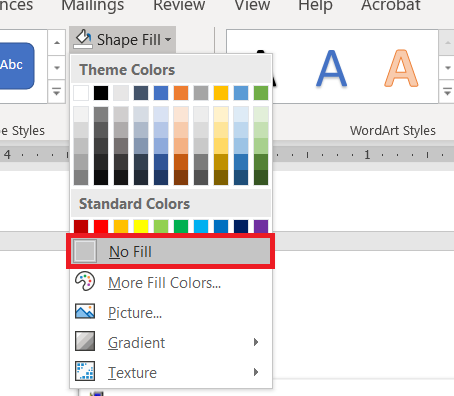
Wait – what about those rectangles I use to highlight the image? From the ribbon bar, select “Insert”and “Shapes”. I took a University course where debugging screen shots had to have the “important bit” highlighted with a red square – that stuck with me. You’ve got an array of shapes and colours available. Pick one. Draw the shape over your image – yes, it looks like the shape covers the important part. Draw it anyway. While the shape is still selected, click “Format” in the ribbon bar. Select “Shape Fill”
Select “No Fill” (you could also use a highly transparent fill colour if you’d prefer).
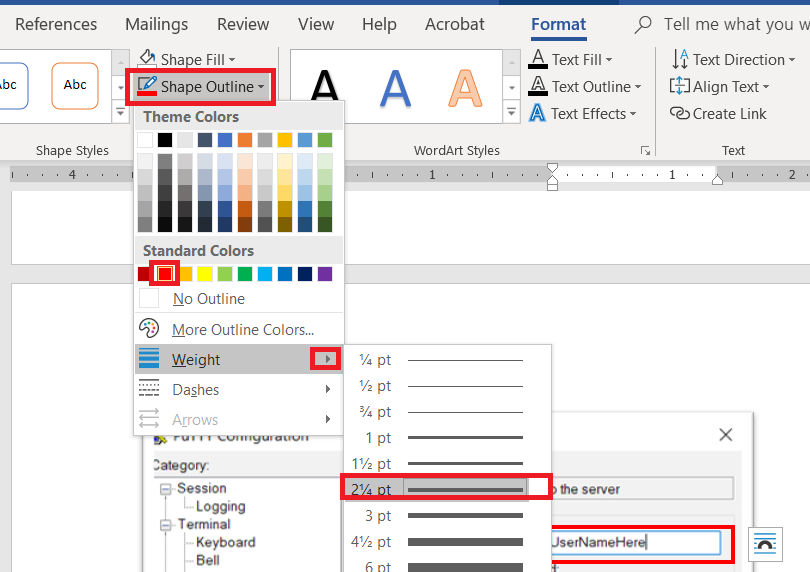
Click “Shape Outline” – pick a colour, and if the line is not thick enough select “Weight” to increase the line width.
When I’m writing documentation with a lot of images, I’ll still use an image editor and ‘print screen’. There are filters that just don’t exist in the Office image editors – sometimes I want to selectively blur screen text so my work conversations are not included in documentation. Sometimes I want to create a composite image. But for small documents – showing someone the error I get on their web site, “click here, type this” – using a single application is efficient.
We purchased a house full of Z-wave dimmers (Leviton VRMX-1LZ and DZSM-1LZ) as a Christmas season special from Leviton two years ago. We were really happy to have dimmers throughout the house — we could use the existing lighting as nightlights, have movie nights with a little pathway lighting … and then we installed a few dimmers and realized the bulbs dimmed. But not DIM dimmed. It was a massive bummer, and significantly diminished the couple hundred bucks we’d dropped on these smart dimmers.
We even called Leviton & got a paper they publish with how different bulbs dim with their various dimmers. And realized that all of the bulbs that went down to 1 or 2% were discontinued. Another bummer! The paper is updated periodically, but even the early 2018 iteration failed to yield any in-production well-dimming bulbs.
Over the summer, I came across a review of various dimmable LED light bulbs. The guy had an integrating sphere rigged up and was measuring output and colour — seemed like he put a lot of effort into it (and I’d LOVE to find that write-up again!). His write-up indicated that Home Depot’s “house brand” bulbs, EcoSmart, dimmed down to basically nothing. I added EcoSmart 60W bulbs to my “next time you’re at Home Depot” list and finally remembered to pick them up in September. Except there were two types — plastic ones and glass ones that can be used in closed fixtures. The plastic ones dimmed well — way better than any of the Cree, Phillips, or Lighting Science bulbs we’d tried. But the glass ones — they dimmed to the point of being off. We had to go through and change what the dimmers consider zero because these bulbs were TOO dim. And they didn’t hum, buzz, or flicker. I was thrilled — swapped out the downstairs hallway bulbs with these glass EcoSmart LEDs and the light fixtures have become nightlights.
I wanted to get bulbs for the other hallway, bedrooms, and bathrooms. So I ordered the bulbs online & they showed up. Replaced one set of bedroom bulbs, dimmed them … and they’re about on par with the Cree bulbs we had. Huh? Upon investigation, while the bulbs we got delivered had the exact same part number, they had a different UPC. And a different product code above the UPC. Even odder — the energy draw and estimated annual cost were different. Apparently there are different revisions of the bulbs, and the 02 revision doesn’t dim any better than every other bulb out there.
We returned the bulbs and checked the light bulb aisle at the store for any with UPC 693690563636 and product code ABA19A60WESD01 — and found a bunch on the shelves. They also had the 02 revision and a 03 revision. Since the 01 ones were a known quantity, we bought them. And they dim down to nothing! It’s been just about two years, but the dimmers we’ve put in are finally PERFECT.