Month: March 2016

Great again?

We’ve been seeing a lot of political ads and campaign rallies – and I am constantly struck by Trump’s slogan. Make American great again. I know there are people who dispute it because “we’re already great”. Whatever, never been a big fan of exceptionalism in any country. What I want to know is … to which “great” time period does he want us to return? Just before Obama – embroiled in two military offensives that were doomed from the start? The 90’s – wait, that was Clinton. 80’s – run away deficits and a nuclear arms race? The 70’s with the oil embargo? The 60’s – well, they’ve got good music, good drugs … but they’re also about as close to nuclear annihilation as we’ve ever been, a president who was assassinated, and a lot of racial turmoil. The 50’s – not the TV fantasy, but the reality – Brown v Board of Education was a good step, but the actual desegregation process was ugly. Outside of schools, it isn’t like Rosa Parks sat down and ended segregation. Women – well, we were allowed to vote, but didn’t have a lot of options that provided economic independence. Maybe back to before women could vote? Or how about when people could be legal possessions? Maybe he thinks we went wrong breaking away from England and we should request our colony status back?

His slogan, at least to me, has an a priori assumption that you are a white dude. Old white dudes gave up a lot — more voters mean less power per vote, more people vying for jobs means it is harder to get a job, independent women mean you need to be more cognizant of your partner’s needs. Young white dudes didn’t get to experience the “great” before, but I could see wanting to return too. But, seriously, half of the country isn’t a dude. Some other significant percentage isn’t white. Maybe you’ll get lucky and a large proportion of white dudes will show up to vote. But how can you govern an entire country when your entire platform is focused on the needs of maybe 40% of the population?

Extending The Gardening Season – Low Tunnel “Greenhouse”

Using a combination of techniques I’ve found on the Internet, Anya and I built a low tunnel greenhouse yesterday. The whole process took about ninety minutes, but we aren’t quite done (the plastic needs to be snugged up, and I want to bury the plastic along the ground).

Last year, Scott built two raised bed garden areas – one is being used for composting until it gets full enough to be a garden. This is the second one – the veggie growing area.

DSC_8614

We wanted to extend our growing season – and have a convenient place to start a *lot* of plants, so I researched easy to build greenhouses. I found two types I like – the low tunnel and the hoop house. A low tunnel is basically PVC pipe bent over your ground with plastic run along it. How “low” is the low hoop? Well, that depends on the length of PVC and the width of the tunnel. The HandyMath.com complete circular arc calculator will take these valeus, then the “height of arc” is the height at the highest point of the tunnel. The lowest point is 0″ (it hits the ground).

A hoop house seems to be a low tunnel on “stilts”, so I decided to make a low tunnel this year … see how it works out for us. If we want it taller, we’ll add the “stilts” next year and have a hoop house.

The materials we used – sourced from the local Home Depot and Staples – are 2′ lengths of 1/2″ rebar, 10′ lengths of 1/2 PVC pipe (used for drinking water – so in theory it shouldn’t leach not-food-safe chemicals), plastic painting dropcloth, and large binder clips. Total cost was just under 55$ for a 25′ run.

After placing the PVC and rebar along the garden bed to make sure everything was spaced as desired, we used hammers to drive the rebar into the ground. Anya started the rebar, and I finished driving it in with an ~8 lb sledge.

DSC_8617

After the rebar was firmly in the ground, we slipped one end of the PVC pipes over the rebar.

DSC_8622

Anya grabbed the pipes and pulled them over to me, and I slipped the other end of the pipe over the rebar. At this point, it kind of looks like I’m  building a Conestoga wagon on my garden. I tied a rope along the top of the arches to make a ridgeline, but I don’t know that this is actually doing anything structural.

DSC_8627

We then spread the plastic drop-cloth over the arches – it isn’t as clear as “clear plastic” sounded to me 🙂 But after visiting two local Home Depots, neither of which had “greenhouse plastic” … it’ll do. I used the binder clips to hold the plastic onto the PVC pipes. Right now, there are four clips on each arch, and eight clips on the arch where two pieces of plastic are joined.

DSC_8628

Unfortunately, a thunderstorm came up pretty quickly … so instead of tightening the plastic, I laid bricks to hold the plastic down along the ground. Once the plastic is snugged up, I will put the bricks back and completely bury the edges in dirt or mulch to avoid wind getting under it. I still need to make a door for an entrance too – right now, you have to unearth and unfurl quite a bit of plastic material to get into the tunnel.

Possible upgrades for the future:

  • A sturdier hoop can be made from electrical metallic tubing – it’s more expensive, and you need to bend it on a pipe bender (we have one, so that isn’t a new cost. For someone without a pipe bender in their workshop … that is a non-trivial investment. We got ours from Harbor Freight with a lot of discounts). The metal hoop is good for higher wind areas. Our garden is sheltered pretty well by trees, so I am hoping the PVC will be sufficiently sturdy.
  • Real greenhouse plastic! I had wanted something completely clear to allow more light to enter and for better visibility.
  • If this height proves to be inconvenient to use, we’ll probably get five more tubes, cut them in half, slip a 5′ length over the rebar, then join the tunnel part to the top of the 5′ section. This will give us a structure 5′ at the low point and ~8.5′ at the high point. Plenty of room for any of us to stand upright. That would mean adding quite a bit more plastic sheeting too.

We’ll either replace the plastic sheets with a bug netting later in the Spring or just take the whole thing down & put it back up in Autumn to (hopefully) extend the growing season even more. If we are really lucky, we will be able to grow some greens throughout the winter.

I think I’m going to place the little seed-starting pots into the greenhouse, then transplant them into the ground as they get a little bit bigger.

Tracking Electrical Usage With SmartThings and AeonLabs Home Energy Meters

When we started shopping for solar generation installations, how much electricity we can consume was a challenging question. We were replacing our HVAC system, so “look at the last 12 months of electric bills” wasn’t an approach that would yield valid data. What we needed was a way to see electrical consumption for the next two or three weeks once our new HVAC system was installed.

We purchased several AeonLabs Home Energy Meters (HEM) and have been using them to track our power consumption for almost six months now. The HEM’s are set up in SmartThings & have a SmartApp-HEMLogger “SmartApp” attached to them that posts data to a MySQL table on our server via a web form (myURL needs to be … well, your URL).

Install a quick MySQL server (does not need to be Internet accessible) and a web server / programming language of your choice combination (*does* need to be Internet accessible – we are using Apache and PHP).

Create the database and a table to hold your energy data:

mysql> describe EnergyMonitors;
+-----------+-------------+------+-----+-------------------+----------------+
| Field | Type | Null | Key | Default | Extra |
+-----------+-------------+------+-----+-------------------+----------------+
| keyID | int(11) | NO | PRI | NULL | auto_increment |
| monitorID | varchar(50) | YES | | NULL | |
| clampID | varchar(50) | YES | | NULL | |
| eventTime | timestamp | NO | | CURRENT_TIMESTAMP | |
| kwatts | double | YES | | NULL | |
| kwhours | double | YES | | NULL | |
+-----------+-------------+------+-----+-------------------+----------------+
6 rows in set (0.00 sec)

Create an ID within your database that has read/write permission to this table. I create another ID that has read-only access (pages displaying data use this ID, the page to post data uses the read/write ID).

We also track temperature — ideally, we’d be able to compare power consumption based on temperature *and* sunlight (we use a lot less power on a cold sunny day than I expect … just don’t know how much less) … but I’m not there yet. Currently, the weather database only holds temperature:

mysql> describe weather;
+--------------+-----------+------+-----+-------------------+-----------------------------+
| Field | Type | Null | Key | Default | Extra |
+--------------+-----------+------+-----+-------------------+-----------------------------+
| recordedTime | timestamp | NO | | CURRENT_TIMESTAMP | on update CURRENT_TIMESTAMP |
| temperature | int(11) | YES | | NULL | |
| id | int(11) | NO | PRI | NULL | auto_increment |
+--------------+-----------+------+-----+-------------------+-----------------------------+
3 rows in set (0.01 sec)

Since we brought our Bloomsky online, I use the Bloomsky API to record temperature. Prior to that, I was parsing the XML from NWS’s closest reporting station’s – for Cleveland, that is  http://w1.weather.gov/xml/current_obs/KCLE.xml … there’s probably one near you. I grabbed both observation_time_rfc822 and temp_f in case observations were not updated regularly – the observation time was stored as the recordedTime. The temperature recording script is in cron as an hourly task.

You also need a small web page where SmartThings can post data — in PHP, I have

<?php
if(!$_POST["monitorID"] || !$_POST["clampID"] ){
echo "<html><body>\n";
echo "<form action=\"";
echo $_SERVER['PHP_SELF'];
echo "\" method=\"post\">\n";
echo "Monitor ID: <input type=\"text\" name=\"monitorID\"><br>\n";
echo "Clamp ID: <input type=\"text\" name=\"clampID\"><br>\n";
echo "KW Value: <input type=\"text\" name=\"kwatts\"><br>\n";
echo "KWH Value: <input type=\"text\" name=\"kWHours\"><br>\n";
echo "<input type=\"submit\">\n";
echo "</form>\n";
echo "</body></html>\n";
}
else{
$strMeter = $_POST["monitorID"];
$strClamp = $_POST["clampID"];
$strKWValue = $_POST["kwatts"];
$strKWHValue = $_POST["kWHours"];
print "<pre>Meter: $strMeter\nClamp: $strClamp\nKW: $strKWValue\nKWH: $strKWHValue\n</pre>\n";
$servername = "DatabaseHostname";
$username = "MySQLUID";
$password = 'MySQLPassword';
$dbname = "HomeAutomation";
$conn = new mysqli($servername, $username, $password, $dbname);
if ($conn->connect_error) {
die("Connection failed: " . $conn->connect_error);
}
if($strKWHValue && $$strKWValue){
$sql = "INSERT INTO EnergyMonitors (monitorID, clampID, kwatts, kwhours) VALUES ('$strMeter', '$strClamp', '$strKWValue', '$strKWHValue')";
}
elseif($strKWHValue){
$sql = "INSERT INTO EnergyMonitors (monitorID, clampID, kwhours) VALUES ('$strMeter', '$strClamp', '$strKWHValue')";
}
else{
$sql = "INSERT INTO EnergyMonitors (monitorID, clampID, kwatts) VALUES ('$strMeter', '$strClamp', '$strKWValue')";
}
if ($conn->query($sql) === TRUE) {
echo "New record created successfully";
}
else {
echo "Error: " . $sql . "<br>" . $conn->error;
}

$conn->close();
}
?>

DatabaseHostname, MySQLUID and MySQLPassword need to be yours too. Since posted data is meant to come from a trusted source (a source where I’ve supplied the URL) and in a known good format, these are quick INSERT statements *not* the safest.

Check in your database that you are getting data, then let it run for a few hours. Once you have a little bit of history, you can start viewing your energy usage. Link it into Excel/Access using MyODBC for ad-hoc reporting, write your own code to do exactly what you want, use a generic charting package capable of reading MySQL data …

I am using pChart to display data – the chart I use most frequently is the stacked bar chart for kWH and a line chart for temperature. Here is the PHP code which generates this PNG: energyUsage-StackedBarChart-Flat – again, DatabaseHostname, MySQLUID, and MySQLPassword need to be yours.

StackedBarChart-KWHAndTemp

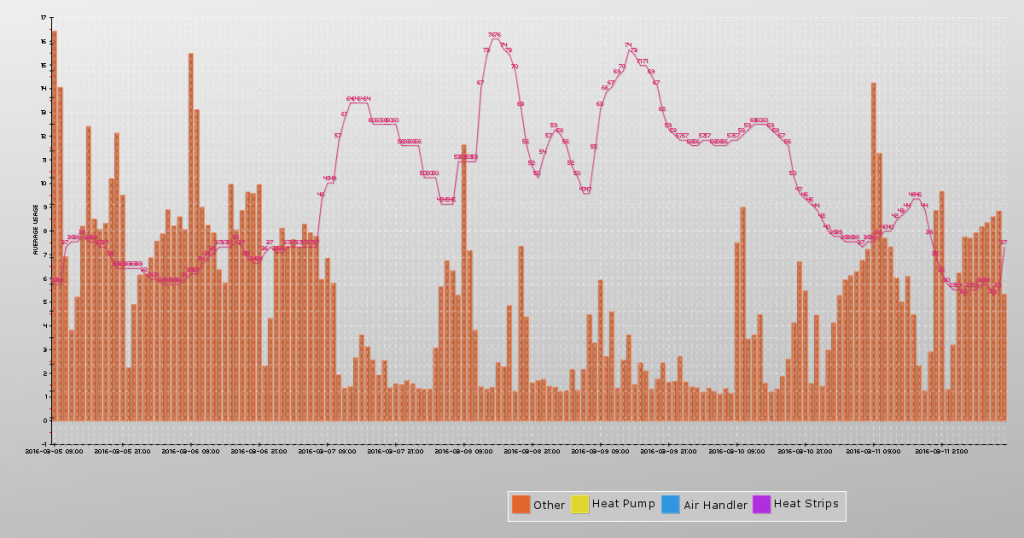
We no longer have our heat pump, air handler, and heat strips being monitored – but for periods where there is data from the other sources, we had several segments to our energy usage report (“other” is the report from the HEM on our mains MINUS all of the other reporting segments). You can yank all of the non-mains segments (or change them to be whatever sub-segments you are monitoring. The monitor ID comes from the HEM name in SmartThings – since those are user-configured, I have the names hard coded. You *could* hard code the Mains and then use “select distinct” to get a list of all the others and make the code more flexible.).

Short term charts (past 24 hours or so) can render out real-time, but longer term views take a long time to load. Since we’re looking more for trends and totals – being up to the second isn’t critical. I’ve got cron tasks that generate out PNG files of the charts.

Two enhancements for a nothing-doing rainy day – adding authentication to the HEM Logger (SmartThings posts from multiple netblocks, so there isn’t a good way to IP source restrict access to the post data page. Anyone with your URL could post rogue energy usage info into your database – or more likely try to hack your servers.) and add lumen to the weather data / graph displays.

Homemade Soap

I’ve been making my own soap for about three years now. I’ve used several different recipes, but my default is a 100% coconut oil soap recipe. I double the recipe to make a six pound batch of soap (66 oz coconut oil, 9.6 oz lye, 19.2 oz water, and 3-6 oz of essential oil if I add any).

The process is quite easy — put the oils (or oil, in this case) in a pot and heat until melted.

In a safe container (heat resistant plastic like polypropylene 5), combine the water and lye slowly — it gets HOT. I use a graduated pitcher from a science supply center. Soap recipes have a weight of water and not volume, so the markings aren’t useful for this particular application.

I turn the oven light on – it’s an incandescent bulb and heat the oven to about 110 degrees F. I then put the lye container and warm oil in the oven and let them set for an hour or so to reach thermodynamic equilibrium.

When the hour is about up, get everything ready. Always a stick blender. If essential oil, colorant, herbs, or abrasives are going to be added, I weigh them out and have them waiting. Remove the pot of oil and set it somewhere (Not a hot burner! This was the one thing that absolutely stumped me on my first batch — the instructions say to heat the oil, but it never says to remove the pot from heat!). Set the stick blender in the pot. Get the container of lye water. Turn on the stick blender and get the oil moving. Slowly add the lye mixture.

Keep the stick blender going until you reach ‘trace’ — kind of like making whipped cream or egg whites where there’s a soft peak and a firm peak state. You’re looking for it to thicken up enough that lines will form or a little bit dropped back into the pot stay in a little mound. You are NOT looking for something that holds peaks (it would be difficult to get into molds at that point).

If you are adding ‘stuff’ you want to do that at the first sign of trace. Some add-ins will accelerate trace (basically harden your soap quicker), and adding them into a medium trace can get you a big block of solid soap pretty quickly.

Once the soap mixture reaches trace, put into the soap molds. Tap the molds on a solid surface a few times to remove air bubbles. I place these molds on a cutting board (hard surface) and then place them back into the warm oven. Proper instructions tell you to wrap it up in towels to retain the heat. After about 12 hours in the warm oven, I turn off the oven light. Let it sit a few more hours to cool, then set on the counter overnight. If the soap is hard to get out a mold, pop the whole thing in the freezer – frozen soap pops right out.

Voila, you’ve got soap. Let it sit for a few weeks to cure (dry out).