Reading about Docker’s account data compromise and I wonder how many organizations include token security as part of their general security practices. Maybe not routine changes (although I’d go that direction to everyone knows how to do it!), but are tokens revoked and re-issued when a member leaves the group?
Month: April 2019
Three New Sewing Projects — Coat and Dresses
I want to try making a coat for Anya — the Polartec fleece jacket turned out incredibly well, even if the thick fabric was incredibly difficult to sew. I intentionally chose a larger size — 8 — so she’d be able to wear the jacket for a few years. For this winter, I thought I’d make a dressy wool coat. Totally basic black wool, but a silky purple lining, purple silk twist for the button holes — still deciding between the darker and lighter purple, and some cool buttons I’ve not yet found.


And as usually happens when ordering fabric, I can avoid paying ten or fifteen bucks for shipping if I buy for a second project. A few years ago, I found a free pattern for a peasant dress. I love the dress, but the “border” part would have been the entire dress when Anya was younger. I bookmarked the pattern to use when she got a little older. Well … she’s older. And certainly taller! Tall enough that I think a dress with border print fabric will work. Since Anya is loving unicorns right now, I thought I’d make her a unicorn peasant dress.

The pattern reminded me of one of my favorite things I’ve ever bought for Anya — this top that she wore as a dress in 2014/2015, a tunic in 2016/2017, and a shirt in 2018. The arms are small now, or she’d still be wearing it as a shirt.

It’s corduroy, but a really awesome light-weight one. In browsing around checking out fabrics, I realized it is 21 wale corduroy — so I added two different fabrics. I figure I can make a blue dress with a cream stripe and a cream shirt with a blue stripe. And what’s a dress today will be a tunic in a few years and a shirt for another year or two after that.


Microsoft Flow Usage Tracking Process Proposal
Assumptions: This proposal is predicated on having some reasonable way to download the Flow usage report that currently needs to be generated from the Flow admin page. Otherwise usage tracking is a manual process kicked off by logging into Flow admin site and downloading the CSV usage detail report.
This proposal is also predicated on the idea that our group is not-for-profit — we are not seeking to recoup O365 licensing cost through Flow usage billback.
Issue: Flow execution is “throttled” when usage exceeds the tenant limits. Per a response from a “Flow Staff” individual to ‘what actually happens when you exceed your allocated cycle limit’, “To clarify what is meant by throttling, flow run usage exceeding your tenant limits may be suspended at Flow’s discretion until the following billing cycle.”. While “at Flow’s discretion” is still vague, a tenant risks having Flow runs suspended when they exceed their allocated cycle limit.
Additional cycles can be purchased to continue Flow execution. As of 26 April 2019, an additional 50,000 runs costs 40$. We should ask Microsoft to clarify “Flow’s discretion”. Are enterprise customers able to have Flow execution continued and be billed for their overage? Do enterprise customers receive a short grace period during which time they can purchase additional execution cycles for upcoming months?
Farther complicating the issue, it is difficult for a manager to assess how many flow cycles are being executed by their subordinates. While Microsoft has added per-workflow usage statistics, even when workflows are maintained under shared spaces, individually checking each Team flow to determine how many times it has executed is cumbersome.
Solution: If we cannot purchase execution cycles after our limit has been reached, we will need to routinely track the number of cycles executed in our tenant to avoid both execution disruption and purchasing additional runs in months where we do not exceed our “free” cycle quota. To determine an appropriate alerting interval, we need to determine the time between identifying that our tenant is approaching its threshold and the activation of newly purchased cycles.
To create a financial incentive to maintain efficient Flow jobs, cycles should be billed back to the business units that are using Flow. Since each Office 365 license includes 2,000 Flow execution cycles, a BU is not charged when they are under their “free” allocation (i.e. # of O365 licensed users in the BU times 2,000). BUs may be charged at a rate of 0.0008$ per cycle over their “free” allocation (question: does this need to be rounded up to avoid fractional pennies? i.e. one cent per 1,250 cycles). In months were the Flow execution cycle limit in the tenant is exceeded, the BUs are charged. Many individuals do not use Flow so there are unused execution cycles. If we are under our tenant limit but a BU has exceeded their allocation, no additional money has been spent so no billback occurs. The BU owner would still be notified with a message that includes “due to low company-wide Flow usage, your overage does not incur any charge this month. This overage could result in a charge of up to {calculatedOverageCost} charged to your BU.”. The message will include the web link to help them understand who is using Flow in their organization.
We would develop a script to update a data table. This table will record each Flow user, the number of cycles used month to date, the number of cycles used during the previous month, the number of cycles used year to date, and the number of cycles used during the previous year. A web interface (which allows managers to view Teams usage of their sub-organization) would be created to provide visibility into the Flow usage data. We would also develop a script, run at the beginning of each month, that determines the BU for each Flow user, aggregates “previous month” Flow usage data per BU, calculates the total number of O365 licensed accounts per BU, calculates the BU’s cycle overage, notifies BU owners per the previous paragraph, and either initiates the billback process or produces the data which is needed to initiate the billback process.
I additionally suggest we create a “best practices” guide for using Flow. As an example, creating a workflow ‘perform some process every time our shared mailbox receives a message from BOB’ incurs a cycle execution every time the shared mailbox receives a message, regardless of the message source. When creating workflows triggered by e-mail messages, using a dedicated mailbox (research: can an O365 group mailbox be used as a trigger??) avoids non-trigger messages executing a Flow.
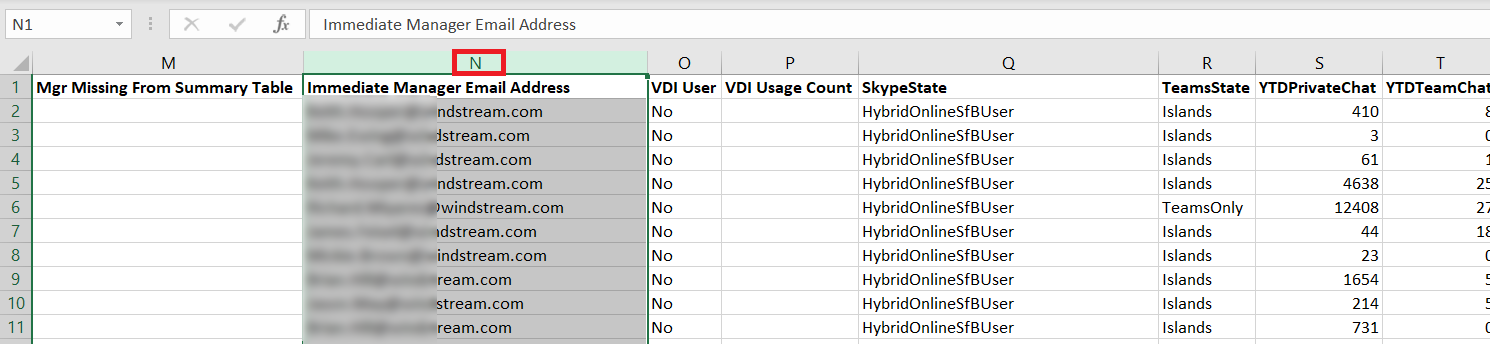
Did you know … Power Query can extract a unique list of records?
Remove duplicates is a quick way to obtain a unique list of records; every time the source data is updated, though, you’ve got to copy and ‘remove duplicates’ again. There’s a better way! Use Power Query to create a unique list that can be updated with a single click.
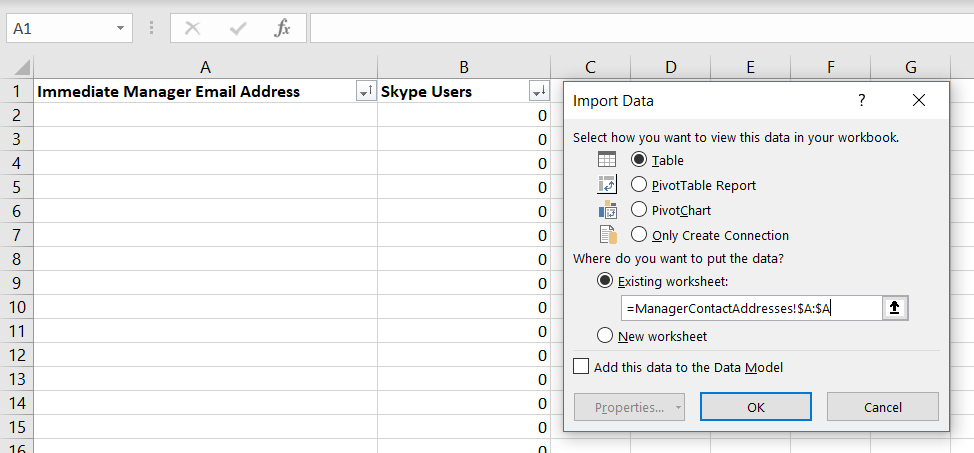
To use Power Query, first highlight the column containing the information for which you want a list of unique values.
On the “Data” ribbon bar, select “From Table/Range”
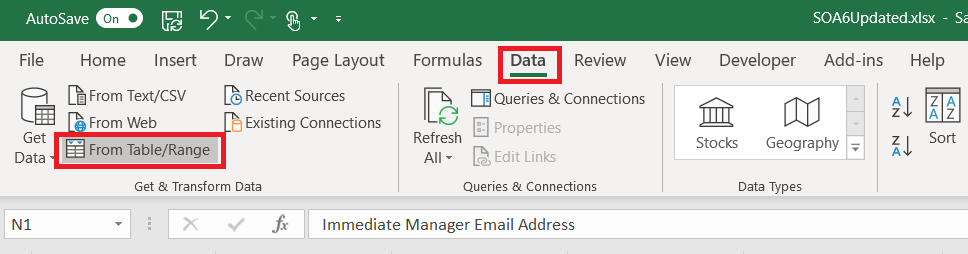
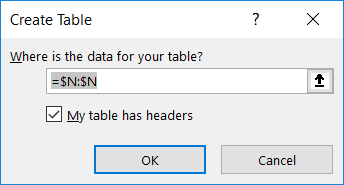
You’ll be asked to confirm where the source data is located – the highlighted selection should appear. Click “OK” to continue.
A new window will open – the Power Query Editor. On the “Home” ribbon bar, click on “Remove Rows” and select “Remove Duplicates”

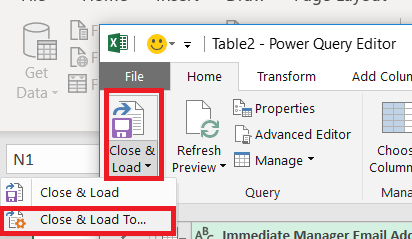
A unique list of values has been extracted in the Power Query editor – but you want to insert that data into your spreadsheet. Click the drop-down by “Close & Load” then select “Close & Load To …”
Now you can select where you want your list of unique values to appear – I am creating a table in an existing worksheet. Click “OK” to insert the unique list.
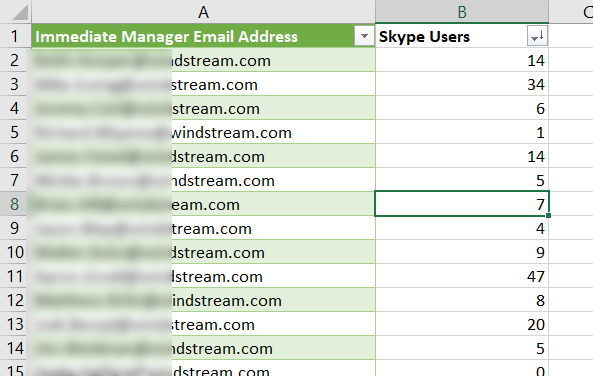
Voila, I now have a unique list.
What happens when new records are added to my source data? The Power Query table does not automatically update as values are added to the source data. On the “Data” ribbon bar, click “Refresh All” to update the unique value list.

Did you know … you can redirect custom URLs to Microsoft Forms?
Microsoft Forms provides a simple framework for creating surveys and polls which can be distributed either to internal users or made publicly available. Including your Form URL in an a href tag is one way to avoid trying to communicate the super-long Form URL … but if you’re looking for a ‘pretty’ URL, something that can be included in print media or provided to someone verbally, you can redirect custom URLs to your Form URL.
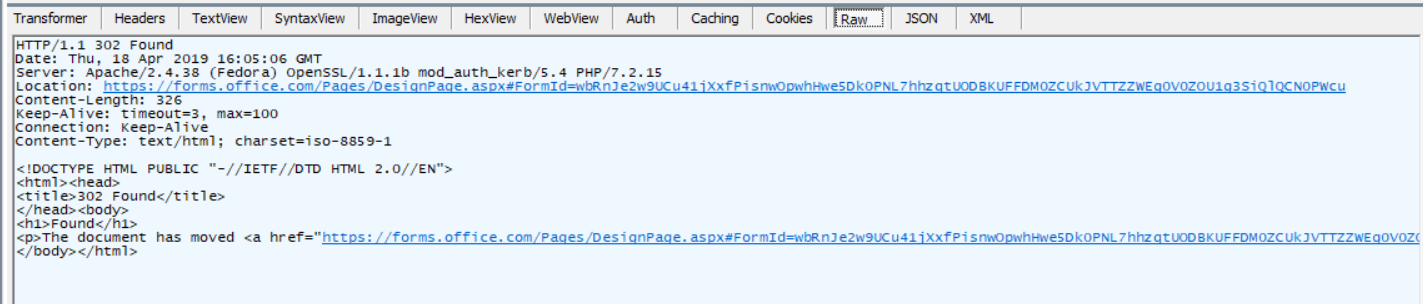
Generally, hosting a forwarding URL requires a web server; but URL-shortening services should work. To use a web server, you’ll need to configure a site (or path from a site) to serve an HTTP redirect. I am using 302 (temporary) redirection instead of 301 (permanent redirection) in case I want to forward my custom URL to a different Form.
Apache config
Use the “Redirect” directive in your virtual host config:
<VirtualHost 10.1.2.3:80>
     ServerName customsite.example.com
     ServerAlias customsite.example.com customsite
     Redirect / https://forms.office.com/Pages/DesignPage.aspx#FormID=wbRnJe2w9UCu41....
</VirtualHost>
IIS Config
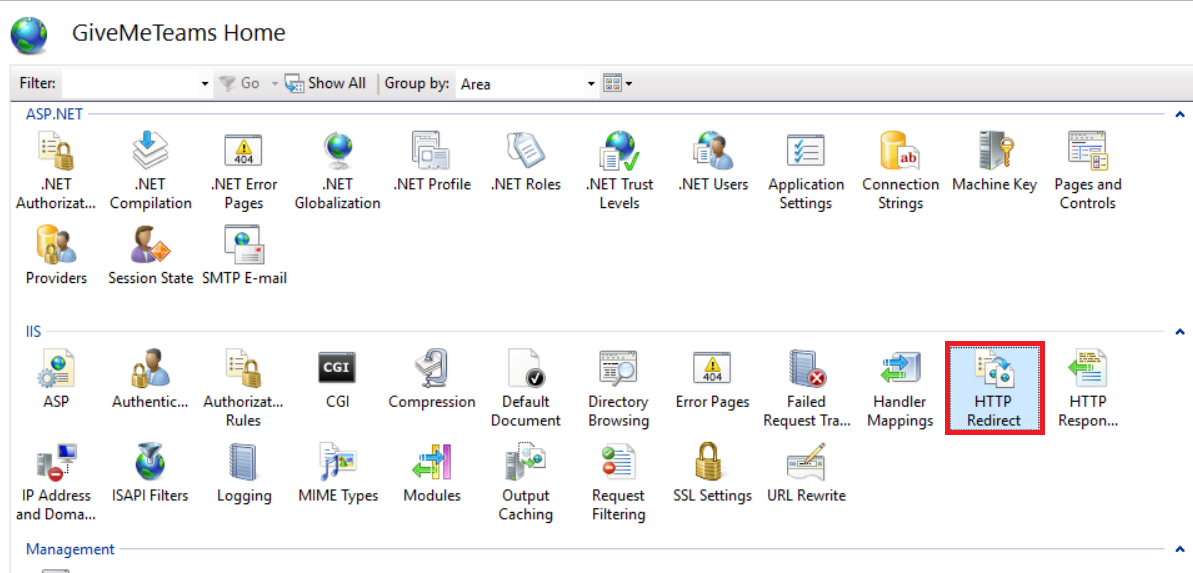
In the IIS management utility, navigate to your website and select “HTTP Redirect”.
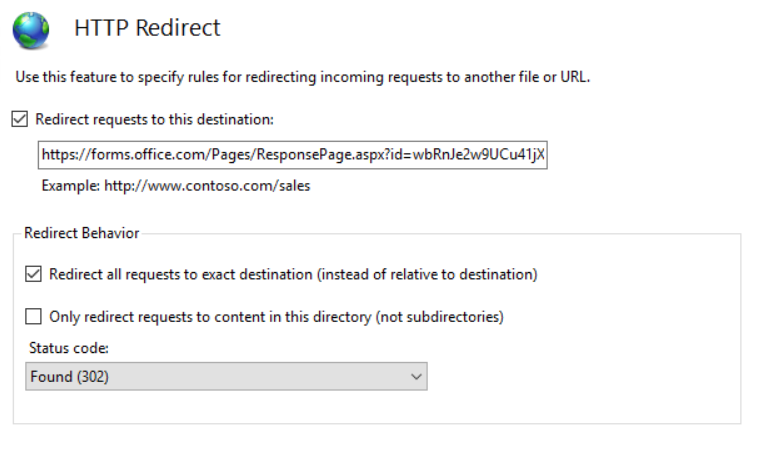
Check the box to redirect requests and paste in your Forms URL. Check the box to redirect all requests to the exact destination.
When your site is accessed, the browser receives the HTTP redirect and displays your Form.
Did you know … you can add manager approvals in Microsoft Flow?
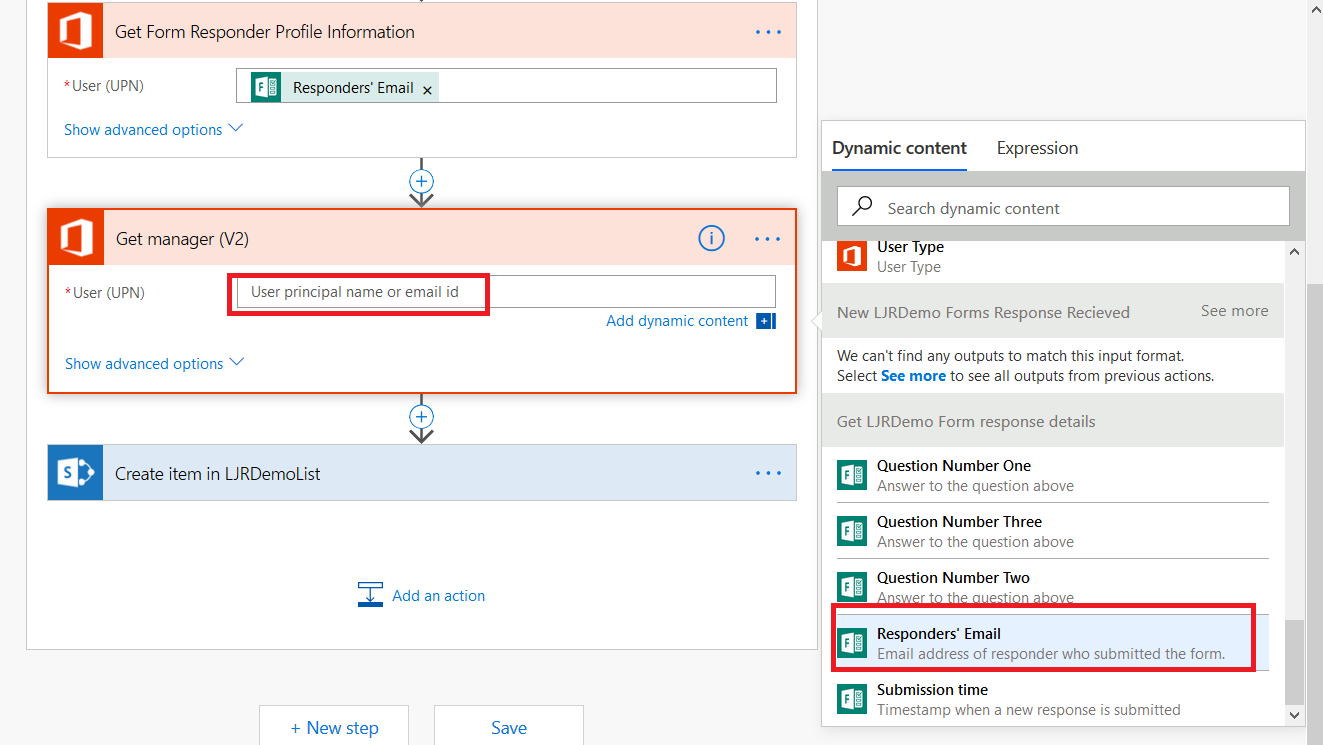
In my previous post, I demonstrated how the Office 365 User search could be used to record a Form responder’s email address instead of their logon ID. But other information about the user is available too – including their manager. This means you can use Flow to build workflows that require manager approval where “manager” is dynamically determined. How?
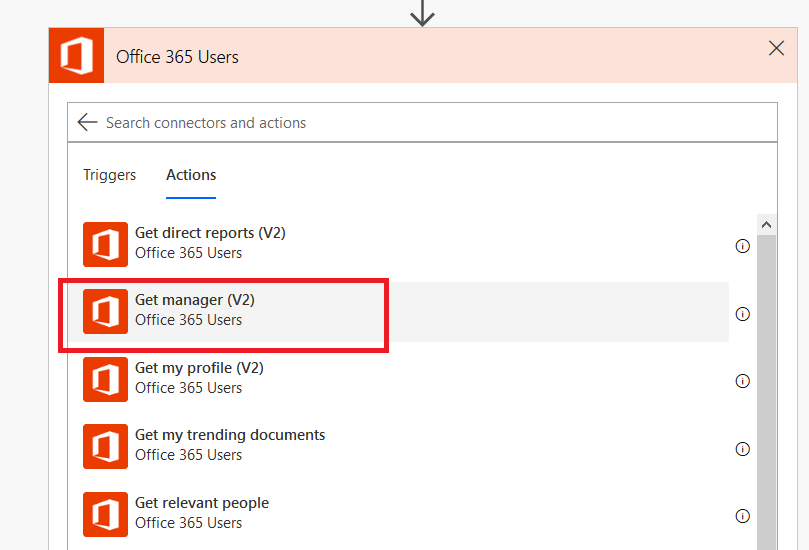
Select the “Get manager (V2)” action from the “Office 365 User” connector.
In this example, I am extending the sample workflow that creates a SPO list item from a Forms submission. I have inserted a step after getting the responder’s profile information. Click in the “User (UPN)” and select the input that contains the responder’s account (which, again, Forms calls an e-mail address)
Insert a new action
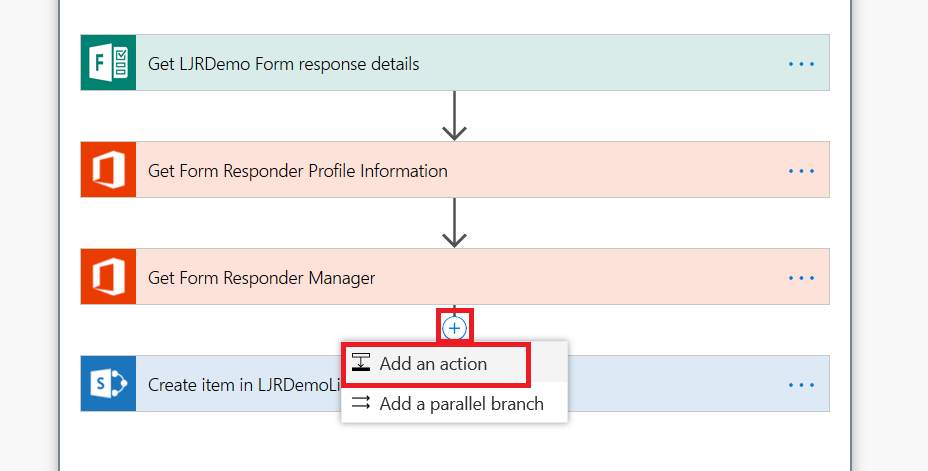
Search for and select “Approvals” and then select the “Start and wait for an approval (V2)” action.
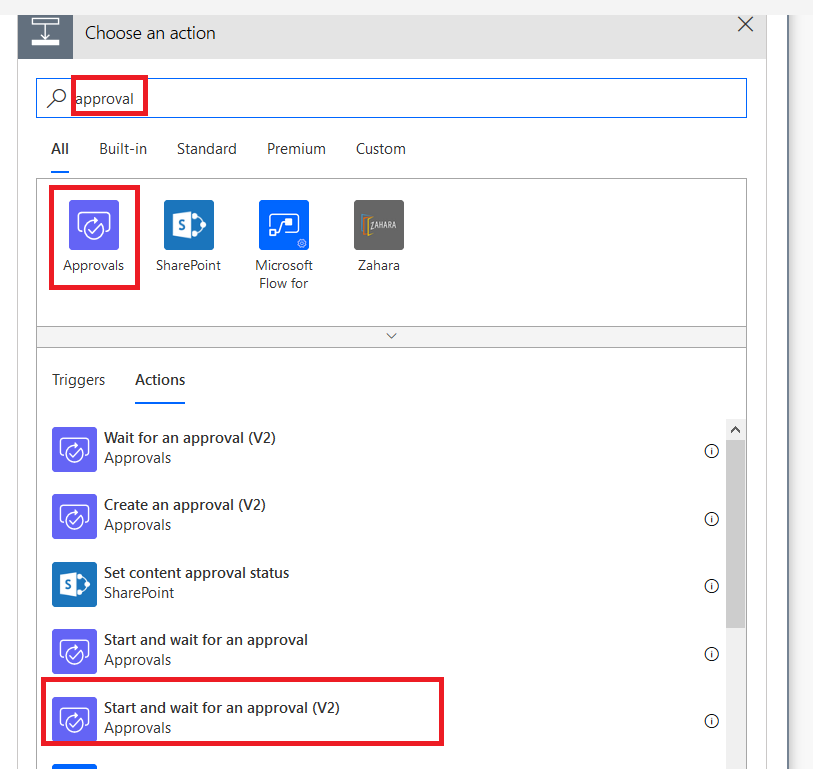
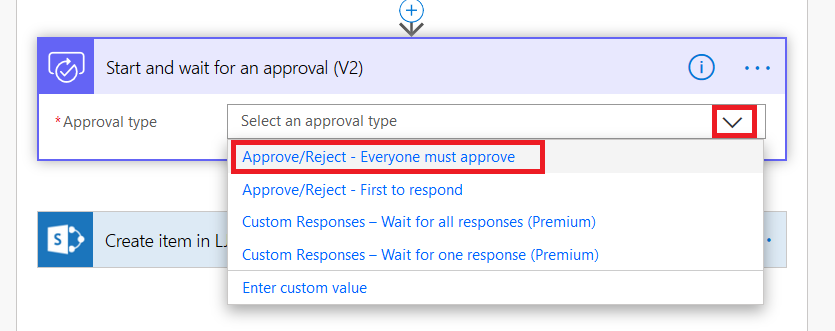
Click the drop-down for “Approval type” – since I am only adding a single approver, the first two options are essentially the same. I can, however, use “Everyone must approve” to have more than one level of manager required for approval, or a manager plus static application owner.
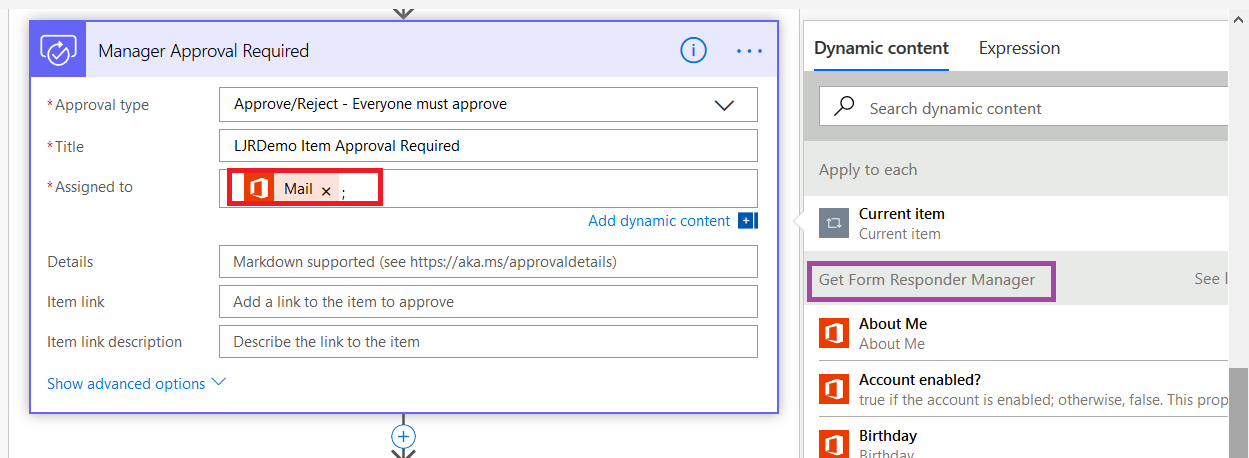
To assign the approval, find the dynamic content from the manager lookup and select “Mail” from that section. Add details that will appear in the approval notification – something to clearly explain what the person is approving.
Save your workflow. Now when a Form response is submitted, the responder’s manager will receive an e-mail which allows them to approve or reject the request.
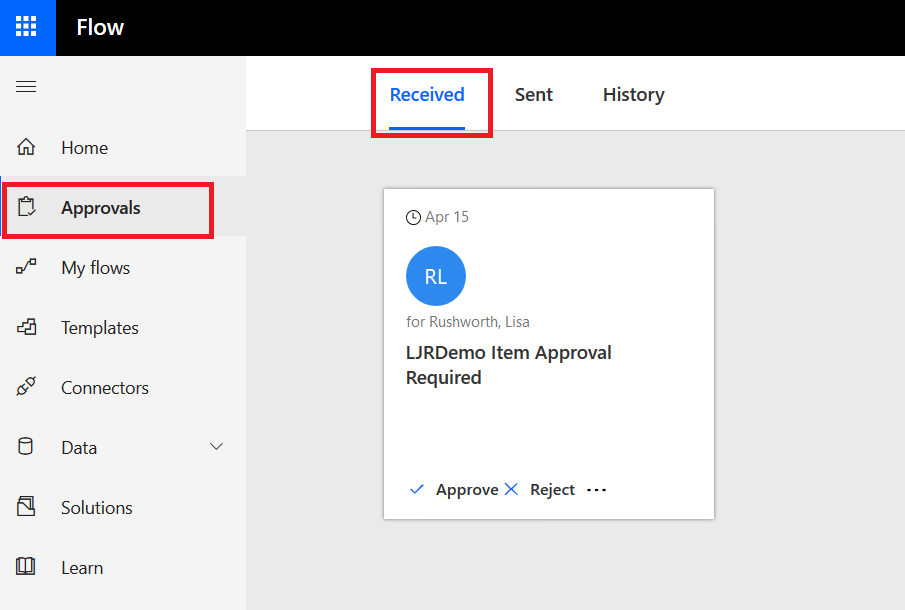
If they use the Flow site, they will see the approval in their Approvals section.
IIS Failed Request Tracing
I set up a PHP website with a really strange issue: site/path/index.php worked fine, but site/path threw a generic ‘something failed’ error. I added the suggested lines to web.config and got … another completely generic error.
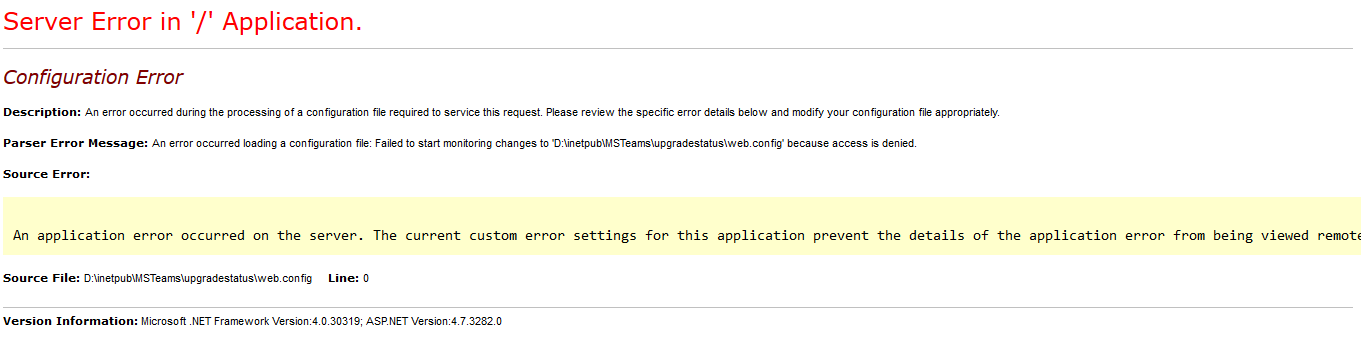
You can enable Failed Request Tracing in the site to get a clearer picture of what is going on.
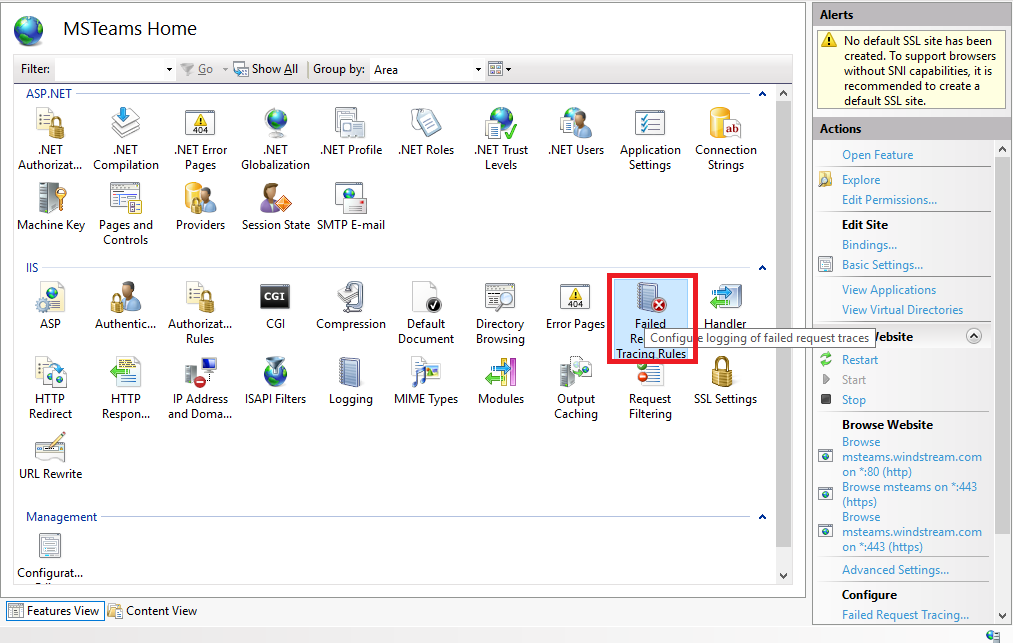
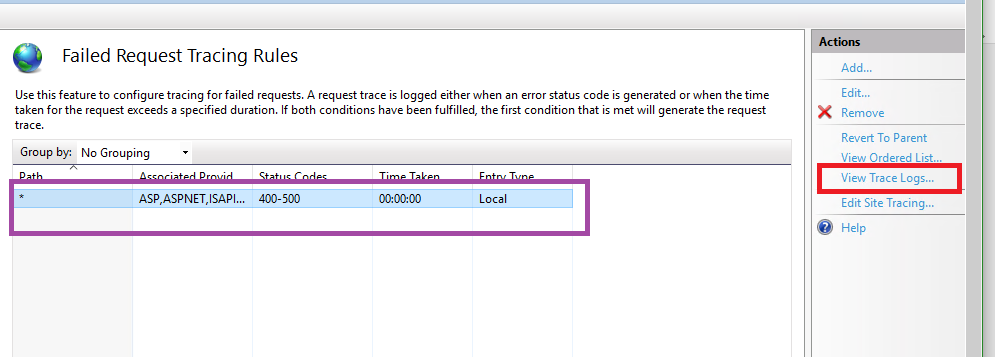
You’ll need to create a tracing rule that includes the return code you are seeing. Click “Add …” and create a rule that will capture the exception you are seeing. Once the rule is in place, reproduce the error in your browser. Click “View Trace Logs …” to open the location where the trace logs are stored.
On the local disk, you’ll get a web page with the exception information. Here, I’m seeing an error in ScriptModule-4.0. The ‘Request Details” tab contains more information.
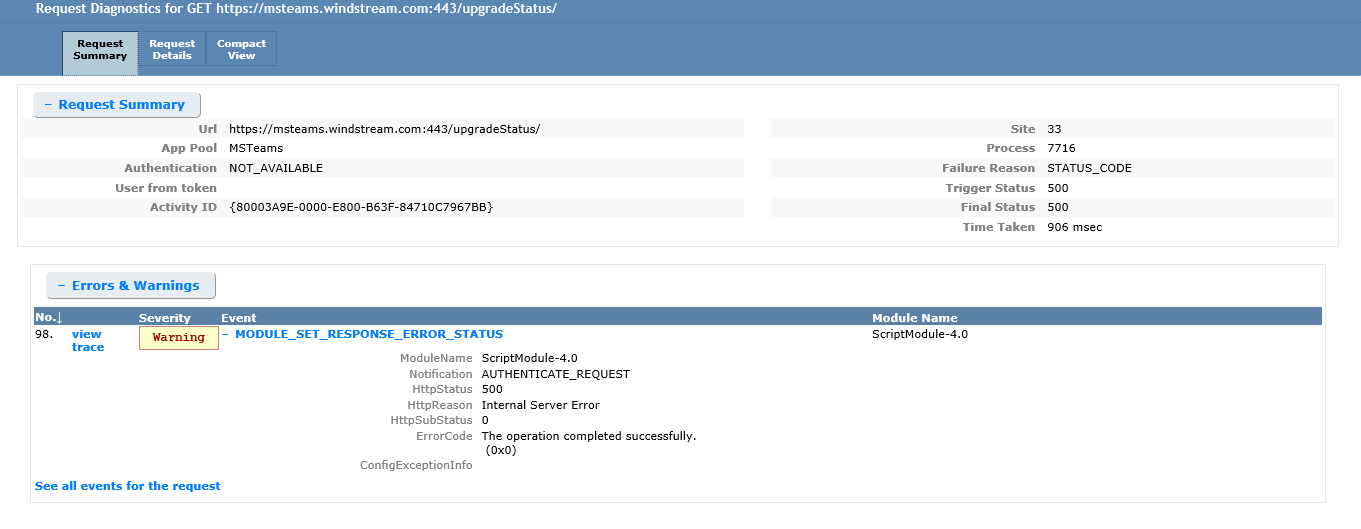
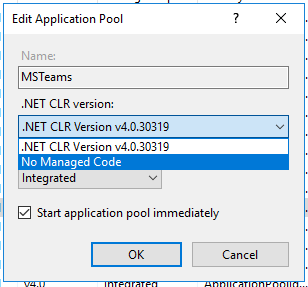
My oddity seems to be related to .NET somehow … I don’t need CLR to manage code execution for my site, so the simple solution was to turn it off – edit the application pool and select “No Managed Code”.
Voila! My site loads using the default document.
SPO Guest Access Stops Working
I ran across an interesting issue today — we have a really awesome SPO site for Project Management – tracking orders, equipment orders, installations, etc. The cool part about the site being hosted in SharePoint Online is that a customer can get set up as a federated partner and be granted access to see equipment readiness and installation scheduling within our system.
Guest access is an interesting concept – while I have an account in our tenant that is linked to my Active Directory account in our domain, you can also create links to accounts in other company’s directories. The guest account can then be set up to access our Azure resources – added to Azure groups, added to SharePoint Online groups, invited to join Teams.
A guest user had her computer replaced and could no longer access the site – SPO insisted that she was not a valid user. Looking in Azure AD, the account existed; the audit log even showed successful authentication events. I’m not sure if the computer replacement was a coincidence, the new computer had a different configuration, or if your browser stashes some information that allowed her to avoid authentication failures, but her guest account in our tenant was no longer working.
For companies that don’t have Azure AD, when an individual accepts guest account access … the guest account link in our tenant lists “Microsoft Account” as the source.

But when the company sets up Azure, the auth framework seems to get confused by the Azure AD account. Easy enough solution – we’ve got to delete the guest account that’s linked to their MS Account from Azure AD. Bonus step specific to SPO, a site administrator needs to use <site>/_layouts/15/people.aspx?MembershipGroupId=0 to delete the guest account from the SPO site.
Once the “Microsoft Account” guest account has been removed, the guest can be re-invited. They’ll step through the registration process again but the guest account will be linked up to their Azure AD account.

Re-add the new guest account to whatever they were using & their access will be restored.
Did you know … you can use Teams to collaborate with vendors?
There were a few organizations set up to “federate” with Skype for Business – from your Skype client, you could send messages to their Skype for Business account. This will continue to work when you move to Teams. Microsoft calls each company’s Office 365 environment a “tenant” – you are able to send messages from Teams in our tenant to a federated partner’s Skype or Teams in their tenant.
** If your account is upgraded to Teams Only, messages sent from federated partners will be delivered to you in Teams. Otherwise messages sent from federated partners will be delivered to you in Skype.
To chat with a federated partner, simply address a new chat message to them. The “We didn’t find any matches” message lets you know there wasn’t anyone found in our organization. Click to search for the account externally.
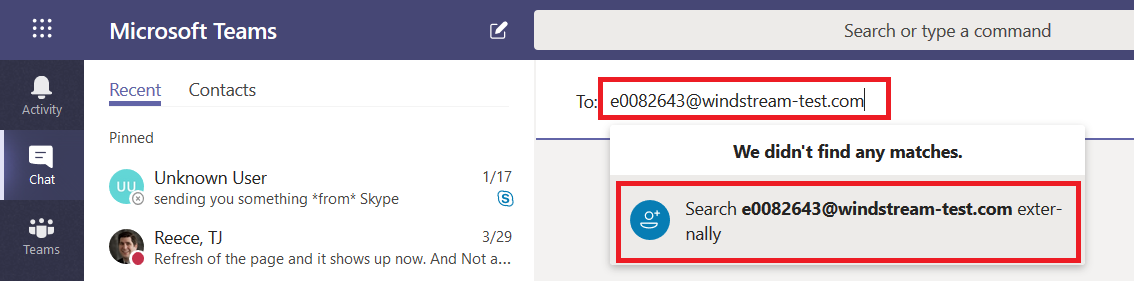
If you get an error indicating that the conversation cannot be set up, you may be mistyping the address. It is also possible that the organization is not on our list of allowed federation partners.
![]()
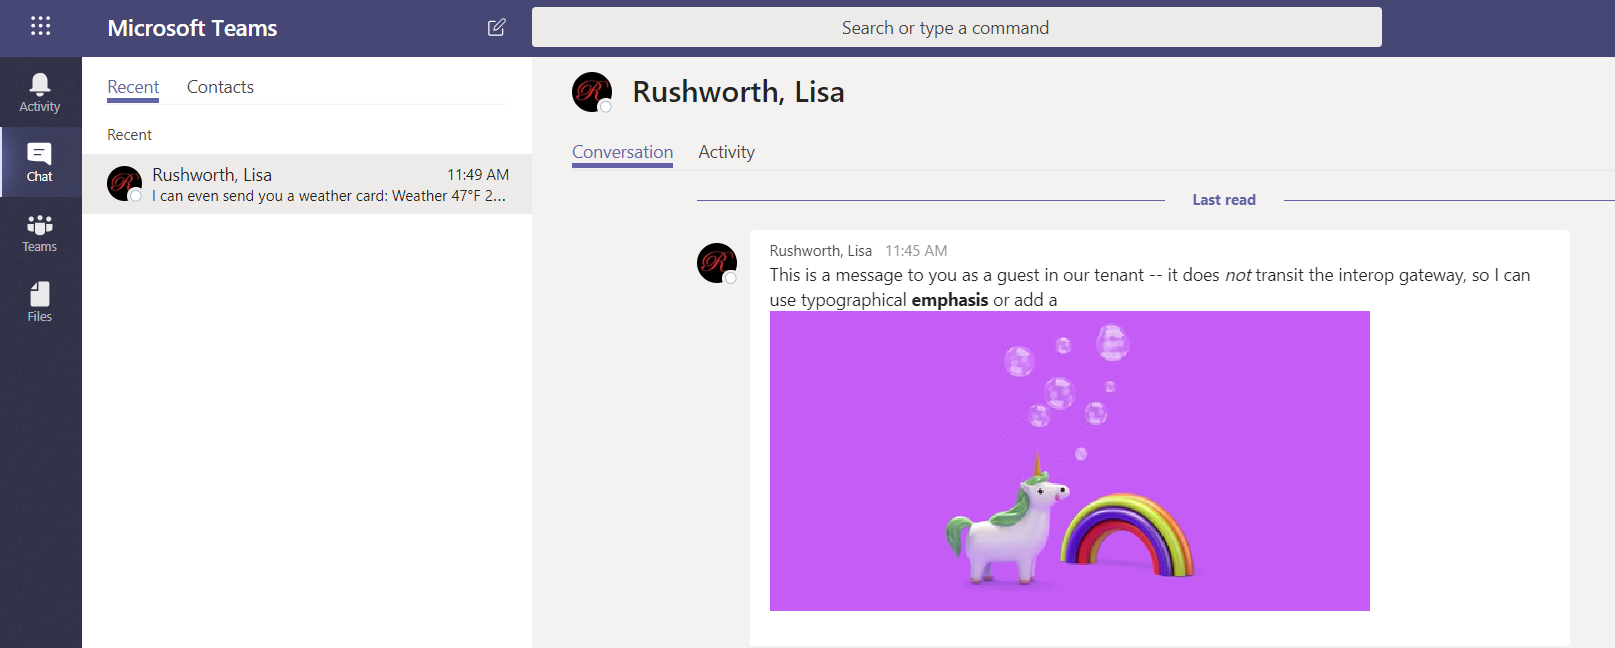
If their organization is on the allowed partner list, you’ll be able to start a new conversation. Along the top banner, there are a few indicators to ensure you realize you are sending information outside of our organization. Messages sent to external recipients transit Microsoft’s Skype/Teams interop gateway. Anything that is not supported through the interop gateway – screen sharing, file sharing, multi-party chat, rich text messages – will not be available when you are chatting with an external recipient.
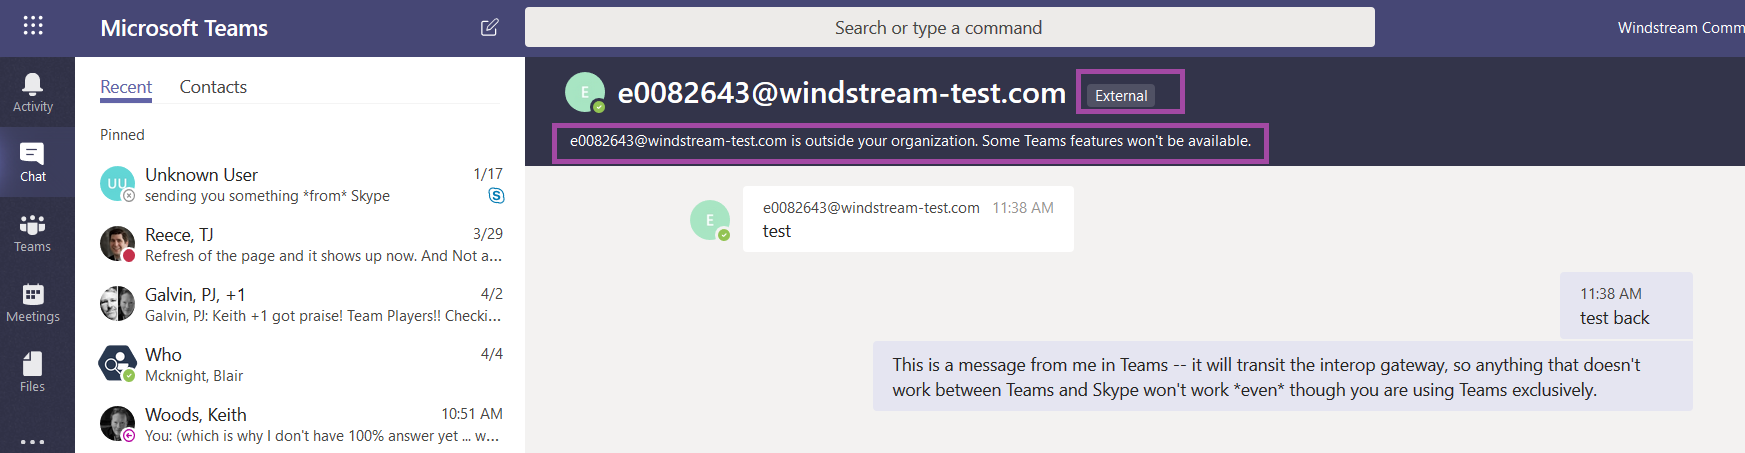
The other person will see your message in their Skype or Teams application – if they’ve been upgraded to Teams Only, the message will be delivered to them in Teams, otherwise it will be delivered in Skype.

Teams expands on Skype’s federated messaging functionality – accounts from allowed organizations can be “guests” in our Teams. This means vendors can participate in collaborative discussions and access shared documents without having an “n99” account with an Office license. Federated partners can add you as a guest in their Teams spaces too.
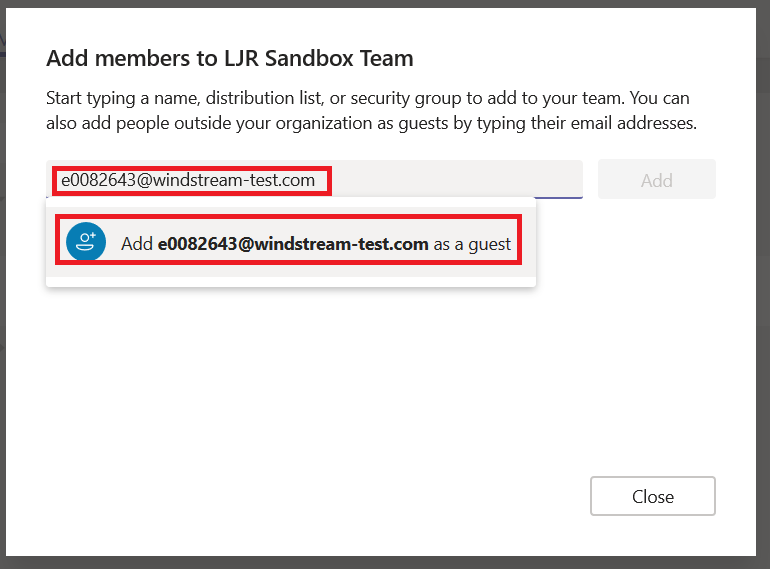
Team owners add guests the same way they add internal Team members.
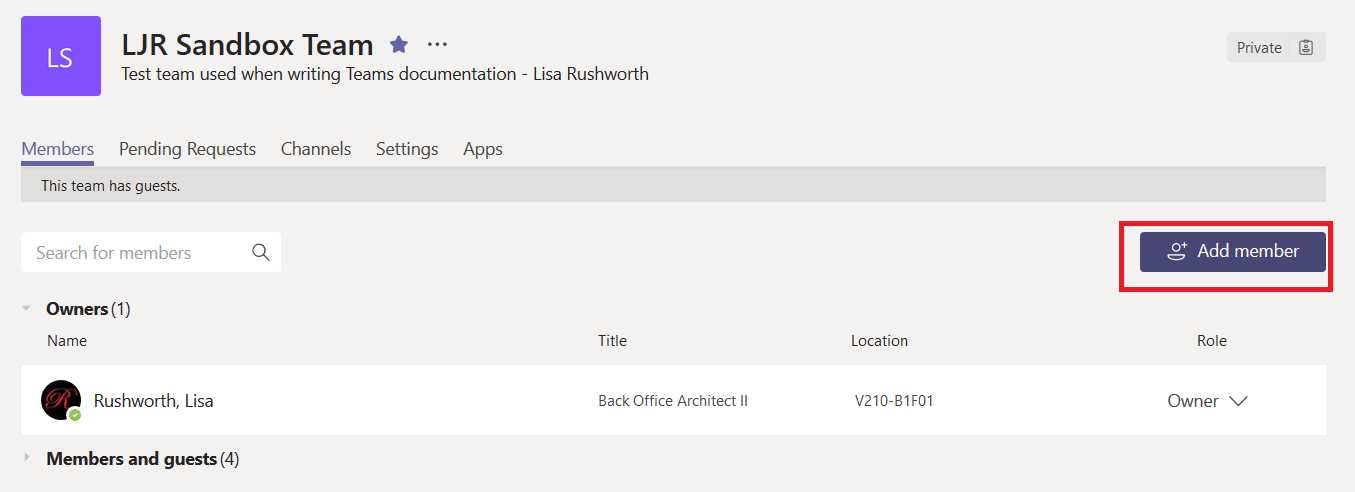
When you type the guest’s address, it will not match any records in our tenant and the option to add them as a guest will be displayed.
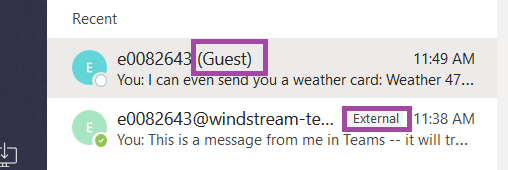
Once someone has been added as a guest to a Teams space, there are two ways you can send them chat messages – the external account and the guest account.
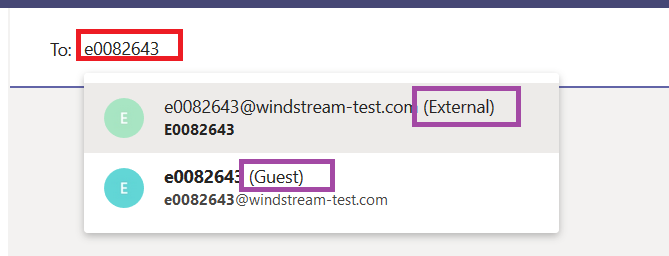
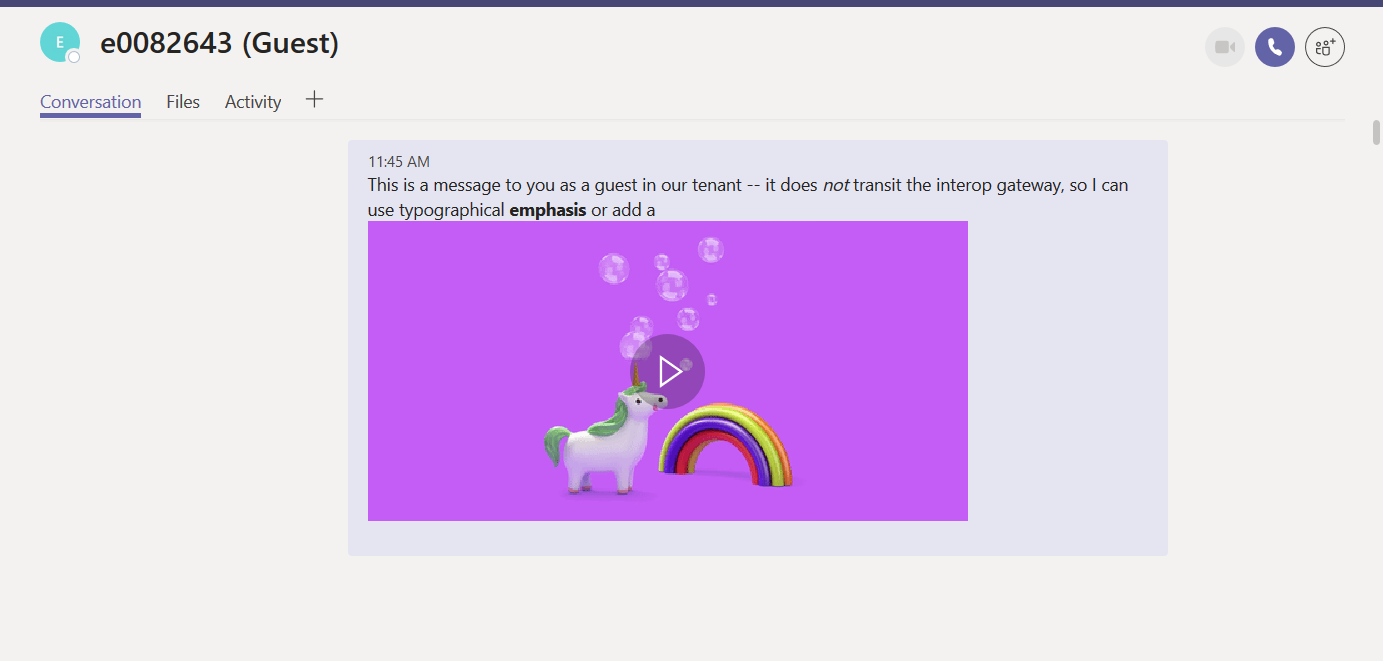
What’s the difference? Where the “external” listing delivered your chat message to Skype or Teams (depending on the individual’s account configuration) in the other person’s tenant, “Guest” will deliver the chat message to Teams within *our* tenant.
Good news – that means you can use features that aren’t supported through the interop gateway. Bad news – the person may not check our Teams tenant regularly to see if there are new messages.
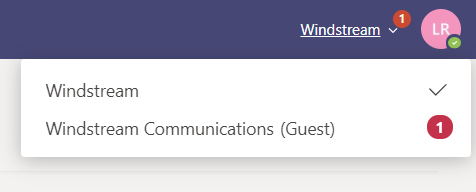
A person added as a guest to our organization will see a drop-down tenant selector next to their avatar in Teams. They’ll be able to click the drop-down and switch contexts to our tenant.

They will be able to see our Teams … well, the ones of which they are a member anyway!
They’ll also see chat messages sent to their guest account.
You may notice that the person appears twice in your chat history – the guest account in our tenant and the external account in their tenant are separate entities.
How will the person know they’ve got messages waiting for them in our tenant? A message count indicator will appear on the tenant selector. If they’re a guest in multiple tenants, clicking the drop-down will show them how many new messages are in each tenant.
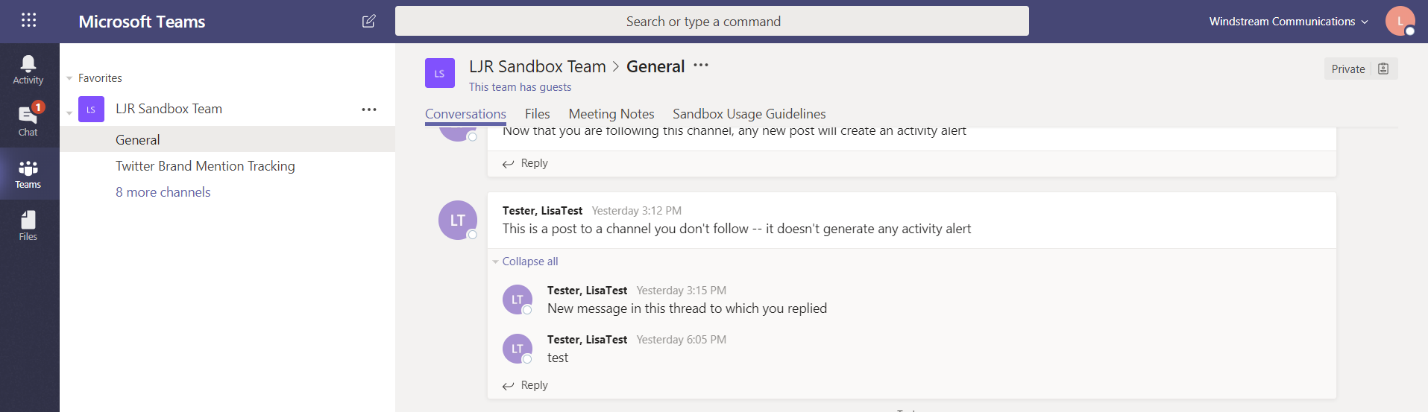
Usage Tip: This notification isn’t immediate (and sometimes the notification is significantly delayed), so time-sensitive communication should be sent to the ‘External’ listing instead of the ‘Guest’ one.
Warning: Conversations and documents in our tenant are under our purview. This means we can restore access if data becomes orphaned, our retention policies apply to the data, documents and conversations will be included in legal discovery activity, etc. Activity in partner tenants are under their purview. Be cognizant of communication and file content before storing information outside of our tenant.
Quick OpenHAB2 Apt Install In Docker Ubuntu Container
# Set up docker image — exposes OpenHAB web on your port 8080
docker run -p 8080:8080 -dit –name UbuntuOH2 ubuntu:latest
# Shell into the container
docker exec -it UbuntuOH2 /bin/bash
# From within the container, run:
apt update
apt install sudo
apt install vim
apt install wget
apt install gnupg
apt install apt-transport-https
# Repo for Zulu Java
echo ‘deb http://repos.azulsystems.com/debian stable main’ > /etc/apt/sources.list.d/zulu.list
# Repo for OpenHAB2 stable build
wget -qO – ‘https://bintray.com/user/downloadSubjectPublicKey?username=openhab’ | apt-key add –
apt-key adv –keyserver hkp://keyserver.ubuntu.com:80 –recv-keys 0xB1998361219BD9C9
echo ‘deb https://dl.bintray.com/openhab/apt-repo2 stable main’ | tee /etc/apt/sources.list.d/openhab2.list
apt-get update
apt-get install zulu-8
apt-get install openhab2
apt-get install openhab2-addons
/etc/init.d/openhab2 start
# OpenHAB will be accessible on your IP at 8080. E.g. http://10.10.10.123:8080.
# docker start/stop UbuntuOH2