Month: September 2019

Python f-strings

I’m accustomed to using variables directly in strings — most of my scripting experience was with Bash, Perl, and PHP. It’s something I have to think about when I would write Java or C++ code, and it’s one of the few things that struck me as a step backward in Python. This is basically the advantage that kwargs have over args, except changing a string common where changing a function definition is pretty rare.

I’ve taken to using the arg identifier numbers in the print statement.

>>> first=”Lisa”
>>> last=”Rushworth”
>>> print(“Hi {0}, you are {0} {1}.”.format(first, last))
Hi Lisa, you are Lisa Rushworth.

This allows me to append a new variable to the format argument list and use it anywhere in the string
>>> salutation=”Hello”
>>> print(“{2} {0}, you are {0} {1}.”.format(first, last, salutation))
Hello Lisa, you are Lisa Rushworth.

Python 3 introduced f-strings, which go beyond the functionality I was missing. You *can* use variable names within the string:

>>> print(f”{salutation} {first}, you are {first} {last}”)
Hello Lisa, you are Lisa Rushworth

You can have multi-line strings — notice that newlines aren’t being magically added. If you *want* newlines, add \n!

>>> strString = (
… f”{salutation} {first}, ”
… f”You are {first} {last} ”
… f”And I have more ”
… f”data down here”
… )
>>> print(strString)
Hello Lisa, You are Lisa Rushworth And I have more data down here

But you can also perform operations:
>>> print(f”{2 ** 3}”)
8

And use the f-string in classes
>>> class MyThing:
… def __init__(self, thing1, thing2, thing3):
… self.thing1 = thing1
… self.thing2 = thing2
… self.age = thing3

… def __str__(self):
… return f”{self.thing1} has 2 {self.thing2} and 3 {self.age}.”

>>>
>>> thingSample = MyThing(“Something1”, “Something2”, “Something3″)
>>> print(f”{thingSample}”)
Something1 has 2 Something2 and 3 Something3.

What if you need to have a literal curly brace?
>>> print(f”Hi {first}, this output needs a {{curly brace}}”)
Hi Lisa, this output needs a {curly brace}

VS Code Keyboard Shortcut: Commenting

We’ve been watching Microsoft’s Python programming course series — only the first couple so far, so it’s a lot of “yeah, knew that”. *But* there’s the occasional cool tip. You can comment line(s) of code with a keyboard shortcut:

Ctrl k,c comment current line (or selection)
Ctrl k,u uncomment current line (or selection)


Highlight the section of code that you want to comment out.

Hit ctrl-k and then ctrl-c … voila, a whole section of commented code. Denoting a comment is language specific, so this does not do anything if VS Code has not yet identified the language for your file.

To remove comments, use ctrl-k then ctrl-u. This works with code that already includes comments – you’ll get an additional comment in front of the commented line, and that additional comment will be removed leaving a commented line.

yEd: Item Alignment

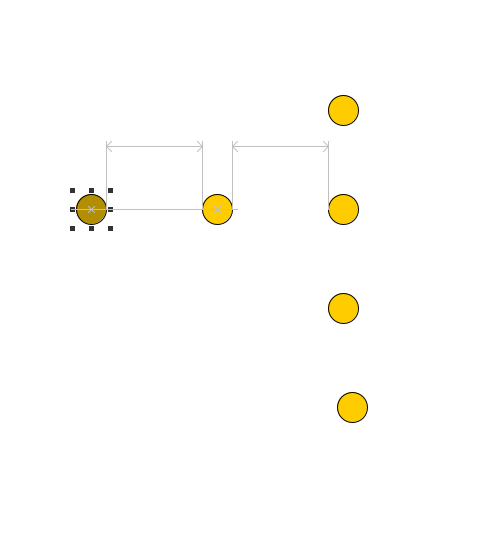
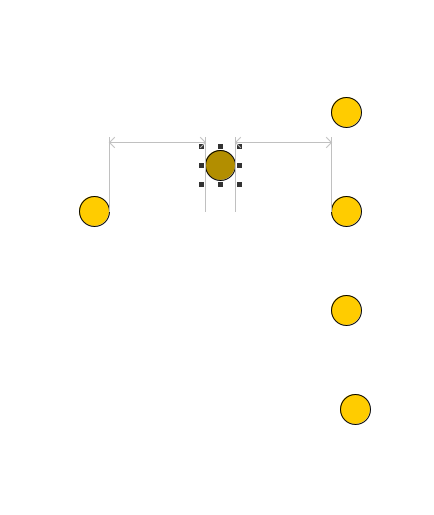
I’ve been using yEd as a free not-quite-Visio, and happened across a feature that I love — as you move items around, little marks pop up when things are lined up and with multiple alignments? When they’re equidistant.

And once you have something lined up and equidistant, you can hold the shift key and drag the item to move it along one axis. In this case, I wanted the middle circle to be, well, in the middle. But I didn’t want it on the same horizontal line, so I was able to drag it up without losing the vertical spacing.

yEd Color Gradient

I don’t want to buy Visio — for one thing, I’m using it for work, and I don’t want to buy anything for work. But I don’t use Visio frequently enough to warrant paying for a license. I tried a few open source iterations with no success (OpenOffice Draw gave me the exact feeling I remember when trying to use the spreadsheet product — halfway there, but missing a LOT of features that are important to me). I happened across a free-but-not-open-source program called yEd. It’s got a basic shape gallery, I can draw lines between shapes, I can add labels to my lines and shapes. Perfect!

Their sample diagram, though, had a cool gradient effect. Not something I’m apt to use on a serious diagram … but I wanted to know how to achieve the same look. A lot of clicking later:

Select two nodes where the gradient starts. Select “Tools” => “Colorize Graph”. On the “General” tab, set “Highlight Feature” to “Graph Distance”. On the “Graph Distance” tab, ensure “Rainbow Interpolation” is unchecked. Pick your starting color, ending color, and a max distance (I used 250). Apply and you’ll have a vertical gradient across your document.

Certificate Generation Script

I finally put together a script that gathers some basic information (hostname & SAN’s) and creates a certificate signed against my CA. I’ve got a base myssl.cnf file that ends with

[ req_ext ]
subjectAltName = @alt_names

[ alt_names ]

The script appends all of the alternate names to the myssl.cnf file.

#!/bin/bash

RED_DARK='\033[38;5;196m'
GREEN_DARK='\033[38;5;35m'
BLUE_DARK='\033[38;5;57m'
NC='\033[0m' # Reset

function getInput {
        echo -e "${BLUE_DARK}Please input the short hostname you wish to use (e.g. server123):${NC}"
        read HOST

        echo -e "${BLUE_DARK}Please input the domain name you wish to use with this hostname (e.g. rushworth.us):${NC}"
        read DOMAIN

        echo -e "${GREEN_DARK}Please enter any SAN values for this certificate, separated by spaces (must be fully qualified):${NC}"
        read SANS

        FQHOST="${HOST}.${DOMAIN}"

        echo -e "Short hostname: $HOST"
        echo -e "Fully qualified hostname: $FQHOST"
        echo -e "SAN: $SANS"

        echo -e "${RED_DARK}Is this correct? (Y/N):${NC}"
        read boolCorrect

        if [ $boolCorrect == 'Y' ] || [ $boolCorrect == 'y' ]
        then
                mkdir $HOST
                echo $HOST
                cp myssl.cnf "./$HOST/myssl.cnf"

                cd "./$HOST"

                echo "The following SANs will be used on this certificate: "
                echo "DNS.1 = ${FQHOST}"
                echo "DNS.1 = ${FQHOST}" >> ./myssl.cnf
                echo "DNS.2 = ${HOST}"
                echo "DNS.2 = ${HOST}" >> ./myssl.cnf

                if [ -n "$SANS" ]
                then
                        SANARRAY=( $SANS )
                        iSANCounter=2
                        for SANITEM in "${SANARRAY[@]}" ; do
                                let iSANCounter=iSANCounter+1
                                echo "DNS.${iSANCounter} = ${SANITEM}"
                                echo "DNS.${iSANCounter} = ${SANITEM}" >> ./myssl.cnf
                        done
                fi
                export strCertKeyPassword=Wh1t2v2rP144w9rd
                export strPFXPassword=123abc456
                openssl genrsa -passout env:strCertKeyPassword -aes256 -out $FQHOST.passwd.key 2048
                openssl req -new -key $FQHOST.passwd.key -passin env:strCertKeyPassword -config ./myssl.cnf -reqexts req_ext -out $FQHOST.csr -subj "/C=US/ST=Ohio/L=Cleveland/O=Rushworth/OU=Home/CN=$FQHOST"
                openssl x509 -req -in $FQHOST.csr -passin env:strCertKeyPassword -extensions req_ext -extfile ./myssl.cnf -out $FQHOST.cer -days 365 -CA /ca/ca.cer -CAkey /ca/ca.key -sha256
                openssl rsa -in $FQHOST.passwd.key -out $FQHOST.key -passin pass:$strCertKeyPassword -passin env:strCertKeyPassword
                openssl pkcs12 -export -out $FQHOST.pfx -inkey $FQHOST.key -in $FQHOST.cer -passout env:strPFXPassword

        else
                getInput
        fi
}

getInput

There’s an encrypted private key and a non-encrypted private key. Because I have some Windows servers — Exchange and Active Directory — I create a PFX file too.


Listing Column Widths in Excel

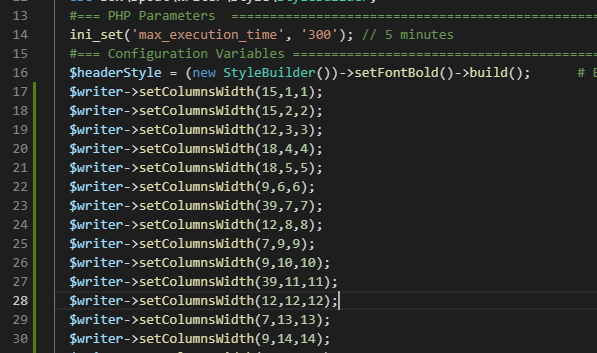
I hacked Box Spout to support column widths formatting, but wanted a quick way of adding appropriate column widths (yes, automatic width determination would be better … but I didn’t want to spend hours sorting that). Instead of wasting time on automatic column widths, I wrote a simple Excel code module to tell me the appropriate column widths. If your data width might vary, you can add some padding to the ReportColumnWidth function. My data, fortunately, is fixed width.

You will need to save your spreadsheet as a macro-enabled workbook (.xlsm). To add a function to Excel, hit Alt and F11. Select “Insert” => “Module” and paste in the following content and save.

Function iCeiling(iInput)
    iCeiling = Int(iInput)
    If iCeiling <> iInput Then
        iCeiling = Int(iInput) + 1
    End If
End Function

Function ReportColumnWidth(CellID As Range) As Double
 Application.Volatile
 ReportColumnWidth = iCeiling(CellID.ColumnWidth)
End Function

In Excel, use the ReportColumnWidth function to print the width of a column into a cell. This is my row #3.

In row #2, I have a counter that provides the row number for use in Box Spout. Row #4 creates the line needed to set the column width in my code using the concat function.

=CONCAT("$writer->setColumnsWidth(",A3,",",A2,",",A2,");")

Replacing the tab characters with newlines, I now have column widths set based on my data.

Docker Hub

Docker Official Images: Official images won’t have a publisher listed, and they will be tagged with “Official Image”.

Docker Official Images are a set of images curated by Docker. They’re generally recommended for new users as Docker has a team that reviews and publishes these images. Beyond Docker’s verification, you can see how an individual image was built. Navigate to the GitHub image library. Find the file corresponding with the image, and you’ll see a GitRepo line. Navigate to that URL to find the Dockerfiles that were used to build the image.

Docker Certified: Other images will be certified by Docker – these are published by someone other than Docker but have been tested & scanned for vulnerabilities, they come from a reputable source, and comply with best practice guidelines.

If you click on the hyperlinked organization name, they are listed as a verified publisher – this means someone put a little effort into ensuring “Oracle” is actually the corporation everyone thinks of when they hear “Oracle”

Other Images: You’ll also find containers that are not certified that have been published by un-verified parties. Don’t use these without some investigation.

We happen to interact with OpenHAB developers and “know” the guy who builds these images. I trust him and do run this image on my home network. I also know where to go to view his Dockerfiles, and I know how his images are built. https://github.com/openhab/openhab-docker

But there are images posted by random Internet denizens – I run Docker on my personal Windows laptop and needed to access the underlying MobyVM. The image justincormack/nsenter1 will do it … but I have no idea who this person is. A quick search of the Internet yielded a Dockerfile for this image, but there’s nothing that ensures the image on Docker Hub is actually built with this file. It’s safer to use the Dockerfile to build your own version of the image.

GitLab – Using the Docker Executor for Testing

Setting up gitlab-runner to use a Docker executor: You need Docker running on the gitlab-runner host. In my sandbox, I have GitLab running as a Docker container. Instead of installing Docker in Docker, I have mounted the host Docker socket to the GitLab container. You’ll need to add the –privileged flag, and since I’m using Windows … my mount path is funky. But it works.

docker run –detach –hostname gitlab.rushworth.us –publish 443:443 –publish 80:80 –publish 22:22 –name gitlab -v //var/run/docker.sock:/var/run/docker.sock –privileged gitlab/gitlab-ee:latest

Register the runner using “docker-runner register”. I always specify the image in my CI YAML file, so the default image is immaterial … but I’ve encountered groups with an image that mirrors the production servers who set that image as the default.

Edit /etc/gitlab-runner/config.toml and change “privileged = false” to true.

Start the runner (docker-runner start). In the GitLab Admin Area, navigate to Overview => Runners and select the one we just created. When a project is updated, tags can be used to select an appropriate runner. Because most of my testing is done with the shell executor, the runner which uses the shell executor has no tags and the runner which uses the Docker executor is tagged with “runner-docker”. You can require all jobs include a tag to select the appropriate runner (which avoids someone accidentally forgetting a tag and having their project processed through the wrong runner).

An image – you’ll need an image. You can use base images from the Docker Hub registry or create your own image. You can add components in the before_script or use a Dockerfile to build an image from the parent image.

Now we’re ready to use the Docker executor! Create your CI YAML file.

If you are not using the default image, start with “image: <the image you want>”.

We don’t want phpunit in the running image, but I use it for testing. Thus, I need a before_script component to install the phpunit package.

If you’ve used a tag to restrict what is run in your Docker-executor based runner, add the appropriate tag. Include the tester command line.

.gitlab.yml:

image: gitlab.rushworth.us:4567/lisa/ljtestproject-dockerexecutor
stages:
- test

before_script:
# Install dependencies
- bash ci/docker_InstallReqs.sh

test_job:
stage: test
tags:
- runner-docker
script:
- phpunit --configuration phpunit_myapp.xml

Docker_InstallReqs.sh

#!/bin/bash
yum install php-phpunit-PHPUnit

Now when you commit changes to the repository, the Docker-executor based runner will be used for the CI/CD pipeline. A transient Docker container will be created with the image, your before_script will be executed, and then the test script will be run within the container.