Tag: Microsoft Forms

Did you know … you can redirect custom URLs to Microsoft Forms?

Microsoft Forms provides a simple framework for creating surveys and polls which can be distributed either to internal users or made publicly available. Including your Form URL in an a href tag is one way to avoid trying to communicate the super-long Form URL … but if you’re looking for a ‘pretty’ URL, something that can be included in print media or provided to someone verbally, you can redirect custom URLs to your Form URL.

Generally, hosting a forwarding URL requires a web server; but URL-shortening services should work. To use a web server, you’ll need to configure a site (or path from a site) to serve an HTTP redirect. I am using 302 (temporary) redirection instead of 301 (permanent redirection) in case I want to forward my custom URL to a different Form.

Apache config

Use the “Redirect” directive in your virtual host config:

<VirtualHost 10.1.2.3:80>
     ServerName customsite.example.com
     ServerAlias customsite.example.com customsite
     Redirect / https://forms.office.com/Pages/DesignPage.aspx#FormID=wbRnJe2w9UCu41....
</VirtualHost>

IIS Config

In the IIS management utility, navigate to your website and select “HTTP Redirect”.

Check the box to redirect requests and paste in your Forms URL. Check the box to redirect all requests to the exact destination.

When your site is accessed, the browser receives the HTTP redirect and displays your Form.


Did you know … you can add manager approvals in Microsoft Flow?

In my previous post, I demonstrated how the Office 365 User search could be used to record a Form responder’s email address instead of their logon ID. But other information about the user is available too – including their manager. This means you can use Flow to build workflows that require manager approval where “manager” is dynamically determined. How?

Select the “Get manager (V2)” action from the “Office 365 User” connector.

In this example, I am extending the sample workflow that creates a SPO list item from a Forms submission. I have inserted a step after getting the responder’s profile information. Click in the “User (UPN)” and select the input that contains the responder’s account (which, again, Forms calls an e-mail address)

Insert a new action

Search for and select “Approvals” and then select the “Start and wait for an approval (V2)” action.

Click the drop-down for “Approval type” – since I am only adding a single approver, the first two options are essentially the same. I can, however, use “Everyone must approve” to have more than one level of manager required for approval, or a manager plus static application owner.

To assign the approval, find the dynamic content from the manager lookup and select “Mail” from that section. Add details that will appear in the approval notification – something to clearly explain what the person is approving.

Save your workflow. Now when a Form response is submitted, the responder’s manager will receive an e-mail which allows them to approve or reject the request.

If they use the Flow site, they will see the approval in their Approvals section.


Did you know … you can store Microsoft Forms responses in a SharePoint Online list with Flow?

Microsoft Forms is a great way to compose simple forms and gather responses but analyzing the data in Excel … well I generally prefer processes to be automated. To use Forms data in automated processes, I store the form response in a SharePoint Online (SPO) list. How do you get the form response into a SPO list? Microsoft Flow.

Note – Microsoft Flow cycles are not free. We receive a number of free cycles each month for each Office 365 license purchased. The company-wide number of free flow cycles is quite large, but not infinite. Be cognizant of what constitutes a cycle. In this case, a cycle is each new form submission … if I expect 20,000 people to submit the form this month, I am using 20,000 flow cycles. Not all trigger cycles are as straightforward as this. As an example, Flow could send me an alert when I receive an e-mail from my manager. A cycle is not triggered on “e-mail from my manager received in my mailbox” but rather “new e-mail message received in my mailbox”. For a mailbox dedicated to a specific purpose, the number of messages received per month may be exactly what you want to process. In my mailbox, system alerts, ITSM notifications, script results and such would quickly use up a significant portion of Windstream’s free cycle allotment.

First you need a Form. When editing your form, grab the URL and find the “FormID” section. Save that string – we’ll need that in the workflow.

Before you start – if you plan to convert your personal form into a group form, do that before creating the Flow workflow. The form ID changes when a form is moved between group and personal forms, and you will need to adjust the workflow accordingly.

To store information in a SharePoint Online list, you’ll also need a SPO list. You can create one in a dedicated SPO site or the SPO site behind a Teams space.

Record the SPO site address and list name – we’ll need that in the workflow.

Now that we’ve got all of the components ready, we can build a workflow to connect them. Log into https://flow.microsoft.com

On the left-hand navigation bar, click “My Flows”.

Click the drop-down next to “New” and select “Create from blank”

Click “Create from blank” to confirm your choice.

Before you do anything else, give your Flow a descriptive name. Click on “Untitled”, type something else, and hit enter. If you don’t name your flow, it will get a default name based on the actions taken within the workflow … which makes it really hard to differentiate between five different workflows that take Forms responses and store them in SPO lists.

The trigger for the workflow will be that a new Forms response is submitted.

Select the “When a new response is submitted” trigger.

Select “Enter custom value” and paste in the form ID we recorded earlier.

Click “+ New step” to add a new step.

To use the data from the Form submission, we need to get the response data. Enter “Forms” again and select “Microsoft Forms”

Select the “Get response details” action.

In “Form Id”, enter a custom value and paste in the Form ID. Click in the “Response Id” field. In the right-hand navigation menu, click “See more”.

Select “List of response notifications Response Id”

You’ll see that the response ID is added to “Select an output from the previous step”. Click “Add an action”

Type “SharePoint” and select “SharePoint”

Select “Create item” from the “Actions” tab

Select “Enter custom value” for the Site Address and enter the site address we recorded earlier. Then click the drop-down for “List Name” – select the list into which you want to insert Forms responses.

Below “List Name”, additional fields will appear – one for each column of your list. Click into a column. In the right-hand bar, you will see the Form attributes that can be placed into the List column. For each List column, select the Form component you want stored in that field.

Flow is aware of column types – if you click into a date column, it will try to present Forms information that holds dates. If you find an option missing, click “See more” to see an unfiltered list of Forms attributes.

When you are selecting values to use in an action, the possible selections are grouped by the action. For a simple form/list combination like this, using the default step names is not too confusing, but if you build more complex workflows with more data elements … figuring out which “Get response details” is which becomes difficult.

It can be clearer if you provide a unique name for each trigger and action – the values from the LJRDemo form are clearly part of the “Get LJRDemo Form response details” section.

To rename a workflow element, click the ellipses and select “Rename”

Type a new name and hit enter

Click “Save” to save and activate your workflow.

Submit answers using your form, then check your SPO list.

Notice that what Forms calls my e-mail address is actually my logon ID. This is very useful for IT folks who can easily correlate logon IDs to actual individuals. Maybe not so useful for you. Flow provides directory lookup capabilities if you want to turn the logon ID field into something … more readable. Edit your Flow. After the get response details step, click the little plus to insert a new step.

Select “Add an action”

Search for “Office 365 Users”, select it, and select “Get user profile (V2)”.

Click in the “User (UPN)” box and select the Form respondent’s “e-mail”

Edit the action which creates the SPO list item. You will now have dynamic content both from the Form response and the Office 365 user lookup. In this case, I will use “Mail” in the Submitter column.

Save you changes. Since we’ve already submitted a Form response, we can test the Flow without submitting a new response. Click “Test” in the upper right-hand corner of your screen.

Select one of the previous runs (there may only be one!) and click “Save & Test” to re-run the Form response through your workflow.

Now the submitter is recorded as an e-mail address.

Did you know … you can create templates in Microsoft Forms?

Microsoft Forms is a secure (and free!) alternative to SurveyMonkey, but it can be time consuming to repeatedly create essentially the same form. Fortunately, there are two ways you can use an existing form as a template for a new form.

Log into Microsoft Forms – if you’ve never used Forms before, you’ll need to create a new form. Click the “New Form” button.

Add a title and description to your form, then use the “Add question” button to build your form.

Click on “Forms” in the upper left-hand corner to return to the Forms home page. The form you created will appear under “My forms”. Click the ellipses in the upper right-hand corner of the form listing.

Select “Copy”

Volia – now there is a copy of the form.

You can also create a public form template. When editing your form, click the “Share” button.

Click “Share as a template”

Copy the URL that is displayed.

Anyone (even people outside of Windstream) can use a form template URL to create a new form. Simply access the URL and click “Duplicate it”.

There is not currently a public library of Forms templates (although I’ve suggested it on Microsoft’s UserVoice site), but if you create a template that would be useful for our organization, feel free to share it in the comments.


Moving A Microsoft Form Can Change The Form ID

Create a personal form at https://forms.office.com

Look at the form ID – it’s in the form URL

Now I’ve tested it & I’m ready to use it. I need to grant the rest of my team rights to modify the form. Click the fallen-over hamburger menu on the form

Select “Move”

Pick Teams space and click “Move”

Return to your Form – in the URL, look at the Form ID again. Compare it to the original … they don’t match!

Why do I mention this? Well, if you use a form in Flow … it is referenced by the form ID. Creating a personal form, building a workflow in flow, then moving the form to your Teams space to allow others to edit it breaks the workflow. When you go into the Flow to add additional owners, you’ll need to update the Form ID as well. If you don’t update your Flow, it will start failing. Oddly not at the initial “when a new response is submitted” step where I would expect it to fail if the Form ID was not valid but at the “get response details” step.

Looking at the error detail on “get response details”, the status code is 404 (HTTP error for ‘not found’, so I assumed it was used in the same context). The result body has an error code 639 which I couldn’t find anyone talking about online.

Did you know … you can send a “receipt” for Microsoft Forms submissions?

I had a maths professor who mused that, back when he was an undergrad, calculators were a newfangled thing that kids only halfway trusted. You’d complete your test; and, time permitting, you would power on that calculator and see if it agreed. Decades later, kids didn’t even do a mental check that the calculator’s results were halfway reasonable. As a technology becomes more familiar, innate trust is built. In the interim … trust but verify. Beyond trust, it’s nice to have a copy of what you’ve submitted when discussing your submissions with someone else. Or, for a periodic survey, to remind you what you said last time. Or because you are particularly proud of a particular turn of phrase and would like to use that one again. For whatever reason you want to create a “receipt” for Forms submissions, you can do it.

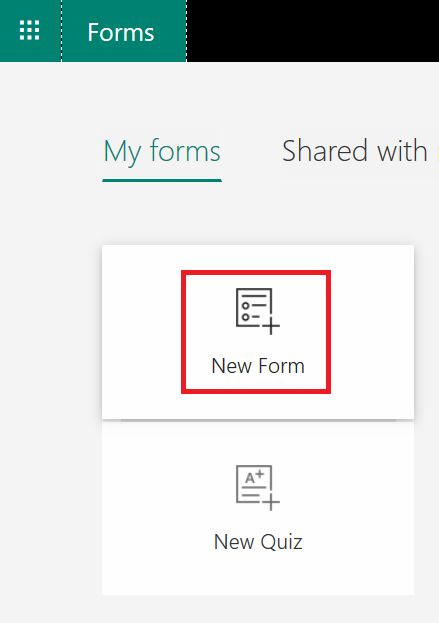
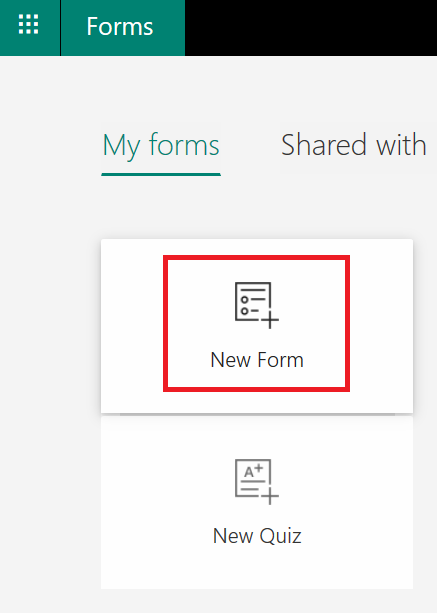
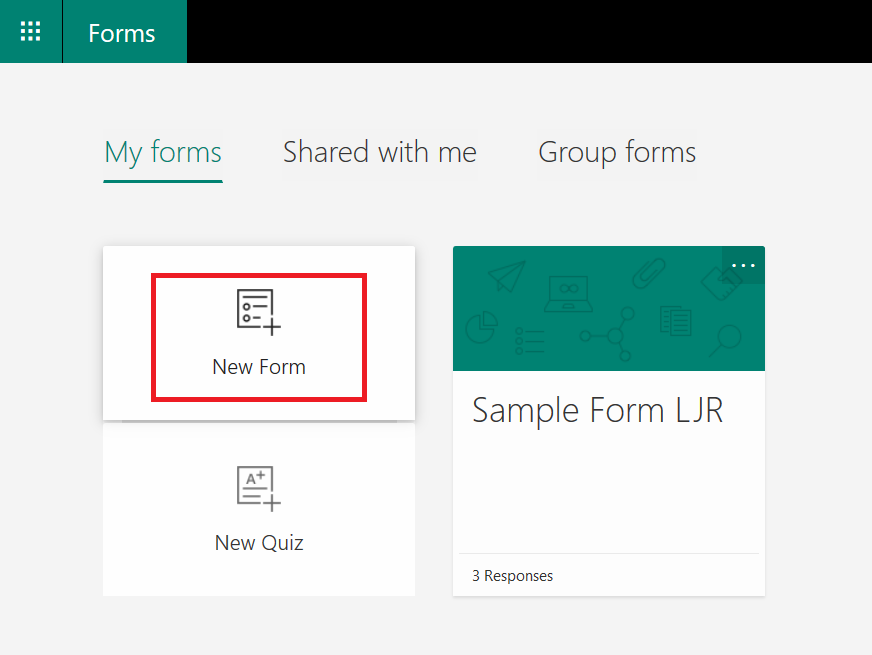
The first thing you need is a Form created under your user ID. Go to https://forms.office.com/ and click “New Form”

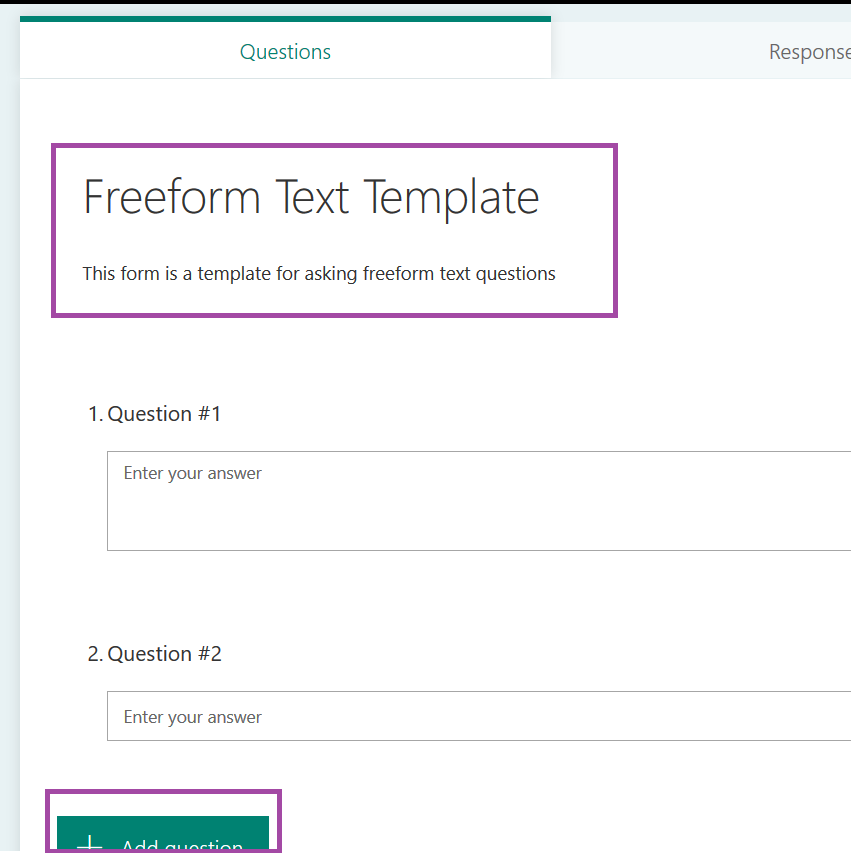
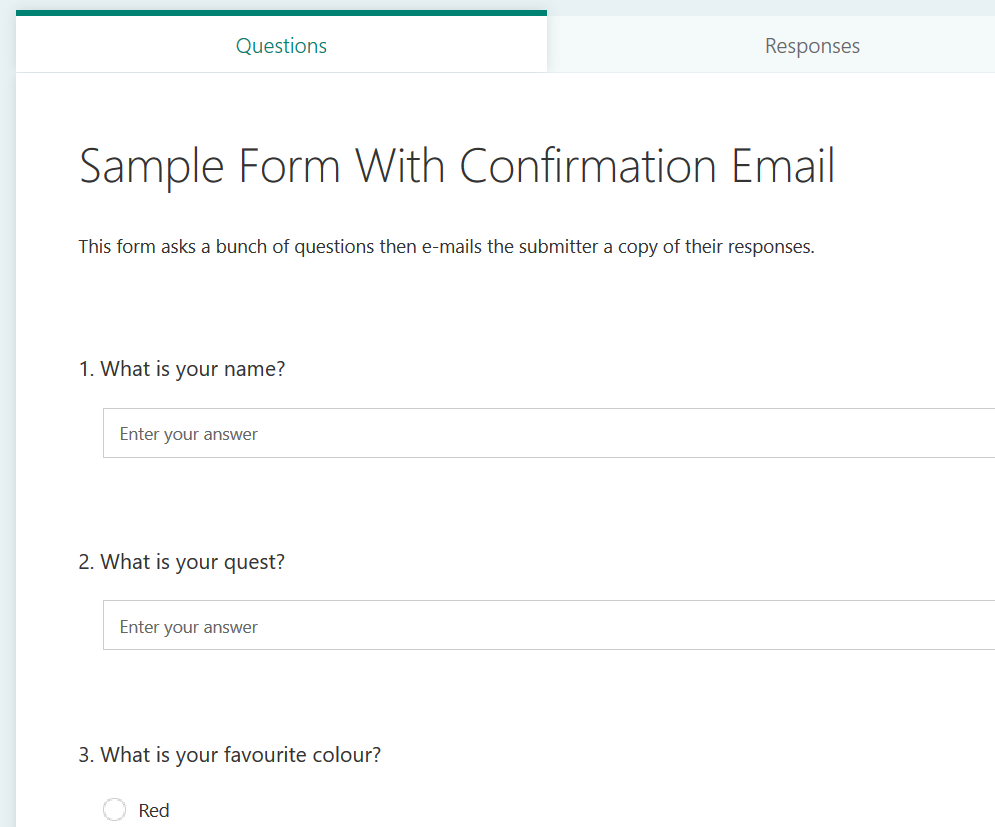
Give your form a name and add some questions

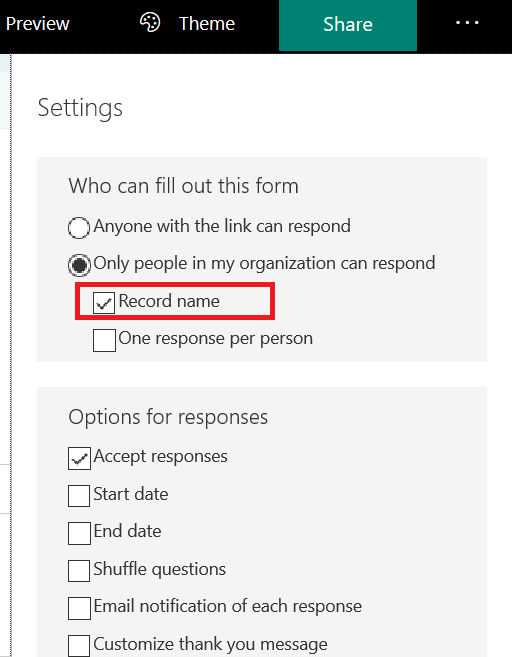
From the hamburger menu in the upper right-hand corner, select “Settings”

Verify that the form is restricted to “people in my organization” and “Record name” is selected.

** If the form needs to be available to individuals outside of the organization, you would need a form field to request their e-mail address … otherwise we don’t know where to send the receipt.

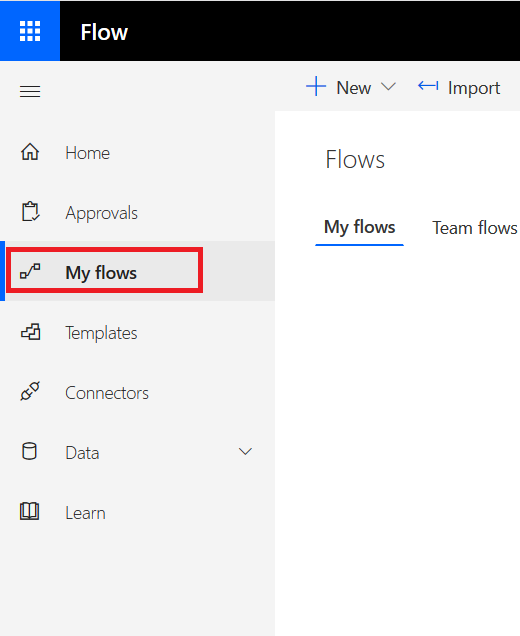
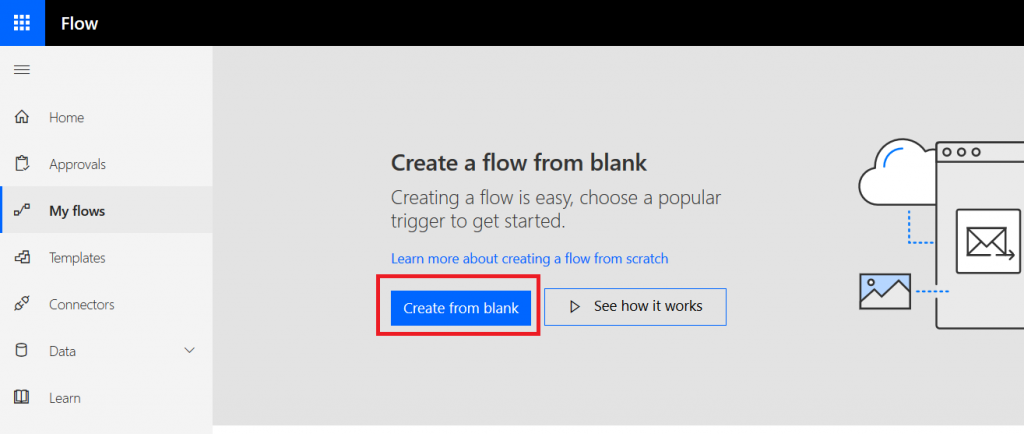
OK, we’ve got a form. Now we need to add a workflow to send the submitter a copy of their responses. Go to https://flow.microsoft.com and select the “My Flows” tile

Click on “New” and “Create from blank” to begin creating the workflow.

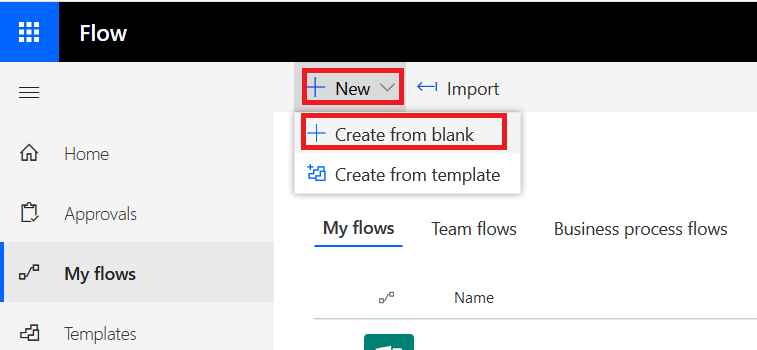
Click “Create from blank” again to confirm you really don’t want one of their templates

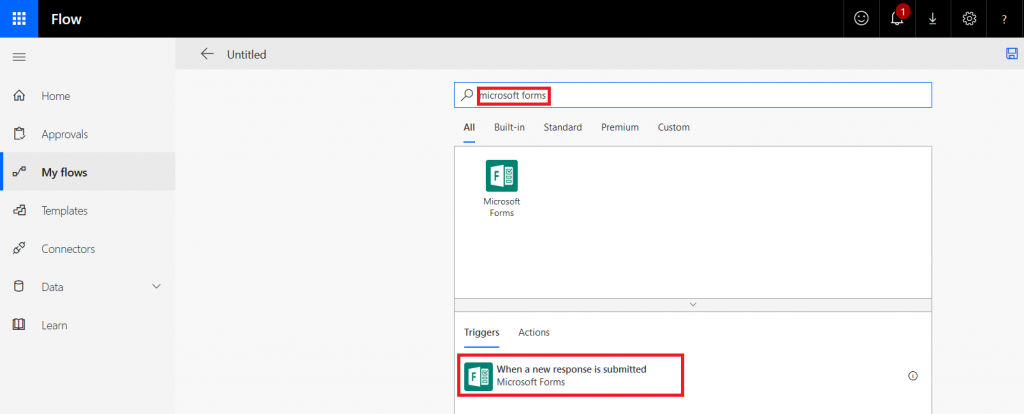
In the search field, type “Microsoft forms” and select the trigger “When a new response is submitted”

Select the form for which you want to generate a receipt – in my case, the form I just created.
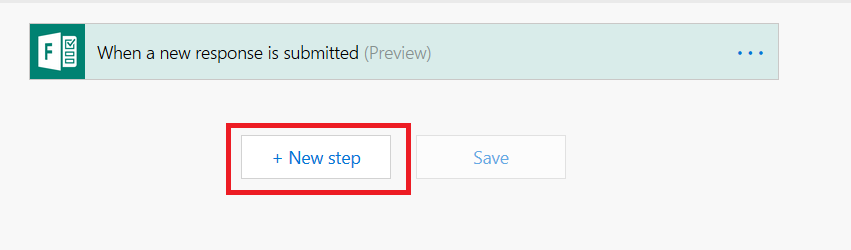
Select “New Step”

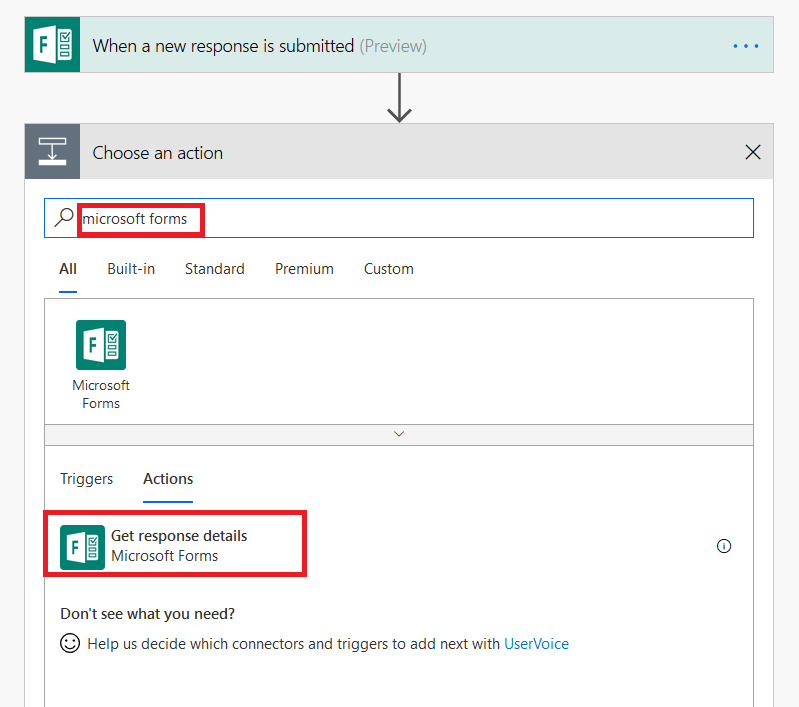
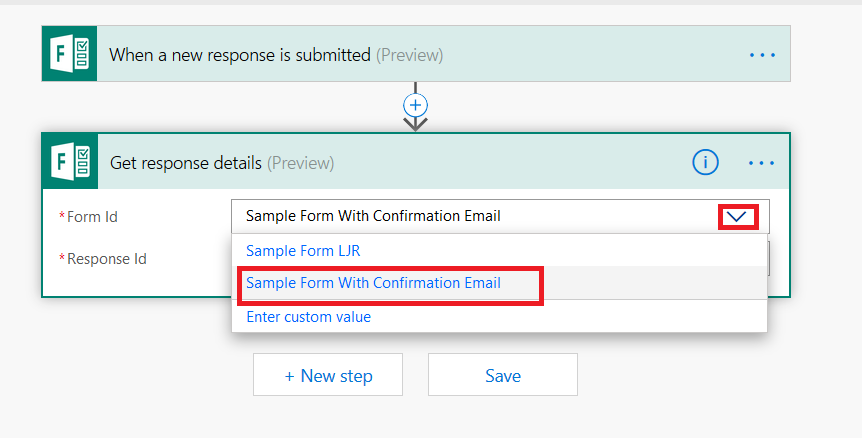
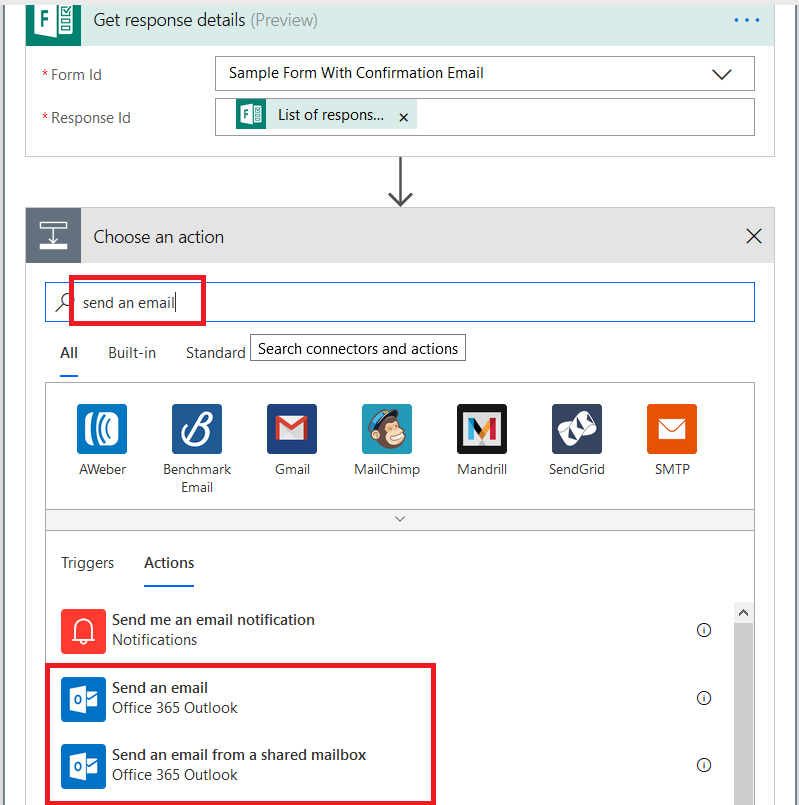
Type “Microsoft forms” in the search dialogue again, and select “Get response details”.

Click the inverted caret for “Form Id” and select your form again.

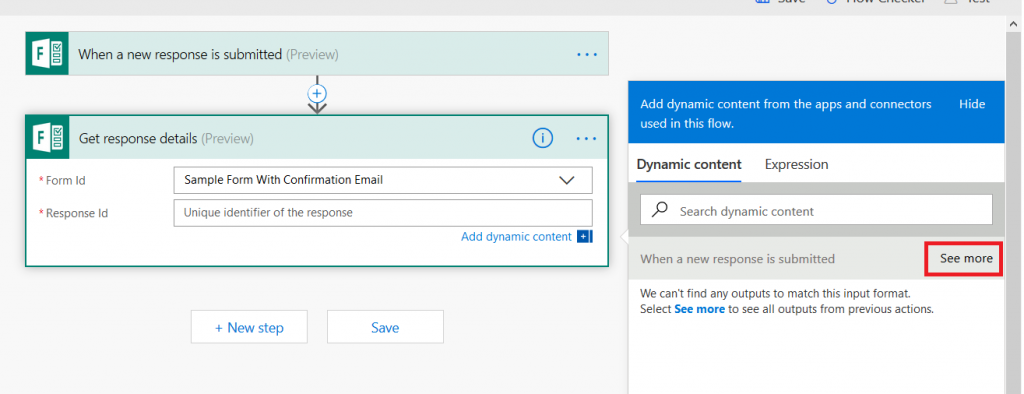
Click in the “Response Id” field – a new pane will appear to the right of your workflow. Click the “See more” button across from “When a new response is submitted”

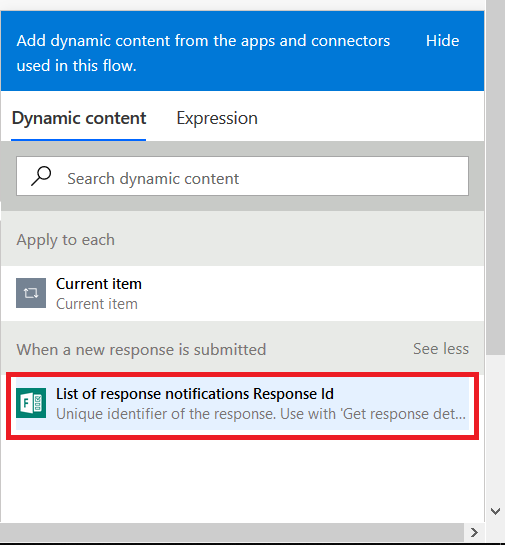
Select “List of response notification Response Id”

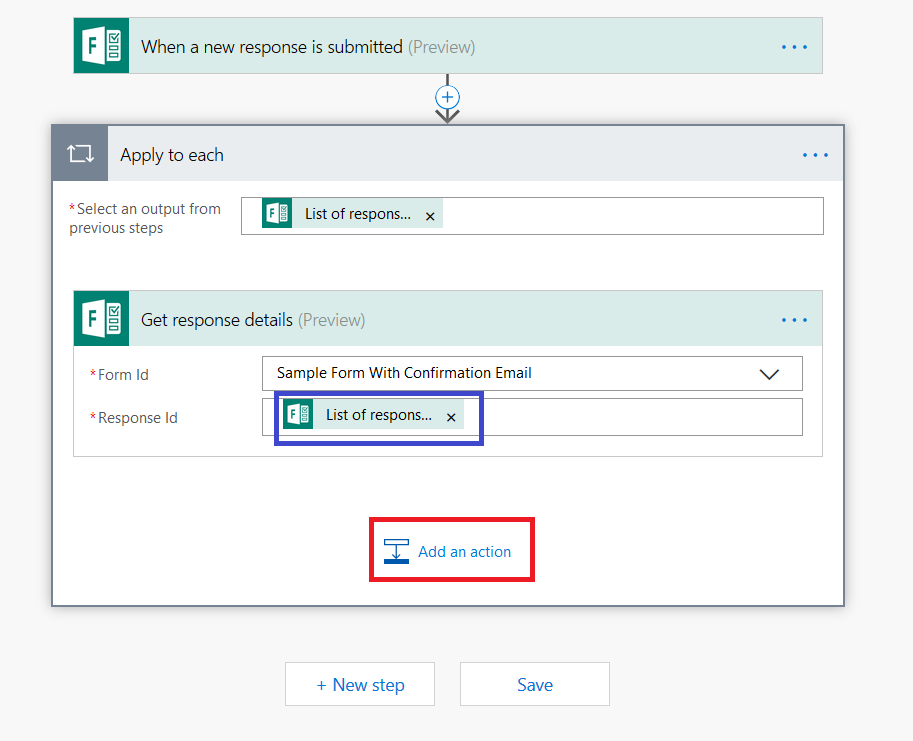
You’ll see the selection populated in the “Response Id” section. Click “Add an action”

In the search dialog, type “send an email”. To send the receipt from your mailbox, select “Send an email” – to send the receipt from a generic mailbox to which you have send-as access select “Send an email from a shared mailbox”.

Click in the “To” field – the dynamic content pane will appear on the right again. Click “See more” across from “Get response details”. If this form is locked down to submitters within the organization and the submitter’s name is recorded, you can select “Responders’ email”, otherwise select the form question where you’re quested the submitter’s e-mail address (warning – since there’s nothing verifying the individual actually owns the e-mail address, forms that take freeform e-mail address submissions can be used to “spam” others).

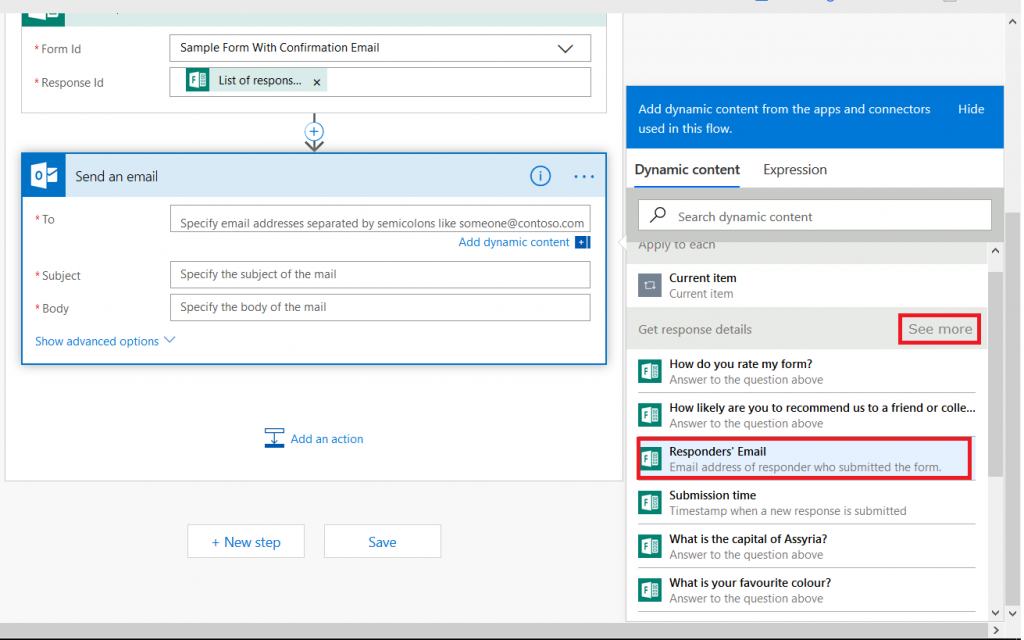
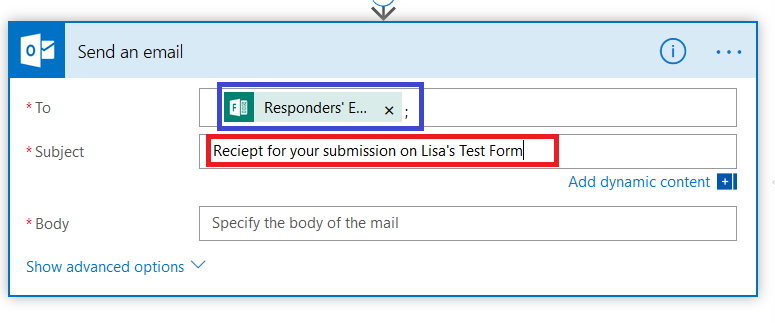
You’ll see “Responders’ E…” populated into the “To” field. Type in a reasonably descriptive subject for your message.

I start by creating my message template – pretty messages will require HTML, so click to “Show advanced options” and set “Is HTML” to yes.

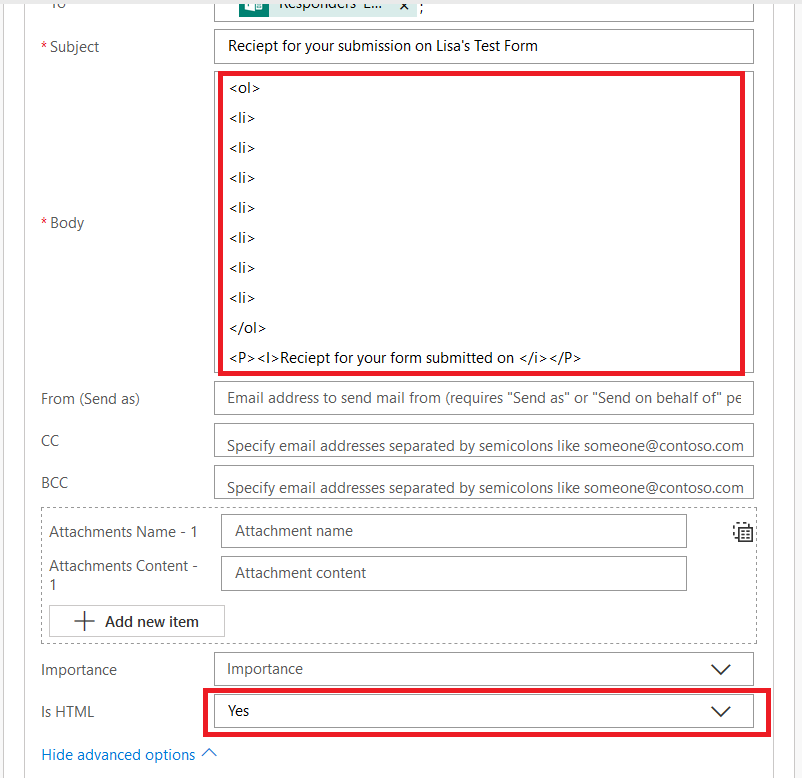
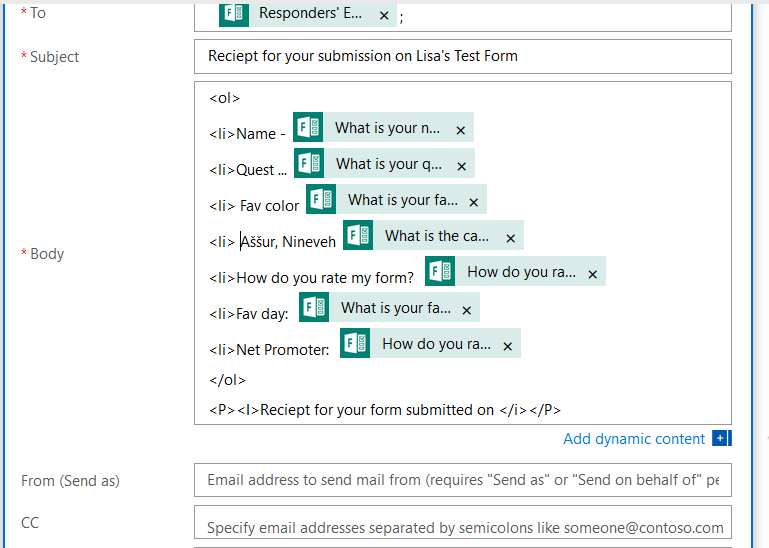
Now’s the part where we include the individual’s response data – click back into the “Body” field and you’ll see the dynamic content pane again. Within the message body, click where you want the response to appear (here, it’s after my first “<LI>” tag. Then select the question whose response you want to insert into that position.

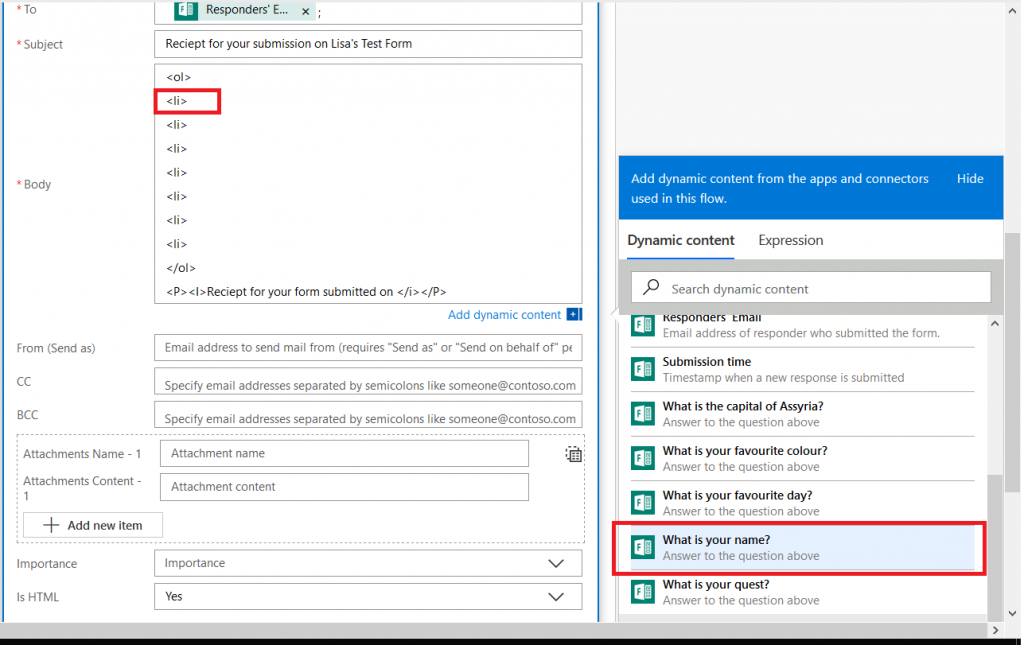
It’s generally helpful to type something before the answer to remind the person what the question was – it’s freeform text, and pretty much anything you can do in HTML is acceptable here.

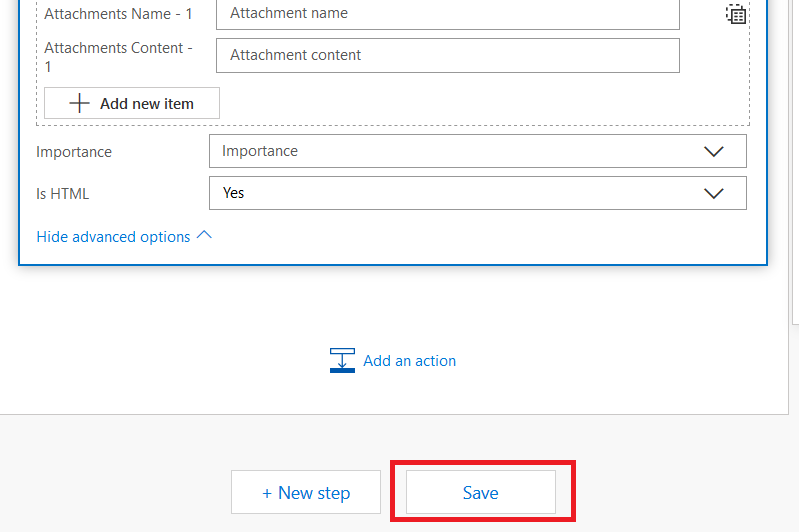
Once you have finished creating your message template, scroll down to the bottom and click “Save”

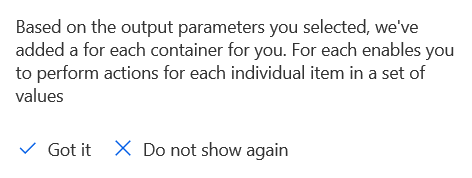
You may get a warning that a “for each” container has been added for you … that’s good, we want to generate a receipt for each submission!

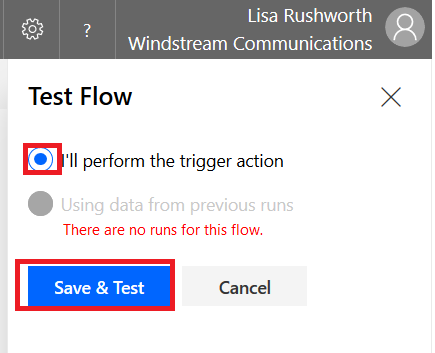
Now that your workflow has been saved, click “Test”

Select “I’ll perform the trigger action” and then click “Save & Test”

Return to your form and click “Preview”. Complete your form and click submit.

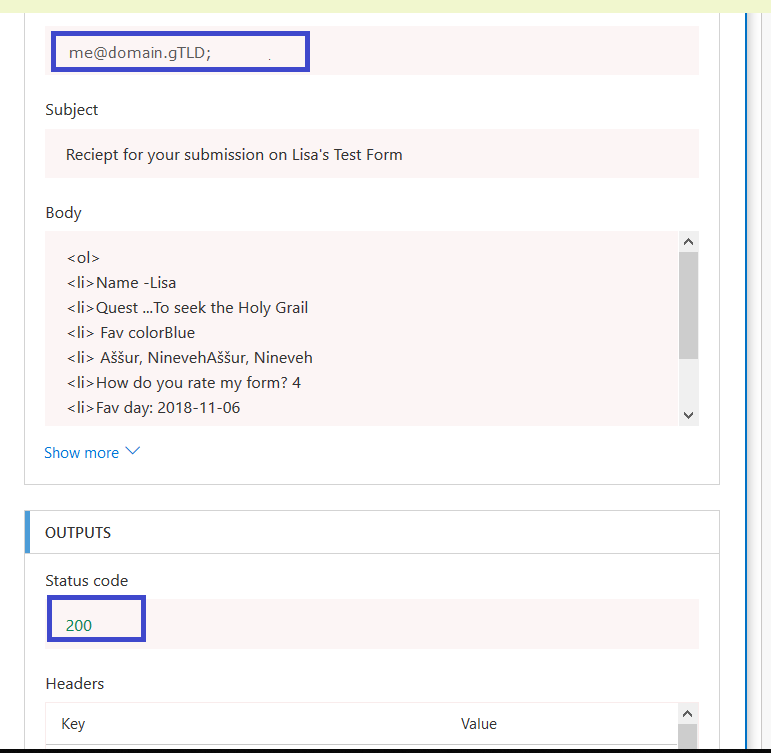
Return to Flow. If you are quick enough, you’ll see a message that your flow is running. Wait. Eventually you’ll see the results. You can click on the “Send an email” section to see detailed results.

Including the e-mail address to which the receipt was sent and the status code (200 is good).

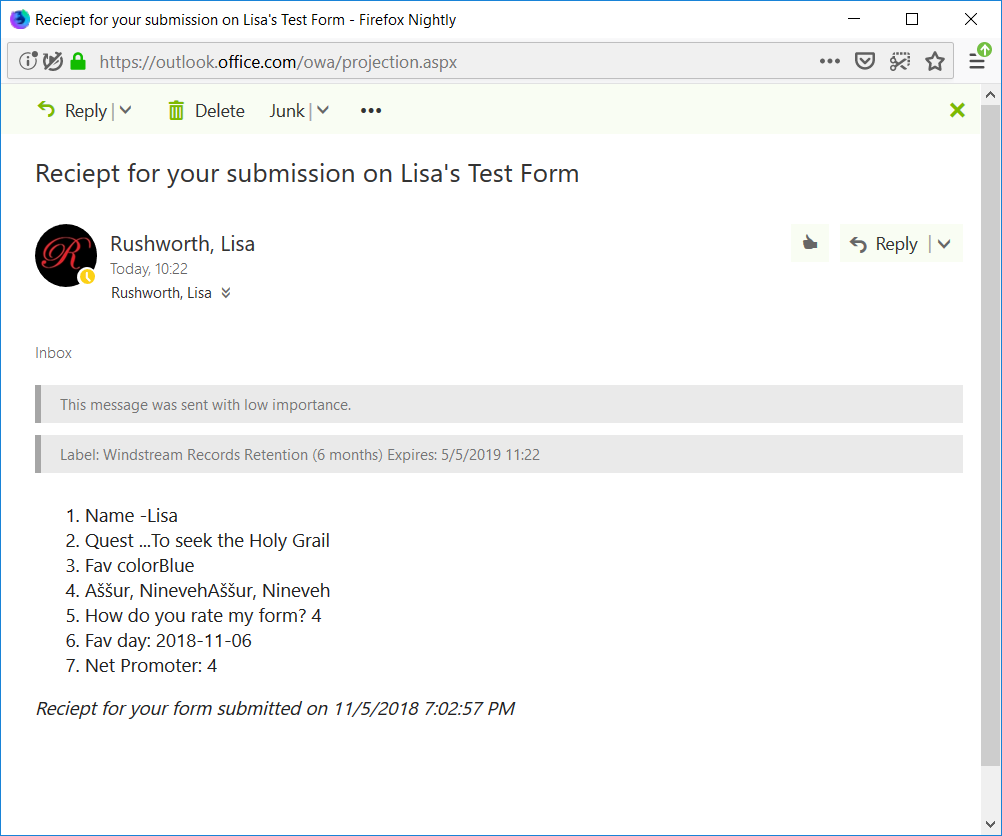
Check your mailbox too – you should have a message: