Month: October 2018

Ruffling Foot

I got some really nice corduroy fabric a few years ago with the idea of making Anya one of those tiered skirts where each layer is progressively larger than the other and gathered along the previous layer. It’s a simple enough process — decide how thick you want each tier to be and cut the fabric into strips that width + 2x a seam allowance. Once you’ve got a bunch of strips, attach them to create a really really long strip of fabric.

Take a wider strip of fabric and fold the top to form to encase an elastic band. Now comes the tricky part — getting the two pieces of fabric in the ruffler foot. There’s a long metal strip at the front that shoves the fabric to ruffle it — you want the long strip of fabric, right side facing up, under this strip. The bottom of the skirt, you want over this metal strip — it’s not going to be ruffled — and facing down. Both pieces of fabric are slipped under the foot at the back. Now sew — it’s a little jerky as the long strip of fabric gets pulled into the gathering mechanism. Once you make it all the way around the skirt, cut the long strip & attach the two ends of the tier. Then do it all over again — get the long strip into the gathering mechanism, get the bottom of the skirt above the gathering mechanism, both pieces of the fabric under the foot, and sew. Add tiers until the skirt is the desired length. Fold the bottom of the skirt up to form a hem. I went over the seams between each tier with my serger.

And we’ve got a skirt!

Most ruffling feet have settings where you can select how many stitches between a gather (I used 6) and the depth of the gather (I used a small gather because I wanted a subtle effect, not a pleated skirt).

Halloween 2018 – Unicorn Hood

Making a horn turned out to be a LOT harder than it seemed. Taking a heavy piece of paper and folding it into a cone was easy enough. I stuffed it with polyfil to give it some form. But how do you make it sparkly? I wanted to wrap the thing in a gold lamé fabric, but getting it all held together just wasn’t working.

Plan G (or so) was spray-on glue and glitter. I’m going to have to coat this thing in some clear sealant so she’s not a unicorn sprinkling glitter everywhere she goes. But it’s a horn!

Did you know … Microsoft Teams provides both public and semi-private Team spaces?

You’ve used Microsoft Teams to collaborate with individuals assigned to a project, and even created Team spaces for ad hoc groups to work on a problem. But what if you want to discuss the office’s community outreach program or plan the next employee engagement activity? Microsoft Teams is a perfect place to host that collaboration too.

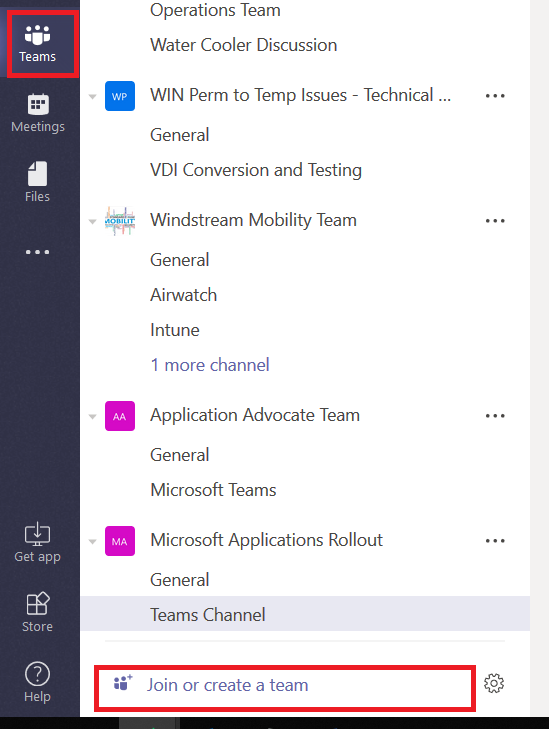
You can create a public Team space – a public Team allows anyone to join without requiring approval. This is great if you do not need to verify qualifications before allowing someone to join a Team. From the “Teams” tile, click on “Join or create a team” at the bottom of your Team list.

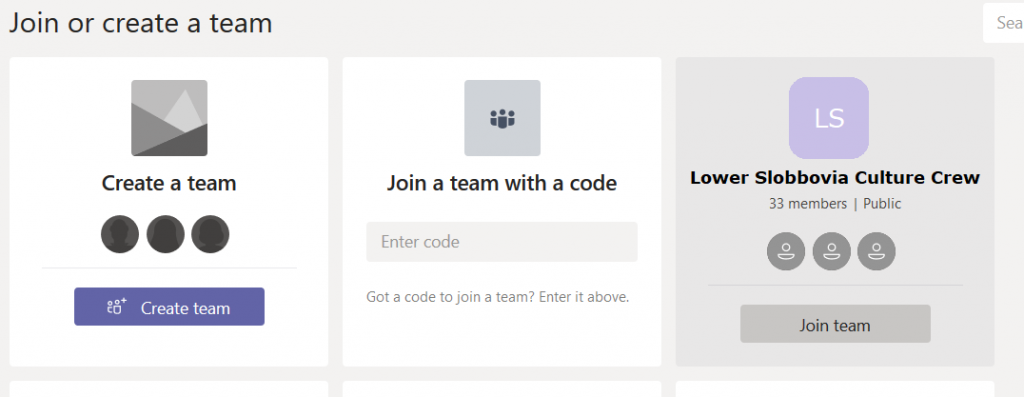
Click “Create team”

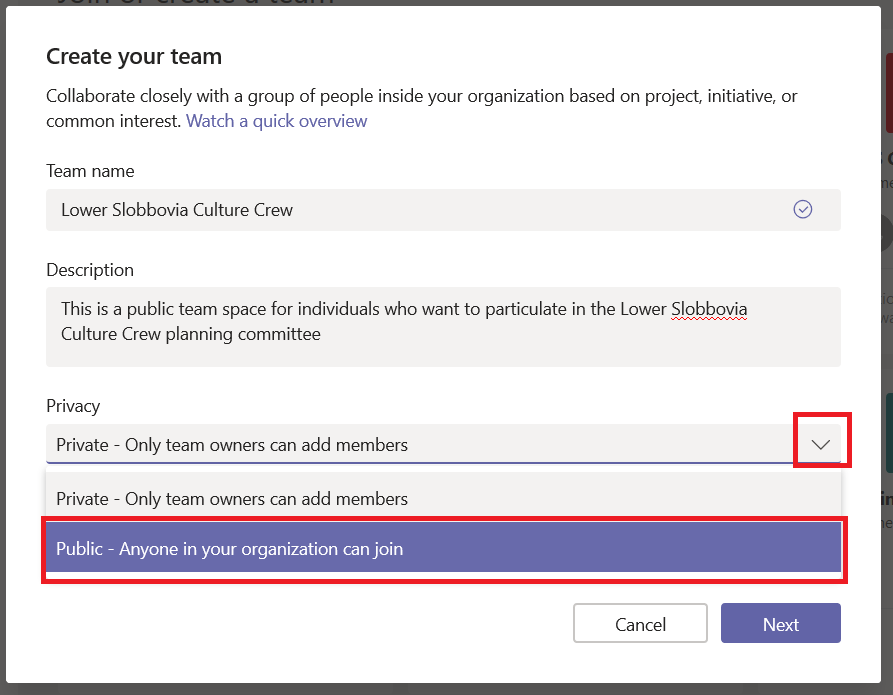
Provide a team name and description so potential members know it’s something that interests them. Now under “Privacy”, click the down arrow and select “Public – Anyone in your organization can join”.

Click Next. You can start your team by adding some members, or you can click “Skip” and let members add themselves. Voila, you’ve got a public team. (Well, give it a few minutes … there’s some background magic that needs to complete). When people click “Join or create a team”, your team will show up in the Team gallery (they may need to search for it – and as of 25 October 2018 it’s a “begins with” search … so Slobbovia will not find my team, but “Lower” or “Lower Slobbovia” will). As soon as they click “Join team”, they will be added as a member of your team.


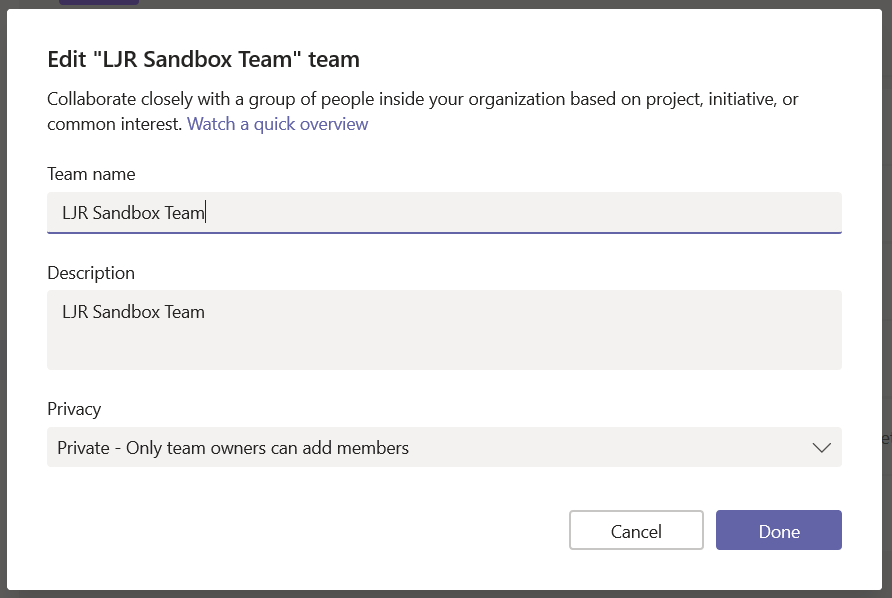
What if you don’t want your team to be that public? Say we only want people who actually work in East Slobbovia to join up. Then leave the Privacy setting at “Private – Only team owners can add members”. This means your new Team won’t appear on the “Create or join a team” Team list …

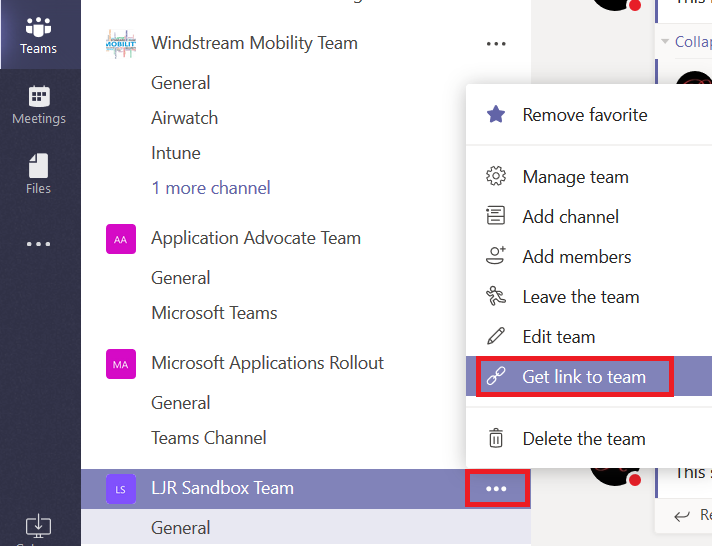
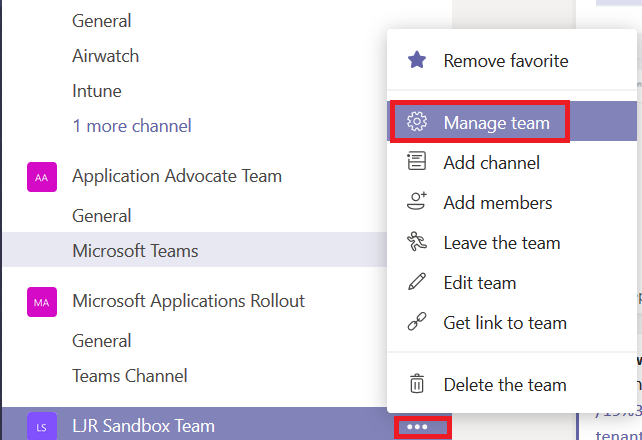
From the hamburger menu next to the team name, select “Get link to team”

The URL will be displayed in a new pane – click “Copy” and you’ll have the URL in your clipboard.

Publicize your URL — you could post it to Stream, have the link included in a local newsletter message, e-mail it to potential Team members … however you let people know about the URL. When someone follows the URL, a membership request will appear on the Team. From the hamburger menu next to the team name, select “Manage team”

Click on the “Pending Requests” tab

You’ll see, well, the pending requests. Click accept to add the person to your team, or click deny if you prefer.

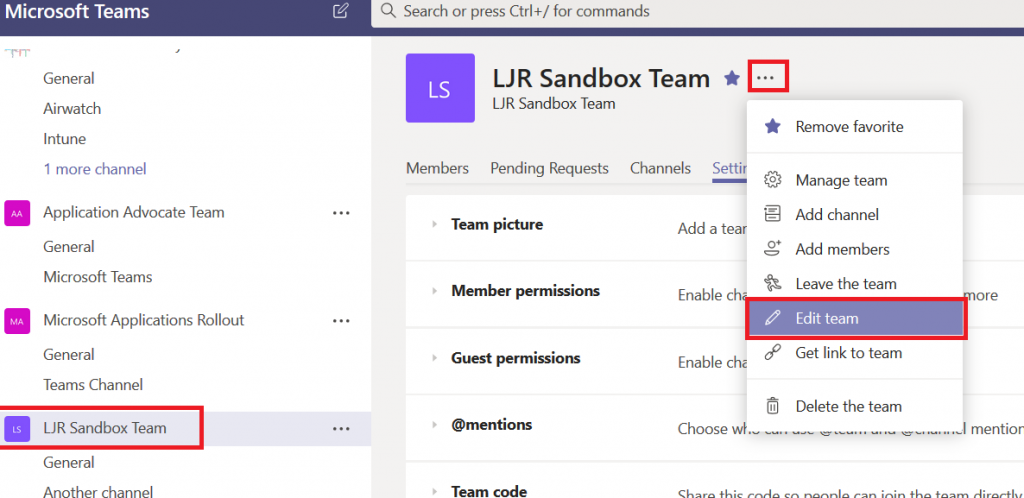
Changing the settings – If you change your mind, that’s OK too. In your Teams list, click on the Team itself (not the hamburger menu next to it, and not one of the channels under it. Then click on the hamburger menu next to the team name in the right-hand pane. Select “Edit team”.

You can change the privacy settings and click “Done”

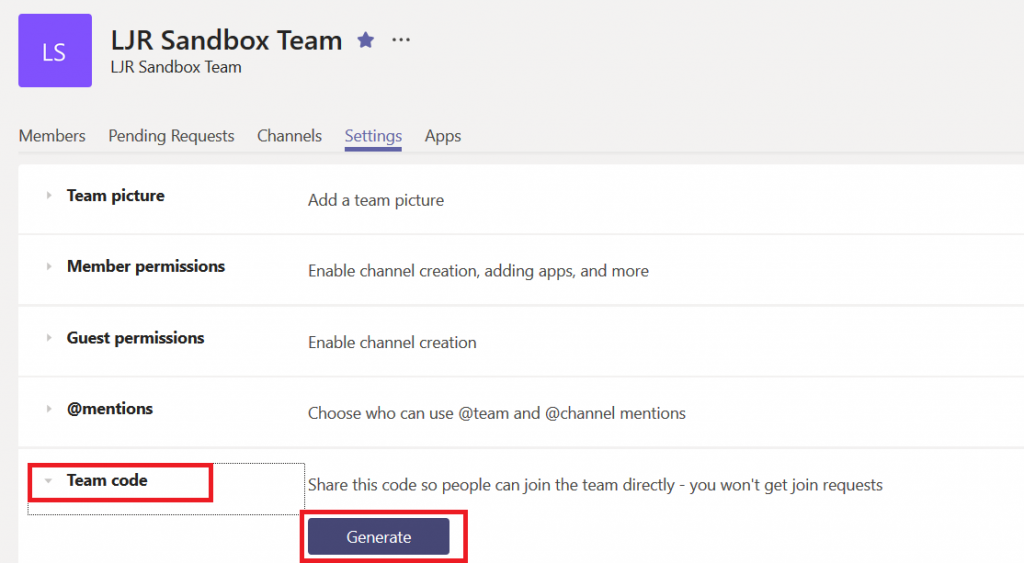
Bonus option … for those of you who have stuck with me this far! You can create a code for your team that allows invited individuals to join the team without waiting for your approval. Click the hamburger menu next to the team name and select “Manage Team”. On the “Settings” tab, expand the “Team code” section. Click “Generate”

Now there’s a code associated with your team.

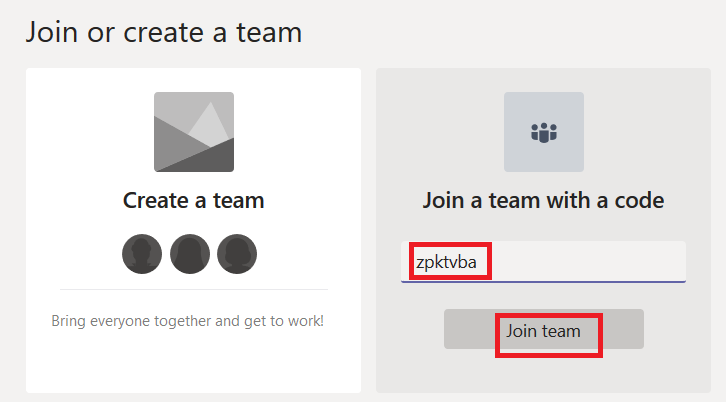
Individuals who have the code can go to the Teams gallery and enter the code in the tile that says “Join a team with a code”

Open Password Filter (OPF) Detailed Overview

When we began allowing users to initiate password changes in Active Directory and feed those passwords into the identity management system (IDM), it was imperative that the passwords set in AD comply with the IDM password policy. Otherwise passwords were set in AD that were not set in the IDM system or other downstream managed directories. Microsoft does not have a password policy that allows the same level of control as the Oracle IDM (OIDM) policy, however password changes can be passed to DLL programs for farther evaluation (or, as in the case of the hook that forwards passwords to OIDM – the DLL can just return TRUE to accept the password but do something completely different with the password like send it along to an external system). Search for secmgmt “password filters” (https://msdn.microsoft.com/en-us/library/windows/desktop/ms721882(v=vs.85).aspx) for details from Microsoft.

LSA makes three different API calls to all of the DLLs listed in the NotificationPackages registry hive. First, InitializeChangeNotify(void) is called when LSA loads. The only reasonable answer to this call is “true” as it advises LSA that your filter is online and functional.

When a user attempts to change their password, LSA calls PasswordFilter(PUNICODE_STRING AccountName, PUNICODE_STRING FullName, PUNICODE_STRING Password, BOOLEAN SetOperation) — this is the mechanism we use to enforce a custom password policy. The response to a PasswordFilter call determines if the password is deemed acceptable.

Finally, when a password change is committed to the directory, LSA calls PasswordChangeNotify(PUNICODE_STRING UserName, ULONG RelativeId, PUNICODE_STRING NewPassword) — this is the call that should be used to synchronize passwords into remote systems (as an example, the Oracle DLL that is used to send AD-initiated password changes into OIDM). In our password filter, the function just returns ‘0’ because we don’t need to do anything with the password once it has been committed.

Our password filter is based on the Open Password Filter project at (https://github.com/jephthai/OpenPasswordFilter). The communication between the DLL and the service is changed to use localhost (127.0.0.1). The DLL accepts the password on failure (this is a point of discussion for each implementation to ensure you get the behaviour you want). In the event of a service failure, non-compliant passwords are accepted by Active Directory. It is thus possible for workstation-initiated password changes to get rejected by the IDM system. The user would then have one password in Active Directory and their old password will remain in all of the other connected systems (additionally, their IDM password expiry date would not advance, so they’d continue to receive notification of their pending password expiry).
While the DLL has access to the user ID and password, only the password is passed to the service. This means a potential compromise of the service (obtaining a memory dump, for example) will yield only passwords. If the password change occurred at an off time and there’s only one password changed in that timeframe, it may be possible to correlate the password to a user ID (although if someone is able to stack trace or grab memory dumps from our domain controller … we’ve got bigger problems!

The service which performs the filtering has been modified to search the proposed password for any word contained in a text file as a substring. If the case insensitive banned string appears anywhere within the proposed password, the password is rejected and the user gets an error indicating that the password does not meet the password complexity requirements.

Other password requirements (character length, character composition, cannot contain UID, cannot contain given name or surname) are implemented through the normal Microsoft password complexity requirements. This service is purely analyzing the proposed password for case insensitive matches of any string within the dictionary file.

Did you know … you can send e-mail to a Microsoft Teams channel?

Why would you send an e-mail to a Microsoft Teams channel? That’s a good question! At first, e-mailing a Team channel sounds like a solution in search of a problem. I think of it as moving an e-mail discussion into Teams. And there are a lot of times when an e-mail thread can be more efficiently handled in Teams.

Attachments that are being updated and resent – you know, the documents where there are five different working copies with various people’s changes and now someone must condense those changes into a single document. Including the document in the Team space allows team members to collaboratively edit it online. One copy! Having the discussion history available in Teams avoids switching between e-mail and Teams as the document is developed.

“I forwarded this to five people, and here’s what they think” – When a message gets forwarded and you’ve got three different sets of recipients discussing the same issue – or if someone keeps going back to an older message and dropping a few recipients who were added late in the discussion – moving the discussion into Teams ensures all of the people who should be involved in the discussion are included and working together – not a person from one of the threads trying to update everyone on a separate thread.

“Hey, Sean, can you forward me that hour-by-hour for this weekend?” – Ever have to ask a coworker to forward some message that you’ve misplaced (probably deleted, but cannot seem to find there either). The Teams threads are persistent (I cannot accidentally delete your message) and searchable.

The new guy – an involved discussion may take months. When a new person joins your group, someone has to remember to include them on the next reply-all (even adding an existing employee to a thread, they get lost when someone else replies to an older message). By moving involved discussions into Teams, you can quickly add a new person to the discussion.

There are also cases where Teams could replace a shared group mailbox – you cannot receive messages from outside of the company, but if your group mailbox only gets messages from other Windstream mailboxes … Teams may be a good replacement for that group mailbox. Team members can post into the thread taking ownership of the request – everyone will see who claimed the request, and if someone is unexpectedly out of office, you can see the issues on which they were working.

Ok, ok … you convinced me! Sending an e-mail into a Teams channel isn’t a completely pointless feature. So how do I do it?

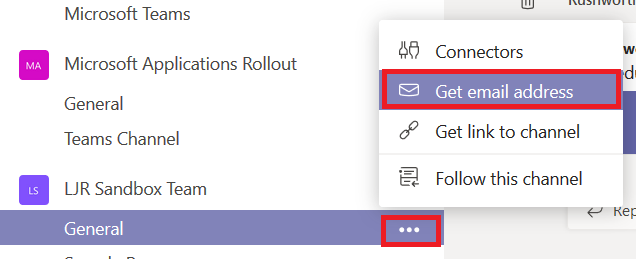
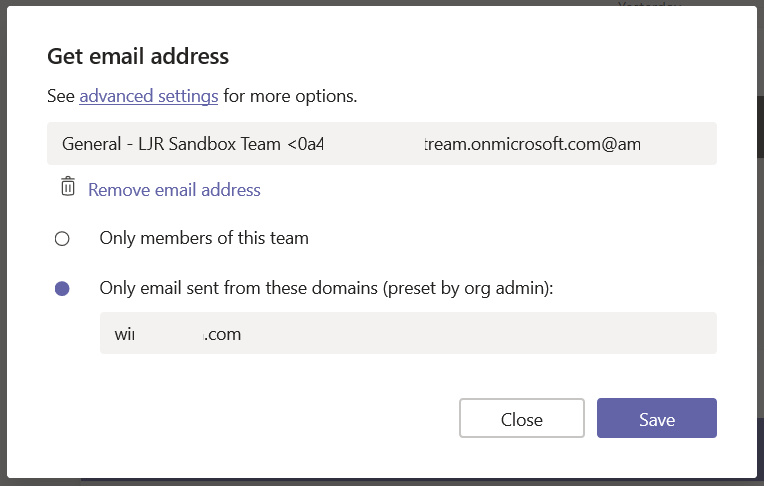
First, you need to know the e-mail address associated with the channel. Click on the hamburger menu next to the channel name and select “Get email address”

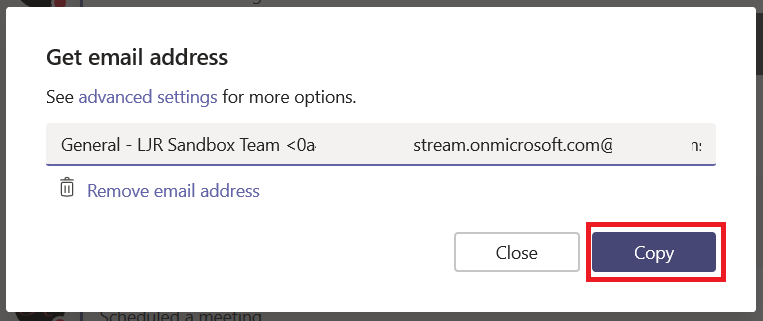
There you have it – you can click “Copy” and all of that text will be in your clipboard.

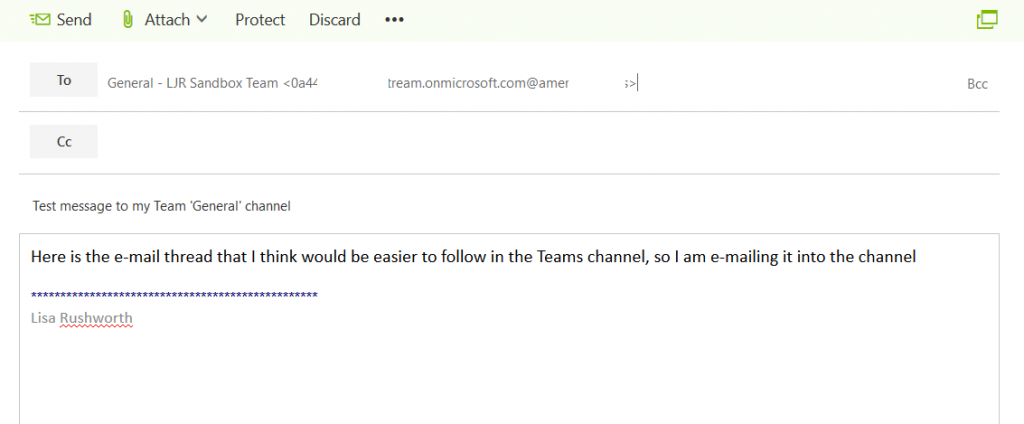
Paste the address into the “to” field of an e-mail message, then send the message.

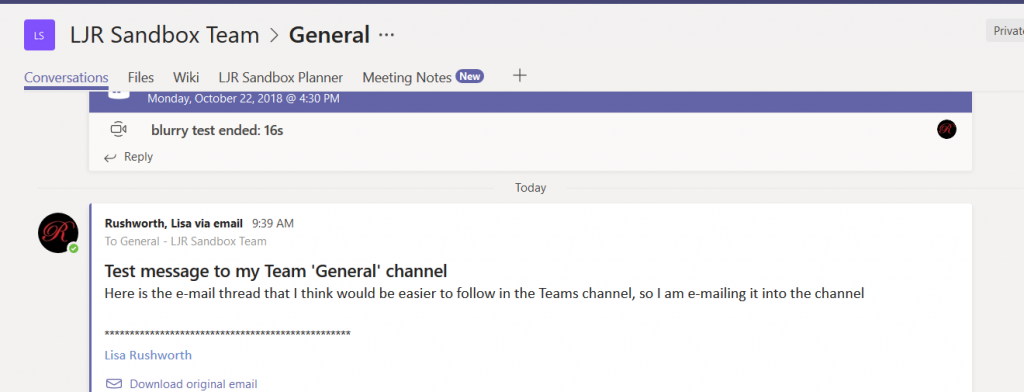
Wait for it … this may take a minute … and the message will appear as a thread in the channel.

If the message includes an attachment, that attachment will be displayed in the thread. You can even edit the document online – in Teams or in Word Online.

The default setting for Channels is to accept e-mail messages from the windstream.com domain – this may be exactly what you want. You can send the address to individuals outside of your team and allow them to create threads without having to grant them access to your Team space. But you may not want that – go back to that pane where you got the channel e-mail address. Click to “See advanced settings for more options” – you can set the channel to accept messages only from Team members:

Think it’s kind of crazy that every Team member can adjust these settings? Vote for my idea on the Teams UserVoice site 🙂

Did you know … you can quickly start a web meeting from within a Microsoft Teams channel discussion?

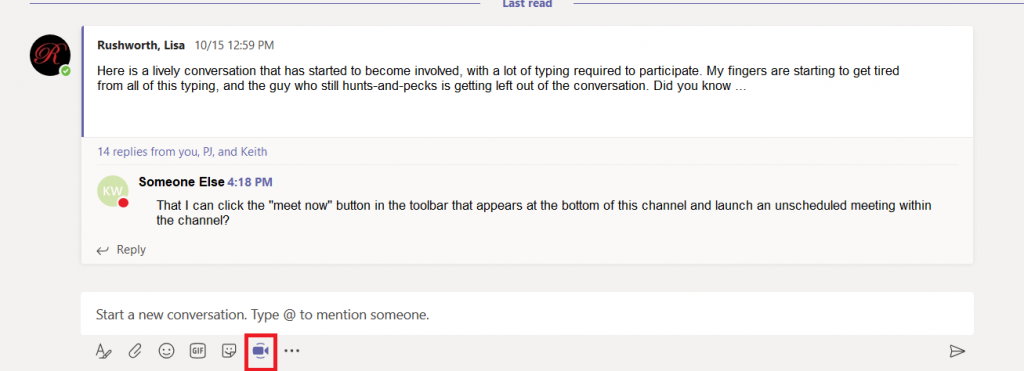
Sometimes text conversations become cumbersome – a topic really takes off, and there’s a lot of typing. A LOT of typing! Sometimes it’s easier to just take a few minutes and talk about the subject instead of typing back and forth. In Microsoft Teams, just click the “Meet now” icon at the bottom of the channel.

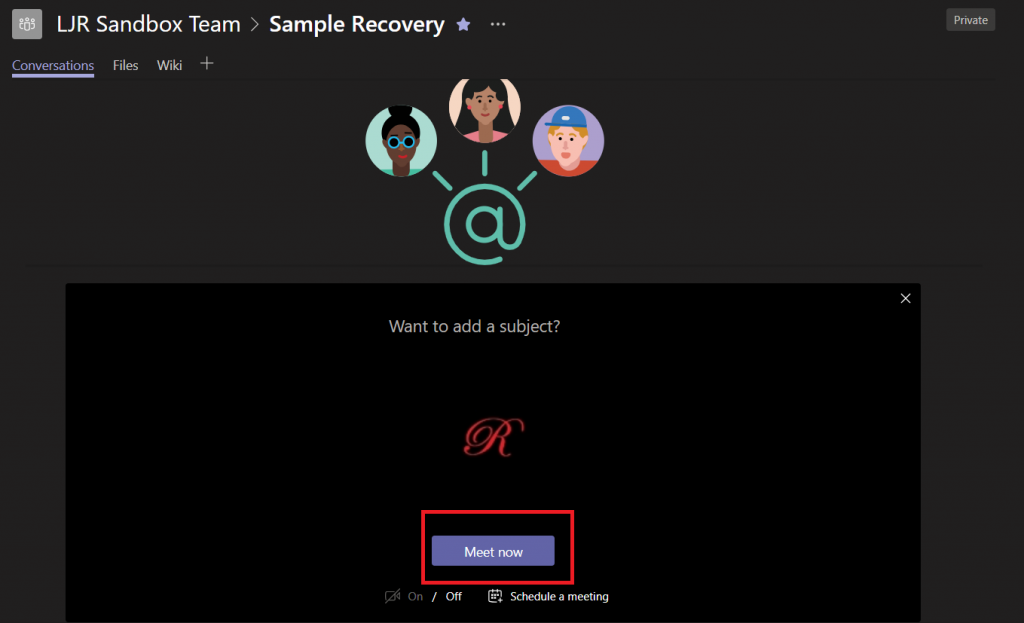
This will bring up a page that lets you start an unscheduled meeting (or schedule a meeting, if people aren’t available right now to discuss the subject). You can add a subject so attendees know which thread you want to discuss. Click “Meet now” and …

Voila – you’ve started a meeting with audio (and video, if participants choose).

Did you know … that you can recover a deleted Teams channel?

Oh no, I didn’t mean to delete THAT!!! Sure, it asked me five times if I was sure that I was sure … and maybe that’s part of the problem – I see so many “are you sure” messages that I click OK a little too easily. Well, they say to err is human. And I must be exceptionally human ? Sometimes recovering my data requires a sheepish call to the Help Desk. But did you know you can recover deleted Teams channels?

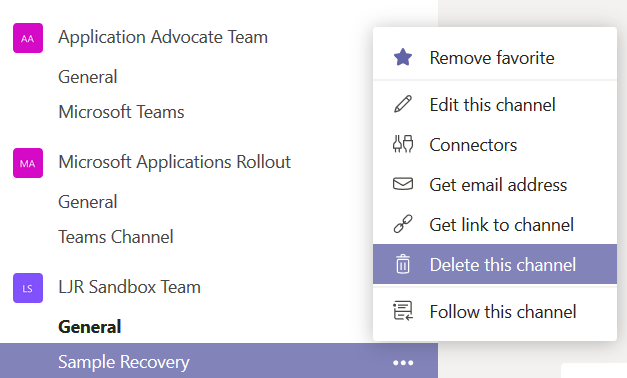
I used the hamburger menu next to a channel to delete it. Oops!

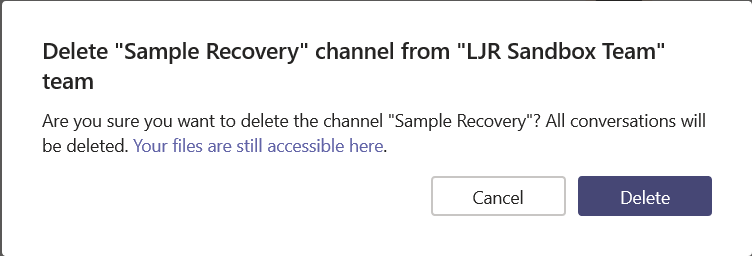
I even read the first few words of the “are you sure” dialogue before clicking the “Delete” button. Except … oops! I didn’t want to delete that channel!

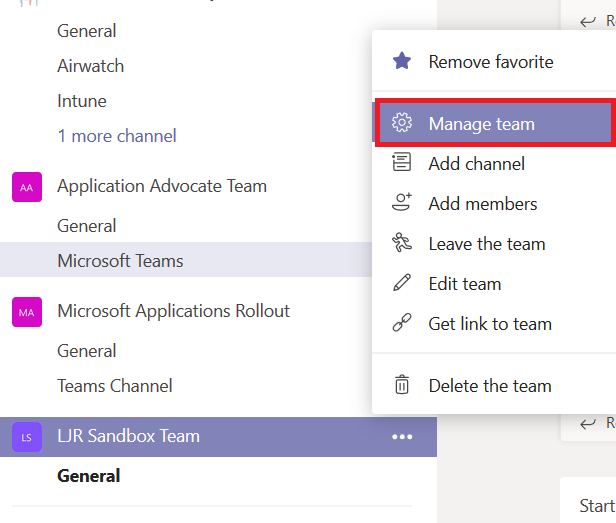
You can recover the channel immediately, all by yourself. Even if you’re not a team owner. From the hamburger menu next to the team, select “Manage team”.

On the Team management page, select “Channels”. You can expand “Deleted” and see the channel you just removed. Click “Restore”

Yet another prompt … click “Restore” again.

Voila, the channel is back. Along with all its content. Whew!

Just because channel recovery is self-service doesn’t mean no one will know that you’ve mis-clicked. The channel deletion event which appears in the “General” channel … well, it’s still there. You can up-vote a request for enhancement on Microsoft’s site … but it’s not like no one will every know about your mistake.  

Do you know … Teams Activity View?


The very first icon on the left-hand navigation menu, “Activity”, isn’t just a listing of all unread Teams activity. This view provides a customized view of important Teams communications, allowing you to focus on the most important communication first. 

This isn’t a list of every thing that has been posted to every one of your Teams spaces. It doesn’t even include chat messages sent to you –new chat messages will show up as a red circle with a message count on the“Chat” view icon.

So what shows up in the Activity feed? Missed calls – missed calls are only displayed in your Activity feed. Clicking on the entry will display a chat with the caller; you can reply with a chat message or click the phone icon to return their call.

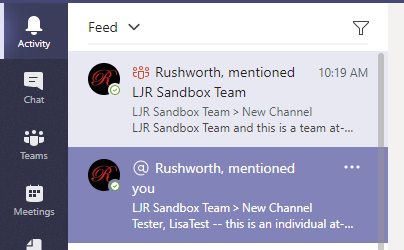
Posts with @mentions – both your individual mentions and mentions for Teams of which you are a member – will appear in the Activity feed.

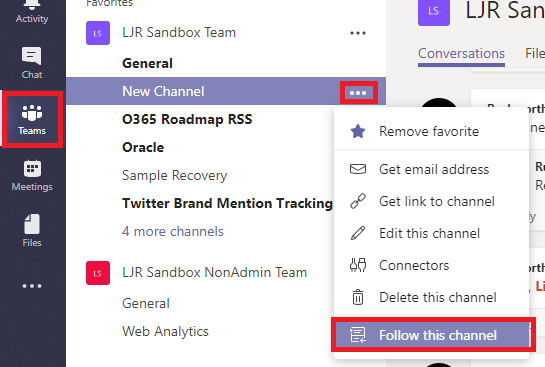
Beyond that, you control what appears in your feed. Posts to channels you follow will appear in your feed. To follow a channel, click the“Teams” icon. Click the not-quite-a hamburger menu next to the channel name and select “Follow channel”.

When messages are posted to the channel, you’ll see a red circle with the number 1. This indicates that there is one thread with unread post(s). There may be a bunch of replies in that thread, but the thread is only counted once. This doesn’t mean replies won’t be highlighted – if someone replies to a thread you’ve already read, that thread will again be counted as a thread with unread post(s).

You can click on an entry to display the specific thread. Clicking on a reply will focus on the reply – which helps identify what part of the thread you haven’t seen.

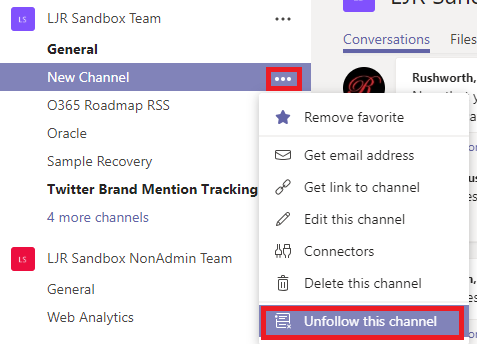
If a channel becomes prolific and irrelevant to you, you can simply stop following the channel. Click the not-quite-a hamburger menu next to the channel name and select “Unfollow this channel”. Anything from the channel in your feed will remain there, but new activity in the channel will cease appearing in your Activity feed.

In addition to a feed of activity from other individuals, you can use the activity feed like the “Sent Items” in your mailbox. Click the inverted caret next to “Feed” and select “My Activity”. You’ll see two weeks of your Teams posts.

Did you know … You can control what members of a Microsoft Team group can do within the team?

When you create a new Team, members can create new channels, delete channels, add apps … they can do a lot of things. Did you know much of that is configurable? You can create a Team where individuals receive but cannot respond to posts. You can restrict your Team so only owners can remove channels.

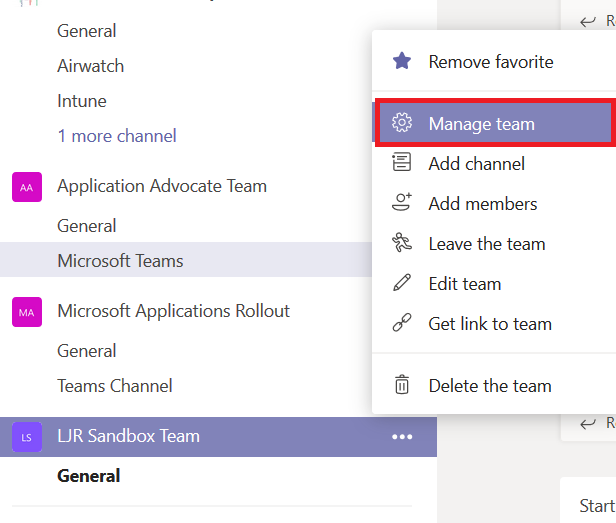
From the hamburger menu next to your Team, select “Manage team”

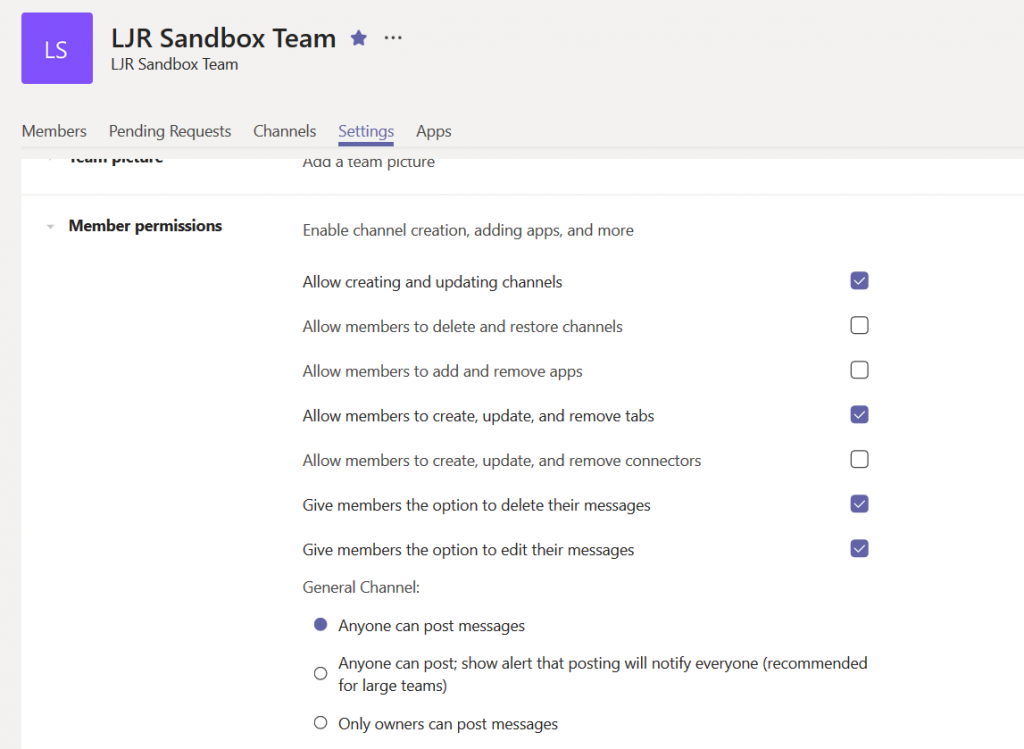
On the Team management page, select the “Settings” tab.

Expand the “Member permissions” section. Now uncheck any permission you want to restrict to Team owners. There’s even a radio button near the bottom of this section so only Team owners can post to the “General” channel (if that’s the only channel, and members are prohibited from creating their own channels, you’ve got a broadcast-only Team space)

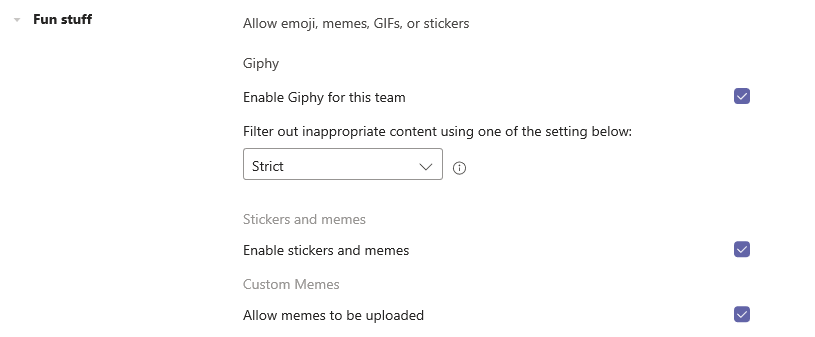
Scroll down and expand “Fun stuff” … you can prevent Gliphy content from being used in the Team (or change the filter used to determine which Gliphy content is appropriate), disable stickers, and disable memes.