Author: Lisa

Persisting Port Names For OpenHAB

If you only have one device connected to your Linux box, your controller may well always be assigned the same port when the system is rebooted. In the real world, multiple connected devices make this unlikely. We use udev rules to create symlinks used within the OpenHAB configuration. The udev rule essentially uses attributes of the device to identify the real port and creates a statically named symlink to that port on boot. So the first thing you need to identify is something unique about the device. We have several video capture cards and a Z-Wave/ZigBee combo controller attached to our server. If you do not have udevinfo, you can use lsusb to find details about the device. First list the devices, then identify the proper one and use the -d switch with the ????:???? formatted ID number. The -v switch outputs verbose information. Find a unique attribute or set of attributes that create a unique identifier. In this case, the interface name is unique and we can stop there.

[lisa@server ~]#  lsusb
Bus 001 Device 004: ID 0bda:0111 Realtek Semiconductor Corp. RTS5111 Card Reader Controller
Bus 001 Device 003: ID 1058:1230 Western Digital Technologies, Inc. My Book (WDBFJK0030HBK)
Bus 001 Device 001: ID 1d6b:0002 Linux Foundation 2.0 root hub
Bus 002 Device 002: ID 10c4:8a2a Cygnal Integrated Products, Inc.
Bus 002 Device 001: ID 1d6b:0001 Linux Foundation 1.1 root hub
[lisa@server ~]# lsusb -d 10c4:8a2a -v
Bus 002 Device 002: ID 10c4:8a2a Cygnal Integrated Products, Inc.
Device Descriptor:
 bLength 18
 bDescriptorType 1
 bcdUSB 2.00
 bDeviceClass 0
 bDeviceSubClass 0
 bDeviceProtocol 0
 bMaxPacketSize0 64
 idVendor 0x10c4 Cygnal Integrated Products, Inc.
 idProduct 0x8a2a
 bcdDevice 1.00
 iManufacturer 1 Silicon Labs
 iProduct 2 HubZ Smart Home Controller
 iSerial 5 90F0016B
 bNumConfigurations 1
 Configuration Descriptor:
 bLength 9
 bDescriptorType 2
 wTotalLength 55
 bNumInterfaces 2
 bConfigurationValue 1
 iConfiguration 0
 bmAttributes 0x80
 (Bus Powered)
 MaxPower 100mA
 Interface Descriptor:
 bLength 9
 bDescriptorType 4
 bInterfaceNumber 0
 bAlternateSetting 0
 bNumEndpoints 2
 bInterfaceClass 255 Vendor Specific Class
 bInterfaceSubClass 0
 bInterfaceProtocol 0
 iInterface 3 HubZ Z-Wave Com Port
 Endpoint Descriptor:
 bLength 7
 bDescriptorType 5
 bEndpointAddress 0x81 EP 1 IN
 bmAttributes 2
 Transfer Type Bulk
 Synch Type None
 Usage Type Data
 wMaxPacketSize 0x0040 1x 64 bytes
 bInterval 0
 Endpoint Descriptor:
 bLength 7
 bDescriptorType 5
 bEndpointAddress 0x01 EP 1 OUT
 bmAttributes 2
 Transfer Type Bulk
 Synch Type None
 Usage Type Data
 wMaxPacketSize 0x0040 1x 64 bytes
 bInterval 0
 Interface Descriptor:
 bLength 9
 bDescriptorType 4
 bInterfaceNumber 1
 bAlternateSetting 0
 bNumEndpoints 2
 bInterfaceClass 255 Vendor Specific Class
 bInterfaceSubClass 0
 bInterfaceProtocol 0
 iInterface 4 HubZ ZigBee Com Port
 Endpoint Descriptor:
 bLength 7
 bDescriptorType 5
 bEndpointAddress 0x82 EP 2 IN
 bmAttributes 2
 Transfer Type Bulk
 Synch Type None
 Usage Type Data
 wMaxPacketSize 0x0020 1x 32 bytes
 bInterval 0
 Endpoint Descriptor:
 bLength 7
 bDescriptorType 5
 bEndpointAddress 0x02 EP 2 OUT
 bmAttributes 2
 Transfer Type Bulk
 Synch Type None
 Usage Type Data
 wMaxPacketSize 0x0020 1x 32 bytes
 bInterval 0

We then need to create a file under /etc/udev/rules.d. The file name begins with a number that is used for a load order – I generally number my custom files 99 to avoid interfering with system operations. The bit in “ATTRS” is the attribute name and value to match. The KERNEL section contains the search domain (i.e. look at all of the ttyUSB### devices and find ones where the interface is this). The symlink bit is the name you want to use (more on this later). Set the group and mode to ensure OpenHAB is able to use the symlink.

[lisa@server rules.d]# cat 99-server.rules
KERNEL=="ttyUSB[0-9]*", ATTRS{interface}=="HubZ Z-Wave Com Port", SYMLINK+="ttyUSB-5", GROUP="dialout", MODE="0666"
KERNEL=="ttyUSB[0-9]*", ATTRS{interface}=="HubZ ZigBee Com Port", SYMLINK+="ttyUSB-55", GROUP="dialout", MODE="0666"

The symlink name can be anything – when I created udev rules for our video capture cards, I named them something immediately obvious: video-hauppauge250 is the Hauppauge 250 card. Tried to do the same thing here, naming the ports controller-zigbee; while the symlink appeared and had the expected ownership and permissions … OpenHAB couldn’t use it.

Turns out there’s a nuance to Java RxTx where non-standard port names need to be accommodated in the java options. So I could have added -Dgnu.io.rxtxSerialPorts=/dev/controller-zigbee and -Dgnu.io.rxtxSerialPorts=/dev/controller-zwave to the OpenHAB startup and been OK (in theory), it was far easier to name the symlinks using the Linux standard conventions. Hence I have symlinks named ttyUSBsomethingsomethingsomething. 

SAN Certificates From OpenSSL CA

For some reason, I had to combine three different sets of instructions to get a SAN added to my certificate. Getting the SAN into the request was easy enough … but actually carrying the extension through to the signed certificate was a significant challenge. There may be unnecessary changes in my custom config file, but this process worked. 

cp /etc/pki/tls/openssl.cnf ./myssl.cnf

Edit the copied file (i.e. don’t change your OpenSSL default config)
# Uncomment:
copy_extensions = copy
# Uncomment:
req_extensions = v3_req # The extensions to add to a certificate request


# Add:
[ req_ext ]
subjectAltName = @alt_names

[ alt_names ]
DNS.1 = exchange01.rushworth.us
DNS.2 = exchange01


Save the file and we’re ready to create a certificate. Make a key

openssl genrsa -aes256 -out exchange01.rushworth.us.key 2048

Then create the cert request using the copied config file. Include the -reqexts option with value of the section of your custom file that includes subjectAltName (e.g. it is called req_ext in my cnf file, so I used -reqexts req_ext)
openssl req -new -key exchange01.rushworth.us.key -config ./myssl.cnf -reqexts req_ext -out exchange01.rushworth.us.csr

Sign the request against your CA – again using the custom config file and req_ext extensions
openssl x509 -req -in exchange01.rushworth.us.csr -extensions req_ext -extfile ./myssl.cnf -out exchange01.rushworth.us.cer -days 365 -CA /ca/ca.cer -CAkey /ca/ca.key -sha256

Before doing anything else, verify that your SAN values are in the certificate

[lisa@linux02]# openssl x509 -in exchange01.rushworth.us.cer -text | grep -A1 Alternative
X509v3 Subject Alternative Name:
DNS:exchange01.rushworth.us, DNS:exchange01

If you are using the certificate in something that understands PEM nodes, you are set. If you are trying to get a certificate for a Windows server, create a PFX export of the public/private key pair and then import the PFX to your computer’s personal certificate store.

openssl pkcs12 -export -out exchange01.rushworth.us.pfx -inkey exchange01.rushworth.us.key -in exchange01.rushworth.us.cer

OpenSSL As A Trusted CA

There are wrappers for OpenSSL that provide certificate authority functionality, but I found myself spending a lot of time trying to get any to work. Since I only wanted to generate a few internal certificates (i.e. not something that needed a simple interface for non-techies), so I set up an OpenSSL certificate authority and used it to sign certificates.

First, generate a public/private keypair for your CA (use however many days you want, this is ten years:

openssl genrsa -aes256 -out ca.key 2048
openssl req -new -x509 -key ca.key -out ca.cer -days 3652 -sha256

Take ca.cer and publish it in our domain GPO as a trusted root certificate authority (Computer Configuration => Policies => Windows Settings => Security Settings => Public Key Policies => Trusted Root Certification Authorities)

If you are impatient, force client to update GPO. Otherwise wait. Eventually you will see your CA in the Windows computer’s certificate store as a trusted root certification authority.

Now generate certificate(s) against the CA (again use whatever value for days is reasonable for your purpose):

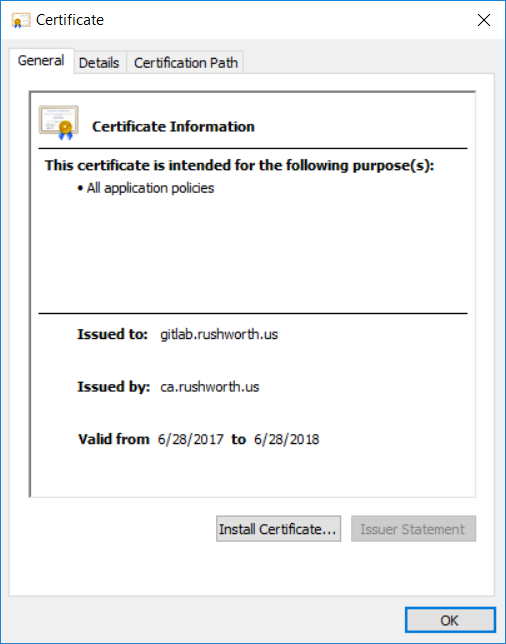
openssl genrsa -aes256 -out gitlab.rushworth.us.key 2048
openssl req -new -key gitlab.rushworth.us.key -out gitlab.rushworth.us.req
openssl x509 -req -in gitlab.rushworth.us.req -out gitlab.rushworth.us.cer -days 365 -CA /ca/ca.cer -CAkey /ca/ca.key -sha256 -CAcreateserial

On subsequent requests, you can omit the “-CAcreateserial” option.

In domain clients will trust your certificate. Non-domain clients will need to import the CA public key to their trust store.

Git Deployment

I ‘inherited’ the Git server at work — which means I had to learn how the back end component of Git works (beyond my file-system based implementation where there are just clients and a disk location). It is not as complicated as I feared. The chap who had deployed the Git backend at work chose Bonobo — since he no longer works for the company, I cannot just ask why this particular implementation. It’s Windows based and priced in our 0$ budget, and I am certain these were selling points. It seems quite stripped down compared to GitHub too — none of the issue tracking / Wiki / chat about it features. Which, for what my department does, is fine. We are not software developers. We have a lot of internal code for task automation, we have some internal code for departmental web sites, and we have some sample code we hand out to other developers (i.e. someone wants to start using LDAP or ADFS authentication, we can give them a sample implementation in their language). There aren’t feature requests. Generally speaking, there aren’t simultaneous development tasks on a project.

Since I deciphered the server implementation at work, I wanted to set up a Git server at home too. The limited feature set of Bonobo was off-putting. I wanted integrated issue tracking. Looking at the available opensource and free options, I selected GitLab. As a sandbox — poke around the server, see how it works and what features it offers — I wanted something ready-to-go. I noticed that there is a Docker container for the project. I helped a few friends who were testing Docker as a development and deployment methodology (I’ve even suggested it for my employer’s internal development staff … being able to develop and run an application with an integrated web server *without* needing the Windows permissions and configuration for a web server (and doing it all over again when your computer is replaced) seemed efficient. But I’d never actually used a Docker container before. It is incredibly easy.

Install docker — a bit obvious, but that was the most time consuming part of the process. I elected to install it on my Windows laptop for expediency. If we decide not to use GitLab, I haven’t thrown a bunch of unnecessary binaries on the server. Lenovo, as a default, does not enable virtualisation. Getting into the BIOS config tool (shift then click the power button, keep holding shift whilst you click restart) was the most time consuming bit of the installation.

Once Docker is installed, pull the container from the Docker store (docker pull gitlab/gitlab-ce). Then run it (docker run –detach –hostname gitlab.rushworth.us –publish 443:443 –publish 80:80 –publish 22:22 –name gitlab –restart always –volume /srv/gitlab/config://c/gldata/etc –volume /srv/gitlab/logs:/var/log/gitlab –volume /srv/gitlab/data://c/gldata/data –volume /svr/docker/gitlab/gitlab://c/gldata/gitlab gitlab/gitlab-ce:latest). You can remap ports (e.g. publish 8443:443) if needed.

Not quite there yet — you’ve got to edit the container config (docker exec -it gitlab vi /etc/gitlab/gitlab.rb) for your environment. Set a valid external url (external_url ‘http://gitlab.rushworth.us’). I also enabled LDAP authentication to test that out.


gitlab_rails[‘ldap_enabled’] = true

###! **remember to close this block with ‘EOS’ below**
gitlab_rails[‘ldap_servers’] = YAML.load <<-‘EOS’
main: # ‘main’ is the GitLab ‘provider ID’ of this LDAP server
label: ‘LDAP’
host: ‘ADHostname.rushworth.us’
port: 636
uid: ‘sAMAccountName’
method: ‘ssl’ # “tls” or “ssl” or “plain”
bind_dn: ‘cn=UserID,ou=SystemAccounts,dc=domain,dc=ccTLD’
password: ‘AccountPasswordGoesHere’
active_directory: true
allow_username_or_email_login: false
block_auto_created_users: false
base: ‘ou=ResourceUsers,dc=domain,dc=ccTLD’
user_filter: ‘(&(sAMAccountName=*))’ # Can add attribute value to restrict authorized users to GitLab access, we leave open to all valid user accounts in the OU. Should be able to authorize based on group membership using linked attribute value like (&(memberOf=cn=group,ou=groupOU,dc=domain,dc=ccTLD))
attributes:
username: [‘uid’, ‘userid’, ‘sAMAccountName’]
email: [‘mail’, ’email’, ‘userPrincipalName’]
name: ‘cn’
first_name: ‘givenName’
last_name: ‘sn’

EOS


The default is to retain a lot of log files — 30 days! This might be reasonable in a corporate environment, but even for production at home … that’s a lot of space dedicated to log files.


logging[‘logrotate_frequency’] = “daily” # rotate logs daily
logging[‘logrotate_rotate’] = 3 # keep 3 rotated logs
logging[‘logrotate_compress’] = “compress” # see ‘man logrotate’
logging[‘logrotate_method’] = “copytruncate” # see ‘man logrotate’


And finally configure SMTP for outbound mail. We don’t use authentication on our SMTP server; it controls relay based on source IP. We do use starttls, but the certificate is not going to be trusted without additional configuration … so I set the ssl verify mode to none.


gitlab_rails[‘smtp_enable’] = true
gitlab_rails[‘smtp_address’] = “smtp.hostname.ccTLD”
gitlab_rails[‘smtp_port’] = 25
# gitlab_rails[‘smtp_user_name’] = “smtp user”
# gitlab_rails[‘smtp_password’] = “smtp password”
# gitlab_rails[‘smtp_domain’] = “example.com”
# gitlab_rails[‘smtp_authentication’] = “login”
gitlab_rails[‘smtp_enable_starttls_auto’] = true
# gitlab_rails[‘smtp_tls’] = false

###! **Can be: ‘none’, ‘peer’, ‘client_once’, ‘fail_if_no_peer_cert’**
###! Docs: http://api.rubyonrails.org/classes/ActionMailer/Base.html
gitlab_rails[‘smtp_openssl_verify_mode’] = ‘none’


Once the config has been updated, restart the container (docker restart gitlab).

Access the web site and you’ll be prompted to set a password for the admin user, root. You can click the ‘ldap’ tab and log in with Active Directory credentials. Fin.

If we deploy this for a production system, I would set up SSL on the web site and possibly externalize the GitLab database to MySQL. The external database is more of an academic experiment because we already use MySQL (and I still don’t want  to learn about vacuuming PostgreSQL).

Soap Swirls!

I have tried many times to get swirls in soap. What I’ve actually gotten is halfway seized blobs of colour. Still works, still smells nice … but it doesn’t look like the pretty soaps I see online.

Everything I’ve read says to mix the components to a light trace so it won’t seize before you get it poured and swirled. Many attempts later, I have swirls! Two tricks — I mixed the essential oil into the oil before adding lye. Adding the EO after the oil:lye is mixed was just too much mixing. I also used more water than the normal 2:1 water to lye ratio.

Added the lye water to the oil/EO mixture and used the stick blender until it was just combined. There were no longer oil spots floating on top, the entire mixture was a homogeneous colour. I split the soap into two pots and stirred in the clay with a tiny whisk. At this point, I still had REALLY runny soap.

I used a modified column pour technique — a rounded cup in the middle of a large mold. This made concentric rings of colour. I then used a very thin wooden dowel / gigantic toothpick that was used in a sandwich at a local restaurant and dragged lines from the perimeter of the mold into the center. The shape held! Popped the whole thing in the oven with the light on and let it sit for 24 hours. Removed it from the mold and it was really soft compared to my normal recipe. That’s the extra water – it needs to cure longer. Bonus, though – it was soft enough to cut easily with a knife.


When cut into bars, there are actual swirls!

Stromboli Recipe

I made, well not quite a stromboli (as I understand it, stromboli have tomato sauce inside, and this was completely without tomato sauce). The bread part is easy enough — you can use whatever pizza dough recipe you fancy. I had purchased KAF’s Artisan Bread Flour when it was on sale a few months ago. Or their French style flour and used a traditional baguette recipe (3c flour, 1t salt, 1c or so water, and 2 1/4t yeast kneaded for a long time to make a chewy bread. Normal bread process – mix/knead, sit until doubled in bulk). For additional flavour, I added 1T of Italian spices to the flour. Once the dough has finished rising, preheat the oven to 550 F.

Take a chunk (I used about a quarter of the dough) and roll it out onto a silicone baking mat. The dough shouldn’t be too thick – somewhere around an eighth of an inch. I made very large stromboli to be cut when served, so the rectangle of dough was about 12″ x 9″. Brush the dough with roasted garlic butter (1T melted salted butter, 1-2 cloves roasted garlic)

Spread filling in the rectangle – leaving some dough on either side to fold in, some dough on the bottom to seal the thing, and a lot of dough on the top to fold over.

Fold the sides along the line shown below — this will seal the ends.

Fold the large piece of dough down to cover the filling. Then stretch the small piece of dough up over stromboli and seal it to the other piece of dough.

Place on a half sheet pan seam side down. If a glossy, crunchy crust is desired, brush with egg wash (mix an egg with a splash of water), let sit for a minute, and then brush again with egg wash. For a softer crust, brush with roasted garlic butter or butter.

Using a sharp knife or bread lame, slice five diagonal lines along the stromboli. I sliced almost completely through the dough and allowed it to split open as it baked. Bake for 10-15 minutes.

What can you put in a stromboli? Traditionally, you cover the dough with tomato sauce, sprinkle on cheese, add Italian meats, then sprinkle more cheese. I wasn’t in the mood for tomato sauce. I made two fillings – 1c ricotta cheese, 1/2c shredded sharp cheddar, and 1c shredded broccoli (this is a great way to use up broccoli stems if you have some left over from another recipe). The other filling was 1c ricotta, 1/2c shredded sharp cheddar, 1c shredded chicken, and 2 diced peaches.

Alternative Fact: Don’t Quote Me On That

Alternative Fact: Trump has tapes from his meetings with Comey (and tune in later this week to hear exciting news about them!).

Real Fact: Rationally, if Trump had something that exonerated him, he would have produced the evidence WEEKS ago. Hell, the day after Comey’s testimony would have been late but suitably theatrical. But it is a little silly to expect rational behaviour from someone who has thus far displayed nothing of the sort.

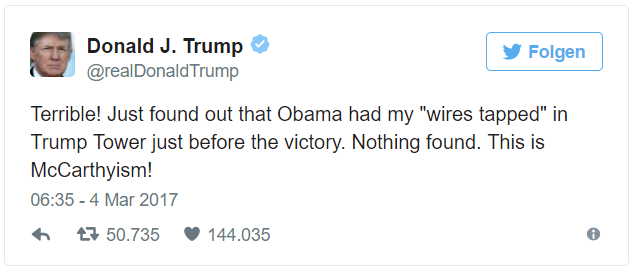
With the “but it was a ‘scare quote’ so he didn’t literally mean it” argument from March’s wire tapping bit of craziness

how can I possibly be asked to believe he has “tapes”?

Bonus real fact: It is impossible to differentiate scare quotes (the phrase in quotes is used sarcastically, ironically, or otherwise without intending the actual meaning of the word) from highlight quote (the “word” is what should be emphasized in this sentence) without prescient knowledge.

Broadcast Blackout

Seems like the White House Press Office is trialing banning audio and video recordings of their press briefings. My first thought is that this can backfire. You don’t want to give me video to go with my report, I’ll make some. They are allowed to write stuff down, right? Some agency gets a court stenographer credentialed for the briefing; Melissa McCarthy can dress up and recreate the scene for news agencies to record. Get the political cartoonist to draw the scene a la the courtroom sketches from closed proceedings. Or, hell, send the sketch artist you’ve already got on staff.


Amazon Acquisition Of Whole Foods

I don’t know why everyone is talking about Amazon Fresh expanding to a radius around every Whole Foods store. There’s not a lot of cost savings or synergy there. Amazon will use their own logistics solution to move thousands of orders to a Whole Foods distribution center and those orders ride on trucks already headed out to the Whole Foods stores. You will stop in after work / on the weekend and pick them up. Saves the expensive last-mile shipping bit (where Amazon currently has to pay money to Fedex or UPS to get a package from their distribution centre to your doorstep). And may increase Whole Foods grocery market share … if you are going there anyway to pick up your stuff, saves time getting your groceries too.