We found a free, open source code editor from Microsoft called Visual Studio Code — there are downloadable modules that include formatting for a variety of programming languages (c#, cpp, fortran), scripts (perl, php), and other useful formats like MySQL, Apache httpd config files. It also serves as a GUI front end to git. And that is something I’ve been trying to find since I inherited a git server at work — a way for people to avoid having to remember a dozen different git commands.
Category: Technology
Business Practices To Avoid
Don’t ignore your customers. Seems obvious, but failing to engage customers undermines large corporations. I worked for one of Novell’s last big customers back in 2000-2010. We had the misfortune of being in the same territory as their biggest customer, FedEx, so got little sales attention. We were having problems managing computers without using the Active Directory domain — the dynamic local user Zen component that hooked the Novell GINA and created/maintained local user accounts had been used before an NT4 domain even existed within the company. In perusing their web site, I identified a product that perfectly met our needs *and* managed mobile devices (which was an up and coming ‘thing’ at the time). Why, I asked the sales guy, would you not pitch this product to us when we tell you about the challenges we are trying to address? No good answer, but it really was a rhetorical question. There wasn’t a downloadable demo available, you had to engage your sales rep to get a working demo copy — I asked for one, and he said he’d get one to me when he got back to his office.
Nothing. Emailed him a week later in case he just forgot. Oh, yeah, I’ll get that right out to you. A few weeks later, emailed him again. A few weeks later — well, let’s be serious here. We started using Exchange in 2000, and had an Active Directory domain licensed for all users anyway. We were willing to consider paying real money for the Novell product because the migration path was easier … but from a software licensing perspective, switching workstation authentication to AD was a 0$ thing. Needed a few new servers to handle authentication traffic – I think I went with five at about three thousand dollars each. Deployment, now that’s a nightmare. I wrote custom code to re-ACL the user profile directory and modify the registry to link the new user.domain SID to the re-ACL’d old profile directory. It got pushed out via automated software deployment and the failures would call in each morning. Even a 1% failure rate when you’re doing 10,000 computers a week is a lot of phone calls and workstation re-images. (At a subsequent employer, we made the same change but placed workstations into the domain as they were re-imaged for other reasons. New computer, you’re in the domain. Big problems with your OS, you’re in the domain. Eventually we had a couple hundred computers not yet in the domain and the individual users were contacted to schedule a reimage. Much cleaner process.)
The company didn’t last much longer — they purchased SuSE not much later. The sales guys came back – we used RHEL but would have happily bundled our Linux purchases into the big million dollar contract. How much are you looking to charge for updates? Dunno. How much is support? Dunno. Do you know anything about the company’s sales plan for SuSE? Not a thing. Well … glad you could stop by? I guess.
As far as software companies go, this is ancient history. But it’s something I think of a lot when dealing with Microsoft these days. There’s a free mechanism that allows you to use your existing Active Directory to store local workstation admin account passwords. Local workstations manage their own passwords — no two passwords are the same; you can read the individual computer’s password out of AD and provide it to the end user. Expire the computer’s local admin password and next time it communicates with the domain, the password will be changed. Never heard of it from the MS sales guy – someone found LAPS through random web searching. Advanced Group Policy Management that provides auditing and versioning for group policies – not something our MS reps mentioned. Visual Studio Code – yet another find based on random web searching. I know it isn’t the sales guy’s job to tell me about every little bit of free add-on code they have created, but isn’t it in their best interest to ensure that the products that we have become an intrinsic part of our business processes? I tell our SharePoint group that all the time — there are a lot of web based content management platforms. If all you use it for is avoiding web coding … well, I’ve got WordPress that does that. Or some Atlassian wiki thing. And some Jive wiki thing. And some Xerox document repository that has web pages. You need to make something unique to your product intrinsically entwined with business oeprations so no one would ever think of replacing your product.
Setting Up A New Email Domain – With SenderID and DK/DKIM TXT Records
If you are going to begin using e-mail on a sub-domain of an existing zone, you do not need to do anything special to register the sub-domain. If this is a new domain, it needs to be publicly registered first. The examples used here-in will be a mail domain subordinate to windstream.com. If you are performing the tasks for a new zone, create the new zone first.
To allow e-mail exchange with a domain, create MX record(s). For a third party vendor, they need to tell you what their mail exchangers are. For internally hosted services, use the same assignments and weights from Windstream.com. As of 19 July 2017, those are:
windstream.com MX preference = 10, mail exchanger = dell903.windstream.com
windstream.com MX preference = 20, mail exchanger = vml905.windstream.com
windstream.com MX preference = 110, mail exchanger = neohtwnlx821.windstream.com
Within Infoblox, you need to be using the external DNS view. You can create matching records internally – we tend not to create internal MX records as it prevents internal multi-mailer infections from routing messages. In the proper zone, click Add => Record => MX Record
The mail destination will be the subzone (here we are exchanging e-mail with @ljrtest.windstream.com)
Save this change and create the other MX records. ** You need to clue the servers into the fact this domain is now valid. ** On each server, edit /etc/mail/access and add
Ljrtest.windstream.com RELAY
If you want to use the virtusertable to map addresses within the domain, you also need to add the domain name to /etc/mail/virtuser-domain
Finally, you need to send the mail somewhere. Edit /etc/mail/mailertable and set a relay destination of somewhere that knows about the domain and is processing mail for it (is that our Exchange server? Someone else’s Unix server? An acquired company’s mail server? … depends on what you are trying to do!)
rushworth.us relay:[10.5.5.85]
Save, make, and restart sendmail … now you have a fully functional external email domain.
Now secure it – that means adding sender policy framework (SPF), domain key (DK), and domain key identified mail (DKIM) records.
SPF and SenderID Records
There are both sender policy framework (v1) and SenderID (v2) records – you can create both. Not too many people use SenderID anymore, but I invariably end up finding the one guy who is evaluating mail validity purely on SenderID when I create just the SPFv1 record.
In InfoBlox, select Add => Record => TXT record. The mail destination from the MX record needs to be put in the “Name” field. Then the text value – what is that?
Quick answer is it depends. A SPF record lists all mail servers that should be sending e-mail for a domain. Is that just our MX servers? The MX servers plus the netblocks for the internal relays? Some third-party vendor?
Our MX servers and a few netblocks would be:
SPF V1: “v=spf1 mx ip4:166.150.191.128/26 ip4:98.17.202.0/23 ip4:173.186.244.0/23 ip4:65.114.230.67/32 ip4:64.196.161.5/32 ?all”
SPF V2: “spf2.0/pra mx ip4:166.150.191.128/26 ip4:98.17.202.0/23 ip4:173.186.244.0/23 ip4:65.114.230.67/32 ip4:64.196.161.5/32 ?all”
If there is a third-party vendor, they may provide an include statement for our SPF record – this is a way of referencing an external company’s SPF record within your own. You’ll see “include:mktomail.com” in our SPF records where Marketo sends mail on our behalf.
The final bit – we use ?all which means these may not be all of the servers sending mail on our behalf – we are not making an assertion beyond saying the listed sources are good. You may see vendors requesting “~all” which is a soft fail — still allows mail to pass if the sender does not match the list. The strictest is “-all” which fails mail coming from any source not in the list.
Does it matter? Depends – if a recipient has configured their mail servers to reject mail based on SPF and you use -all … mail from servers not on the list will be rejected. Not a lot of companies are thusly configured, though … so there’s not a whole lot of effective difference.
The final step is to test the SPF record. The easiest way to do so is an online SPF test site like http://tools.bevhost.com/spf/
I usually test both a host on the list and one not. The ones on the list will pass. The ones not on the list may fail (with -all) or report as neutral (?all).
DK/DKIM Records
DK and DKIM are public/private key based header signatures that assure the validity of the e-mail sender. The first thing you will need is a public/private key pair – these do not have to be trusted keys from a public certificate authority. A vendor or another internal group may provide their own public key for inclusion in our DNS record. Do not provide our private key to anyone else – keys are free, and if they are unable to generate one of their own, make one for them!
You can use openssl (openssl genrsa -out dkimkey.private 1024 followed by openssl rsa -in dkimkey.private -out dkimkey.public -pubout -outform PEM), an online generator, or the Web CA server. Once you have a key pair, you need a selector. This is because different mail servers may send mail for a domain whilst using unique private keys to sign the messages. The selector can be anything – the selector name is configured in the mail server. It is visible in the mail headers and mail logs, so don’t elect to use anything rude. Stash the private key on your mail server (or provide it to the mail server owner) and put the public key in a DNS TXT record “selectorname._domainkey.sub.domain.gTLD”. The k= indicates the key type (rsa in the openssl example), you can indicate signatures are being tested “t=y” if desired, and then paste the bits between —-BEGIN PUBLIC KEY—- and —-END PUBLIC KEY—- into the p= part.
k=rsa; p=MIIBIjANBgkqhkiG9w0BAQEFAAOCAQ8AMIIBCgKCAQEA0s07391Axpsi/G0PTsO1 io1LOXSZ0bWAku4bgJ//swZj8OlFvDo59n9qC2Wsd21afI3si/PdDoDP69HNdgAT tIPaK6J0UqcCo9RNSiM3uA+GngdgTupwE2KrKn9/WQbC0tDA8e64e0HBHXwcF/ru OF+18LvpoA/cu1TFUNk0z+GSvqQ4L79k+gZWALvJL7kvCMIu3Gy8ZJpNerRSdrYH l/Nvg87dlZ+9yRI33IwNYpVl1UIrd6qLnGgM1xDMF+Sn21Obd06FOkV5ObXqKBPv 7gMhsUOPu8cIWK7wrd143wH5sWWX1VCBhhIEv1GFp6+SotvZayH5fQ/ri+BjWYzf PwIDAQAB
You should have an author domain signing practices record (_adsp._domainkey.sub.domain.gTLD) – this tells recipients what to do if a message is not signed. The content is “dkim=all” when all mail from the domain is signed. If all mail is signed and anything not signed should be dumped, then the content is “dkim=discardable”. This does not ensure that unsigned messages are discarded – that decision is up to the individual mail recipient configurations. To make no assertion, use “dkim=unknown”.
You should also have a _domainkey.sub.domain.gTLD record – you can include “t=y” when you are testing – this instructs recipients to treat signed and unsigned mail no differently. You can include notes (n=), a responsible party for the domain (r=). The important one is o= … “o=-“ means all mail from the domain should be signed, “o=~” means some mail from the domain may be unsigned.
Then test the records – you can send a message to autorespond+dkim@dk.elandsys.com and receive back a very detailed report on the DKIM validation, or you can use a web-based validation tool that checks only the DNS components.
Bar Codes
I realized, recently, that my experience in manufacturing inventory management systems is actually useful for smaller craft businesses. Someone inquired about using bar codes in their soap making business. The first question is why are you using bar codes. For personal use (like inventory management) or codes used by outside parties? Or both — you can have both internal maintained inventory management bar codes and a UPC maintained code for finished products.
If you are trying to sell products in a store that uses laser scanners for checkout, then you need to use a system with managed number assignment. Otherwise two companies could randomly assign the same code to a product — you ring up a bar of soap and get charged for a hundred dollar handbag. What that system *is* depends on where the product would be sold (and, to some extent, what the product *is* — books use an ISBN system). UPC in the US (https://www.gs1us.org), EAN in the EU (https://www.gs1uk.org). The price to use these codes depends on how many unique products you have (https://www.gs1us.org/upcs-barcodes-prefixes/get-started-guide/1-get-a-gs1-us-issued-company-prefix). Up to 10 codes for a 250$ initial fee plus 50$ annual renewal. Up to 100 codes is a 750$ initial fee plus 150$ annual renewal. Up to 1,000 codes is 2,500$ initial fee plus 500$ annual renewal. The price tiers are economical for companies that do not have variants of a single product (different sizes, different colours) because multiple codes are not used for essentially the same product.
I’ve only worked with companies that manufacture single variations of a product. In small craft manufacturing, the number of codes you need can get out of control. Using registered bar codes creates a financial incentive for streamlining product offerings — you could package your bath bombs individually, in two packs, three packs, four packs … ten packs *but* that uses nine different UPC codes! Add a pot of lip balm, a tube of lip balm, a guest bar of soap, and a full size bar of soap and the the renewal fee triples. Some small vendors will accept a single code for same-price items (“4 oz soap bar” or “bath bombs, four pack”), but larger vendors require a unique code for each unique iteration of the product because they manage their inventory through UPC codes. You need to understand who will be using the codes and what their requirements are before you can determine how many codes you need to purchase.
Does purchasing a single UPC through a reseller make sense? Again, the individual retailer requirements need to be checked — some companies require the company prefix be registered to the manufacturer (i.e. you cannot use a reseller to purchase a single UPC code). Assuming your intended customer allows resold codes, the cost effectiveness depends on how many products and for how long you want to maintain your codes. The reseller structure is good for someone test-marketing in a retail store – if the market test does not pan out, you are out ten bucks (current price from a quick Google search). Even long term, a single UPC reseller is cost effective for up to five products. If you have nine products, you save money registering with GS1 in the third year. Seven products breaks even after five years. Six products breaks even after ten years. But verify the services offered by the reseller — how do you update your product registration?
Printing the bar codes is fairly trivial — there are UPC and EAN fonts available. Some are free, some cost money. You type the proper characters (I prefer fonts where ‘9’ on my keyboard is the 9 bar code. A lot of free fonts are mapped oddly – like you need to type ‘c’ to get a 9) and change the font. I also prefer fonts with human-readable characters under the bar code. Firstly this confirms I’ve typed the proper thing, but it also allows for manual code entry in case the bar code gets obscured. You can print the code on your product wrapping, or include the code in your packaging design and outsource package production.
Could you use the UPC/EAN codes for inventory management? Sure — raw materials you purchase may already have a unique code assigned. Scan the bar code, enter the quantity … voila. But if you are purchasing raw materials that are not already coded … there’s no reason to spend money on a prefix that allows you to code all of your inventory! UPC prefix assignments are a little bit like network blocks — there are different “size” blocks that allow different numbers of products to be registered. A prefix block that allows up to 10 products costs a lot less than a prefix block that allows ten thousand products. If you grow a bunch of different botanicals in your garden, allocating a registered code to each item could get quite costly.
As an inventory management system (the majority of my barcode experience), you can use whatever format bar code and whatever numbering system you like. The number doesn’t need to mean anything to anyone else – and it does not need to be globaly unique – so the entire process is a lot easier. If the manufacturing company next door uses your code for resistance wire for their quart bottles … who cares. As long as you have a database that indicates that item 72 is magnesium oxide powder, people scanning inventory against your database will see magnesium oxide powder.
For printing bar codes, there are fonts available for free online. I’ve used code 39 in the inventory systems I’ve built out – to print the code, just type the numbers and change the font. We used sheets of sticky labels & printed the barcodes onto them – then stuck the label on the raw material bins. Work orders printed out on a form and had a sticky label for the product(s) being built. Scanning the product bar code brought up a list of materials that needed to be used and pull up the engineering draft for the product. Employees scanned raw materials out of inventory as they pulled parts, built the item, then affixed the label from the work order to finished product to scan the completed item into inventory. All of the number assignments were internal – generally using whatever manufacturing software the company already maintained, but I’ve done it in custom code with a PHP front end and MySQL backend too. You need a form for adding to inventory and a form for removing from inventory. Scan the bar code to input the item number, enter the amount being used, submit. You could even maintain your purchase orders and recipes as a batch of inputs — receive an order and check everything contained there-in into inventory. Select a specific recipe and check set amounts of ingredients out of inventory.
I generally also create a reconciliation form — similar to how stores will go through and do manual inventory counts to true-up their database inventory with reality, a reconciliation form allows you to update the inventory database with the actual amount on hand. Personally, I store deltas from true-up operations too — if we should have fifty ounces of shea butter but only have forty seven because of over-measuring or small bits left on scoops, we want to know that there was a loss of three ounces. Once you know your inventory deltas, then you can include that loss into the cost of goods produced.
Why would you want to put so much effort into tracking your inventory? I see a lot of people asking how someone calculates costs for finished products. Calculating cost is fairly easy if you track your inventory in and out (costs not associated with inventory [your time, electricity, space, taxes] still need to be accommodated). In the inventory database, you have an item number, a quantity, and a price per unit value. As inventory is checked in, the price per unit is adjusted to include the incoming items. A recipe — specific amounts of different items — can be represented as a cost. You can also track material cost over time (trend the price of an ingredient, see if there’s a better time to buy it) or compare costs for product reformulation – takes additional database space and a little extra coding, but it is good information to manage costs.
How to reflect shipping costs on incoming inventory is a personal decision. The easiest way is to divide the cost equally over the items – this works well for flat-rate shipped orders. You could also divide the shipping cost over the weight of the shipment — 10 dollars in shipping over forty pounds of materials is twenty-five cents per pound. Then a three pound item cost seventy-five cents in shipping. A ten pound item is 2.50$ to ship.
The question was specifically asked regarding soap making, but the methodology is valid for basically any industry or home business. Most of my experience was garnered in an electric heater element manufacturer. The approach is viable for recipe-based manufacturing (knitting, crocheting, sewing, soap making) and even non-recipe based manufacturing … you’d just need to pull materials from inventory as you use them.
Certificate Error On Git
Finally got around to switching my GitLab site over to HTTPS — made an ssl folder in /etc/gitlab and then placed the public/private key pair in that folder. Files named with the external URL hostname with a key and crt suffix (gitlab.rushworth.us.crt and gitlab.rushworth.us.key in my case). Then in gitlab.rb, I changed the external_url to an https:// prefix. Voila, a secure GitLab server.
Oops – forgot about the client. Adding the secure site as the remote, I get “unable to get local issuer certificate” on the git client. Since I used a CA signed certificate, I just had to put the CA public key into git’s ca bundle. If you use a self-signed certificate, I believe the certificate public key would need to be used.
Where is git’s CA bundle? Ask git:
C:\Program Files\Git\bin>git config –list
core.symlinks=false
core.autocrlf=true
core.fscache=true
color.diff=auto
color.status=auto
color.branch=auto
color.interactive=true
help.format=html
rebase.autosquash=true
http.sslcainfo=C:/Program Files/Git/mingw64/ssl/certs/ca-bundle.crt
diff.astextplain.textconv=astextplain
filter.lfs.clean=git-lfs clean — %f
filter.lfs.smudge=git-lfs smudge — %f
filter.lfs.required=true
filter.lfs.process=git-lfs filter-process
credential.helper=manager
http.sslverify=true
Edit that file with something that understands Unix new line characters and paste your CA public key at the end of the file.
Creating a Docker Image
There are a lot of pre-built images available on Docker Hub — most recent OS builds, Apache, MariaDB, there’s even an Oracle Enterprise database server. If you’ve got a fairly recent OS, you can start from that base image and use Dockerfile (or in a CI/CD pipeline, the before_script) to install additional components. But if your OS is out-of-date … you still need a test platform that matches production! You can create your own Docker image without using a base.
First, you need a server. This can be your current dev box (or your current prod box, but I avoid touching the prod boxes!). It can be a new install. Either way, you need a server. Log in and su to root. Then tar off the installation:
tar -czf /image/centos51.tgz ./ --exclude /image
Once you’ve got a tar of the server, scp the tar to whatever computer is running your docker client. Import the image to Docker. (You can tag the image and upload it to a registry, if you’ve got one.)
docker load centos51.tgz sampleproject/cent51
Finally, start a container based on the image:
docker run -p 80:80 -p 443:443 -v /data/docker/certs:/etc/httpd/certs -v /data/docker/conf.d/SampleProjectSite.conf:/etc/httpd/conf.d/SampleProjectSite.conf -v /data/git/SampleProjectCode:/var/www/vhtml/SampleProject/html -dit --name SampleProject sampleproject/cent51 /bin/bash
Making Soap Molds – Material Research
Before trying to print my own soap molds, I need to identify what characteristics I like in a mold. I find flexible molds easier to work with than rigid ones – I’ve snapped a number of molds trying to remove the soap.
So I am trying to find a material that will withstand heat generated by saponification. It looks like saponification can yield temperatures up to 88° C. I don’t want to buy pounds of different filaments to test them out, but GlobalFSD offers “sample” size filament cuttings that are perfect for experimentation or small niche products (e.g. printing glow in the dark mailbox numbers).
One material included information about temps for printed objects, so I’ve contacted the other manufacturers to see if they provide any sort of guidance.
| Material | Max C | Min C | Notes | URL |
| NinjaFlex | 65.5 | -30 | https://www.globalfsdusa.com/ninjaflex-by-fenner-drives.html?category_id=20 | |
| CrystalFlex | – | – | Food safe | https://www.globalfsdusa.com/crystalflex-tm-by-formfutura.html?category_id=20 |
| FilaFlex | https://www.globalfsdusa.com/filaflex-by-recreus-1-75mm.html?category_id=20 | |||
| FlexFill | 230 | -40 | https://www.globalfsdusa.com/flexfil-98a-by-fillamentum-1-75mm.html?category_id=20 | |
| F41 Flex | 75 | -20 | https://www.globalfsdusa.com/f41-flex-tm-1-75mm-black-polyolefin-filament-by-forefront.html?category_id=20 |
Kerberos Authentication on Tomcat
I finally got around to testing out TomCat 8 and setting up Kerberos authentication for a “single sign-on” experience (i.e. it re-uses the domain logon Kerberos token to authenticate users). This was all done in a docker image, so the config files can be stashed and re-used by anyone with Docker.
First you need an account – on the account properties page, the DES encryption needs to be unchecked and the two AES ones need to be checked. The account then needs to have a service principal name mapped to it. That name will be based on the URL used to access the site. In my case, my site is http://lisa.example.com:8080 (SPNs don’t mind http/https or port numbers) so my SPN is HTTP/lisa.example.com … to set the SPN, run
setspn -A HTTP/lisa.example.com sAMAccountNameOfMyNewlyCreatedAccount
Then generate the keytab:
ktpass /out .\lisa.example.com.keytab /mapuser sAMAccountNameOfMyNewlyCreatedAccount@EXAMPLE.COM /princ HTTP/lisa.rushworth.us@EXAMPLE.COM /pass P@ssw0rdG03sH3r3
** Note about keytabs – there is a KVNO (key version number) associated with a keytab file. When security-related attributes on the account are changed, the KVNO is incremented. Aaaand you need a new keytab. This means you need to be able to get a new keytab if you plan on changing the account password, but it also means that tweaking account settings can render your keytab useless. Get the account all sorted (check off password never expires if that’s what you want, check off user cannot change password, etc) and then generate the keytab.
While you’re working on getting the SPN and keytab stuff sorted, get docker installed and running on your box. I use Docker CE (free) on my Windows laptop, and I’ve had to disable the firewall to allow access from external clients. I would expect a rule (esp one allowing anything to make an inbound connection to 8080/tcp!) would sort it, but I’ve always had the port show as filtered until the firewall is turned off. YMMV.
I create a folder for files mapped into docker containers (i.e. c:\docker) and sub-folders for each specific container. All of the files from TomcatKerberosConfigFiles are unzipped into that folder. The test website is named lisa.rushworth.us and is either set up in DNS or added to c:\windows\system32\drivers\etc\hosts on the client(s) that will access the site. And, of course, there’s a client machine somewhere logged onto the domain. You are going to need to tweak my config files for your domain.
In jaas.conf — I have debug on. Good for testing and playing around, bad for production use. Also you’ll need your SPN and keytab file name
principal="HTTP/lisa.example.com@EXAMPLE.COM"
keyTab="/usr/local/tomcat/conf/lisa.example.com.keytab"
In krb5.conf — the encryption is about the only thing you can keep. Use your hostnames and domain name (REALM). If you have multiple domain controllers, you can have more than one “kdc = ” line in the realms.
[libdefaults]
default_realm = EXAMPLE.COM
default_keytab_name = /usr/local/tomcat/conf/lisa.rushworth.us.keytab
default_tkt_enctypes = aes128-cts rc4-hmac des3-cbc-sha1 des-cbc-md5 des-cbc-crc
default_tgs_enctypes = aes128-cts rc4-hmac des3-cbc-sha1 des-cbc-md5 des-cbc-crc
permitted_enctypes = aes128-cts rc4-hmac des3-cbc-sha1 des-cbc-md5 des-cbc-crc
forwardable=true

[realms]
RUSHWORTH.US = {
kdc = exchange01.example.com:88
master_kdc = exchange01.example.com:88
admin_server = exchange01.example.com:88
}

[domain_realm]
example.com= EXAMPLE.COM
.example.com= EXAMPLE.COM
In web.xml – Roles may need to be sorted around (I’m not much of a TomCat person, LMGTFY if you want to do something with roles). Either way, the realm needs to be changed to yours
<realm-name>EXAMPLE.COM</realm-name>
Once Docker is running and the files are updated with your domain info, install the tomcat:8.0 image from the default repository. Start the container mapping all of the custom config files where they go:
docker run -detach --publish 8080:8080 --name tomcat8 --restart always -v /c/docker/tomcat8/tomcat-users.xml:/usr/local/tomcat/conf/tomcat-users.xml:ro -v /c/docker/tomcat8/lisa.example.com.keytab:/usr/local/tomcat/conf/lisa.example.com.keytab:ro -v /c/docker/tomcat8/krb5.conf:/usr/local/tomcat/conf/krb5.conf:ro -v /c/docker/tomcat8/jaas.conf:/usr/local/tomcat/conf/jaas.conf:ro -v /c/docker/tomcat8/web.xml:/usr/local/tomcat/webapps/examples/WEB-INF/web.xml:ro -v /c/docker/tomcat8/context.xml:/usr/local/tomcat/webapps/examples/WEB-INF/context.xml:ro -v /c/docker/tomcat8/logging.properties:/usr/local/tomcat/conf/logging.properties:ro -v /c/docker/tomcat8/spnego-r9.jar:/usr/local/tomcat/lib/spnego-r9.jar:ro -v /c/docker/tomcat8/login.conf:/usr/local/tomcat/conf/login.conf:ro -v /c/docker/tomcat8/testAuth.jsp:/usr/local/tomcat/webapps/examples/testAuth.jsp:ro tomcat:8.0
A couple of useful things about Docker — the container ID is useful
C:\docker\tomcat8>docker ps
CONTAINER ID IMAGE COMMAND CREATED STATUS PORTS NAMES
4e06b32e1ca8 tomcat:8.0 "catalina.sh run" 12 minutes ago Up 12 minutes 0.0.0.0:8080->8080/tcp, 0.0.0.0:8888->8080/tcp tomcat8
But most commands seem to let you use the ‘friendly’ name you ascribed to the container. Running “docker inspect” will give you details about the container – including its IP address. I’ve found different images use different settings: some map to localhost on my box, some get an IP address within my DHCP range.
C:\docker\tomcat>docker inspect tomcat8 | grep IPAddress
"SecondaryIPAddresses": null,
"IPAddress": "172.17.0.2",
"IPAddress": "172.17.0.2",
Since this is an image that maps to localhost on my box, I need the lisa.example.com hostname to resolve to my laptop’s IP address. For simplicity, I did this by editing the c:\windows\system32\drivers\etc\hosts file.
Shell into the container:
docker exec -it tomcat8 bash
Update your packages and install the kerberos client utilities:
root@4e06b32e1ca8:/usr/local/tomcat/conf# apt-get update
root@4e06b32e1ca8:/usr/local/tomcat/conf# apt-get install krb5-user
Then test that your keytab is working:
root@4e06b32e1ca8:/usr/local/tomcat/conf# kinit -k -t ./lisa.example.com.keytab HTTP/lisa.example.com@EXAMPLE.COM
root@4e06b32e1ca8:/usr/local/tomcat/conf# klist
Ticket cache: FILE:/tmp/krb5cc_0
Default principal: HTTP/lisa.example.com@EXAMPLE.COM

Valid starting Expires Service principal
07/08/2017 18:27:38 07/09/2017 04:27:38 krbtgt/EXAMPLE.COM@EXAMPLE.COM
renew until 07/09/2017 18:27:38
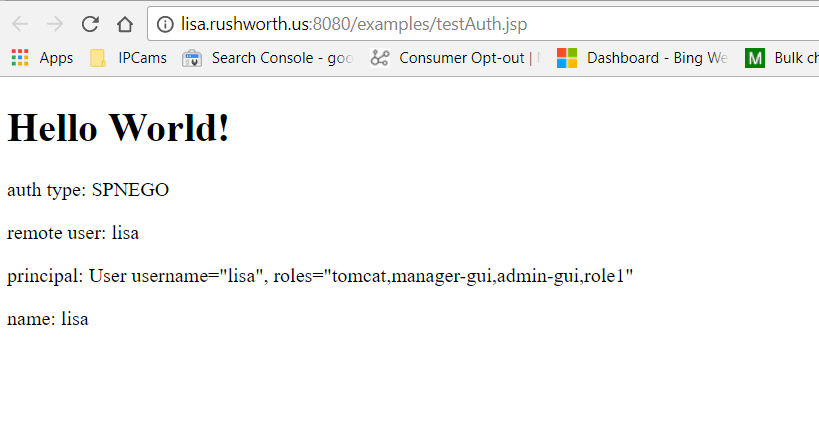
Assuming you don’t get errors authenticating using the Kerberos client utilities, try accessing the TomCat site. I’ve added a testAuth.jsp file to the examples webapp – it shows the logon method, user name, and what roles they have:
- Log files are in /usr/local/tomcat/logs
- If you aren’t using Integrated Authentication for other stuff, you may need to configure your browser to pass along your Kerberos token.
- If you are getting an error in your Catalina log that says:
09-Jul-2017 15:42:55.734 FINE [http-apr-8080-exec-1] org.apache.catalina.authenticator.SpnegoAuthenticator.authenticate Unable to login as the service principal
java.security.PrivilegedActionException: GSSException: Defective token detected (Mechanism level: GSSHeader did not find the right tag)
Verify that your SPN is set to the same name being used to access the site. I’m not sure why the configured service principal name doesn’t supersede the user-entered hostname. But I got nothing but auth failures until I actually entered the hostname into my hosts file and used an address that matches the service principal name.
Making Soap Molds
I want to design and print my own soap molds – special holiday bars or pre-stamped bars. We’re still working on setting up the 3d printer, so haven’t tried anything yet. I have a few downloadable soap mold forms bookmarked (https://www.thingiverse.com/thing:1806226/apps happens to be up in another tab now, but search thingverse for ‘soap mold’ and you will find quite a few).
The trick will be finding an appropriate filament — one that won’t melt at soaping temps (something I need to better understand) but can still be extruded at my printer temp (190-250C). Preferably a not-too-rigid filament with a little bit of flex. That’s trial and error – expensive, too, when buying whole rolls of filament. I found http://globalfsd.com/ (there’s both a US and European site) that sells small quantities of many filiments, and I’ve purchased a bunch that *seem* like they might work.
What I planned to do until I can identify a perfect filament for non-melting and easy to remove soaps is create positive forms on the 3d printer (essentially print what you want a bar of soap to look like) and then google up a procedure for making a silicon mold (uneducated guess is glop some silicon ‘stuff’ onto the positive form to create the negative silicon mold).
For anyone wanting to play with a 3d printer without dropping a couple hundred bucks on it: check your local library. Ones around here are building “maker spaces” with 3d printers, embroidery machines, engraving machines, large format printers, etc. You pay for consumables (i.e. filament in this cae) but gain familiarity with the machines before deciding to invest in one.
Git
I mentioned that I had inherited a Git implementation last week. Here is the documentation I created to teach my coworkers what Git is and how to use it. Some isn’t applicable outside of our environment (you won’t care about the AD groups that control access to the system), some is applicable for small non-dedicated development teams … but I figured I’d post the presentation and quick reference guide on the Internet in case it was useful to someone else.
Background:
Git is a system that provides version control for files – we’re using it to control script/program code versions (source control management), but I could put this document in Git and use the version control to manage edits to the document. You can use it to maintain configuration files – allowing config changes to be traceable. You could use it as a cookbook if you were so inclined – a chef tinkering with a recipe might be interested in going back a few versions and trying something else.
Git provides some functionality that is redundant to other systems – you could, for instance, import our scripts to SharePoint and make code changes within SharePoint. The individual replacing the file is recorded. If a previous version is needed, SharePoint maintains previous versions that can be recovered. Why use Git instead of SharePoint? Git makes it easier to have multiple developers working on a program, including functions to “merge” the edited files together. You can have different versions of the whole project – in SharePoint, I can see different versions of each file, but I have no way of correlating which version of file x.cs goes with y.h … which makes the versioning less useful. The inverse is also true — I’m speaking about git as a source code management platform, but we use it to maintain configuration files too. There are even less IT/source control uses for git out there — anything where tracking who changed what when is valuable could leverage git.
If you want the history, LMGTFY 🙂 Or, you know, read WikiPedia. LT;DR: It’s one of Torvalds’s projects, initially used for Linux kernel development and has since become a widely adopted source control management platform. If you have ever looked at a project on GitHub, you have seen a little bit of Git. GitHub is a massive, public Git repository. Because Git has significant adoption within the OpenSource community, there are a lot of good documents on its internal mechanisms (https://book.git-scm.com/book/en/v2/Git-Internals-Git-Objects for example, if you are interested in how data is stored), how it is used (Google “git cheatsheet” and there are thousands of them, or full books like https://git-scm.com/book/en/v2), and oddball errors that might crop up.
Implementation
We have a Bobobo Git server using Active Directory for both authentication and authorization. The server source is available on GitHub (https://github.com/jakubgarfield/Bonobo-Git-Server) where you can see issues and be included in conversation about source updates (subscribing lets you know when new versions should be available for install).
Questions and bugs regarding the program are maintained in the GitHub issues section. The Google forum that may come up in searches is not active and was retained for history.
This brainshare is primarily to show client-side usage of the Git server. Server setup, configuration, and management is not the focus. One thing I will highlight on the server config: the groups used to provide authorization are not preexisting or nested groups. This means new team members will need to be added to the appropriate “Windstream CSG Git …” group to use the server.
<add key=”ActiveDirectoryMemberGroupName” value=”Windstream CSG Git Users” />
<add key=”ActiveDirectoryTeamMapping” value=”VDI=Windstream CSG Git VDI,SharePoint=Windstream CSG Git SharePoint, Directory Design=Windstream CSG Git Directory Design”/>
<add key=”ActiveDirectoryRoleMapping” value=”Administrator=Windstream CSG Git Admins” />
The above snippet is from the Web.config file located on the server at F:\inetpub\www\CSG – if new groups need to be added to the Git server, that is where the magic happens.
Some Terminology:
A repository is a storage location. It can store one file, it could be a whole bunch of files that make up a single program (e.g. the CSOCheck Visual Studio project), it could be a bunch of independent programs that have similar purposes (e.g. ‘Provisioning’ that holds all our provisioning scripts). A repository could be all our code glommed into one place (don’t do this – it makes maintaining an individual program more difficult).
A branch is another server-hosted copy of the project. You don’t want to directly edit the in-use production code (we do but this is certainly not a programming best practice!) – a branch is a copy on which development is done. Once development has been completed, the branch is merged back into the master copy. Looking at Git with small projects and a small number of developers, I wouldn’t expect to see a lot of branches on a project. A large program with a lot of dedicated developers may have some break/fix branches as well as longer term feature enhancement branches.
A fork is a personal copy of a repository. In OpenSource development, forks avoid making changes in someone else’s repository. You create your fork, work within your copy, then offer the changes in your fork for inclusion in the project. We don’t have much need to create forks — we would create a branch within the project.
Project – Bonobo does not seem to have projects, but other Git implementations do. A project includes the repository, an issues log, pull requests, and sometimes even a Wiki for the application. If you see someone referring to a project, for us that is just the repository.
The project maintainer is the individual who “owns” the project – this isn’t a project sponsor (a non-tech individual who owns a business relationship) but a technical supervisor for the development work who may also have project sponsor define-requirement type roles. The maintainer decides if changes and features are added. You can suggest changes or features – in OpenSource projects, review the existing issues to see if the feature was already requested (and make a new issue to request the feature if one does not exist) before spending a lot of time working on code that will not be accepted. Your idea may be something people are excited to see included in the project. Or it may be something they don’t want (you can always make a fork and add the feature to your iteration of the project). Even a bugfix – your proposed solution may be accepted. Or there may be a reason the maintainer wants to use a different approach to the issue. We do not have project maintainers.
Commit – this is basically making changes to the branch (add a file, delete a file, or modify a file). A commit should represent a single change. By that, I don’t mean every time you change a line, make a commit. You may well have to update a hundred lines of code across five different files to resolve an issue or implement a feature. But it’s just *one* issue or feature being implemented in the commit. You shouldn’t have a commit that implements SSL encryption in LDAP authentication and allows individuals to approve requests for direct reports. These two things have nothing to do with each other, even if they happen to be the two cards you’ve worked on today.
Commit messages associated with commits where you can indicate what is being changed in the commit. A “good” commit message is like well commented code – don’t provide too much info like “I added XYZ to line 81 on file abc.def, but don’t write “Bug fixes” either. A commit message should convey what has been changed without someone having to diff the versions (i.e. saves time). In more formal software development, commit messages also aid in the creation of release notes. Something like “Changed new user template to include ourOrgPerson objectClass” provides enough detail that we can tell what the commit did – if someone wants to find out what lines got edited, they can diff the files and tell. You can view the commit history in the web site or by using “git log”.
Push is the process of updating the server repository with changes you have made on your local repository.
Pull Request is a term you may encounter when reading Git documentation or participating in GitHub. The request basically clue someone into the fact you’ve got code to be reviewed or integrated into an upstream branch. The project maintainer would, once the changes had been reviewed and agreed upon, merge the feature into the repository and close the pull request. This is not a process we are following, nor are code-related discussions or issue lists tracked within the Git server.
Deploy – once the pull request has been approved, you can deploy and test the changes. If the changes do not work, you roll back by re-deploying the existing master.
Merge is used to combine an individual’s local repository with a server-housed copy of the branch or to combine two branches.
GitHub is an Internet based Git repository used by a lot of people and a lot of OpenSource projects. Projects are publicly readable (well, projects held in free accounts. There’s an add-on fee that allows you to maintain private projects). Yes, we could just get Git enterprise licenses and use the hosted service. We elected to deploy an internally hosted and maintained server.
Process Flow:
In a simple development environment like we have (we’re not dedicated programmers working on enormous applications), branches are straightforward. We’ve got a master for a project. When we encounter a problem, or wish to expand functionality, we make a working branch. Sort the issue or add the feature, commit. Deploy and test the code, then merge your working branch back into master.
If there is only one person working on a project at a time, merge conflicts are not really a thing. We don’t have ten different branches, we don’t have branches from branches (e.g. a branch for implementing external authentication which then has a branch for LDAP, DB table, and external authentication providers. Then the external authentication provider branch has a branch for Facebook, .NET, and Google authentication providers.). When you have a tree full of branches, you need to resolve merge conflicts (pick which change makes it) before you can merge your pull request branch.
A lot of “how to use Git” is process-related and not technical how-to stuff. Questions like “what are your software development lifecycle management processes?” and “What are your criterion for creating a new branch?”
When I worked with full-time developers, we created an “EmerStaging” branch for development on critical incidents and a “DevStaging” branch for development on non-critical incidents. The EmerStaging branch was only intended to be around for a few days – the branch would start out identical to the master, whatever big deal issue would be sorted, then the branch merged back into the master. These changes would then be sync’d down to all other branches (we don’t want the bug to impact development or, worse, to be reintroduced as someone merges in their long-term development project). The DevStaging branch was always present – there’s always a backlog of lower priority bug-fix type stuff to be done – and the project maintainer would ensure the downstream branches were updated when they processed pull requests. In addition to these break/fix branches, a new branch existed for the long-term development work – next version application or specific new features that had not been assigned to a specific release iteration.
Our environment is not so complex – we should be able to get by with one development branch when there is active development on a project and only the master branch when changes are not being made. Following this process, we avoid the challenges of synchronizing and merging multiple branches and sub-branches.
The Git Client
Simply put, a Git client puts files on the local disk and pushes those files back to the server. The first step is getting a git client installed. The examples I am showing today are using the CLI utilities from https://git-scm.com/download/win simply because I already use them at home (it’s the version . Yes, there are other git clients. Lots. If you have used a different client that you prefer, go for it. Different clients will not corrupt a repository.
Some IDE’s have Git integration – their own Git client – it may or may not work with our implementation (some are specific to GitHub / GitHub Enterprise which is not the same thing). If you are using an IDE, it may be convenient to research integrating your IDE directly with Git. There is no need – you can use the command line utilities to retrieve files, switch over to the IDE for your development work, and then use the command line utilities to add, commit, and merge your changes.
To install the Git-SCM clients, download and run the installer. Selecting the defaults on the installation are sufficient – although if you do not have the Win32 port of the GNU utilities, you can select the third option to get grep and such in DOS.
Once the installation completes, grab the two files from \\CWWAPP695\c$\Program Files\Git\mingw64\ssl\certs and put them into your install path\git\mingw64\ssl\certs folder (I renamed the existing ones, but there’s no reason not to delete them). If you see the error “SSL certificate problem: unable to get local issuer certificate”, re-read the last sentence and try again.
Identify a folder on your computer into which you want to clone projects. You can store different projects in distinct locations or you can have a top-level folder in which all your projects are housed.
Creating A New Repository
Log into https://csggit.windstream.com using your Active Directory username and password (no need to specify domain). Repositories are sorted into groups – a group may be a single application project. For example, “AD Password Filter”. A group may contain several different application projects – for example, “Auth Samples”.
To create a new repository, click the big blue button in the upper right-hand corner that says exactly that. Provide a name for the repository – this cannot contain spaces, but should be descriptive enough that people do not need to actually read through the code to see what the program does. I am making a project called “HelloWorld” because … tradition.
Supplying a group name will sort the repository into a group on that first page – please do this, even if your group is your program. Otherwise it’s like creating all of your files in one folder … fine for a small number of files, but quickly difficult to look at. We may want to make a Misc group to hold oddball one-off programs.
The description field provides a place for freeform text describing the purpose of the program. This doesn’t have to be long, but it would be nice to have something. We can consider adding the server(s) to which the code is deployed – that would provide a quick way to list our scripts, what they do, and where they run.
Contributors can clone, push, and pull a repository. Administrators are additionally able to edit the repository details (i.e. change the stuff we’re putting in here now) and delete the repository.
Select the team(s) which will need to access the repository. Disclaimer – most of my experience with Git is at home using a GitLab server. There are only two of us, so permissioning isn’t really a concern. Not sure exactly how secure this is (i.e. if I don’t select Directory Design, can they still view the source but cannot write to it? Do they not even see the repository? I’d not interested enough to get another ID and add it into the security group, but if someone wants to test now … that would be cool.). Click ‘Create’ and the repository will be created.
Look near the top of the page – there will be a hyperlink to go to the new repository. Click that.
We will need the “General Url” as we begin working with the repository (i.e. copy the link address now).
Working With Your Repository
Now that you have a project and URL, clone the project to your local repository – if this is a new project, ignore the warning. If this is a project you expect to have some existing content … well, don’t ignore the error:
D:\tempCSG\ljr\Git>git clone https://csggit.windstream.com/CSG/LJR.git
Cloning into ‘LJR’…
warning: You appear to have cloned an empty repository.
If you are using the Git credential manager, you will be asked to authenticate to the server the first time you clone a repository. You do not need to specify the domain. When you change your password, you can use the Windows Credential Manager to edit your stored credential.
Once the connection has been authenticated, the client will clone the repository and volia, we have stuff
D:\tempCSG\ljr\Git\LJR>dir
Volume in drive D is Data
Volume Serial Number is FA7B-B3E4
Directory of D:\tempCSG\ljr\Git\LJR
06/26/2017 02:33 PM <DIR> .
06/26/2017 02:33 PM <DIR> ..
0 File(s) 0 bytes
2 Dir(s) 9,644,441,600 bytes free
OK, that wasn’t a whole lot of stuff – it just created a folder for my application! Make some files in there – that may mean using the folder as your IDE project location. It may mean using notepad and making a new file. Whatever your approach, make a new file and add some code.
D:\tempCSG\ljr\Git\LJR>notepad helloworld.pl
Then add the new file(s) to the local git repository – important bit here, we are currently making changes to our copy. If you check the server, it is still an empty project.
D:\tempCSG\ljr\Git\LJR>git add *
The * is a wildcard – if you are working on a larger project, you can add just the files you are updating (i.e. I could use git add helloworld.pl here). I used the wildcard here because a lot of people like the convenience. Personally, I always recommend programmers add by name to ensure they are adding the proper ‘stuff’ to the project. There are other short-cut add options: git add . will stage new and modified files (not deletions), git add -u will stage modified and deleted files, and git add -A will stage all files.
Then commit – since this is the first file, I am not using a great commit note. Generally I’ve recommended making the first commit note a link to the requirements document … basically if I wanted to find out why we’ve got this program and what it is meant to do, where do I go? In our case, this might be an INC # or a SharePoint URL. Or it might just be a freeform text like “Provision DMZAD group memberships from acildsdb:OSR2.CWSODMZTable”.
D:\tempCSG\ljr\Git\LJR>git commit -m “Created project”
[master (root-commit) 7a66c68] Created project
1 file changed, 2 insertions(+)
create mode 100644 helloworld.pl
Check the web view to see what’s in the project: nothing. Push the changes:
D:\tempCSG\ljr\Git\LJR>git push
Counting objects: 3, done.
Writing objects: 100% (3/3), 256 bytes | 0 bytes/s, done.
Total 3 (delta 0), reused 0 (delta 0)
To https://csggit.windstream.com/CSG/LJR.git
* [new branch] master -> master
I mentioned earlier that making updates in the master branch is not a best practice … the first time around is an exception … there’s no production implementation that you’re going to bugger up. Now that we’ve got a project that’s running in production (pretend), we’ll make a branch when we want to make changes. Check out the branch – this changes your git ‘context’ to the new branch.
D:\tempCSG\ljr\Git\LJR>git branch newEdits
D:\tempCSG\ljr\Git\LJR>git checkout newEdits
Switched to a new branch ‘newEdits’
Yes there is a shortcut to doing this – “git checkout -b newBranchName”. Push the new branch
D:\tempCSG\ljr\Git\LJR>git push origin newEdits
Total 0 (delta 0), reused 0 (delta 0)
To https://csggit.windstream.com/CSG/LJR.git
* [new branch] newEdits -> newEdits
Make some more changes and add the changed file(s) to the local repo
D:\tempCSG\ljr\Git\LJR>notepad helloworld.pl
D:\tempCSG\ljr\Git\LJR>git add helloworld.pl
Commit the changes and push to the server:
D:\tempCSG\ljr\Git\LJR>git commit -m “Added international support”
[newEdits 28365d9] Added international support
1 file changed, 8 insertions(+), 1 deletion(-)
D:\tempCSG\ljr\Git\LJR>git push origin newEdits
Counting objects: 3, done.
Delta compression using up to 2 threads.
Compressing objects: 100% (2/2), done.
Writing objects: 100% (3/3), 335 bytes | 0 bytes/s, done.
Total 3 (delta 0), reused 0 (delta 0)
To https://csggit.windstream.com/CSG/LJR.git
7a66c68..28365d9 newEdits -> newEdits
Now if you look @ the repository browser on the web site, https://csggit.windstream.com/CSG/Repository/LJR/newEdits/Blob/helloworld.pl, you will see the additions we’ve made. Add some more and repeat the process.
D:\tempCSG\ljr\Git\LJR>notepad helloworld.pl
D:\tempCSG\ljr\Git\LJR>git commit -m “Added Swedish and Hungarian greetings”
[newEdits b2cbedd] Added Swedish and Hungarian greetings
1 file changed, 2 insertions(+)
D:\tempCSG\ljr\Git\LJR>git push origin newEdits
Counting objects: 3, done.
Delta compression using up to 2 threads.
Compressing objects: 100% (2/2), done.
Writing objects: 100% (3/3), 340 bytes | 0 bytes/s, done.
Total 3 (delta 1), reused 0 (delta 0)
To https://csggit.windstream.com/CSG/LJR.git
28365d9..b2cbedd newEdits -> newEdits
Now look at repository explorer and see how the history is tracked – look @ each commit (notice the commit messages and who made the changes). Click into previous version and see how the differences are tracked.
Fast Forward Merging:
This is possible for simple projects like we’re using – there is a master, a branch for changes, then that branch gets collapsed back into the master when the changes have been finished.
D:\tempCSG\ljr\Git\LJR>git checkout master
Switched to branch ‘master’
Your branch is up-to-date with ‘origin/master’.
D:\tempCSG\ljr\Git\LJR>git merge newEdits
Updating 7a66c68..08931d5
Fast-forward
helloworld.pl | 12 +++++++++++-
1 file changed, 11 insertions(+), 1 deletion(-)
D:\tempCSG\ljr\Git\LJR>git push origin master
Total 0 (delta 0), reused 0 (delta 0)
To https://csggit.windstream.com/CSG/LJR.git
7a66c68..08931d5 master -> master
Check web site – you’ll see your changes in master. But newEdits branch is still there.
D:\tempCSG\ljr\Git\LJR>git branch
* master
newEdits
My recommendation is to collapse the branch (delete it) when you have completed your changes. Otherwise you need to manage branches and merges. If there’s a need for multiple branches of sustained development … that’s beyond the scope of a quick brain share. You can find information on more complex merging operations, including conflict resolution (https://git-scm.com/book/en/v2/Git-Branching-Basic-Branching-and-Merging#_basic_merging) and rebasing (https://git-scm.com/book/en/v2/Git-Branching-Rebasing). Google can also tell you the ongoing debate about etiquette around creating new branches, merging, and rebasing.
To delete a branch once development has been completed and the changes have been merged into master:
D:\tempCSG\ljr\Git\LJR>git push origin –delete newEdits
To https://csggit.windstream.com/CSG/LJR.git
– [deleted] newEdits
D:\tempCSG\ljr\Git\LJR>git branch -d newEdits
Deleted branch newEdits (was 08931d5).
Notice the commit history / notes were copied from the newEdits branch into the master, so we haven’t lost anything by merging our branch into the master.
Your local repository is not automatically updated with changes other people commit to the project. A pull retrieves changes pushed by others to the Git server. Alternately , fetch and merge operations to download the changes and play those changes into your local repository.
Since we are not full-time developers, we might opt not to persistently store projects locally (i.e. we have a specific program that needs to be updated, clone the repository locally, perform the edits, push and merge these edits, then destroy the local copy). Provided two people are not simultaneously working on the same project, the newly cloned project is up-to-date each time you start working on a program.
Stashing Changes
If you are working on a particular branch but not yet ready to commit your changes – and you have a need to work on some else in the previous commit – use “git stash save” to table the changes you’ve currently made. Make whatever changes you need to make, add those changes, commit them, and then use “git stash pop” to return the tabled changes.
Getting Rid Of Stuff
The first question is should you remove something? We often keep old code around for future reference (you want to do something similar, instead of re-writing the whole thing … copy this old program and tweak it for the current need). But leaving every old bit of code in the repository is a bit like never deleting an e-mail message or document on disk … eventually you’ll have a big mess of useless stuff that you’re looking through and backing up.
You could change the repository group to “Archive” (or “zzArchive” so it sorts to the bottom of the web view) – this would retain the code but sort it out into a different logical container to identify it as no longer used code.
Some companies will set up a second Git server dedicated to archive – lower I/O requirements on hardware, not frequently backed up, etc. Old code is pushed up to the archive server and then deleted from the active code server. As we don’t currently have an archive Git server, this isn’t an option. But it is a possibility if inactive code that we want to keep becomes burdensome. Other companies archive the code outside of Git and delete the project from the repository.
To remove a file from the repository, use “git rm filename.xtn”. To remove a repository, you can click the little rubbish can next to the project on the web site.
There is no such thing as removing a group – as soon as no repositories exist in the group, it will disappear from the web view.
A Note On Binary Files
The typical solution to storing large binary files in Git is to implement LFS – this feature is not yet supported in Bonobo. As such, avoid storing binary files in Git (media, compiled binaries, compressed data).
Binary files tend to be large. Because of the distributed nature of Git, large files are transmitted and stored a lot of places. Frequently changing binary files bloat the server database too. This isn’t to say you cannot store binary files – just that it is a judgement call. Smaller and more static files, great. Three gig files that get updated daily … find another solution.
Many types of binary files do not compress well – especially already compressed files. You can disable delta compression in .gitattributes (*.mp4 binary -delta) to avoid the I/O of attempting to compress already-compressed data.
When merging binary files, diff just tells you they are different. Not particularly illuminating information if you are manually resolving merge conflicts. For non-text files, there may be a filter that allows changes to be represented in a readable format (e.g. Microsoft Word documents) by setting an appropriate filter in .gitattributes (*.docx diff=word). The diff would not include format changes (i.e. if I bolded a specific sentence, that would not be apparent in the diff), but it will display text content that has been updated.
Remote Repositories
The whole point of Git is distributing copies of the repository elsewhere. It is possible to use Git locally – this would allow a single developer to track and revert changes – but typical implementations have multiple developers pulling from and pushing to a remote repository.
You can have more than one remote repository.
D:\tempCSG\ljr\Git\PKIWeb>git remote -v
origin https://csggit.windstream.com/CSG/PKIWeb.git (fetch)
origin https://csggit.windstream.com/CSG/PKIWeb.git (push)
You may notice that we have the word origin in some of the commands – this is a default repository created when we clone the branch. You can add additional remote repositories (the example I am using is silly since they are the same location). This could be done to transfer a project to a different repository (moving an out-of-support product to an archive Git server or an acquired company moving repositories into the new company’s repository) or to pull a project from an alternate location (other users who maintain their own project for the same application).
D:\tempCSG\ljr\Git\PKIWeb>git remote add ljr https://csggit.windstream.com/CSG/PKIWeb.git
D:\tempCSG\ljr\Git\PKIWeb>git remote -v
ljr https://csggit.windstream.com/CSG/PKIWeb.git (fetch)
ljr https://csggit.windstream.com/CSG/PKIWeb.git (push)
origin https://csggit.windstream.com/CSG/PKIWeb.git (fetch)
origin https://csggit.windstream.com/CSG/PKIWeb.git (push)
Normally there’s no need for us to do this (i.e. don’t maintain your own copy of a project, create a branch in the existing one!), except if our project is derivative work of an opensource project that we need to publish externally. You could have both the internal Git server and GitHub registered as repositories. Make your changes and do “push origin” as well as “push whateverYouCallGitHub”.
You can also “fetch origin” and “fetch whateverYouCallGitHub”, but to avoid confusion, I would use the internal Git server as the authoritative repository (anyone else in the group may be editing the code) and only push to GitHub.
When you no longer need a remote repository, you can remove it.
D:\tempCSG\ljr\Git\PKIWeb>git remote rm ljr
D:\tempCSG\ljr\Git\PKIWeb>git remote -v
origin https://csggit.windstream.com/CSG/PKIWeb.git (fetch)
origin https://csggit.windstream.com/CSG/PKIWeb.git (push)
README
If you participate in GitHub projects, you will notice a README.md file at the root of projects. This is a standard place to include documentation (hence the name), but it is also rendered out in the Git server web site. For an example, see the AD Password Filter project (https://csggit.windstream.com/CSG/Repository/ADPasswordFilter/master/Tree). If there is not a convenient external reference for the initial commit notes, you may want to consider including program documentation in the README.md file.
What if the changes don’t work?
One nice Git feature is undoing changes. The first thing you need to know is that commits have ID numbers (often called a SHA in documentation). You can find that using “git log” or by looking at the web site.
If the changes are local but haven’t been committed to the server, just reset your local copy: git reset –hard ID#
If the changes haven’t been merged into the master branch yet (i.e. you clone your dev branch to the script server, test it … then realize that won’t work), use the git revert functions. First find the commit ID. Then use “git revert ID#” and git will create a commit that is the inverse of the commit specified (it undoes whatever the commit does). Don’t forget to push this revert back to the server.
If the problem is just the commit message, you can modify the message (i.e. remove a typo): git commit –amend -m “This is my new commit message”
You can temporarily revert to a specific commit version (say, to see if the problem you are having was introduced in this version) using “git checkout ID#”. If you intend to make changes from the old state, use “git checkout -b previousState ID# ” to create a new branch from that point.
Ingesting Existing Code
Create the repository. In the directory with your existing code, initialize the directory as a git repository. Add all files to the local repository and commit the initial file load.
D:\Scripts\ljl\wincare-oud>git init
Initialized empty Git repository in D:/Scripts/ljl/wincare-oud/.git/
D:\Scripts\ljl\wincare-oud>git add *
D:\Scripts\ljl\wincare-oud>git commit -m “Uploading existing code to project”
[master (root-commit) 231bafa] Uploading existing code to project
2 files changed, 76 insertions(+)
create mode 100644 _simulateWincare.pl
create mode 100644 res.txt
Add a remote location repository (you can use “git remote -v” to confirm the repository has been added) and push the local repository to the remote
D:\Scripts\ljl\wincare-oud>git remote add origin https://csggit.windstream.com/CSG/WinCareOUDTesting.git
D:\Scripts\ljl\wincare-oud>git push origin master
Counting objects: 4, done.
Delta compression using up to 2 threads.
Compressing objects: 100% (3/3), done.
Writing objects: 100% (4/4), 1.06 KiB | 0 bytes/s, done.
Total 4 (delta 0), reused 0 (delta 0)
To https://csggit.windstream.com/CSG/WinCareOUDTesting.git
* [new branch] master -> master
But wait …
We’ve got a whole bunch of code written and stashed somewhere … but how does that deploy it? It doesn’t. For compiled code, there would be a build process that follows the commits. Someone like a build manager (or an automated process) takes the updated source code, compiles it, hands it off for testing (may be manual testing by QA people or may be an automated test program), then supplies the compiled binaries for release or deployment.
With our interpreted code, using Git is a process change. Instead of going to the task server, copying the script file to something-ljr.xtn, editing my copy, testing, then moving my copy back to something.xnt – we would branch the master for development, clone the development branch to our workstation or elsewhere on the terminal server, make changes, test, commit and push those changes, then merge the development branch back into master.
Once the branch has been merged into master, use git on the task server to integrate changes. (The shortcut below can also be done as “git fetch origin master” and “git merge master”). I am assuming that fast-forward merges can be done.
D:\Scripts\ljl\wincare-oud>git pull origin master
From https://csggit.windstream.com/CSG/WinCareOUDTesting
* branch master -> FETCH_HEAD
Updating 231bafa..202da14
Fast-forward
_simulateWincare.pl | 10 +++++++++-
1 file changed, 9 insertions(+), 1 deletion(-)
On next script execution, the updated code will be used.
Etiquette
There are guidelines to contributing to OpenSource projects (https://opensource.guide/how-to-contribute/) – if you will be working on public projects, read the guidelines and engage with the other developers. Individual projects may have their own guidelines – Git itself is an OpenSource project on GitHub, but pull requests with the obvious repository (named Git) are ignored.
Here, we all know each other … if you see a ticket that requests a new column in a report or a different format for an export, make a development branch, sort the issue, test it, and merge the development branch back into master.
There is one part of the OpenSource guidelines that produce more readable code when multiple individuals are contributing: coding standards. Software development teams have formal documents that define all manner of form within their coding. How to name variables. Are spaces or newlines used before braces? Are spaces used before parenthesis? How are functions named? What does a program or function comment block look like? How are variable and function names cased? When looking at OpenSource projects – or our internal team code – there isn’t a single coding standard. In the absence of a company-supplied standard, most individuals have one of their own. From a class, from a previous job … something.
Some people prefix variable names with type indicators (in statically cast language, you’ve got to search up to the variable declaration otherwise). Some people appreciate concise code and write if(x == y){ doWhatever; } all on one line, others would consider that hopelessly unreadable. Some people use switch statements, some hate them and would rather long-form the if/elseif/else version. If you are making a quick change (+2 needs to be +4 or some word was misspelt), you don’t need to review the code to see how it is written. Anything beyond a quick edit, it is polite to look at how the project maintainer (or original author in our case) has written the code and follow their form.