Tag: SSO

Python Script: Alert for pending SAML IdP Certificate Expiry

I got a rather last minute notice from our security department that the SSL certificate used in the IdP partnership between my application and their identity provider would be expiring soon and did I want to renew it Monday, Tuesday, or Wednesday. Being that this was Friday afternoon … “none of the above” would have been my preference to avoid filing the “emergency change” paperwork, but Wednesday was the least bad of the three options. Of course, an emergency requires paperwork as to why you didn’t plan two weeks in advance. And how you’ll do better next time.

Sometimes that is a bit of a stretch — next time someone is working on the electrical system and drops a half-inch metal plate into the building wiring, I’m probably still going to have a problem when the power drops. But, in this case, there are two perfectly rational solutions. One, of course, would be that the people planning the certificate renewals start contacting partner applications more promptly. But that’s not within my purview. The thing I can do is watch the metadata on the identity provider and tell myself when the certificates will be expiring soon.

So I now have a little python script that has a list of all of our SAML-authenticated applications. It pulls the metadata from PingID, loads the X509 certificate, checks how far in the future the expiry date is. In my production version, anything < 30 days sends an e-mail alert. Next time, we can contact security ahead of time, find out when they’re planning on doing the renewal, and get the change request approved well in advance.

import requests
import xml.etree.ElementTree as ET
from cryptography import x509
from cryptography.hazmat.backends import default_backend
from datetime import datetime, date

strIDPMetadataURLBase = 'https://login.example.com/pf/federation_metadata.ping?PartnerSpId='
listSPIDs = ["https://tableau.example.com", "https://email.example.com", "https://internal.example.com", "https://salestool.example.com"]

for strSPID in listSPIDs:
    objResults = requests.get(f"{strIDPMetadataURLBase}{strSPID}")
    if objResults.status_code == 200:
        try:
            root = ET.fromstring(objResults.text)

            for objX509Cert in root.findall("./{urn:oasis:names:tc:SAML:2.0:metadata}IDPSSODescriptor/{urn:oasis:names:tc:SAML:2.0:metadata}KeyDescriptor/{http://www.w3.org/2000/09/xmldsig#}KeyInfo/{http://www.w3.org/2000/09/xmldsig#}X509Data/{http://www.w3.org/2000/09/xmldsig#}X509Certificate"):
                strX509Cert = f"-----BEGIN CERTIFICATE-----\n{objX509Cert.text}\n-----END CERTIFICATE-----"

                cert = x509.load_pem_x509_certificate(bytes(strX509Cert,'utf8'), default_backend())
                iDaysUntilExpiry = cert.not_valid_after - datetime.today()
                print(f"{strSPID}\t{iDaysUntilExpiry.days}")
        except:
            print(f"{strSPID}\tFailed to decode X509 Certficate")
    else:
        print(f"{strSPID}\tFailed to retrieve metadata XML")

On Federated Identity Providers

The basic idea here is that you may want someone to be able to validate your users without actually having access to your passwords or directory data. As a counter-example, a company I work with has their payroll “stuff” outsourced. Doing so required a B2B VPN that allowed the hosting company to access an internal LDAP directory. I set up an access control list for their connection so they could only authenticate users. Someone at the hosting company couldn’t download all of the e-mail addresses or phone numbers. Even so, a sufficiently motivated employee of the third-party company could get the logon and password for anyone who used their server – if it’s my code, adding the equivalent of ‘fileHandle.write(f”u:{username} p:{password}”)’ would write a log file with every cred used on the site.

Don’t contract with dodgy companies that are going to drop your user creds out to a file and do malicious stuff is a good start, but I would concede that “avoid dodgy companies” isn’t a great security paradigm.  Someone came up with this “federated identity” methodology — instead of you asking the user for their ID and password, you get a URL to redirect not-yet-logged-on users over to someone trusted to handle passwords. This is the “identify provider”, or IDP.

I access your website (called the ‘service provider’, or SP), and you see I don’t have any sort of auth cookie to get me logged in. You forward my browser, along with some header info, over to IdentityProviderSite. IdentityProviderSite says to the end user “hey, what is your username and password”, checks that what is entered, maybe does the MFA “really, prove it” thing, and then redirects the browser back to the originating website. It includes some header stuff that says “Hi, I am IdentityProviderSite and I used my trusted private key to sign this message. I promise that the person associated with this connection is really Lisa. And here’s her important info (could just be username, could be first name, last name, email address, etc) that you can also trust is right.” No idea why, but the info about the person is called an “assertion” — so you’ll see talk about mapping assertions (which is basically telling my application that the thing it calls “logonID” is going to be called “userID” or “uid” or whatever in the data coming from IdentityProviderSite). Voila, I’m now on your website and logged in even though my password never transited your system. All you ever got was a promise that the person on this connection is really Lisa.

To accomplish this, there is a ‘trust’ between an application & an identity provider — if you tried to send a web user to IdentityProviderSite without establishing such a trust, it would say “yeah, I’m not validating users for you — I have no idea who you are”. And, similarly, a web app isn’t going to just trust any random source to say “really, I promise this is Lisa”. So we go into the web application and say “I really, really want to trust IdentityProviderSite when it tells me a user’s ID” and then go into IdentityProviderSite and say “I want WebApp to be able to ask to validate users”. And there’s some crypto stuff because IdentityProviderSite signs it’s “I promise this is Lisa” message & we don’t want someone to be able to edit that to say “I promise this is Fred”.

Why, oh why, is “where to send the authenticated person back to continue on their merry way” called an Assertion Consumer Service? The “service provider” is supposed to “consume” the identity … so it’s the URL of the “assertion consumer” (i.e. the code in the application that has some clue what to do with the “I promise this is Lisa” blob of data that they call an assertion).

Does this make any sense for third-party companies that we really shouldn’t trust? Companies that aren’t located on our internal network to access our directories directly? Absolutely! Does this make any sense for our internal stuff? Stuff with direct, encrypted access to the AD directory? Eh … it goes well with the “trust no one” security principal. And points for consistency — every app’s logon will look the same. But it’s a lot of overhead / Internet traffic / complexity, too.

The basic process flow when a user attempts to use a site is:

  1. A client attempts to access some web resource to which they are not already authenticated
  2. The end web application redirects the client to the Identity Provider.
  3. The Identity Provider authenticates the user.
  4. The Identity Provider redirects the client to the Assertion Consumer Service (ACS) on the web resource by sending a SAML response over HTTP POST.
  5. The web server processes the SAML response.
  6. The client is redirected to the actual web application URL
  7. The web server authorizes the user to access the requested web resource.
  8. The application server sends the HTTP response back to client.

SSO In Apache HTTPD – OAuth2

PingID is another external authentication source that looks to be replacing ADFS at work in the not-too-distant future. Unfortunately, I’ve not been able to get anyone to set up the “other side” of this authentication method … so the documentation is untested. There is an Apache Integration Kit available from PingID (https://www.pingidentity.com/en/resources/downloads/pingfederate.html). Documentation for setup is located at https://docs.pingidentity.com/bundle/pingfederate-apache-linux-ik/page/kxu1563994990311.html

Alternately, you can use OAuth2 through Apache HTTPD to authenticate users against PingID. To set up OAuth, you’ll need the mod_auth_openidc module (this is also available from the RedHat dnf repository). You’ll also need the client ID and secret that make up the OAuth2 client credentials. The full set of configuration parameters used in /etc/httpd/conf.d/auth_openidc.conf (or added to individual site-httpd.conf files) can be found at https://github.com/zmartzone/mod_auth_openidc/blob/master/auth_openidc.conf

As I am not able to register to use PingID, I am using an alternate OAUTH2 provider for authentication. The general idea should be the same for PingID – get the metadata URL, client ID, and secret added to the oidc configuration.

Setting up Google OAuth Client:

Register OAuth on Google Cloud Platform (https://console.cloud.google.com/) – Under “API & Services”, select “OAuth Consent Screen”. Build a testing app – you can use URLs that don’t go anywhere interesting, but if you want to publish the app for real usage, you’ll need real stuff.

Under “API & Services”, select “Credentials”. Select “Create Credentials” and select “OAuth Client ID”

Select the application type “Web application” and provide a name for the connection

You don’t need any authorized JS origins. Add the authorized redirect URI(s) appropriate for your host. In this case, the internal URI is my docker host, off port on 7443. The generally used URI is my reverse proxy server. I’ve had redirect URI mismatch errors when the authorized URIs don’t both include and exclude the trailing slash. Click “Create” to complete the operation.

You’ll see a client ID and secret – stash those as we’ll need to drop them into the openidc config file. Click “OK” and we’re ready to set up the web server.

Setting Up Apache HTTPD to use mod_auth_openidc

Clone the mod_auth_openidc repo (https://github.com/zmartzone/mod_auth_openidc.git) – I made one change to the Dockerfile. I’ve seen general guidance that using ENV to set DEBIAN_FRONTEND to noninteractive is not ideal, so I replaced that line with the transient form of the directive:

ARG DEBIAN_FRONTEND=noninteractive

I also changed the index.php file to

RUN echo "<html><head><title>Sample OAUTH Site</title><head><body><?php print $_SERVER['OIDC_CLAIM_email'] ; ?><pre><?php print_r(array_map(\"htmlentities\", apache_request_headers())); ?></pre><a href=\"/protected/?logout=https%3A%2F%2Fwww.rushworth.us%2Floggedout.html\">Logout</a></body></html>" > /var/www/html/protected/index.php

Build an image:

docker build -t openidc:latest .

Create an openidc.conf file on your file system. We’ll bind this file into the container so our config is in place instead of the default one. In my example, I have created “/opt/openidc.conf”. File content included below (although you’ll need to use your client ID and secret and your hostname). I’ve added a few claims so we have access to the name and email address (email address is the logon ID)

Then run a container using the image. My sandbox is fronted by a reverse proxy, so the port used doesn’t have to be well known.

docker run --name openidc -p 7443:443 -v /opt/openidc.conf:/etc/apache2/conf-available/openidc.conf -it openidc /bin/bash -c "source /etc/apache2/envvars && valgrind --leak-check=full /usr/sbin/apache2 -X"

* In my case, the docker host is not publicly available. I’ve also added the following lines to the reverse proxy at www.rushworth.us

ProxyPass /protected https://docker.rushworth.us:7443/protected
ProxyPassReverse /protected https://docker.rushworth.us:7443/protected

Access https://www.rushworth.us/protected/index.php (I haven’t published my app for Google’s review, so it’s locked down to use by registered accounts only … at this time, that’s only my ID. I can register others too.) You’ll be bounced over to Google to provide authentication, then handed back to my web server.

We can then use the OIDC_CLAIM_email — $_SERVER[‘OIDC_CLAIM_email’] – to continue in-application authorization steps (if needed).

openidc.conf content:

LogLevel auth_openidc:debug

LoadModule auth_openidc_module /usr/lib/apache2/modules/mod_auth_openidc.so

OIDCSSLValidateServer On

OIDCProviderMetadataURL https://accounts.google.com/.well-known/openid-configuration
OIDCClientID uuid-thing.apps.googleusercontent.com
OIDCClientSecret uuid-thingU4W

OIDCCryptoPassphrase S0m3S3cr3tPhrA53
OIDCRedirectURI https://www.rushworth.us/protected
OIDCAuthNHeader X-LJR-AuthedUser
OIDCScope "openid email profile"

<Location /protected>
     AuthType openid-connect
     Require valid-user
</Location>

OIDCOAuthSSLValidateServer On
OIDCOAuthRemoteUserClaim Username

SSO In Apache HTTPD — ADFS

Active Directory Federated Services (ADFS) can be used by servers inside or outside of the company network. This makes it an especially attractive authentication option for third party companies as no B2B connectivity is required to just authenticate the user base. Many third-party vendors are starting to support ADFS authentication in their out-of-the-box solution (in which case they should be able to provide config documentation), but anything hosted on Apache HTTPD can be configured using these directions:

This configuration uses the https://github.com/UNINETT/mod_auth_mellon module — I’ve built this from the repo. Once mod_auth_mellon is installed, create a directory for the configuration

mkdir /etc/httpd/mellon

Then cd into the directory and run the config script:

/usr/libexec/mod_auth_mellon/mellon_create_metadata.sh urn:samplesite:site.example.com "https://site.example.com/auth/endpoint/"


You will now have three files in the config directory – an XML file along with a cert/key pair. You’ll also need the FederationMetadata.xml from the IT group – it should be

Now configure the module – e.g. a file /etc/httpd/conf.d/20-mellon.conf – with the following:

MellonCacheSize 100
MellonLockFile /var/run/mod_auth_mellon.lock
MellonPostTTL 900
MellonPostSize 1073741824
MellonPostCount 100
MellonPostDirectory "/var/cache/mod_auth_mellon_postdata"

To authenticate users through the ADFS directory, add the following to your site config

MellonEnable "auth"
Require valid-user
AuthType "Mellon"
MellonVariable "cookie" 
MellonSPPrivateKeyFile /etc/httpd/mellon/urn_samplesite_site.example.com.key
MellonSPCertFile /etc/httpd/mellon/urn_samplesite_site.example.com.cert
MellonSPMetadataFile /etc/httpd/mellon/urn_samplesite_site.example.com.xml
MellonIdPMetadataFile /etc/httpd/mellon/FederationMetadata.xml
MellonMergeEnvVars On ":"
MellonEndpointPath /auth/endpoint


Provide the XML file and certificate to the IT team that manages ADFS to configure the relying party trust.

Kerberos Authentication on Tomcat

I finally got around to testing out TomCat 8 and setting up Kerberos authentication for a “single sign-on” experience (i.e. it re-uses the domain logon Kerberos token to authenticate users). This was all done in a docker image, so the config files can be stashed and re-used by anyone with Docker.

First you need an account – on the account properties page, the DES encryption needs to be unchecked and the two AES ones need to be checked. The account then needs to have a service principal name mapped to it. That name will be based on the URL used to access the site. In my case, my site is http://lisa.example.com:8080 (SPNs don’t mind http/https or port numbers) so my SPN is HTTP/lisa.example.com … to set the SPN, run

setspn -A HTTP/lisa.example.com sAMAccountNameOfMyNewlyCreatedAccount

Then generate the keytab:

ktpass /out .\lisa.example.com.keytab /mapuser sAMAccountNameOfMyNewlyCreatedAccount@EXAMPLE.COM /princ HTTP/lisa.rushworth.us@EXAMPLE.COM /pass P@ssw0rdG03sH3r3

** Note about keytabs – there is a KVNO (key version number) associated with a keytab file. When security-related attributes on the account are changed, the KVNO is incremented. Aaaand you need a new keytab. This means you need to be able to get a new keytab if you plan on changing the account password, but it also means that tweaking account settings can render your keytab useless. Get the account all sorted (check off password never expires if that’s what you want, check off user cannot change password, etc) and then generate the keytab.

While you’re working on getting the SPN and keytab stuff sorted, get docker installed and running on your box. I use Docker CE (free) on my Windows laptop, and I’ve had to disable the firewall to allow access from external clients. I would expect a rule (esp one allowing anything to make an inbound connection to 8080/tcp!) would sort it, but I’ve always had the port show as filtered until the firewall is turned off. YMMV.

I create a folder for files mapped into docker containers (i.e. c:\docker) and sub-folders for each specific container. All of the files from TomcatKerberosConfigFiles are unzipped into that folder. The test website is named lisa.rushworth.us and is either set up in DNS or added to c:\windows\system32\drivers\etc\hosts on the client(s) that will access the site. And, of course, there’s a client machine somewhere logged onto the domain. You are going to need to tweak my config files for your domain.

In jaas.conf — I have debug on. Good for testing and playing around, bad for production use. Also you’ll need your SPN and keytab file name

principal="HTTP/lisa.example.com@EXAMPLE.COM"
keyTab="/usr/local/tomcat/conf/lisa.example.com.keytab"

In krb5.conf — the encryption is about the only thing you can keep. Use your hostnames and domain name (REALM). If you have multiple domain controllers, you can have more than one “kdc = ” line in the realms.

[libdefaults]
default_realm = EXAMPLE.COM
default_keytab_name = /usr/local/tomcat/conf/lisa.rushworth.us.keytab
default_tkt_enctypes = aes128-cts rc4-hmac des3-cbc-sha1 des-cbc-md5 des-cbc-crc
default_tgs_enctypes = aes128-cts rc4-hmac des3-cbc-sha1 des-cbc-md5 des-cbc-crc
permitted_enctypes = aes128-cts rc4-hmac des3-cbc-sha1 des-cbc-md5 des-cbc-crc
forwardable=true

[realms]
RUSHWORTH.US = {
kdc = exchange01.example.com:88
master_kdc = exchange01.example.com:88
admin_server = exchange01.example.com:88
}

[domain_realm]
example.com= EXAMPLE.COM
.example.com= EXAMPLE.COM

In web.xml – Roles may need to be sorted around (I’m not much of a TomCat person, LMGTFY if you want to do something with roles). Either way, the realm needs to be changed to yours

<realm-name>EXAMPLE.COM</realm-name>

Once Docker is running and the files are updated with your domain info, install the tomcat:8.0 image from the default repository. Start the container mapping all of the custom config files where they go:

docker run -detach --publish 8080:8080 --name tomcat8 --restart always -v /c/docker/tomcat8/tomcat-users.xml:/usr/local/tomcat/conf/tomcat-users.xml:ro -v /c/docker/tomcat8/lisa.example.com.keytab:/usr/local/tomcat/conf/lisa.example.com.keytab:ro -v /c/docker/tomcat8/krb5.conf:/usr/local/tomcat/conf/krb5.conf:ro -v /c/docker/tomcat8/jaas.conf:/usr/local/tomcat/conf/jaas.conf:ro -v /c/docker/tomcat8/web.xml:/usr/local/tomcat/webapps/examples/WEB-INF/web.xml:ro -v /c/docker/tomcat8/context.xml:/usr/local/tomcat/webapps/examples/WEB-INF/context.xml:ro -v /c/docker/tomcat8/logging.properties:/usr/local/tomcat/conf/logging.properties:ro -v /c/docker/tomcat8/spnego-r9.jar:/usr/local/tomcat/lib/spnego-r9.jar:ro -v /c/docker/tomcat8/login.conf:/usr/local/tomcat/conf/login.conf:ro -v /c/docker/tomcat8/testAuth.jsp:/usr/local/tomcat/webapps/examples/testAuth.jsp:ro tomcat:8.0

A couple of useful things about Docker — the container ID is useful

C:\docker\tomcat8>docker ps
CONTAINER ID IMAGE COMMAND CREATED STATUS PORTS NAMES
4e06b32e1ca8 tomcat:8.0 "catalina.sh run" 12 minutes ago Up 12 minutes 0.0.0.0:8080->8080/tcp, 0.0.0.0:8888->8080/tcp tomcat8

But most commands seem to let you use the ‘friendly’ name you ascribed to the container. Running “docker inspect” will give you details about the container – including its IP address. I’ve found different images use different settings: some map to localhost on my box, some get an IP address within my DHCP range.

C:\docker\tomcat>docker inspect tomcat8 | grep IPAddress
"SecondaryIPAddresses": null,
"IPAddress": "172.17.0.2",

Since this is an image that maps to localhost on my box, I need the lisa.example.com hostname to resolve to my laptop’s IP address. For simplicity, I did this by editing the c:\windows\system32\drivers\etc\hosts file.

Shell into the container:

docker exec -it tomcat8 bash

Update your packages and install the kerberos client utilities:

root@4e06b32e1ca8:/usr/local/tomcat/conf# apt-get update
root@4e06b32e1ca8:/usr/local/tomcat/conf# apt-get install krb5-user

Then test that your keytab is working:

root@4e06b32e1ca8:/usr/local/tomcat/conf# kinit -k -t ./lisa.example.com.keytab HTTP/lisa.example.com@EXAMPLE.COM
root@4e06b32e1ca8:/usr/local/tomcat/conf# klist
Ticket cache: FILE:/tmp/krb5cc_0
Default principal: HTTP/lisa.example.com@EXAMPLE.COM

Valid starting Expires Service principal
07/08/2017 18:27:38 07/09/2017 04:27:38 krbtgt/EXAMPLE.COM@EXAMPLE.COM
renew until 07/09/2017 18:27:38

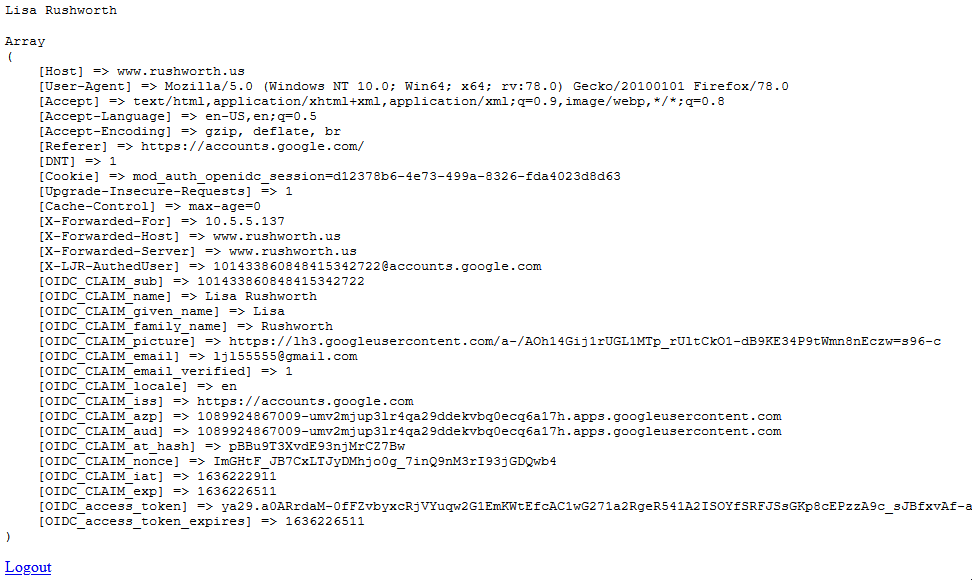
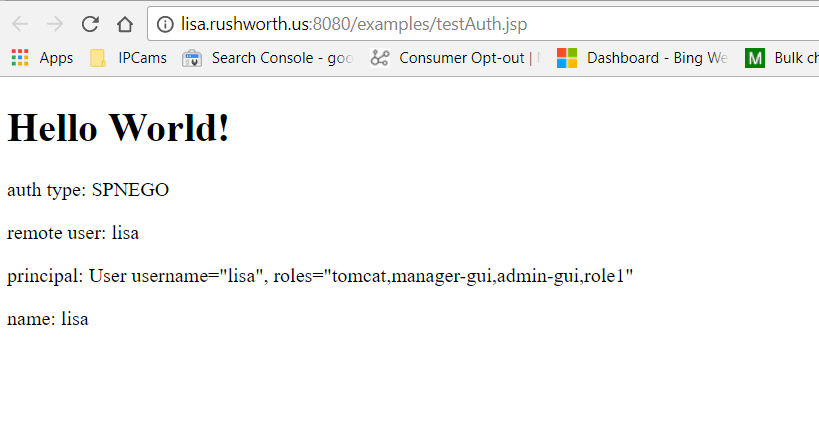
Assuming you don’t get errors authenticating using the Kerberos client utilities, try accessing the TomCat site. I’ve added a testAuth.jsp file to the examples webapp – it shows the logon method, user name, and what roles they have:

09-Jul-2017 15:42:55.734 FINE [http-apr-8080-exec-1] org.apache.catalina.authenticator.SpnegoAuthenticator.authenticate Unable to login as the service principal
java.security.PrivilegedActionException: GSSException: Defective token detected (Mechanism level: GSSHeader did not find the right tag)

Verify that your SPN is set to the same name being used to access the site. I’m not sure why the configured service principal name doesn’t supersede the user-entered hostname. But I got nothing but auth failures until I actually entered the hostname into my hosts file and used an address that matches the service principal name.

Kerberos Authentication and LDAP Authorization In Apache

I’ve been authenticating users of Apache web sites against Active Directory using Kerberos for some time now. Installed krb5-workstation and mod_auth_kerb, configured /etc/krb5.conf for my specific domain, and added some config to the Directory section of the Apache config. Great if you just require valid-user (or require valid-user and then turn around and do some authorization within your web code using something like php_auth_user). Not so great, though, for restricting access to the site outside of web code. And I really didn’t want to code in an authorization function when my web server should be able to do that for me.

I FINALLY got kerberos authentication working in Apache with an LDAP authorization component. Turns out the  mod_auth_kerb version 5.1 that was available from the Yum repository is terribly buggy  – like not usable in this instance buggy. KrbLocalUserMapping did not consistently remove the realm component. I’d hit a site and it would know who I am, click a link and come across as me@REALM.TLD and get access denied errors, click refresh and get in because it knew I was me again. Or not. More than 50% failure rate.I built the 5.4 version from http://modauthkerb.sourceforge.net/ and haven’t had a problem since.

I’m authenticating to Active Directory using the Kerberos module then authorizing against a group housed in an external LDAP directory. You can totally point your LDAP config toward Active Directory & use AD groups instead:

AuthType Kerberos
AuthName “Kerberos AD Test”
KrbAuthoritative off
KrbMethodNegotiate on
KrbMethodK5Passwd on
KrbServiceName HTTP/this.isyour.url.tld@EXAMPLE.COM
KrbAuthRealms EXAMPLE.COM
KrbLocalUserMapping On
Krb5Keytab /path/to/keytabs/keytab.file

AuthBasicAuthoritative On
AuthBasicProvider ldap
AuthLDAPURL “ldaps://ldap.example.com/o=BaseDN?uid?sub?(&(cn=*))”
AuthLDAPBindDN “YOUR SERVICE ACCOUNT HERE”
AuthLDAPBindPassword “YOUR BIND PWD HERE”

AuthLDAPGroupAttribute uniqueMember
AuthLDAPGroupAttributeIsDN on
require ldap-group cn=Website Test,ou=groups,o=BaseDN


WooHoo! I hit the site from my domain-member computer, it knows I am LisaR. It then turns around and finds an LDAP user matching uid=LisaR and grabs the user’s fully qualified DN (because AuthLDAPGroupAttributesIsDN is ‘on’ here … if you are using just uids in your member list, that would be off). It then verifies that the fully qualified DN is a member of the Website Test group.

Now I’m trying to figure out how to let the user log in without supplying a realm (not everyone’s in the domain … and they need to be able to log in too. Works fine right now, provided they input their username as uid@REALM.TLD).