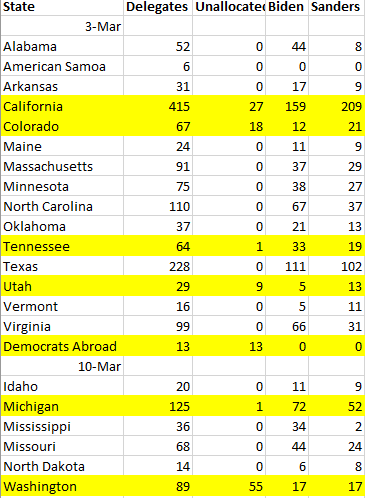
Striking how the states where Biden is leading count so much quicker than the ones where Bernie is leading ..
Striking how the states where Biden is leading count so much quicker than the ones where Bernie is leading ..
Of course you can use the math libraries and actually round, but this is a quick one-liner that truncates to two digits.
fValue = static_cast<int>(fValue * 100) / 100.0;
(Warning: If saying Castro had a decent literacy program offended you … you probably want to skip this comment). There’s one thing I think Trump does well — play the media. In the 2016 election, he didn’t need to buy a bunch of advertising because every major news outlet handed over HUGE chunks of airtime to him. Did they mean to? Probably not. They thought they were doing X and Trump was working the system to accomplish Y. I worry that the Democratic candidate this Autumn will be unable to complete with Trump because Trump is playing a different game. It’s like kitting up for a baseball game and showing up at a Formula One race. You might be an awesome baseball player … but you really should have brought a car. Bernie playing the media like this — because you *know* they weren’t there to cover an “I look forward to the debate Sunday” speech … they thought he was pulling out of the race — shows me that he can compete with Trump on issues *and* can play the media to his advantage.
And, yeah, I look forward to Biden answering for his history on Sunday. His fabricated Civil Rights legacy. Direct quotes where he is willing to cut Social Security. The money he’s received from credit card companies and how that influences his position on bankruptcy and consumer protections. His support of the PATRIOT Act — his pride that it’s based on legislation he drafted!
Letter sent to my Ohio State Representative and Senator:
I am writing to encourage you to support GA133 HB-546 introduced on 10 March 2020. The bill alters the definition of hybrid and electric vehicles to reclassify plug-in hybrid vehicles. These are vehicles that will both plug into an external source to charge for a modest electric range AND use the gasoline engine when the charge is depleted. Examples of vehicles in this category are Chevy Volt, Toyota Prius Prime, Chrysler Pacifica PHEV, Kia Niro PHEV, Honda Clarity, and Ford Fusion Energi. These vehicles are not intended to run on electricity alone — they use a combination of electricity and gasoline.
Plug-in hybrid owners have been uniquely penalized by the latest gas tax bill. Plug-in hybrid vehicle owners pay tax on the gasoline used and pay the higher registration fee for fully electric vehicles. HB-546 accommodates said payment of the gasoline tax by halving the registration fee for plug-in hybrid vehicles. Without a system to account for electric miles driven (i.e. a system that taxes road use by electric vehicles the same way the gasoline tax does), reclassifying plug-in hybrids seems like the best way to accommodate the fact that plug-in hybrid drivers are already paying toward road maintenance through the gas tax.
The first question, of course, is are there even “Bernie Bros”? And the answer may well be NO. Like Biden’s “giant delegate lead” being reported with over 100 delegates from Super Tuesday still unallocated and data from 44 machines in Texas missing, This may be a narrative that’s being reported with little supporting evidence.
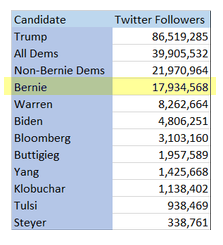
There may be “Bros” but as a numeric rather than statistical fact — how many Twitter followers does Bernie have (highlight mine)?
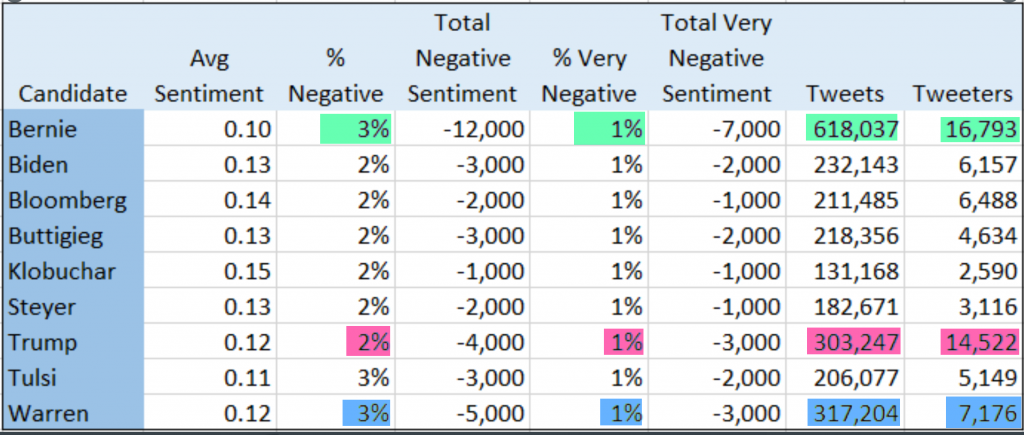
Are these followers particularly negative (again, highlight mine)? Not more negative than Warren’s followers. And, ironically, both Bernie and Warren’s followers appear to be more negative than Trump’s.
Even if we leave aside lexical sentiment analysis, the accuracy of which can legitimately be discussed. If we leave aside what actually constitutes negative commentary — someone who posts convey a negative-sentiment as they face bankruptcy after a serious illness isn’t the same as someone who attacks immigrants or espouses white supremacist beliefs — are the Bros Bernie’s? One thing people grappled with, back when the Internet first became a consumer offering, is that I may not be what I say I am. And not the type refuted by ‘yeah, there aren’t that many barely 18 girls on the planet’. “I’m a 32 year old guy living in Bloomington, IL who is really into R/C airplanes”. No way to tell — my ISP uses MPLS routing so my IP address geo-locates to Nebraska, Georgia, Pennsylvania, Arkansas, and North Carolina quite regularly. It’s not like social-media sites take any extreme measures to validate identify — a ten cent registration fee and your information needs to match up with the billing details, send us a copy of your cable bill, we need a copy of your birth certificate and state-issued ID card?! I’ve got friends who play games through Facebook who create additional accounts to “friend” and boost their game performance. Is it inconceivable that some 4-chann’er would create a social media account posing as a liberal? What percent of ‘Bernie Bros’ are MAGA’ers? How many MAGA’ers are trolls? What percent are Russian operatives? Does perpetuating the ‘Bernie Bro’ myth create division in America (i.e. something the Russians want)? Not saying there aren’t assholes who support Bernie. There are. And, statistically, I expect a significant percentage of those individuals to be active online. But what part of Bernie’s campaign is designed to *attract* assholes? But I don’t see evidence that Bernie’s supports have a higher percentage of assholes then any other campaign. A fortunate, but often ignored, facet of free speech is that freedom to speak freely does not imply freedom from consequences for your speech. Moving discourse online has significantly disrupted the threat of consequences.
Even if we discount the existence of real negativity and assume anyone who claims to be a Bernie supporter is a Bernie supporter … what can Bernie do about it? He’s already disavowed the comments and said he does not consider these individuals to be part of his movement. Is he supposed to get a warrant to unmask the identify of everyone who posts a snake emoji on Twitter and deliver a cease and desist letter? Drop by and speak to them about their online behavior?
Statistical analysis can make you suspicious — ‘black swan’ statistical outliers (which are still possible outcomes) and amazing coincidences where outlier possibilities are reality. Maybe it’s more fun to think about the conspiracy theory possibilities — there’s drama and intrigue. Whereas an unlikely occurrence happening because unlikely doesn’t mean impossible … that’s far less entertaining.
The Super Tuesday results are still not complete today. Where are results still pending? There are 115 delegates not yet allocated to a candidate. 13 of these are classed as “Democrats Abroad” — saying that the results for “Democrats Abroad” is outstanding because ballots are still in the post is reasonable. I’d expect a large portion of “Democrats Abroad” ballots to be posted (although there are evidently like 400 in-person polling sites too). And I don’t know how “Abroad” they’re talking about — Canada? Germany? Australia? McMurdo Station? The ISS? I’m willing to remove these delegates from the Super Tuesday list (IIRC, their in-person voting spanned a week coming up to Super Tuesday too). Of the remaining 102 delegates, one is from a state where Biden is in the lead. Not quite 1% of the outstanding delegates are in a state where Biden is in the lead. Is it possible that this outlier is an amazing coincidence? Sure. But could the DNC be creating a narrative where Biden has a decent lead in the electoral count ahead of voting this coming Tuesday with the intent of influencing voters (some 60% of whom say electability is more important than the fact the candidate agrees with them about issues)? Hard not to go there.
| State | Winner | Delegates | Unallocated Delegates | % Unallocated | Biden | Bloomberg | Gabbard | Sanders | Warren |
| Alabama | Biden | 52 | 0 | 0% | 44 | 0 | 0 | 8 | 0 |
| Arkansas | Biden | 31 | 0 | 0% | 17 | 5 | 0 | 9 | 0 |
| Maine | Biden | 24 | 0 | 0% | 11 | 0 | 0 | 9 | 4 |
| Massachusetts | Biden | 91 | 0 | 0% | 37 | 0 | 0 | 29 | 25 |
| Minnesota | Biden | 75 | 0 | 0% | 38 | 0 | 0 | 27 | 10 |
| North Carolina | Biden | 110 | 0 | 0% | 67 | 4 | 0 | 37 | 2 |
| Oklahoma | Biden | 37 | 0 | 0% | 21 | 2 | 0 | 13 | 1 |
| Tennessee | Biden | 64 | 1 | 2% | 33 | 10 | 0 | 19 | 1 |
| Texas | Biden | 228 | 0 | 0% | 111 | 10 | 0 | 102 | 5 |
| Virginia | Biden | 99 | 0 | 0% | 66 | 0 | 0 | 31 | 2 |
| American Samoa | Bloomberg | 6 | 0 | 0% | 0 | 4 | 2 | 0 | 0 |
| California | Sanders | 415 | 61 | 15% | 148 | 15 | 0 | 186 | 5 |
| Colorado | Sanders | 67 | 27 | 40% | 10 | 9 | 0 | 20 | 1 |
| Utah | Sanders | 29 | 13 | 45% | 2 | 2 | 0 | 12 | 0 |
| Vermont | Sanders | 16 | 0 | 0% | 5 | 0 | 0 | 11 | 0 |
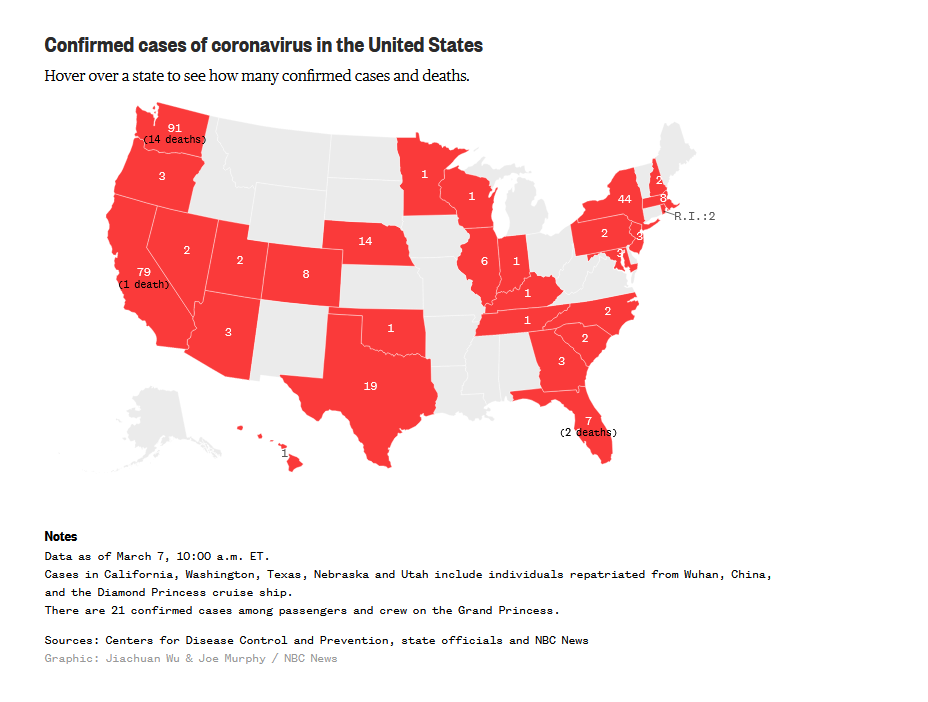
It bother anyone that the map on the CDC’s web site
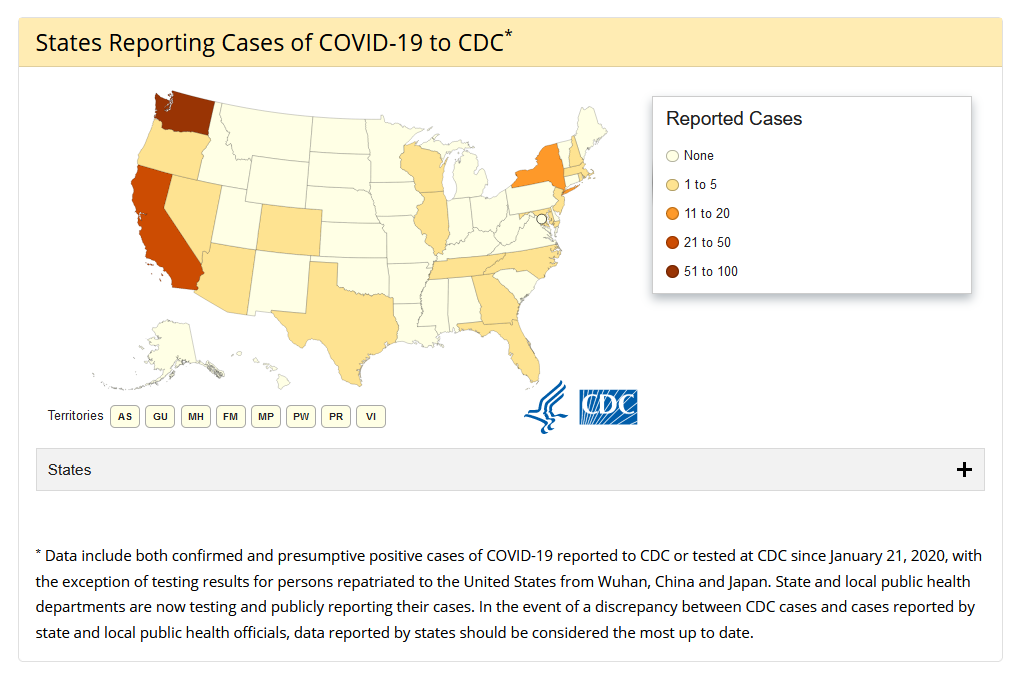
Is missing a lot of data points that the map on NBC’s web site has?
While at a recent Zoning Commission meeting, they discussed how a use was judged to be (or not to be) agriculture vis-à-vis Township not having a right to regulate agriculture per ORC 519.21. The example of a greenhouse used to grow flowers was given — not agriculture. Which got me thinking about the false association between ‘commerce’ and ‘agriculture’ — flowers are absolutely included in Ohio’s list of agriculture. ORC 303.01 reads:
agriculture" includes
 farming; ranching; algaculture meaning the farming of algae; aquaculture; apiculture;
 horticulture; viticulture; animal husbandry, including, but not limited to, the care and raising
    of livestock, equine, and fur-bearing animals;
 poultry husbandry and the production of poultry and poultry products;
 dairy production; the production of field crops,
 tobacco, fruits, vegetables, nursery stock,
 ornamental shrubs, ornamental trees, flowers,
 sod, or mushrooms; timber; pasturage;
 any combination of the foregoing; and the processing, drying, storage, and marketing
 of agricultural products when those activities are conducted in conjunction with,
 but are secondary to, such husbandry or production.
So why wouldn’t a greenhouse used to grow flowers count as an agricultural use? Wickard v. Filburn, 317 U.S. 111 (1942) — a fairly wide reaching case — found that Mr. Filburn producing wheat for his own use (i.e. not selling it) still counted as commerce because he would have otherwise bought the wheat on the open market. Which is to say his wheat production was commerce because it was grown to allow him to avoid commerce. While Mr. Filburn’s production was not substantial, the cumulative action of personal-use growers would have a substantial impact on the market. Which was enough commerce to grant the federal government power to regulate his wheat production.
Same holds true here — and I think flowers were used an an example because it’s easy enough to say “eh, it’s just flowers”. But my concern is that the Township is going to want to use the same logic to regulate other agricultural activities. The personal production of poultry products may not be substantial, but the cumulative production of everyone who has some egg layers in their yard would be substantial. Thus egg laying chickens that produce for personal use would still be considered commerce by the logic of WIckard v. Filburn. I think someone claiming agricultural use for flowers might have a bigger hurdle, but a sufficiently motivated individual may be able to use this argument to substantiate the agricultural exemption for their greenhouse.
Hopefully this is one of those situations where the government doesn’t try to have it both ways — if personal production is commerce in one case, it should be commerce in other (very similar) cases.
There are murmurs of a conspiracy to defeat Sanders (there’s also a president outright saying it). There is also push-back against these murmurs because diminishing people’s faith in the Democratic process suppresses voter turnout.
Questioning if this is a conspiracy is almost moot — did a bunch of people get together and plan this or did dozens of individuals achieve this state in an uncoordinated fashion? I don’t care. We’ve had a long run of elections that create legitimate doubt in how well the result reflects the will of Americans. And not just Clinton’s popular vote victory in 2016 — I’d go back to Gore, but I’m not terribly familiar with the American elections in the 80’s, and I wasn’t alive long enough to be aware of elections in the 70’s.
I watched news reports on Tuesday night announcing that Biden had won the popular vote across all of the states that had voted on Super Tuesday and had results to far. Except … California hadn’t started reporting yet. Cali has 30% of the delegates, and I am not interested enough to go check state populations to get a better number. But how meaningful is the popular vote stat with 30% of the vote outstanding? Delegate count too — I’ve been tracking delegate assignment based on NPR’s data, and a sixty point spread with 144 delegates from Cali unassigned (228 total unassigned across all Super Tuesday states) isn’t a huge blowout. I’ve also quite lazily started tracking by adding all of Bloomberg, Buttigieg, and Kobluchar’s delegates to Biden’s count — 687 to 531 is a much bigger spread, and the 144 from Cali aren’t going to close that gap (although delegates from Cali plus Warren’s 65 might do it). I don’t know if delegates in each of the states where Bloomberg, Buttigieg, and Kobluchar have delegates *can* be reassigned in the first round or if their delegates become like super delegates and only really count in the second round (or if their delegates can be reassigned at all). But this seems like the sort of research some media outlet should pay a reporter to perform. If Bloomberg can only reallocate a dozen of his delegates in the first round, the delegate count looks a lot different than it does when I’ve got all 58 of his delegates assigned to Biden.
Thirty years ago, it would have been difficult to recompute ranked-choice votes as candidates dropped out of the primary. But the one thing I think caucuses get right is that someone who puts their vote behind a non-viable candidate gets to reconsider and have their vote “count”. It would be algorithmically trivial to provide a full list of candidates. Pick your first choice. Now pick your second choice. Pick your Nth choice. You’re a huge Gabbard fan who wouldn’t consider voting for anyone else? Great, you get to abstain after your first selection. Would prefer Warren but consider Sanders a good second option, you can vote accordingly and abstain after your second choice. Don’t mind “voting” for any of the candidates? Then you can work your way through *all* of them. This is ideally suited for electronic ballots where your already-selected candidates can be removed from subsequent selection options. But so what if someone’s 1st through Nth choice is Sanders … he’s either still in the race & their 1st choice counts or he dropped out & they’ve abstained from voting. Maybe you voted for Buttigieg because you think he secretly harbors super progressive views but has the McKinsey experience to speak like a centrist. Your second choice was Warren, followed by Sanders, followed by no one. Buttigieg dropped out on Monday, and your vote is reassigned to Warren. She dropped out today? You voted for Sanders. Instead of allowing the individual candidate to decide where their delegates go, allow individual voters to decide. It would add an interesting nuance to primary coverage because the results of previous elections would effectively change as candidates drop out. But it would allow the results of the primary to better reflect what voters actually want. I’d extend this to the general election as well. Maybe it made you feel good to protest-vote for Stein. You could stop there and abstain on the second choice. Or you could pick a second preference.
And I’d be remiss to avoid pointing out that direct representation isn’t the impossibility it used to be. In 1790, getting the near four million Americans together to read through legislation and vote was an inconceivable undertaking. Getting the near 63 million Americans together in 1890, or even he 250 million in 1990 would have been an insurmountable task. But the technology is available today to do this. What impact would getting rid of the Legislature have on the Democracy in our system? Direct representation is a technical possibility. Yes, there are problems that would need to be addressed. Security. More importantly accessibility. As much as it may seem otherwise, 100% of Americans don’t have a smartphone in their hand. Requiring access to relatively costly technology could be seen as an attack on the rights of poorer individuals. Or individuals who aren’t technically savvy. You can use a computer at your free, public library – maybe the public libraries have extended hours during the voting season. Maybe there are secure Internet kiosks set up in town halls across the country. Maybe broadband access gets better funding. Maybe there’s additional funding for community education to teach people how to engage with the direct representation platform.
Even without changing the entire structure of government, I think the IRS should create a new class of tax-deductable donation restricted to federal government agencies. “Donations” to the agency are a 1:1 reduction in tax owed. The ‘donation’ process is inline with filing taxes — not like I need to cut a 4k check to NWS and then wait for my 4k refund check. I pay 10k in taxes? I could earmark 4k to the EPA, 4k to the Dept of Education, 2k to NOAA (hopefully there would be enough granularity that I wouldn’t need to select Commerce), and be done. I could allocate 10k to the military. I could spend hours agonizing on how I think my tax money would best be apportioned. Or I could just pay my taxes without any of these deductions and *that* is the money Congress would have available to budget. This idea, ironically, implements a populist version of “starve the beast”. And maybe I’m wrong and trillions of dollars would still pour into Defense and EPA would be left unfunded. But it would provide a way for citizens to clearly show their priorities. It could, if constructed properly, provide an end-run around the Hyde Amendment. *Your* federal dollars *didn’t* get used, but someone else could volunteer *their* federal dollars.
The exit polling where upward of 60% of voters say it was more important to nominate a candidate who could beat Trump than someone who agrees with them on issues … that’s pretty unbelievable to me. But it’s especially odd that “dude who can beat Trump” is also the dude who wasn’t dragged through the mud as a tangent to the impeachment trial. Anyone want to guess what this year’s “but her emails!!!” will be?