Tag: CI/CD

Testing Procedural Code with PHPUnit

You can use PHPUnit to test procedural code — in this case, I’m testing the output of a website. I have some Selenium tests for UI components but wanted to use the shell executor for functional testing. In the test code, you can populate the _SERVER and _POST (or _GET) arrays and simulate the web environment.

<?php
    namespace phpUnitTests\CircuitSearch;
    class CircuitExportTest extends \PHPUnit_Framework_TestCase{
        private function _execute(array $paramsPost = array(), array $paramsServer = array() ) {
            $_POST = $paramsPost;
            $_SERVER = $paramsServer;
            ob_start();
            include "../../myWebSitePage.php";
            return ob_get_clean();
        }
        public function testUsageLogging(){
            $argsPost = array('strInput'=>'SearchValue', 'strReportFormat'=>'JSON');
            $argsServer = array("DOCUMENT_ROOT" => '/path/to/website/code/html/', "HOSTNAME" => getHostByName(),
                                "SERVER_ADDR" => getHostByName(php_uname('n')), "PWD" => '/path/to/website/code/html/subcomponent/path');
            $this->assertEquals('{}', $this->_execute($argsPost, $argsServer));
        }
    }
?>

Running the test, my web output is compared to the static string in assertEquals. In this case, I am searching for a non-existent item, nothing is returned, and I expect to get empty braces. I could use AssertsRegExp or or AssertsStringContainsString to verify the specifics of a real result set.

GitLab – Using the Docker Executor for Testing

Setting up gitlab-runner to use a Docker executor: You need Docker running on the gitlab-runner host. In my sandbox, I have GitLab running as a Docker container. Instead of installing Docker in Docker, I have mounted the host Docker socket to the GitLab container. You’ll need to add the –privileged flag, and since I’m using Windows … my mount path is funky. But it works.

docker run –detach –hostname gitlab.rushworth.us –publish 443:443 –publish 80:80 –publish 22:22 –name gitlab -v //var/run/docker.sock:/var/run/docker.sock –privileged gitlab/gitlab-ee:latest

Register the runner using “docker-runner register”. I always specify the image in my CI YAML file, so the default image is immaterial … but I’ve encountered groups with an image that mirrors the production servers who set that image as the default.

Edit /etc/gitlab-runner/config.toml and change “privileged = false” to true.

Start the runner (docker-runner start). In the GitLab Admin Area, navigate to Overview => Runners and select the one we just created. When a project is updated, tags can be used to select an appropriate runner. Because most of my testing is done with the shell executor, the runner which uses the shell executor has no tags and the runner which uses the Docker executor is tagged with “runner-docker”. You can require all jobs include a tag to select the appropriate runner (which avoids someone accidentally forgetting a tag and having their project processed through the wrong runner).

An image – you’ll need an image. You can use base images from the Docker Hub registry or create your own image. You can add components in the before_script or use a Dockerfile to build an image from the parent image.

Now we’re ready to use the Docker executor! Create your CI YAML file.

If you are not using the default image, start with “image: <the image you want>”.

We don’t want phpunit in the running image, but I use it for testing. Thus, I need a before_script component to install the phpunit package.

If you’ve used a tag to restrict what is run in your Docker-executor based runner, add the appropriate tag. Include the tester command line.

.gitlab.yml:

image: gitlab.rushworth.us:4567/lisa/ljtestproject-dockerexecutor
stages:
- test

before_script:
# Install dependencies
- bash ci/docker_InstallReqs.sh

test_job:
stage: test
tags:
- runner-docker
script:
- phpunit --configuration phpunit_myapp.xml

Docker_InstallReqs.sh

#!/bin/bash
yum install php-phpunit-PHPUnit

Now when you commit changes to the repository, the Docker-executor based runner will be used for the CI/CD pipeline. A transient Docker container will be created with the image, your before_script will be executed, and then the test script will be run within the container.


GitLab SSH Deployment Setup

Preliminary stuff – before setting up SSH deployment in your pipeline, you’ll need a user on the target box with permission to write to the files being published. You will need a public/private key pair.

On the target server, the project needs to be cloned into the deployment directory. The public key will need to be added to authorized_keys (or authorized_keys2 on older versions of Linux) file so the private key can be used for authentication.

To set up your GitLab project for SSH-based deployment, you need to add some variables to the project. In the project, navigate to Settings ==> CI/CD

Expand the “Variables” section. You will need to add the following key/value variable pairs:

Key Value
SSH_KNOWN_HOSTS Output of ssh-keyscan targetserver.example.com
SSH_PRIVATE_KEY Content of your private key
DEPLOYMENT_HOST Target hostname, e.g. targetserver.example.com
DEPLOYMENT_USER Username on target server
DEPLOYMENT_PATH Path to which project will be deployed on target server

Save the variables

I am managing both a production and development deployment within the pipeline, so I’ve got prod and dev specific variables. We use the same username for prod and dev; but the hostname, path, and target server public key are different.

If your repository is publicly readable, this is sufficient. If you have a private repository, you’ll need a way to authenticate and fetch the data. In this example, I am using a deployment token. Under Settings Repository, expand the “Deployment Tokens” section and create a deployment token. On my target servers, the remote is added as https://TokenUser:TokenSecret@gitlab.example.com/path/to/project.git instead of just https://gitlab.example.com/path/to/project.git

Once you have defined these variables within the project, use the variables in your CI/CD YAML. In this example, I am deploying PHP code to a web server. Changes to the development branch are deployed to the dev server, and changes to the master branch are deployed to the production server.

In the before_script, I set up the key-based authentication by adding the private key to my runner environment and adding the prod and dev target server’s public key to the runner environment.

- 'which ssh-agent || ( apt-get update -y && apt-get install openssh-client -y )'
- eval $(ssh-agent -s)
- echo "$SSH_PRIVATE_KEY" | tr -d '\r' | ssh-add - > /dev/null
- mkdir -p ~/.ssh
- chmod 700 ~/.ssh
- echo "$SSH_KNOWN_HOSTS_DEV" > ~/.ssh/known_hosts
- echo "$SSH_KNOWN_HOSTS_PROD" >> ~/.ssh/known_hosts
- chmod 644 ~/.ssh/known_hosts

In the deployment component, username and host variables are used to connect to the target server via SSH. The commands run over that SSH session change directory into the deployment target path and use “git pull” to fetch and merge the updated code. This ensures the proper branch is pulled to the production and down-level environments.

production-deployment:
 stage: deploy
  script:
    - ssh $DEPLOYMENT_USER@$DEPLOYMENT_HOST_PROD "cd '$DEPLOYMENT_PATH_PROD'; git pull origin master"
  only:
    - master

development-deployment:
 stage: deploy
 script:
   - ssh $DEPLOYMENT_USER@$DEPLOYMENT_HOST_DEV "cd '$DEPLOYMENT_PATH_DEV'; git pull origin development"
 only:
   - development

Now when I make changes to the project code,

Assuming the tests still pass, the deployment will run

If you click on the deployment component, you can see what changes were pulled to the target server

And, yes, the updated files are on my target server.


Setting up gitlab-runner

CLI on the GitLab server:

# Set up the GitLab Repo
curl -L https://packages.gitlab.com/install/repositories/runner/gitlab-runner/script.rpm.sh

# Install package
yum install gitlab-runner

# verify runner is executable
ll `which gitlab-runner`
# If needed, flag it executable – shouldn’t be a problem with RPM installations, but it’s been a problem for me with manual installs
#chmod ugo+x /usr/local/bin/gitlab-runner

# Register a runner
gitlab-runner register

# use URL & token from http://<GITLABSERVER>/admin/runners
# add tags, if you want to use tags to assign runner
# executor: shell (and docker, if you want to use docker executors. The shell executor is the simplest case, so I am starting there)

# start the runner
gitlab-runner start

On the GitLab Web GUI:

Admin section => Overview => Runners. Click pencil to edit the runner and uncheck “Lock to current projects”, and (unless you want to use tagging) check “Run untagged jobs”

** I was getting an error in every pipeline job saying the git command was not found.

For most other commands, you can append to the path in the before_script section of your .gitlab-ci.yml

before_script:
– export PATH=$PATH:/opt/whatever/odd/path/bin

But that doesn’t work in this case because we’re not getting that far: the bootstrap “stuff” cannot fetch the project to see the before script. Git, on my system, was part of the GitLab package. I just created a symlink into a “normal” binary location:

root@gitlab:~# which git
/opt/gitlab/embedded/bin/git
root@gitlab:~# ln -s /opt/gitlab/embedded/bin/git /usr/bin/git

And we’ve got successful test execution:


Did you know … you can push GitLab notifications to Microsoft Teams?

Microsoft Teams offers a lot of connectors which allow you to see external notifications right in a Teams channel, and you can push GitLab notifications to Teams. Determine the channel into which you want the notifications posted – I decided to make a new channel just for GitLab notifications, but you can use an existing channel too. Click the hamburger menu next to the channel name and select “Connectors”

Locate “Incoming Webhook” and click “Add” next to it

There’s not much to see here – just click “Install”

Provide a descriptive name for the webhook and click “Create”

Scroll down and copy the webhook URL

Click “Done”. Now go to your GitLab project. On the sidebar, scroll down to “Settings” and select “Integrations”

Scroll down to the “Project services” section.

Locate “Microsoft Teams Notification” and click on it

Check the box to activate the integration. Select the events for which you want information pushed to Teams

Remember that URL we copied? Well, here’s where you paste it in. You can elect to receive notifications for only the default branch or all branches. You can elect to receive all pipeline notifications or only broken pipeline notifications. Click “Test settings and save changes”

If everything worked, you will see a banner indicating that the Microsoft Teams Notification was activated.

Now do something in your GitLab project – commit a code update, create an issue, add a page to the Wiki … anything that you’ve selected to trigger notifications.

And … check out your Teams channel:

Jenkins: Creating A Build Pipeline

Prerequisites:

You will need the “Git” plugin (https://plugins.jenkins.io/git).

You will need the “GitHub” plugin (https://plugins.jenkins.io/github)

Setting Up Access Within GitHub:

Log into GitHub and navigate to your repository. Click the “Settings” tab, then select “Developer settings” from the bottom of the left-hand menu. From the Developer Settings page, select “Personal access tokens”.

Click “Generate new token” to add a token for your Jenkins integration.

Provide a description for the token and select permissions – read access to the repo is sufficient.

Save the token and copy the secret text.

Setting Up Jenkins – Configuring GitHub Integration

On your Jenkins server, select “Manage Jenkins”

Select “Configure System”

Scroll down – possibly a lot – to the GitHub section. Click on the “Add GitHub Server” drop-down and select “GitHub Server”

Provide a name, the API URL is pre-populated. Next to Credentials, click the drop-down for “Add” and select “Jenkins”.

The credential kind is “Secret text”, and “ID” is your GitHub user ID. Save the credential

Select cred from drop-down and test

Hopefully the credentials are verified, you are done.

Using Jenkins – Creating A Basic Pipeline:

Click on “New Item”, create a new Freestyle project, and give it a descriptive name.

Since this is a GitHub project, I’m adding the project URL – that’s the actual project URL, not the URL for a specific branch or the path to clone the project.

As you scroll down, the tab will change to “Source Code Management”. Select “Git” and enter the URL used to clone the repository. If you have not already added credentials, click “Add”; otherwise select the appropriate credential from the drop-down menu. If you intend to build a branch other than master, correct the branch name.

Build triggers will depend on what exactly you want to happen. You can trigger new builds based on PRs or push activity. You can schedule a nightly build.

If there are a lot of changes, you may not wish to re-build the project every single time the repo changes. Conversely if the repo rarely changes, nightly builds waste a lot of cycles), etc.

Using the hook trigger requires that your Jenkins server be Internet-accessible and as such has a non-zero risk of malicious access. You can expose your endpoint through a reverse proxy to have more control over service access. I have also experimented with using GitHub provided metadata, https://api.github.com/meta, to restrict access to certain subnets. A potential attacker could still proxy their access by attempting to register your Jenkins endpoint in their GitHub project … but that’s a narrower attack vector than “anyone who can make a web call”.

If you want to trigger builds based on changes within the GitHub project, you can configure Jenkins to automatically register webhooks or you can manually add the webhook to your project.

Manual Webhook creation: Within your project’s “Settings” tab, select “Webhooks” and then “Add webhook”.

Automatic Webhook creation: Manage Jenkins => Configure System. In the GitHub section, click the second “Advanced” button (with a notepad next to it).

Click the “Additional Actions” drop-down menu and select “Convert login and password to token”

Enter your credentials and click “Create token credentials”

A message will be displayed confirming the credential.

In this case, I will schedule a nightly build of the project. After selecting “Build periodically”, enter the cron-like expression to control when you want builds to occur. To avoid having a lot of project builds initiated at quarter-hour marks, use the modifier “H” to indicate a time range. In this example, the build will be triggered some time between 02:00 and 04:59. Since the value of H is a hash of the job name, the build time will be consistent (i.e. the time displayed below the schedule field will be the time used each cycle). This means it is still possible to have a number of builds scheduled simultaneously.

Time, by default, is relative to your Jenkins’ server JVM configuration. You can override that setting by adding a TZ directive at the beginning of the schedule field.

There are a number of pre-build and post-build actions you can take, and various add-on modules expand this functionality. You can manage builds, Docker containerization, and deployment into Kubernetes clusters from Jenkins build pipelines.

Once the job has been saved, you can run it immediately by returning to the dashboard. Click the little clock to the right of the item listing.

Once a build has been completed, the item’s workspace will contain the build and console output from the build job. If a job fails, console output is a good point to start troubleshooting.

Building A Jenkins Sandbox

You can use a pre-built docker container (the “long term support” iteration is published as jenkins/jenkins:lts) or perform a local installation from https://jenkins.io/download/, add a package repo to your package manager config (http://pkg.jenkins-ci.org/redhat-stable/jenkins.repo for RedHat-based systems), or build it from the source repo. In this sandbox example, I will be using a Docker container.

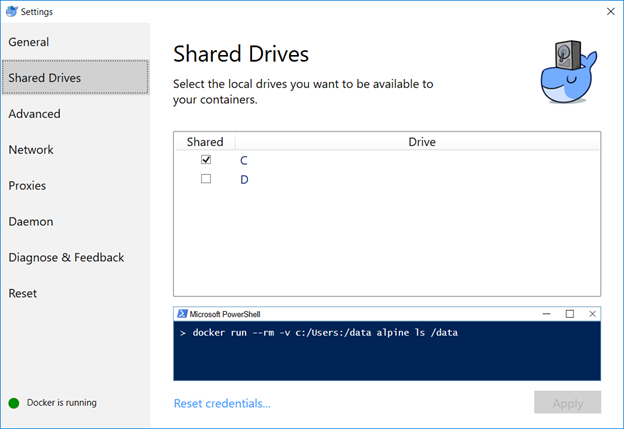
Map the /var/Jenkins_home value to something. This allows you to store user-specific data on your local drive, not within the Docker image. In my case, c: is shared in Docker and I’m using c:\docker\jenkins\jenkins_home to store the data.

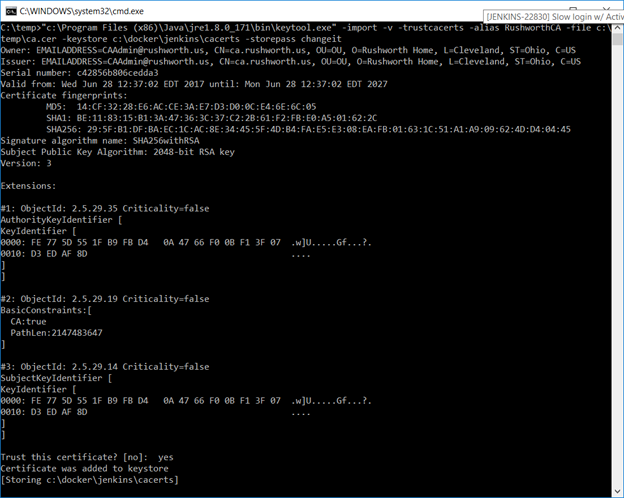
I have a java cacerts file mounted to the container as well – my CA chain has been imported into this file, and the default password, changeit, is used. This will allow Java to trust internally signed certificates. The keystore password appears as part of the process (i.e. anyone who can run commands like “ps aux” or “ps -efww” will see this value, so while security best practices dictate the default password should be changed … don’t change it to something like your root password!).

We can now start the Docker container:

docker run -p 8080:8080 -p 50000:50000 -v /c/docker/jenkins/jenkins_home:/var/jenkins_home -v /c/docker/jenkins/cacerts:/usr/lib/jvm/java-8-openjdk-amd64/jre/lib/security/cacerts jenkins/jenkins:lts

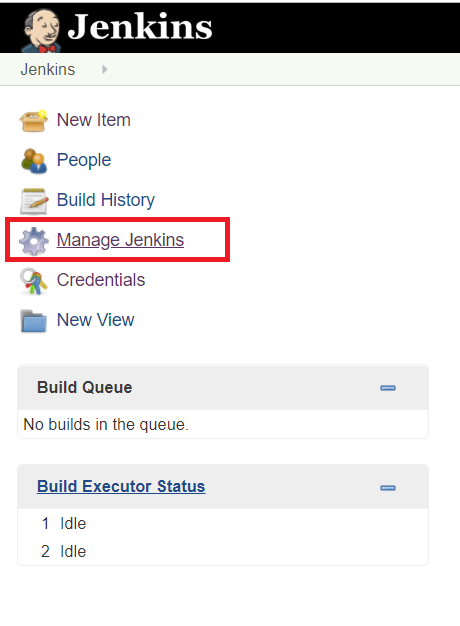
Once the container is running, you can visit the management web site (http://localhost:8080) and install the modules you want – or just take the defaults (you’ll end up with ‘stuff’ you don’t need … I don’t use subversion, for instance, and don’t really need a plugin for it). For a sandbox, I accept the defaults and then use Jenkins => Manage Jenkins => Manage Plug-ins to remove obviously unnecessary ones. And add any that may be needed (e.g. if you are using Visual Studio solution files, add in the MSBuild plugin).


Configuring Authentication (LDAP)

First install the appropriate plug-in – referrals cause authentication problems when using AD as the LDAP authentication source, if you are using AD for authentication … use the Active Directory plugin).

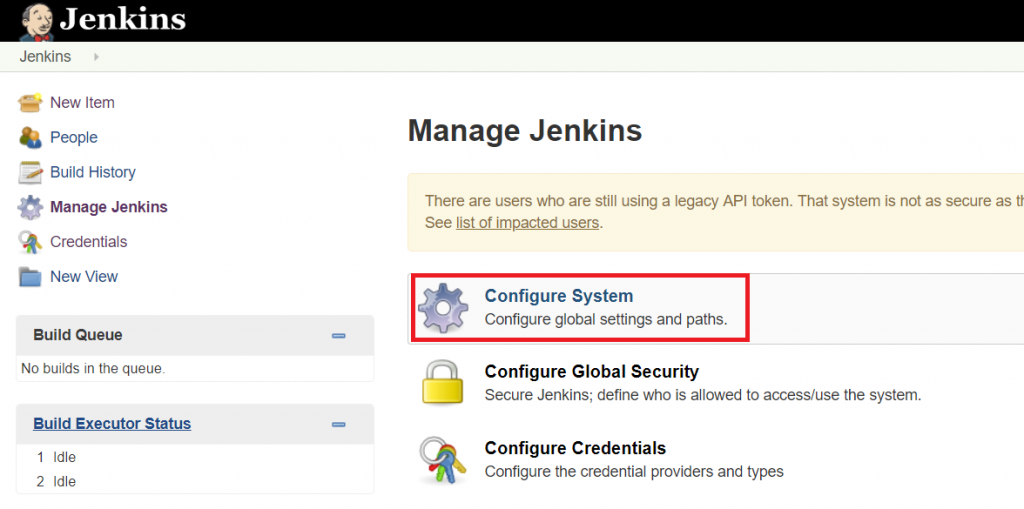
Manage Jenkins => Configure Global Security. Under access control, select the radio button for “LDAP” or “Active Directory”. Configuration is implementation specific.

AD:

Click the button to expand the advanced configuration. You should not need to specify a domain controller if service records for the domain are present in DNS. The “Site” should be “UserAuth”. For the Bind DN, you can use your userid (user@domain.ccTLD or domain\uid format) with your password. Or you can create a dedicated service account – for a “real world” implementation, you would want a dedicated service account (using *your* account means you’ll need to update your Jenkins config whenever you change your password … and when you forget this update, auth fails).

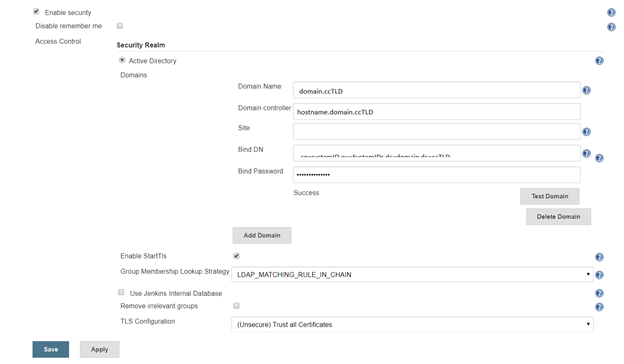
A note about the group membership lookup strategy:

For some reason, Jenkins assumes recursive group memberships will be used (e.g. there is a “App XYZ DevOps Team” that is placed into the “Jenkins Users” group, and “Jenkins Users” is assigned authorizations within the system). Bit of a shame that “none” isn’t an option for cases where there isn’t hierarchical group membership being built out.

There are three lookup strategies available: recursive group queries, LDAP_MATCHING_RULE_IN_CHAIN, and Toke-Groups user attribute. There have been bugs in the “Automatic” strategy that caused timeout failures. Additionally, the group list returned by the three strategies is not identical … so it is possible to have inconsistent authorization results as different strategies are used. To ensure consistent behaviour, I select a specific strategy.

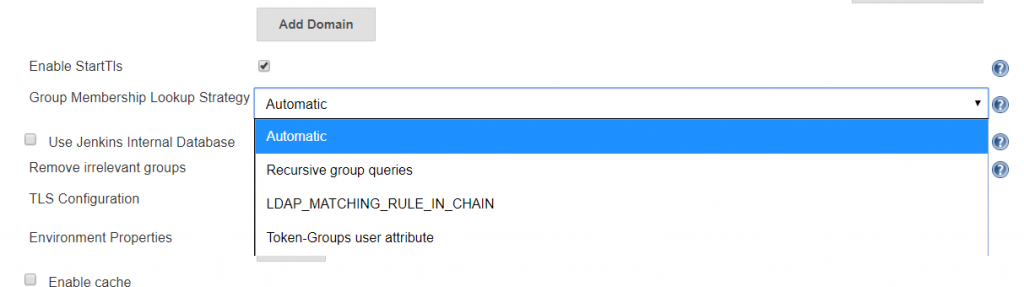
Token-Groups: If you are not using Distribution groups within Jenkins to assign authorization (and you probably shouldn’t since it’s a distribution group, not a security group), you can select the Token-groups user attribute to handle recursive group membership. Token-groups won’t work if you are using distribution groups within Jenkins, though, as only security groups show up in the token-groups attribute.

LDAP_MATCHING_RULE_IN_CHAIN: OID 1.2.840.113556.1.4.1941, LDAP_MATCHING_GROUP_IN_CHAIN is an extended matching operator (something Microsoft added back in Windows 2003 R2) that can be used in LDAP filters:

(member:1.2.840.113556.1.4.1941:=cn=Bob,ou=ResourceUsers,dc=domain,dc=ccTLD)

This operator has known issues with high fan-outs and can cause hangs while data is retrieved. It is, however, a more efficient way of handling recursive group memberships. If your Jenkins groups contain only users, you will not encounter the known issue. If you are using nested groups, my personal recommendation would be to test each option and time logon activities … but if you do not wish to perform a test, this is a good starting option.

Recursive Group Queries: Jenkins issues a new LDAP query for each group – a lot of queries, but straight-forward queries. This is my last choice – i.e. if everything else hangs and causes poor user experience, try this selection.

For Active Directory domains that experience slow authentication through the AD plug-in regardless of the selected recursion scheme, I’ve set up the LDAP plug-in (it does not handle recursive group memberships) but it’s not a straight-forward configuration.
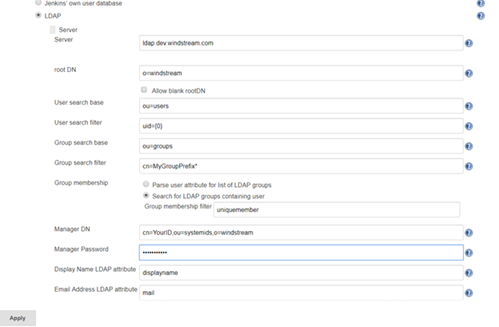
LDAP:

Click the button to expand the advanced server configuration. Enter the LDAP directory connection details. I usually start with clear text LDAP. Once the clear text connection tests successfully, the certificate trust can be established.

You can add a group search filter, but this is not required. If you request your group names start with a specific string, e.g. my ITSS CSG organization’s Jenkins server might use groups that start with ITSS-CSG-Jenkins, you can add a cn filter here to restrict the number of groups your implementation looks through to determine authorization. My filter, for example, is cn=ITSS-CSG-Jenkins*

Once everything is working with clear text, load the Root and Web CA public keys into your Java instance’s cacerts file (if you have more than once instance of Java and don’t know which one is being used … either figure out which one is actually being used or repeat the keytool commands for each cacerts file on your machine).

In the Docker container, the file is /usr/lib/jvm/java-8-openjdk-amd64/jre/lib/security/cacerts and I’ve mapped in from a locally maintained cacerts file that already contains our public keys for our CA chain.

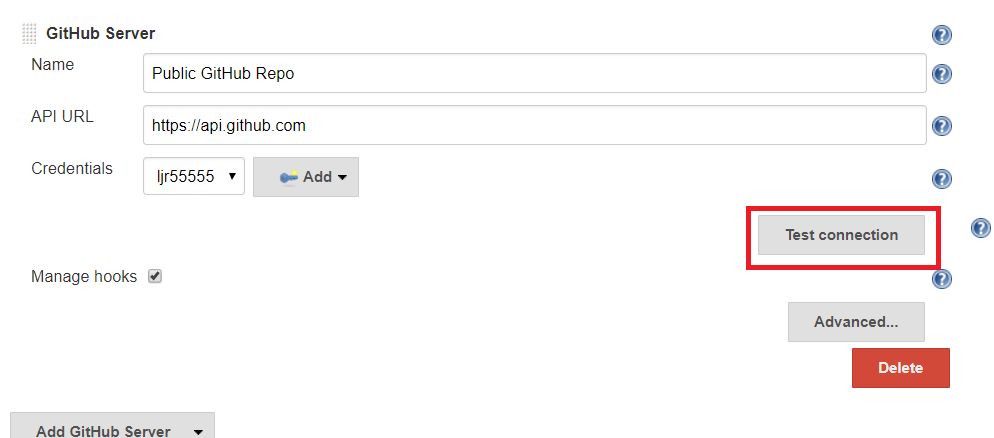
Before saving your changes, make sure you TEST the connection.

Under Authorization, you can add any of your AD/LDAP groups and assign them rights (make sure your local back door account has full rights too!).

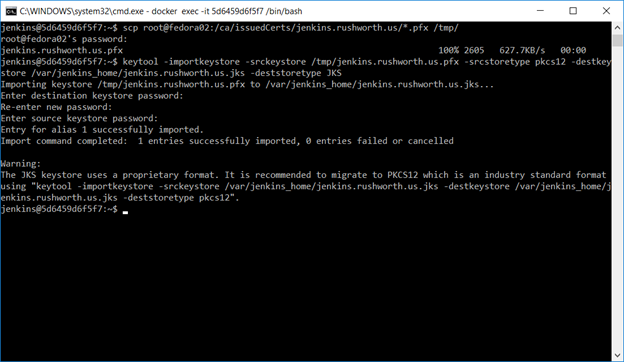
Finally, we want to set up an SSL web site. Request a certificate for your server’s hostname (make sure to include a SAN if you don’t want Chrome to call your cert invalid). Shell into the Docker instance, cd into $JENKINS_HOME, and scp the certificate pfx file.

Use the keytool command to create a JKS file from this PFX file – make sure the certificate (PFX) and keystore (JKS) passwords are the same.

Now remove the container we created earlier. Don’t delete the local files, just “docker rm <containerid>” and create It again

docker run –name jenkins -p 8443:8443 -p 50000:50000 -v /c/docker/jenkins/jenkins_home:/var/jenkins_home -v /c/docker/jenkins/cacerts:/usr/lib/jvm/java-8-openjdk-amd64/jre/lib/security/cacerts jenkins/jenkins:lts –httpPort=-1 –httpsPort=8443 –httpsKeyStore=/var/jenkins_home/jenkins.cert.file.jks –httpsKeyStorePassword=keystorepassword

Voila, you can access your server using an HTTPS URL. If you review the Jenkins documentation, they prefer leaving the Jenkins web server on http and using something like a reverse proxy to perform SSL offloading. This is reasonable in a production environment, but for a sandbox … there’s no need to bring up a sandbox Apache server just to configure a reverse proxy. Since we’re connecting our instance to the real user passwords, sending passwords around in clear text isn’t a good idea either. If only you will be accessing your sandbox (i.e. http://localhost) then there’s no need to perform this additional step. The server traffic to the LDAP / AD directory for authentication is encrypted. This encryption is just for the client communication with the web server.


Using Jenkins – System Admin Stuff

There are several of “hidden” URLs that can be used to control the Jenkins service (LMGTFY, basically). When testing and playing with config parameters, restarting the service was a frequent operation, so I’ve included two service restart URLs here:

   https://jenkins.domain.ccTLD:8443/safeRestart ==> enter quiet mode, wait for running builds to complete, then restart

   https://jenkins.domain.ccTLD:8443/restart ==> Restart not so cleanly

Multiple discussions about creating a more fault tolerant authentication scheme within Jenkins exist on their ‘Issues’ site. Currently, you cannot use local accounts if the directory service is unavailable. Not a big deal if you’re on the company network and using one of our highly available directory solutions. Bit of a shocker, though, if your sandbox environment is on your laptop and you try to play with the instance when not on the company network. In production implementations, this would be a DR consideration (dependency on the directory being recovered). In a cloud-hosted implementation, this creates a dependency on network connectivity into the company.

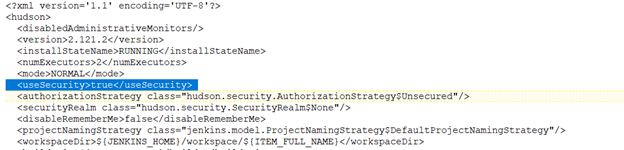
As an emergency solution, you can disable security on your Jenkins installation. I’d also get some sort of firewall rule (OS-based or hardware firewall) to restrict console access to a trusted terminal server or workstation. To disable security, stop Jenkins. Edit the config.xml file in $JENKINS_HOME, and ifnd the <useSecurity> section. Change ‘true’ to ‘false’ and start Jenkins. You’ll be able to access the console without credentials.

Updating Jenkins Image

General practice for updating an application is not to update a container. Instead, download an updated image and recreate the container with the new image. I store the container initialization command along with the folder to which image directories are mapped. My file system has /path/to/docker/storage/AppName that contains a text file with the initialization command and folder(s) that are mapped into the container. This avoids having to find the proper initialization parameters when I upgrade the container.

To update the container, pull a new image, stop the container, remove the container, and create it again. That is:

docker stop jenkins
docker pull jenkins/jenkins:lts
docker rm jenkins
<whatever you used to create the container>