Month: February 2019

Did you know … you can bookmark Teams posts for quick access?

There are a few posts to which I frequently refer – support contacts for a product, time reporting codes to use for our projects, etc. These posts aren’t updated frequently, so looking for them takes some scrolling. Searching for the post helps, but I still find myself scrolling through a dozen results.

You can save a post for later – essentially add a bookmark to the post – by clicking the little ribbon in the upper right-hand corner of the post.

To access saved posts, click on your avatar in the upper right-hand corner of Teams and select “Saved”.

Or, if you prefer to keep your hands on the keyboard, use CTRL + E to move to the command bar and type /saved

Either method brings you to the same place – your saved posts.


Pressure Cooked Oat Groats

Add equal parts groats and water (i.e. 2c water with 2c groats) to pressure cooker. Add a teaspoon of oil to reduce foaming (butter, olive oil)

Bring to high pressure and cook for 20 minutes. Remove from heat and allow to release pressure naturally.

To serve – shred an apple, mix into hot groats. Add a teaspoon or two of brown sugar and sprinkle with cinnamon. Add 1/2 cup of almond milk.

Do you know … if you should create a new Team or new Channel?

Do you know … if you should create a new Team or new Channel?

It’s certainly a good idea to break topics into different locations in Microsoft Teams – cognitive research on how efficiently people multi-task suggests this, it’s easier for non-impacted individuals to ignore information that’s not relevant to them if it’s not interspersed with information they need, and spreading topics out reduces the frequency of posts – ten new conversations don’t appear while you’re reading a thread. But should you create a new channel or a new Team?

There are a few technical limitations that make “Team” generally the right answer. Each channel in a Teams space has the same permissions – if you want to restrict access to confidential information or if you want to involve additional people – people who don’t need access to your other channels, you need to create a new Team.

You can archive a Team, but you cannot archive a channel. If you create a new channel for every project, your Teams space can become cluttered with old projects. The channels get collapsed into a “more channels” fly-out, but I still find myself renaming channels “zzSomething Or Other” to get really done projects sorted to the bottom of the more channels fly-out.

You cannot move a channel into another Team. If the project moves to another group (such transitions are common in IT – there’s a development/implementation phase, then the project moves to production support under a different group) … there’s no way to transition the information in a channel to another group. Even if that’s not standard operating procedure in your organization, reorgs happen. A supported system becomes big enough to warrant its own group or staff is re-aligned –having the historic knowledge of the Teams discussion available to the new organization is beneficial. (Not to mention, if you could move a channel into another team, you could indirectly archive channels by moving them into an archived Teams space!)

There are some scenarios where a new channel makes sense – that daily e-mail chain where people decide where to eat lunch could become a channel. There’s no reason to move the historic restaurant selection to another group – or, for that matter, retain it. If group lunches become ‘not a thing’ – just delete the channel. And anyone not heading to lunch today can ignore the channel. Similarly, “Water Cooler” discussions – a place where the comradery we took for granted when sitting in the same physical space can re-emerge – make sense as channels.

Did you know … you can perform CRUD operations on SharePoint Lists?

Not crud like “ugg, that’s a bunch of crud … let’s load it up in a SharePoint list to store it forever!” – that wouldn’t make sense at all. In programming-speak, CRUD is an abbreviation for Create, Update, Read, Delete – the basic types of operations for data storage. And you can create, update, read, and delete SharePoint list items through the REST API.

First, you’ll need a list. Here, I am using a sample list that has columns for SiteID, MailingAddress, City, State, and ZipCode – the usual information if you’re going to use a LOOKUP column to correlate a location in a record with address details for the location (i.e. there’s no reason to type 1925 Enterprise Parkway and such in every order you want to ship to the Twinsburg office).

And you need some sort of code that communicates with the REST API – something that sends HTTPS calls. In the example code, I am using Python. Functions, along with example code to use those functions can be found at https://github.com/ljr55555/spoRestAPICRUD. Clone the repository locally.

You will find a config.sample – I use this as a template for storing user-specific configuration parameters. Copy config.sample to config.py and edit config.py. The actual config.py is included in the .gitignore file, so retrieving updates from the repository won’t wipe our your settings.

There are a handful of values you will need to set. Most of the values you can get from your list’s web address. Open your list in the web browser of your choice and find the information in the address line:

There are three values we need to extract from this URL – the SharePoint tenant address, your SharePoint site name, and the list name

Edit config.py and modify the following variables with your list-specific information

strConnectURL = “tenant.sharepoint.com

strContextURI = “https://tenant.sharepoint.com/sites/SiteName/_api/contextinfo”

strListInfoURI = “https://tenant.sharepoint.com/sites/SiteName/_api/web/lists/GetByTitle(‘ListName‘)”

Then you need some credentials – this config file will need to be updated when the account password changes, so you may wish to use a non-user account with a very long password that changes less often.

Obviously, typing a username and password in clear text is a bad idea. I’m using simplecrypt to keep an encrypted password in the config file which is decrypted using a key in the script file. Anyone who obtains both files can decrypt the password – in my production code, the key comes from another location to reduce the probability of someone accessing the key file.

Use stashStringForConfig.py to generate the string to use for the username and password values – change strKey to match whatever you are using for your key, and change strString to your user id. Run the script and copy the output into your config.py file. Change strString to your password and repeat the process.

C:\ljr\git\spoRestAPICRUD>python stashStringForConfig.py

b’c2MAAnHWW1nqXuc4bO+pt8q1FjTG6Q5CYNz1O5ORHnJxl8vBOpGKj0HxVSYdGa1o+Ij/VicrQLTWTyU7P0StspMEJ7zBe/qtFWuHGrfEvnLO5dU=’

That’s it for configuration – at this point, if you have a list with the same columns I do, you can run the script.

Voila, records!

What’s the script doing? Well – CRUD, of course!

Connecting To SharePoint Online – I am using a modified version of sharepy which can be found in the develop branch of my fork of the repository. This is a requests wrapper that handles authentication to SharePoint Online. The connection, in my script, is named spoConnection. The arguments supplied are sourced from config.py

spoConnection = sharepy.connect(strConnectURI,strUID,strPass)

Creation – You need a dictionary with your data. The required metadata type value is retrieved from your list. The remaining key:value pairs in the dictionary are the column names and record values, respectively.

{“__metadata”: { “type”: strListItemEntityTypeFullName}, “Title”: “Bedford Office”, “SiteID”: ‘123456’, “MailingAddress”: “17500 Rockside Road”, “City”: “Bedford”, “State”: “OH”, “ZipCode”: “44146”}

The writeNewRecord function will insert the record into your list. The dictionary containing my record is called strBody (because it ends up being the HTTP POST body).

iNewRecordResult = writeNewRecord(spoConnection, strContextURI, strListDataURI, strBody)

Read – Now that we have records, we can retrieve the full list or filter to find specific records. To find all records, run findSPRecord – the arguments are the SharePoint connection and the URI for the list.

jsonResult = findSPRecord(spoConnection, strListDataURI)

If you want to return a filtered subset of data, add the column on which to filter, the filter operator, and the value. You can construct more complex ODATA filters – see the ODATA query operations supported in the SharePoint REST API for more information.

jsonResult = findSPRecord(spoConnection, strListDataURI, “SiteID”, “eq”, “234567”)

Update – I intentionally included incorrect data in one of my create lines – the Twinsburg office isn’t in Rochester NY! To update a record, you need it’s internal ID number. The findSPRecordID function has the same parameters as findSPRecord, but instead of returning the full record, it returns the integer record ID.

iRecordToUpdate = findSPRecordID(spoConnection, strListDataURI, “SiteID”, “eq”, “345678”)

Now that we have a record number, we also need a dictionary with the new values. Values that are not changing do not need to be included – just anything value you want to update. As with the record creation, the metadata type is determined programmatically.

dictRecordPatch = {“__metadata”: { “type”: strListItemEntityTypeFullName}, ‘Title’: “Rochester Office”}

And then updateRecord is called to write the new information into the selected record.

iRecordPatchResult = updateRecord(spoConnection, strContextURI, strListDataURI, dictRecordPatch)

Delete – Delete operations are similar to update operations – you need to find the internal record ID number to delete it. There’s no validation – nothing checks that the City for item #x is Rochester.

iDeletionResult = deleteRecord(spoConnection, strContextURI, strListDataURI, iRecordToDelete)

By combining CRUD operations, you can use a SharePoint list as a user-created and user-administered database. SharePoint still stores its information in a Microsoft SQL database, and going through the REST API to interact with your data adds overhead … so this isn’t a good approach for someone with an enormous data set where views would speed up data access or complex join operations are warranted. But for someone with fairly straight-forward database requirements, you may be able to do-it-yourself using SharePoint lists.


Cognitive Theory & Microsoft Teams

We’ve been using Microsoft Teams for most of this year, and I find it to be an incredibly efficient way to work. That’s not just a personal preference — years ago, I followed research on how human brains multi-task. TL;DR? Rarely well! Performing multiple natural activities, those that don’t put much demand on the prefrontal cortex, did not greatly diminish efficiency (I can walk and chew gum at the same time!). But fMRI scans performed by the Institut National de la Santé et de la Recherche Médicale in Paris showed that the prefrontal cortex has a left and right side which cooperate to focus on a single task but work independently when the subject was given two tasks. And when the subject was given three tasks? The rate at which a task was forgotten increased and errors were three times as likely for the tasks that were performed.

The recommendation was to dedicate chunks of time — 20 or 30 minutes — to a particular subject, then move on to a new subject rather than bounce back and forth between topics. Sounded great in theory, but each morning I’d sit down and start going through e-mail. The epitome of rapid topic shifting — read through something, switch to the next message/topic, maybe do a little work on that topic, go to the next one.

Starting my day in Teams is completely different — any channel that has had activity is bold. I can click on a channel, finish everything related to that topic, then move on to the next channel. Instead of jumping from topic to topic, and wasting time mentally “shifting gears”.

During a busy day, multiple channels light up with activity … but having each topic contained to its own location helps me maintain focus on that topic. Extrapolating — it makes sense to create a new channel or team for different projects instead of having multiple projects discussed within the same channel.

Installing pycrypto On WIN10 with Visual Studio 2017

Yes, I know it’s old and no longer maintained … but it’s also what my function already uses, and I don’t want to take a few hours to get moved over to pycryptodome. You can install pycrypto on Windows 10 running Visual Studio 2017. But there’s a trick. Find the location of stdint.h in your VS installation.

Open x86_x64 Cross Tools Command Prompt For VS 2017

Run:

set CL=-FI"C:\Program Files (x86)\Microsoft Visual Studio\2017\Enterprise\VC\Tools\MSVC\14.14.26428\include\stdint.h"

where the bit in quotes is the path to your stdint.h (VS build version may differ, which will change the path).

Now, from within the Cross Tools Command Prompt, run:

pip install pycrypto

Voila — it installs:

SharePoint Column Naming Inconsistency

I have been interfacing with SharePoint list data via the REST API and assumed the name I typed onto the column was, well, the column’s name. It’s not!

In the ‘normal’ view, click ‘Add column’ and add a column.

Switch to “Quick edit” view.

Add a column using the “+” symbol.

What do we have? The columns look like they have the names I’ve supplied through either method. But … hover your mouse over the column and check out the URL for the column.

While the ones added using “Add Column” are named exactly what I typed, the ones added in quick edit have four-character pseudo-random strings instead of the name I typed.

https://tenant.sharepoint.com/sites/SiteName/_layouts/15/FldEdit.aspx?List=%2MZQ472C3%2F5P5D%2M3M4%2P9T5%2DJ3K5CE52M9I1%7D&Field=AddedViaAddColumn

https://tenant.sharepoint.com/sites/SiteName/_layouts/15/FldEdit.aspx?List=%9MZQ472C3%9F5P5D%2M3M4%2P9T5%2DJ3K5CE52M9I1%7D&Field=dwev

https://tenant.sharepoint.com/sites/SiteName/_layouts/15/FldEdit.aspx?List=%9MZQ472C3%9F5P5D%2M3M4%2P9T5%2DJ3K5CE52M9I1%7D&Field=fqkm

https://tenant.sharepoint.com/sites/SiteName/_layouts/15/FldEdit.aspx?List=%9MZQ472C3%9F5P5D%2M3M4%2P9T5%2DJ3K5CE52M9I1%7D&Field=NumberViaAddColumn

For GUI access to your data, this is immaterial – the friendly name displays on forms; but, when you are accessing data via the REST API, you must use the internal field name and not the display name you think is assigned to the column. It took me a long time to figure out why my REST call kept saying there was no field “uid” when I could clearly see a column with that name in my list.


Birthday Beef Stroganoff

Ingredients:

  • flat iron steak
  • 4T butter
  • 3 cloves roasted garlic
  • 16 oz mushrooms
  • 1 large onion
  • 1/4 cup all purpose flour
  • 3 cups beef broth (pressure cooker: beef bones, carrot trimmings, onion trimmings, celery trimmings, potato peels)
  • 1-2T mustard spice blend
  • 2-5T porcini mushroom powder
  • 2T corn starch
  • 3/4 cup sour cream
  • package wide egg noodles cooked for lowest time on package directions

Mustard spice blend: mortar together 1c brown mustard seed, 1T salt, 3 bay leaves, 1t rosemary needles, 1/2t sage

Method:

  1. Slice beef across the grain into strips. Season with salt & pepper. Divide meat into small batches so pieces can be placed in pan with an inch between them. Divide 2T of butter into same number of pieces. Put pan on medium heat (6), melt a piece of butter then sear a batch of meat. Remove from pan and set aside. Repeat with remaining batches.
  2. Slice mushrooms. Divide into 4 batches and sprinkle with salt. Divide the remaining butter into four batches. Melt a piece of butter in pan, saute mushrooms until they become golden brown. Remove from pan and set aside. Repeat with remaining batches.
  3. Slice onion into thin pieces about 1″ long. Sauté for a few minutes.
  4. Add flour to onions & stir to coat them in flour. Remove from pan.
  5. Deglaze pan with 1/2c of beef broth. Add mushroom powder and spice blend. Stir to remove any lumps.
  6. Mush garlic cloves and stir in.
  7. Lower heat to simmer. Add remaining beef broth. Return onions to pan and stir to distribute flour.
  8. Put corn starch in a bowl or glass. Add *just* enough water to turn it into oobleck. Drizzle into pan, while stiring, to form a thick gravy.
  9. Return beef and mushrooms to pan and simmer until beef is cooked.
  10. Stir in sour cream.
  11. Serve over egg noodles.

SharePoint Rest API Does Not Allow Unindexed Queries

I’ve been developing code templates for CRUD operations (that’s a real acronym — Create, Read, Update, Delete) against SharePoint — we need to use SharePoint lists to replace database tables. Retrieving information worked fine until I tried to filter the data through the REST call. SharePoint throws a generic error about exceeding some admin-set limit. (1) I know the limit, I can see the limit. The limit is 5,000, and I know my filtered result set is 121 records. WAY lower than 5,000. Oh, and (2) I can run the query without the filter — I’m paging it! — and read all 29,887 records so what does the limit have to do with anything? Reasoning with an HTTP response … well, doesn’t work. No matter how unassailable my argument is, the API call still returned:

{"error":
    {"code":"-2147024860, Microsoft.SharePoint.SPQueryThrottledException",
     "message":{"lang":"en-US",
       "value":"The attempted operation is prohibited because it exceeds the list 
                view threshold enforced by the administrator."}}}

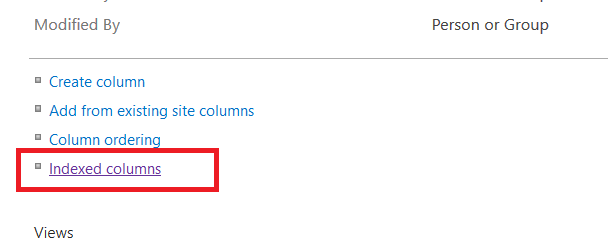
It is, it turns out, a poorly worded error. I started thinking about the query limits on my LDAP servers — we have hard limits to operations and also require most people perform queries against indexed attributes. It’s computationally expensive to search through unindexed attributes (and the Right Thing To Do, generally speaking, is add an index for something that is a frequent query target). I wondered if there was an analogous “no unindexed queries” setting in SharePoint. Quick enough to test — add an index on the column(s) you use in the filter. In the site content listing, click the sideways hamburger menu by the list name. Select “Settings”

Scroll down to Index Columns and click the hyperlink.

Click ‘Create a new index’

Wait for the index process to complete, then try the filtered request again … I’ve got data! Evidently SharePoint ODATA filter queries to the REST API need to be performed against indexed columns. I’m sure Microsoft has that documented somewhere but quite a bit of Googling didn’t get me anywhere … so I’m posting this in case anyone else encounters the same error.

Did you know … you can archive a Team in Microsoft Teams?

Sometimes a project is done. You’ve used Teams to plan, coordinate, and implement the projected … and there’s a lot of good information in the Teams space … but there’s no need to continue the discussion. Did you know a Team can be read-only? This is called “Archived” – members can search and read content, but no new files or posts can be created.

To archive a Team, view your Teams. At the bottom of the Teams list, click the little gear.

I recommend changing the Team description to let others know it is archived – this is especially valuable if your team is Public as people may join intending to participate in an active discussion. To modify the Team description, select the sideways hamburger menu next to the Team name and select “Edit team”.

I prefix the description with “ARCHIVED:” … hoping people at least glance at the description. Click ‘Done’ to save your change.

To archive your Team, click the sideways hamburger menu again. Select “Archive team”.

You will be asked if you want to make the SharePoint site for the Teams space read-only as well – the answer is generally yes, but if you’re using the SharePoint site for more than just the Team then you do not want to check this box. Click ‘Archive’ to archive the Team.

Should you need to begin accepting new content in your Teams space, you can find the archived teams by expanding the “Archived” section.

Click the sideways hamburger menu and select ‘Restore Team’. This will move your Team back to the “Active” section and allow members to continue posting content.