I often need to quickly see if a cert is going to expire — I’ve got nice monitoring scripts too, but something that I can run from the command line right now
echo -n Q | openssl s_client -connect $HOST:$PORT | openssl x509 -noout -dates
I often need to quickly see if a cert is going to expire — I’ve got nice monitoring scripts too, but something that I can run from the command line right now
echo -n Q | openssl s_client -connect $HOST:$PORT | openssl x509 -noout -dates
RedHat is phasing out ZFS – there are several reasons for this move, but primarily ZFS is a closed source Solaris (now Oracle) codebase. While OpenZFS exists, it’s not quite ‘the same’. RedHat’s preferred solution is Virtual Data Optimizer (VDO). This page walks through the process of installing PostgreSQL and creating a database cluster on VDO and installing TimescaleDB extension on the database cluster for RedHat Enterprise 8 (RHEL8)
Before we create a VDO disk, we need to install it
yum install vdo kmod-kvdo |
Then we need to create a vdo – here a VDO named ‘PGData’ is created on /dev/sdb – a 9TB volume on which we will hold 16TB
vdo create --name=PGData --device=/dev/sdb --vdoLogicalSize=16T |
Check to verify that the object was created – it is /dev/mapper/PGData in this instance
vdo list |
Now format the volume using xfs.
mkfs.xfs /dev/mapper/PGData |
And finally add a mount point
# Create the mount point foldermkdir /pgpool# Update fstab to mount the new volume to that mount pintcat /etc/fstab/dev/mapper/PGData /pgpool xfs defaults,x-systemd.requires=vdo.service 0 0# Load the updated fstabsystemctl daemon-reload# and mount the volumemount -a |
it should be mounted at ‘/pgpool/’
The main reason for using VDO with Postgres is because of its compression feature – this is automatically enabled, although we may need to tweak settings as we test it.
We now have a place in our pool where we want our Postgres database to store its data. So let’s go ahead and install PostgreSQL,
here we are using RHEL8 and installing PostgreSQL 12
# Install the repository RPM:dnf install -y https://download.postgresql.org/pub/repos/yum/reporpms/EL-8-x86_64/pgdg-redhat-repo-latest.noarch.rpmdnf clean all# Disable the built-in PostgreSQL module:dnf -qy module disable postgresql# Install PostgreSQL:dnf install -y postgresql12-server |
Once the installation is done we need to initiate the database cluster and start the server . Since we want our Postgres to store data in our VDO volume we need to initialize it into our custom directory, we can do that in many ways,
In all cases we need to make sure that the mount point of our zpool i.e., ‘/pgpool/pgdata/’ is owned by the ‘postgres’ user which is created when we install PostgreSQL. We can do that by running the below command before running below steps for starting the postgres server
mkdir /pgpool/pgdatachown -R postgres:postgres /pgpool |
Customize the systemd service by editing the postgresql-12 unit file and updateding the PGDATA environment variable
vdotest-uos:pgpool # grep Environment /usr/lib/systemd/system/postgresql-12.service# Note: avoid inserting whitespace in these Environment= lines, or you mayEnvironment=PGDATA=/pgpool/pgdata |
and then initialize, enable and start our server as below
/usr/pgsql-12/bin/postgresql-12-setup initdbsystemctl enable postgresql-12systemctl start postgresql-12 |
Here ‘/usr/pgsql-12/bin/’ is the bin directory of postgres installation you can substitute it with your bin directory path.
or
We can also directly give the data directory value while initializing db using below command
/usr/pgsql-12/bin/initdb -D /pgpool/pgdata/ |
and then start the server using
systemctl start postgresql-12 |
Now we have installed postgreSQL and started the server, we will install the Timescale extension for Postgres now.
add the time scale repo with below command
tee /etc/yum.repos.d/timescale_timescaledb.repo <<EOL[timescale_timescaledb]name=timescale_timescaledbbaseurl=https://packagecloud.io/timescale/timescaledb/el/8/\$basearchrepo_gpgcheck=1gpgcheck=0enabled=1gpgkey=https://packagecloud.io/timescale/timescaledb/gpgkeysslverify=1sslcacert=/etc/pki/tls/certs/ca-bundle.crtmetadata_expire=300EOLsudo yum update -y |
then install it using below command
yum install -y timescaledb-postgresql-12 |
After installing we need to add ‘timescale’ to shared_preload_libraries in our postgresql.conf, Timescale gives us ‘timescaledb-tune‘ which can be used for this and also configuring different settings for our database. Since we initialize our PG database cluster in a custom location we need to point the direction of postgresql.conf to timescaledb-tune it also requires a path to our pg_config file we can do both by following command.
timescaledb-tune --pg-config=/usr/pgsql-12/bin/pg_config --conf-path=/pgpool/pgdata/postgresql.conf |
After running above command we need to restart our Postgres server, we can do that by one of the below commands
systemctl restart postgresql-12 |
After restarting using one of the above commands connect to the database you want to use Timescale hypertables in and run below statement to load Timescale extension
CREATE EXTENSION IF NOT EXISTS timescaledb CASCADE; |
you can check if Timescale is loaded by passing ‘\dx’ command to psql which will load the extension list.
in order to configure PostgreSQL to allow remote connection we need to do couple of changes as below
DNF provides both a history using using dnf history list

And a history for a specific package using dnf history list packagename

Quick command to list each running VM and the vnet that is associated to the VM
for vm in $(virsh list | grep running | awk '{print $2}'); do echo -n "$vm:"; virsh dumpxml $vm| grep -oP "vnet\d+" ; done
After upgrading to Fedora 39, we started having problems with Samba falling over on startup. The server has IPv6 disabled, and (evidently) something is not happy about that. I guess we could enable IPv6, but we don’t really need it.
Adding the following to lines to the GLOBAL section of the smb.conf file and restarting samba sorted it:
bind interfaces only = yes
interfaces = lo eth0

Feb 11 06:26:01 systemd[1]: Started smb.service – Samba SMB Daemon.
Feb 11 06:26:01 smbd[1109]: [2024/02/11 06:26:01.285076, 0] ../../source3/smbd/server.c:1091(smbd_open_one_socket)
Feb 11 06:26:01 smbd[1109]: smbd_open_one_socket: open_socket_in failed: Address family not supported by protocol
Feb 11 06:26:01 smbd[1109]: [2024/02/11 06:26:01.290022, 0] ../../source3/smbd/server.c:1091(smbd_open_one_socket)
Feb 11 06:26:01 smbd[1109]: smbd_open_one_socket: open_socket_in failed: Address family not supported by protocol
Feb 11 08:01:43 systemd[1]: Stopping smb.service – Samba SMB Daemon…
Feb 11 08:01:43 systemd[1]: smb.service: Deactivated successfully.
Feb 11 08:01:43 systemd[1]: Stopped smb.service – Samba SMB Daemon.
The /var partition was filling up with gigs of space in /var/spool/abrt — crash dumps. Luckily there’s a quick CLI command to review the dumps and remove any you don’t want to investigate farther.
abrt-cli rm /var/spool/abrt/*
You can use rm -f to avoid being prompted to confirm each deletion.
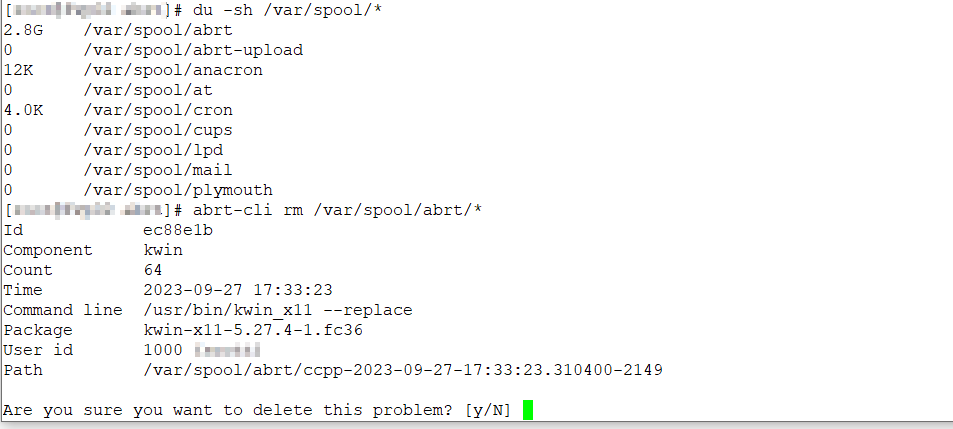
To remove records older than a week (7 days) from the journalctl log records:
journalctl --vacuum-time=7d
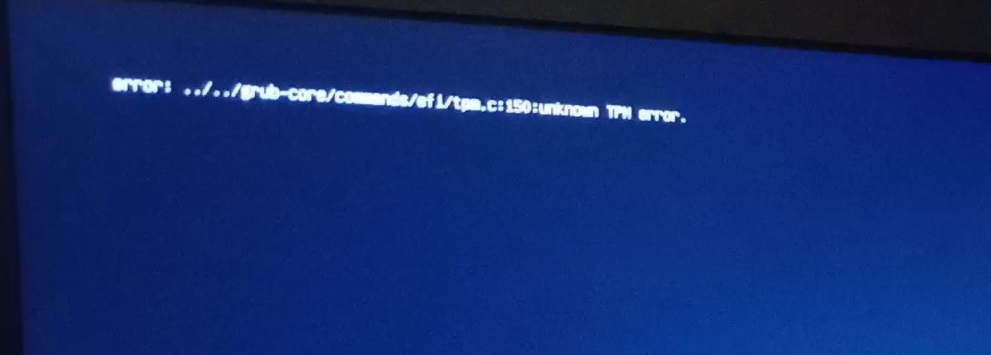
If you film the boot sequence and look frame by frame, you’ll see that it very briefly flashes a TPM error
error: ../../grub-core/commands/efi/tpm.c:150:unknown TPM error.
From what I’ve been able to glean, this secure boot stuff works off of signatures. Microsoft has signatures in BIOS. Everyone else kind of inserts their keys on the fly … so you can run out of space to save these keys and be unable to boot. To work around this, every time an update gets us over the limit, we go into the secure boot DBX management menu and reset the “Forbidden Signatures” from factory default. This is 13 keys instead of 373, and the OS is able to do it’s “thing” and boot.
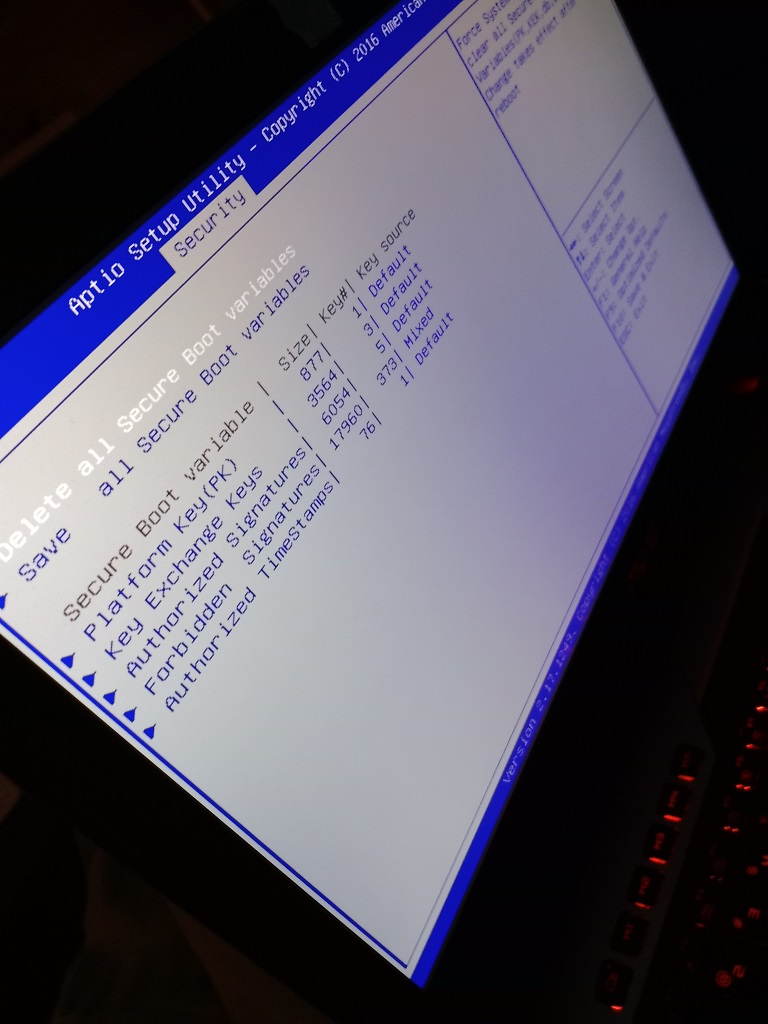
And I’m actually writing this down this time because I had spent a lot of time researching this last time Scott’s laptop failed to boot and dumped out to a grub menu. This time, I kinda know what we did and why but lost a lot of the details.
The rsync utility was meant to be used to sync files across the network — to or from an rsync server. For some time, I had a group of friends who shared documents off of my rsync server. Anyone with access could run an rsync command and sync their computer up with the group’s documents. With the advent of online file storage and collaborative editing, this was no longer needed. But I still use rsync to make sure my laptop has a local copy of a folder on the server. Mount /path/to/folder/contents/to/copy to the SMB or NFS share, and the following rsync command ensures the laptop’s /path/to/where/contents/should/be/placed has an exact mirror of the contents of the server folder
rsync –archive –verbose –update –delete “/path/to/folder/contents/to/copy/” “/path/to/where/contents/should/be/placed/”
–archive is a grouping of:
-r recursive
-l copy symlinks
-p preserve permissions
-t preserve modification timestamps
-g preserve group
-o preserve owner
–devices preserve device files (su only)
–specials preserve special files
We’ve got several PostgreSQL servers using ZFS file system for the database, and I needed to know how compressed the data is. Fortunately, there appears to be a zfs command that does exactly that: report the compression ratio for a zfs file system. Use zfs get compressratio /path/to/mount
