Ever since we upgraded to Fedora 41, we have been having horrible problems with our Exchange server. It will drop off the network for half an hour at a time. I cannot even ping the VM from the physical server. Some network captures show there’s no response to the ARP request.
Evidently, the VM configuration contains a machine type that doesn’t automatically update. We are using PC-Q35 as the chipset … and 4.1 was the version when we built our VMs. This version, however has been deprecated. Which you can see by asking virsh what capabilities it has:
2025-01-02 23:17:26 [lisa@linux01 /var/log/libvirt/qemu/]# virsh capabilities | grep pc-q35
      <machine maxCpus='288' deprecated='yes'>pc-q35-5.2</machine>
      <machine maxCpus='288' deprecated='yes'>pc-q35-4.2</machine>
      <machine maxCpus='255' deprecated='yes'>pc-q35-2.7</machine>
      <machine maxCpus='4096'>pc-q35-9.1</machine>
      <machine canonical='pc-q35-9.1' maxCpus='4096'>q35</machine>
      <machine maxCpus='288'>pc-q35-7.1</machine>
      <machine maxCpus='1024'>pc-q35-8.1</machine>
      <machine maxCpus='288' deprecated='yes'>pc-q35-6.1</machine>
      <machine maxCpus='255' deprecated='yes'>pc-q35-2.4</machine>
      <machine maxCpus='288' deprecated='yes'>pc-q35-2.10</machine>
      <machine maxCpus='288' deprecated='yes'>pc-q35-5.1</machine>
      <machine maxCpus='288' deprecated='yes'>pc-q35-2.9</machine>
      <machine maxCpus='288' deprecated='yes'>pc-q35-3.1</machine>
      <machine maxCpus='288' deprecated='yes'>pc-q35-4.1</machine>
      <machine maxCpus='255' deprecated='yes'>pc-q35-2.6</machine>
      <machine maxCpus='4096'>pc-q35-9.0</machine>
      <machine maxCpus='288' deprecated='yes'>pc-q35-2.12</machine>
      <machine maxCpus='288'>pc-q35-7.0</machine>
      <machine maxCpus='288'>pc-q35-8.0</machine>
      <machine maxCpus='288' deprecated='yes'>pc-q35-6.0</machine>
      <machine maxCpus='288' deprecated='yes'>pc-q35-4.0.1</machine>
      <machine maxCpus='288' deprecated='yes'>pc-q35-5.0</machine>
      <machine maxCpus='288' deprecated='yes'>pc-q35-2.8</machine>
      <machine maxCpus='288' deprecated='yes'>pc-q35-3.0</machine>
      <machine maxCpus='288'>pc-q35-7.2</machine>
      <machine maxCpus='288' deprecated='yes'>pc-q35-4.0</machine>
      <machine maxCpus='1024'>pc-q35-8.2</machine>
      <machine maxCpus='288'>pc-q35-6.2</machine>
      <machine maxCpus='255' deprecated='yes'>pc-q35-2.5</machine>
      <machine maxCpus='288' deprecated='yes'>pc-q35-2.11</machine>
Or filtering out the deprecated ones …
2025-01-02 23:16:50 [lisa@linux01 /var/log/libvirt/qemu/]# virsh capabilities | grep pc-q35 | grep -v "deprecated='yes'"
      <machine maxCpus='4096'>pc-q35-9.1</machine>
      <machine canonical='pc-q35-9.1' maxCpus='4096'>q35</machine>
      <machine maxCpus='288'>pc-q35-7.1</machine>
      <machine maxCpus='1024'>pc-q35-8.1</machine>
      <machine maxCpus='4096'>pc-q35-9.0</machine>
      <machine maxCpus='288'>pc-q35-7.0</machine>
      <machine maxCpus='288'>pc-q35-8.0</machine>
      <machine maxCpus='288'>pc-q35-7.2</machine>
      <machine maxCpus='1024'>pc-q35-8.2</machine>
      <machine maxCpus='288'>pc-q35-6.2</machine>
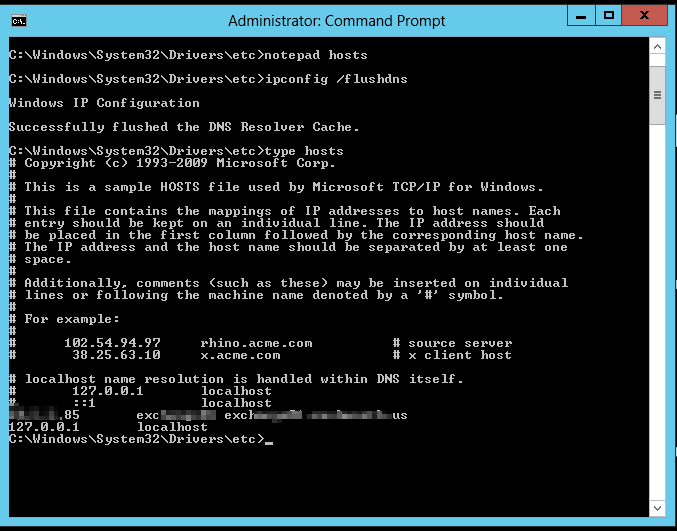
So I shut down my Exchange server again (again, again), used “virsh edit “exchange01”, changed
  <os>
    <type arch='x86_64' machine='pc-q35-4.1'>hvm</type>
    <boot dev='hd'/>
  </os>
to
  <os>
    <type arch='x86_64' machine='pc-q35-7.1'>hvm</type>
  </os>
And started my VM. It took about an hour to boot. It absolutely hogged the disk physical server’s resources. It was the top listing in iotop -o
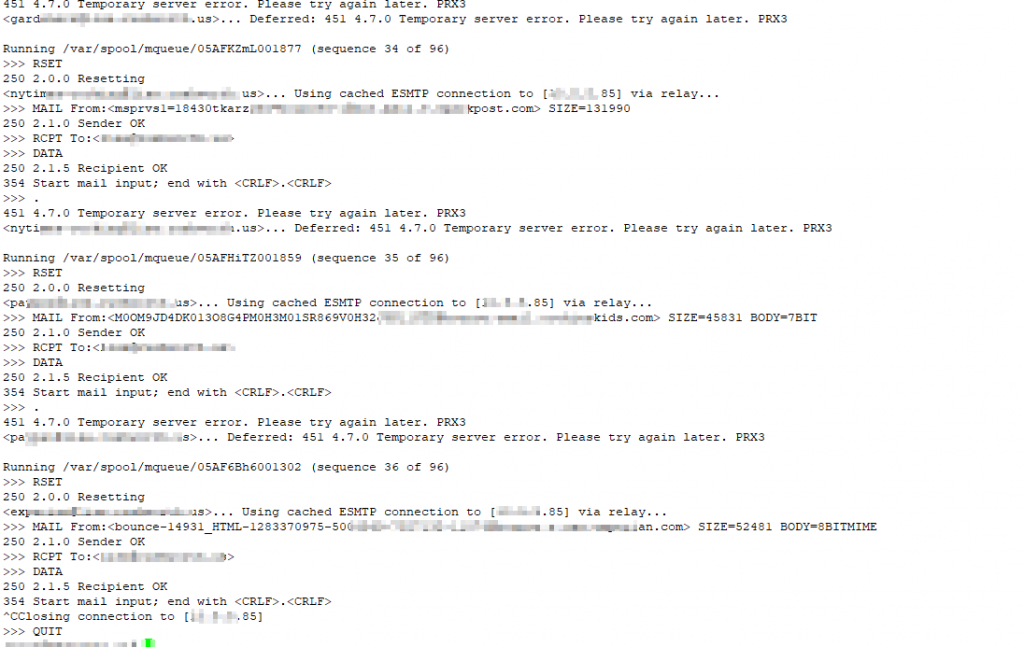
But then … all of the VMs dropped off of iotop. My attempt to log into the server via the console was logged in and waiting for me. My web mail, which had failed to load all day, was in my e-mail. And messages that had been queued for delivery had all come through.
The load on our physical server dropped from 30 to 1. Everything became responsive. And Exchange has been online for a good thirty minutes now.