Category: Technology

Listing Column Widths in Excel

I hacked Box Spout to support column widths formatting, but wanted a quick way of adding appropriate column widths (yes, automatic width determination would be better … but I didn’t want to spend hours sorting that). Instead of wasting time on automatic column widths, I wrote a simple Excel code module to tell me the appropriate column widths. If your data width might vary, you can add some padding to the ReportColumnWidth function. My data, fortunately, is fixed width.

You will need to save your spreadsheet as a macro-enabled workbook (.xlsm). To add a function to Excel, hit Alt and F11. Select “Insert” => “Module” and paste in the following content and save.

Function iCeiling(iInput)
    iCeiling = Int(iInput)
    If iCeiling <> iInput Then
        iCeiling = Int(iInput) + 1
    End If
End Function

Function ReportColumnWidth(CellID As Range) As Double
 Application.Volatile
 ReportColumnWidth = iCeiling(CellID.ColumnWidth)
End Function

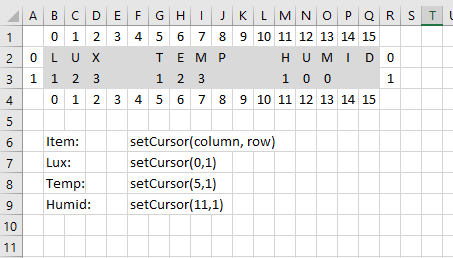
In Excel, use the ReportColumnWidth function to print the width of a column into a cell. This is my row #3.

In row #2, I have a counter that provides the row number for use in Box Spout. Row #4 creates the line needed to set the column width in my code using the concat function.

=CONCAT("$writer->setColumnsWidth(",A3,",",A2,",",A2,");")

Replacing the tab characters with newlines, I now have column widths set based on my data.

Docker Hub

Docker Official Images: Official images won’t have a publisher listed, and they will be tagged with “Official Image”.

Docker Official Images are a set of images curated by Docker. They’re generally recommended for new users as Docker has a team that reviews and publishes these images. Beyond Docker’s verification, you can see how an individual image was built. Navigate to the GitHub image library. Find the file corresponding with the image, and you’ll see a GitRepo line. Navigate to that URL to find the Dockerfiles that were used to build the image.

Docker Certified: Other images will be certified by Docker – these are published by someone other than Docker but have been tested & scanned for vulnerabilities, they come from a reputable source, and comply with best practice guidelines.

If you click on the hyperlinked organization name, they are listed as a verified publisher – this means someone put a little effort into ensuring “Oracle” is actually the corporation everyone thinks of when they hear “Oracle”

Other Images: You’ll also find containers that are not certified that have been published by un-verified parties. Don’t use these without some investigation.

We happen to interact with OpenHAB developers and “know” the guy who builds these images. I trust him and do run this image on my home network. I also know where to go to view his Dockerfiles, and I know how his images are built. https://github.com/openhab/openhab-docker

But there are images posted by random Internet denizens – I run Docker on my personal Windows laptop and needed to access the underlying MobyVM. The image justincormack/nsenter1 will do it … but I have no idea who this person is. A quick search of the Internet yielded a Dockerfile for this image, but there’s nothing that ensures the image on Docker Hub is actually built with this file. It’s safer to use the Dockerfile to build your own version of the image.

GitLab – Using the Docker Executor for Testing

Setting up gitlab-runner to use a Docker executor: You need Docker running on the gitlab-runner host. In my sandbox, I have GitLab running as a Docker container. Instead of installing Docker in Docker, I have mounted the host Docker socket to the GitLab container. You’ll need to add the –privileged flag, and since I’m using Windows … my mount path is funky. But it works.

docker run –detach –hostname gitlab.rushworth.us –publish 443:443 –publish 80:80 –publish 22:22 –name gitlab -v //var/run/docker.sock:/var/run/docker.sock –privileged gitlab/gitlab-ee:latest

Register the runner using “docker-runner register”. I always specify the image in my CI YAML file, so the default image is immaterial … but I’ve encountered groups with an image that mirrors the production servers who set that image as the default.

Edit /etc/gitlab-runner/config.toml and change “privileged = false” to true.

Start the runner (docker-runner start). In the GitLab Admin Area, navigate to Overview => Runners and select the one we just created. When a project is updated, tags can be used to select an appropriate runner. Because most of my testing is done with the shell executor, the runner which uses the shell executor has no tags and the runner which uses the Docker executor is tagged with “runner-docker”. You can require all jobs include a tag to select the appropriate runner (which avoids someone accidentally forgetting a tag and having their project processed through the wrong runner).

An image – you’ll need an image. You can use base images from the Docker Hub registry or create your own image. You can add components in the before_script or use a Dockerfile to build an image from the parent image.

Now we’re ready to use the Docker executor! Create your CI YAML file.

If you are not using the default image, start with “image: <the image you want>”.

We don’t want phpunit in the running image, but I use it for testing. Thus, I need a before_script component to install the phpunit package.

If you’ve used a tag to restrict what is run in your Docker-executor based runner, add the appropriate tag. Include the tester command line.

.gitlab.yml:

image: gitlab.rushworth.us:4567/lisa/ljtestproject-dockerexecutor
stages:
- test

before_script:
# Install dependencies
- bash ci/docker_InstallReqs.sh

test_job:
stage: test
tags:
- runner-docker
script:
- phpunit --configuration phpunit_myapp.xml

Docker_InstallReqs.sh

#!/bin/bash
yum install php-phpunit-PHPUnit

Now when you commit changes to the repository, the Docker-executor based runner will be used for the CI/CD pipeline. A transient Docker container will be created with the image, your before_script will be executed, and then the test script will be run within the container.


Building a Docker Image From a Parent Image

Docker maintains a registry of pre-built images that may be all you need. Put some thought into it, though – don’t just trust any image you find on the registry. When a pre-built image doesn’t meet your needs, you can make your own image based on any base image.

I create a new folder to hold the build instructions, additional configuration files, and notes about the build process. In that folder, create a file named “Dockerfile” which controls the image build.

You’ll need to specify the base image for your build using the FROM directive. I have examples here for installing sqlite3 on both a CentOS and Ubuntu base image. Add LABELs indicating the purpose of the image and who maintains it. Use the “RUN” directives to provide instructions to modify the base image to your needs – install what you want, create folders or files, clean up anything you don’t want.

The ENTRYPOINT is what runs when the container starts – it can be an executable, as in this case, or a script file.

If you need to expose ports for inter-container communication, add a list of ports to expose. SQLite is self-contained, but a microservice environment may have “EXPOSE 21443” to allow other containers to communicate with it on port 21443. Note this is different than binding the container port to a host – my Apache web server container has 443 bound; but that’s done in the “docker run” line where the container is built, not in the Dockerfile for the image.

Example – SQLite3 on CentOS

FROM centos:latest

LABEL "version": "latest"
LABEL "description": "CentOS server running SQLite3"
LABEL "maintainer": "DockerImages@lisa.rushworth.us"

RUN yum -y install glibc.i686
RUN yum -y install zlib.i686
RUN yum -y install wget
RUN yum -y install unzip

RUN cd /root && wget https://sqlite.org/2019/sqlite-tools-linux-x86-3290000.zip && unzip -j -d /usr/bin -o /root/sqlite-tools-linux-x86-3290000.zip && rm -f /root/sqlite-tools-linux-x86-3290000.zip

RUN rm -rf /var/lib/apt/lists/* /tmp/* /var/tmp/*

RUN mkdir -p /db

WORKDIR /db

ENTRYPOINT [ "sqlite3" ]

Example – SQLite3 on Ubuntu

FROM ubuntu:latest

LABEL "version": "latest"
LABEL "description": "Ubuntu server running SQLite3"
LABEL "maintainer": "DockerImages@lisa.rushworth.us"

RUN DEBIAN_FRONTEND=noninteractive apt-get -yq update

RUN DEBIAN_FRONTEND=noninteractive apt-get -yq install sqlite3

RUN rm -rf /var/lib/apt/lists/* /tmp/* /var/tmp/*

RUN mkdir -p /db

WORKDIR /db

ENTRYPOINT [ "sqlite3" ]

Save your Dockerfile and build your container using “docker build -t image/name .”

Use “docker images” to confirm the image has been successfully created.

And start a container using your image:

docker run -it --name ljrimagetest ljr/sqllite3

If you are having problems starting your container, change the entrypoint to something like “/bin/bash” – this will drop you to the host’s command line instead of the application. From there, you can troubleshoot your launch problems and sort the problem. The CentOS sqlite install, as an example, required glib and zlib components to run. Rather than trying something, rebuilding the image, launching a container, and looping until sqlite3 launched … I used bash as my entrypoint, installed packages until the application ran, and then modified the Dockerfile and rebuilt the image.

At this point, you can tag the image and upload it to a registry. I use my GitLab server to store Docker images. There is a DockerImages repository

To tag the image, use

docker tag ljr/sqllite3 gitlab.rushworth.us:4567/lisa/dockerimages/sqllite3:latest

And upload the image to your registry (you may need to authenticate first)

docker push gitlab.rushworth.us:4567/lisa/dockerimages/sqllite3:latest

If you are using GitLab as your registry, navigate to the repository. Select Packages => Container Registry

Here’s my Sqlite3 image


GitLab – Using the built-in Docker Registry

GitLab has a built-in Docker registry that you can use for projects. With the Omnibus install (or a container based on the official Docker image), enabling the registry is as simple as adding a config line to your gitlab.rb (this assumes you have a SSL key at /etc/gitlab/ssl named with the fully qualified hostname and using .crt for the public key and .key for the private key

registry_external_url ‘https://gitlab.example.com:4567’

Then just tag an image to a project’s repository URL

docker tag ossautomation/cent68php56 gitlab.example.com:4567/lisa/ljtestproject-dockerexecutor

Log in and push the image:

D:\git\ljtestproject-dockerexecutor>docker login gitlab.example.com:4567
Username: lisa
Password:
Login Succeeded

D:\git\ljtestproject-dockerexecutor>docker push gitlab.example.com:4567/lisa/ljtestproject-dockerexecutor
The push refers to repository [gitlab.example.com:4567/lisa/ljtestproject-dockerexecutor]
45c3e2f5d139: Pushing [=> ] 33.31MB/1.619GB

GitLab SSH Deployment Setup

Preliminary stuff – before setting up SSH deployment in your pipeline, you’ll need a user on the target box with permission to write to the files being published. You will need a public/private key pair.

On the target server, the project needs to be cloned into the deployment directory. The public key will need to be added to authorized_keys (or authorized_keys2 on older versions of Linux) file so the private key can be used for authentication.

To set up your GitLab project for SSH-based deployment, you need to add some variables to the project. In the project, navigate to Settings ==> CI/CD

Expand the “Variables” section. You will need to add the following key/value variable pairs:

Key Value
SSH_KNOWN_HOSTS Output of ssh-keyscan targetserver.example.com
SSH_PRIVATE_KEY Content of your private key
DEPLOYMENT_HOST Target hostname, e.g. targetserver.example.com
DEPLOYMENT_USER Username on target server
DEPLOYMENT_PATH Path to which project will be deployed on target server

Save the variables

I am managing both a production and development deployment within the pipeline, so I’ve got prod and dev specific variables. We use the same username for prod and dev; but the hostname, path, and target server public key are different.

If your repository is publicly readable, this is sufficient. If you have a private repository, you’ll need a way to authenticate and fetch the data. In this example, I am using a deployment token. Under Settings Repository, expand the “Deployment Tokens” section and create a deployment token. On my target servers, the remote is added as https://TokenUser:TokenSecret@gitlab.example.com/path/to/project.git instead of just https://gitlab.example.com/path/to/project.git

Once you have defined these variables within the project, use the variables in your CI/CD YAML. In this example, I am deploying PHP code to a web server. Changes to the development branch are deployed to the dev server, and changes to the master branch are deployed to the production server.

In the before_script, I set up the key-based authentication by adding the private key to my runner environment and adding the prod and dev target server’s public key to the runner environment.

- 'which ssh-agent || ( apt-get update -y && apt-get install openssh-client -y )'
- eval $(ssh-agent -s)
- echo "$SSH_PRIVATE_KEY" | tr -d '\r' | ssh-add - > /dev/null
- mkdir -p ~/.ssh
- chmod 700 ~/.ssh
- echo "$SSH_KNOWN_HOSTS_DEV" > ~/.ssh/known_hosts
- echo "$SSH_KNOWN_HOSTS_PROD" >> ~/.ssh/known_hosts
- chmod 644 ~/.ssh/known_hosts

In the deployment component, username and host variables are used to connect to the target server via SSH. The commands run over that SSH session change directory into the deployment target path and use “git pull” to fetch and merge the updated code. This ensures the proper branch is pulled to the production and down-level environments.

production-deployment:
 stage: deploy
  script:
    - ssh $DEPLOYMENT_USER@$DEPLOYMENT_HOST_PROD "cd '$DEPLOYMENT_PATH_PROD'; git pull origin master"
  only:
    - master

development-deployment:
 stage: deploy
 script:
   - ssh $DEPLOYMENT_USER@$DEPLOYMENT_HOST_DEV "cd '$DEPLOYMENT_PATH_DEV'; git pull origin development"
 only:
   - development

Now when I make changes to the project code,

Assuming the tests still pass, the deployment will run

If you click on the deployment component, you can see what changes were pulled to the target server

And, yes, the updated files are on my target server.


VSCode Tab Key Not Working

Tab suddenly stop tabbing in VSCode? Try hitting ctrl+m — evidently there’s another ‘mode’ for the tab key where it changes focus instead of tabbing. Very cool and useful when used deliberately. Very “huh?!?!” when you accidentally hit ctrl+m 🙂

From https://code.visualstudio.com/docs/getstarted/keybindings

Ctrl+M Toggle Use of Tab Key for Setting Focus editor.action.toggleTabFocusMode

Of course if that wasn’t your problem … focus mode is turned on now & you’ll want to hit ctrl+m again to change back to tab mode!

Corrupted Spreadsheets From PHPSpreadsheet (andPHPExcel)

I need to deliver Excel files to the browser, so used php://output as the save location. Does exactly what I want except …

Excel says it has a problem with some of the file content. It’s recoverable – click “Yes” and you’ll see all of the spreadsheet data. But no one is going to want to run a repair on every single file they download from my site!

I confirmed the buffer was being cleared, that I didn’t have any extraneous PHP errors getting inserted into the spreadsheet data. My output was clean – it was also corrupt. I’d actually started using the old PHPExcel module, installed and changed over to PHPSpreadsheet because I know PHPExcel is not maintained. But the problem persisted. I started reading through the docs for PHPSpreadsheet to see if I could find a hint.

https://phpspreadsheet.readthedocs.io/en/latest/topics/recipes/#redirect-output-to-a-clients-web-browser

Caution:

Make sure not to include any echo statements or output any other contents than the Excel file. 
There should be no whitespace before the opening <?php tag and at most one line break after the closing ?> tag 
(which can also be omitted to avoid problems). 
Make sure that your script is saved without a BOM (Byte-order mark) because this counts as echoing output. 
The same things apply to all included files. 
Failing to follow the above guidelines may result in corrupt Excel files arriving at the client browser, 
and/or that headers cannot be set by PHP (resulting in warning messages).

Do I have more than one newline after the closing “?>” tag? Sure do!

Got rid of the extra newline, and the downloaded file is fine.