Tag: teams

Did you know … you can blur the background when joining Microsoft Teams video meetings?

Do you have a two-foot-high stack of papers on the desk behind you? Does your whiteboard contain information that isn’t quite ready to be broadcast? Or maybe you are working from the aeroport and your camera is facing the main terminal hallway – all of those people running past can be distracting. Video meetings humanize participants, but what’s behind you isn’t always something you want to share with others. When you join a scheduled Teams meeting, you can use a video filter to blur all of that stuff.

Click to join a meeting.

Click the slider next to the video camera to join the meeting with video.

You will see a video preview. Click the middle slider to activate the background blurring filter.

The video preview shows the changes. If the blur sufficiently obfuscates whatever you didn’t want to show, click ‘Join now’ and join the meeting. If your desk still looks a mess … move your stuff 😊 The blur effect is not applied to things the filter considers to be in the “foreground” … so you might be able to achieve more blurring by pushing an object farther from the camera.

You can currently blur the background when joining scheduled Teams meetings. There is an RFE on UserVoice to enable this feature for ‘meet now’ meetings and video calls.

Did you know … Microsoft Teams lets you share your screen?

It does! You can share your screen within a meeting, or you can share your screen in a chat (screen sharing with chats is currently being rolled out — it is available in the Teams desktop client, but may not appear in your web client yet).

Screen Sharing In A Chat:

While you are able to chat with someone who is offline, they’ll need to be online before you can share your screen with them. Check the circle before their name — a little gray circle in it means they are offline (or hover your mouse over the larger circle to see their presence in text).

Once the person is online, click the “start sharing your screen” button to start sharing your screen.

Select what you want to share – “Desktop” will share everything you have active on your desktop. Selecting an individual application listed under “Window” will only share your screen when that application is active – convenient if you’ve got confidential information in other desktop applications, as you cannot inadvertently display it within the screen share.

Screen Sharing In A Meeting:

In a meeting, you can begin sharing before others arrive. After you have joined a meeting, click the “Open share tray” button.

Select what you want to share – as in the chat-based screen sharing, you can share your entire desktop or select a specific window. You can also share a PowerPoint presentation or a virtual white-board.

Using Screen Sharing:

When you are sharing your screen, the shared content will be outlined with a red box (the red box in the screenshot below isn’t something I drew in) to remind you that your screen is being shared.

You can move your mouse to the top of the screen to reveal a screen sharing control bar. From this bar, you can give another person control of your mouse and keyboard (or take back control).

Select the person to whom you want to give control

You can also stop sharing your screen with the “Stop presenting” button. There is also a meeting control window that appears in the lower right-hand corner of your screen – you can click the “Stop sharing” button there to stop sharing your screen too. If you were in a meeting, you’ll still be in your meeting … .just not sharing your screen. If you were in a chat, you’ll be returned to your chat. 


Did you know … Microsoft Teams aggregates all your Planner tasks?

Adding a Planner board to Teams spaces is a great way to manage tasks within a group or for a project, but it can be a little difficult as an individual to keep track of tasks scattered across various Teams. Microsoft Teams also provides a view of your tasks.

Click on “More apps” on the left-hand toolbar and select “Planner”

Click on “My Tasks”. You will see tasks in any Planner board that have been assigned to you. You can edit task content, change labels, and change the completion status from within this view.

Although you can edit most of the Task details, you cannot drag it between buckets on the Planner board. To do that, you need to open the containing Planner board. Currently, there’s no way to navigate directly to the Planner board from within this view. You can click the inverted caret next to “Group by …” and select “Plan” to see the name of the Planner board that contains your task. You can then find the board on https://tasks.office.com

Did you know … there are keyboard shortcuts in Microsoft Teams?

I know modern software is driven by graphical user interfaces, but as an old-school Unix admin (there were loads of interface choices – Bourne shell, c shell, korn shell, bash shell!) it’s weird to take my hand away from my keyboard just to turn a bit of text bold or move to a new field. And Microsoft has done a decent job of standardizing keyboard shortcuts across their applications – ctrl-b will toggle “bold” pretty much anywhere (even Teams!)

But … within your Teams client (even the web client) hold the “Ctrl” key and type a full stop (.) and look – special keyboard shortcuts!

There’s even a link at the bottom for all of the shortcuts on Windows and Mac. I can hit ctrl-shift-1 to flip over to my Activity feed; ctrl-shift-3 puts me back in the Teams chat section.

Did you know … you can use markdown in Teams messages?

Teams supports markdown within messages – type something like this

And you actually see this:

You’ll know it’s working because the markdown is converted as you type it (pasting a marked down string into Teams doesn’t work — you’ll have the literal characters and not the implied formatting)

You can even type a backtick (`)

To get an inline code block

You can insert multi-line code blocks as well. It’s a little trickier to get a code block in a message since you’ve got to use shift-enter to move to a new line then type three back ticks.

After you type the three back ticks, your cursor will be in the code block. Enter will now move to a new line instead of sending the post.

They’ve got a bug where you cannot do anything after the multi-line code block … but you can always reply to your post if you’ve got something to add.

As of this writing, you cannot paste markdown text into the message and have the formatting rendered. You can paste content into the multi-line code block composer, but you cannot paste *things* with ~markdown in them~ and see “`
pretty output

Did you know … you can edit the tag for Teams @ mentions?

Well, you can ? Not generally worthwhile if you are only mentioning one or two people, but if you need to flag half a dozen people, the list of names starts getting REALLY long.

Click in the middle of the name – your cursor will be placed within the name element.

Use backspace or delete to remove one of the name components – backspace will remove the surname and comma, delete will remove the given name.

The links are maintained, so the individual gets flagged with the post.

Does it matter if there are three Bob’s on there? In the previous case, no – I’m trying to garner the attention of a bunch of people and direct them all to the same text. But if you have a bunch of people in your Teams group with the same name … it’s probably better to leave their full name in place or delete the given name!

Did you know … you can push GitLab notifications to Microsoft Teams?

Microsoft Teams offers a lot of connectors which allow you to see external notifications right in a Teams channel, and you can push GitLab notifications to Teams. Determine the channel into which you want the notifications posted – I decided to make a new channel just for GitLab notifications, but you can use an existing channel too. Click the hamburger menu next to the channel name and select “Connectors”

Locate “Incoming Webhook” and click “Add” next to it

There’s not much to see here – just click “Install”

Provide a descriptive name for the webhook and click “Create”

Scroll down and copy the webhook URL

Click “Done”. Now go to your GitLab project. On the sidebar, scroll down to “Settings” and select “Integrations”

Scroll down to the “Project services” section.

Locate “Microsoft Teams Notification” and click on it

Check the box to activate the integration. Select the events for which you want information pushed to Teams

Remember that URL we copied? Well, here’s where you paste it in. You can elect to receive notifications for only the default branch or all branches. You can elect to receive all pipeline notifications or only broken pipeline notifications. Click “Test settings and save changes”

If everything worked, you will see a banner indicating that the Microsoft Teams Notification was activated.

Now do something in your GitLab project – commit a code update, create an issue, add a page to the Wiki … anything that you’ve selected to trigger notifications.

And … check out your Teams channel:

Did you know … you can draw attention to Teams posts?

Before I tell you how – don’t be the person who flags every single message as urgent. Not because it’s annoying (although it is), but because it’s hard to single something out for attention if YOU ALREADY MARK EVERYTHING URGENT AND USE HUGE, BOLD, RED LETTERS AND END WITH !!!!!!!!!! If everything is urgent, you don’t have a classification for super urgent things.

OK, now that I’ve done my quasi-civic duty and at least tried to avoid having big red icons next to 97% of the messages I see …

You can use @ mentions to draw individuals’ or groups’ attention to a specific post. In the message, type @ and then begin typing either an individual’s name or the Team’s name. The @ mention can be included anywhere in the message – it doesn’t have to come first.

Team members using the desktop or mobile client will get a banner message alerting them that they have been mentioned in a post.

All clients will have a little logo along the right-hand side of the message indicating either a group

Or individual mention.

If you want to draw attention to an item without banner messages, you can also mark a post as important. When you are typing your message, click on the “Format” button when typing the message.

Then click the exclamation point. (For anyone who prefers keyboard shortcuts – use ctrl-shift-i)

And you’ll see both the red bar along the left and the IMPORTANT! designation atop the message.

Team members will see an exclamation point marking channels with important messages too.

If you accidently mark a message as important (keyboard users who type ctrl-i for italics can get both ctrl and shift occasionally), click the hamburger menu next to your post and select Edit.

Click the exclamation point again to remove the important designation.

Voila, the message no longer has an over-inflated sense of self-worth. Or my typo.

Did you know … you can send e-mail to a Microsoft Teams channel?

Why would you send an e-mail to a Microsoft Teams channel? That’s a good question! At first, e-mailing a Team channel sounds like a solution in search of a problem. I think of it as moving an e-mail discussion into Teams. And there are a lot of times when an e-mail thread can be more efficiently handled in Teams.

Attachments that are being updated and resent – you know, the documents where there are five different working copies with various people’s changes and now someone must condense those changes into a single document. Including the document in the Team space allows team members to collaboratively edit it online. One copy! Having the discussion history available in Teams avoids switching between e-mail and Teams as the document is developed.

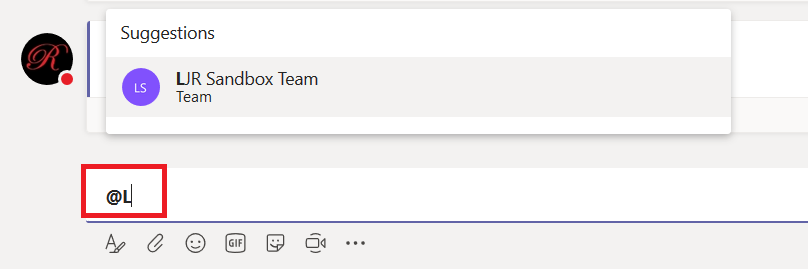
“I forwarded this to five people, and here’s what they think” – When a message gets forwarded and you’ve got three different sets of recipients discussing the same issue – or if someone keeps going back to an older message and dropping a few recipients who were added late in the discussion – moving the discussion into Teams ensures all of the people who should be involved in the discussion are included and working together – not a person from one of the threads trying to update everyone on a separate thread.

“Hey, Sean, can you forward me that hour-by-hour for this weekend?” – Ever have to ask a coworker to forward some message that you’ve misplaced (probably deleted, but cannot seem to find there either). The Teams threads are persistent (I cannot accidentally delete your message) and searchable.

The new guy – an involved discussion may take months. When a new person joins your group, someone has to remember to include them on the next reply-all (even adding an existing employee to a thread, they get lost when someone else replies to an older message). By moving involved discussions into Teams, you can quickly add a new person to the discussion.

There are also cases where Teams could replace a shared group mailbox – you cannot receive messages from outside of the company, but if your group mailbox only gets messages from other Windstream mailboxes … Teams may be a good replacement for that group mailbox. Team members can post into the thread taking ownership of the request – everyone will see who claimed the request, and if someone is unexpectedly out of office, you can see the issues on which they were working.

Ok, ok … you convinced me! Sending an e-mail into a Teams channel isn’t a completely pointless feature. So how do I do it?

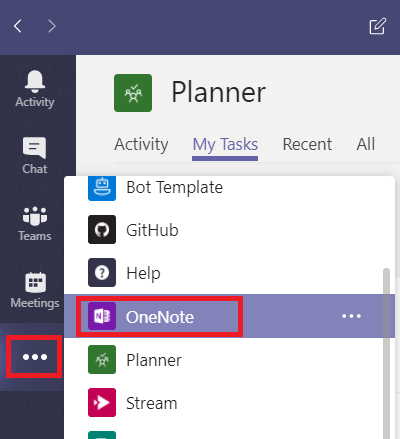
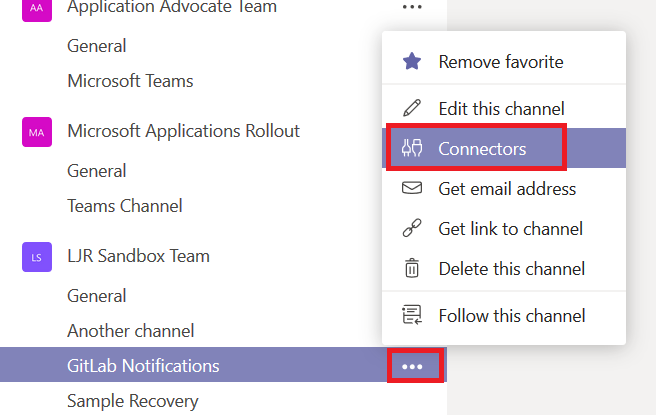
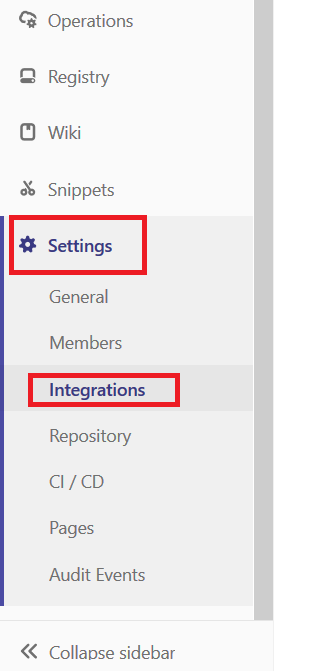
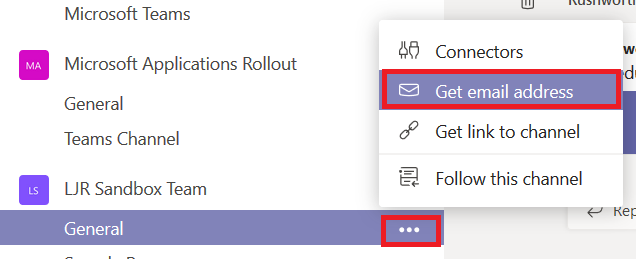
First, you need to know the e-mail address associated with the channel. Click on the hamburger menu next to the channel name and select “Get email address”

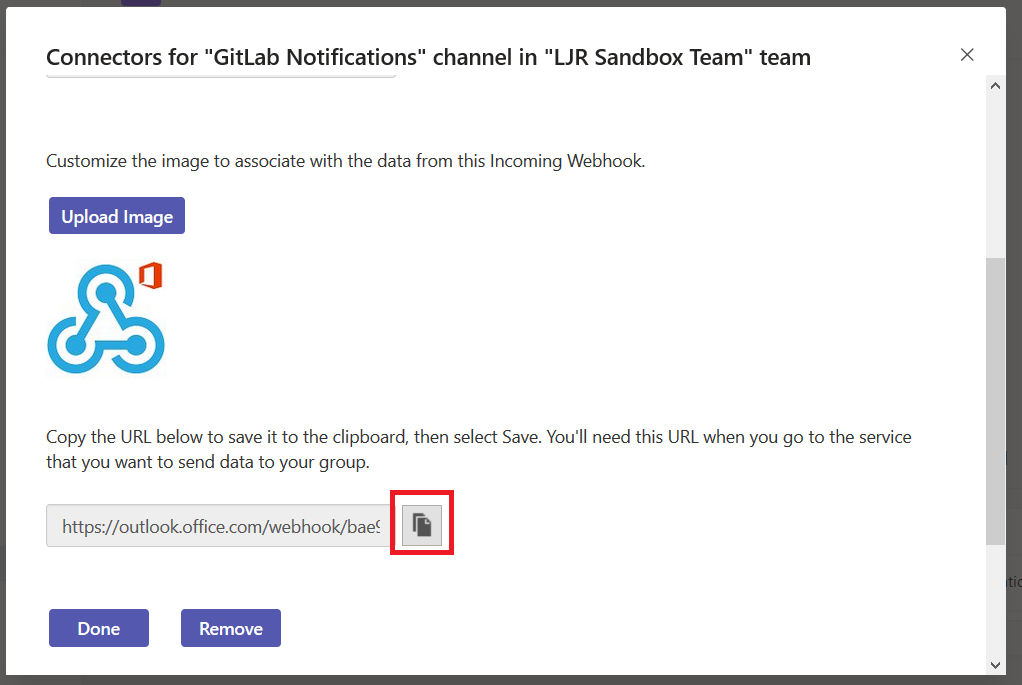
There you have it – you can click “Copy” and all of that text will be in your clipboard.

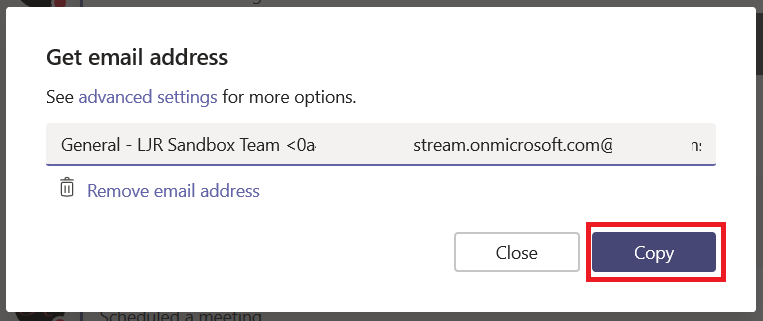
Paste the address into the “to” field of an e-mail message, then send the message.

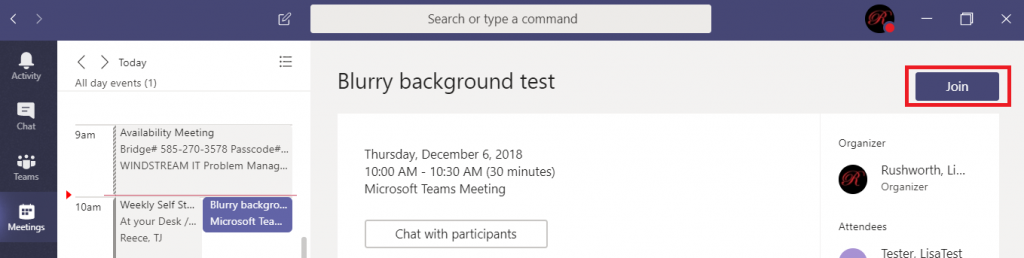
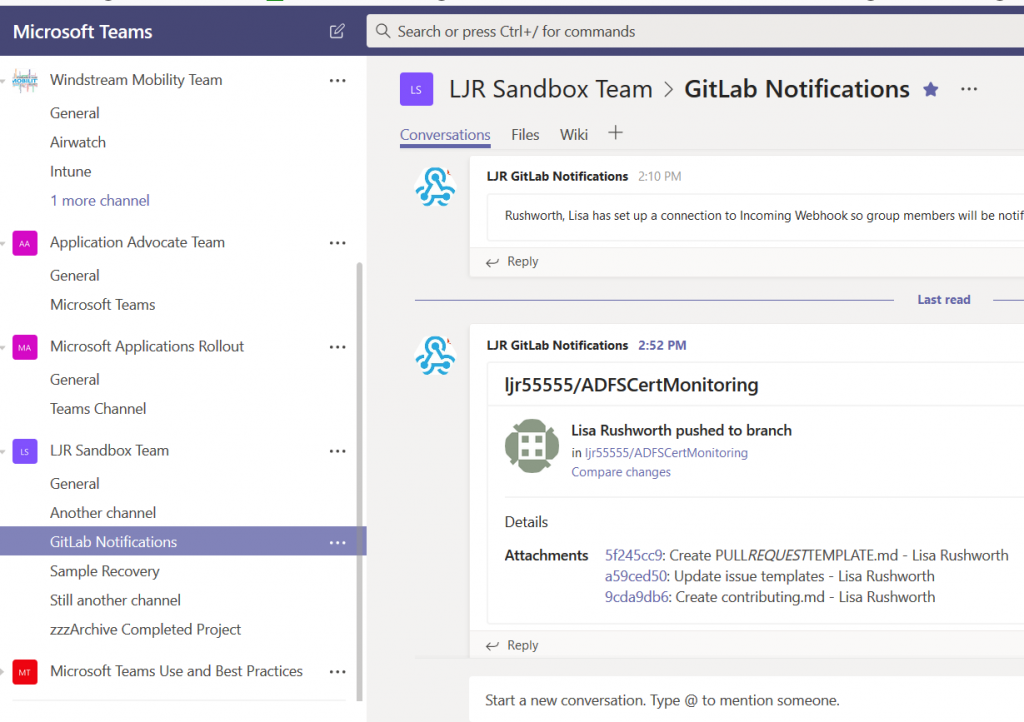
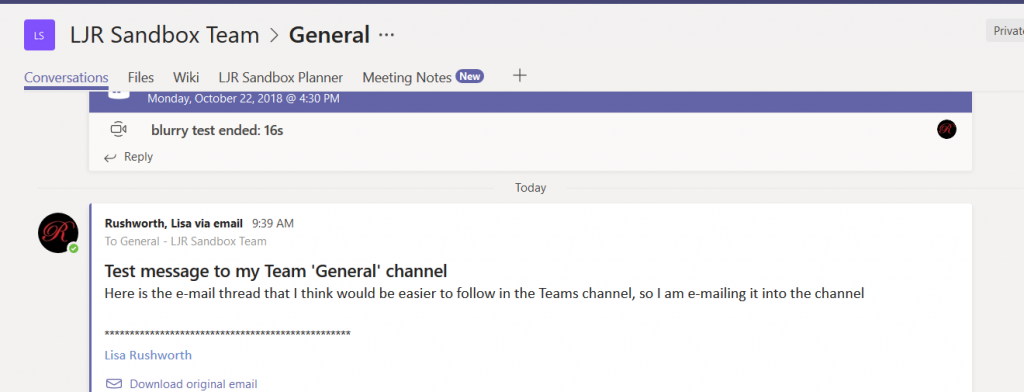
Wait for it … this may take a minute … and the message will appear as a thread in the channel.

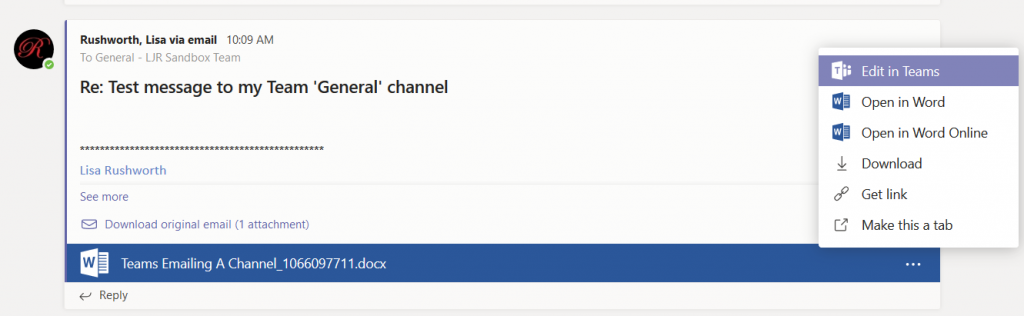
If the message includes an attachment, that attachment will be displayed in the thread. You can even edit the document online – in Teams or in Word Online.

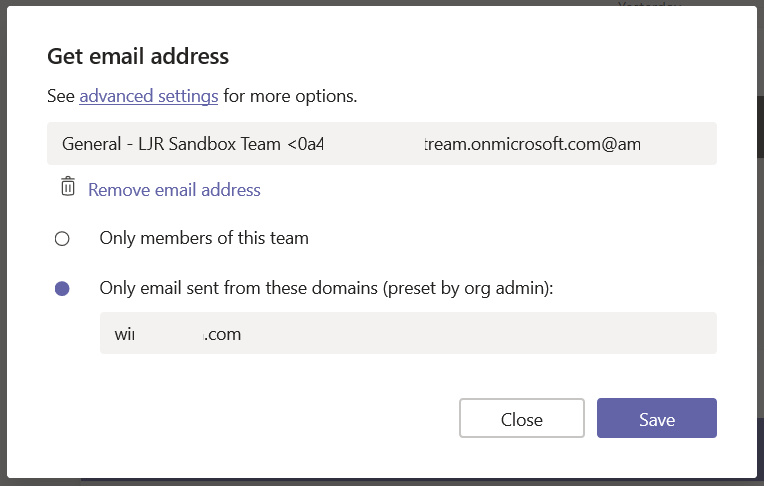
The default setting for Channels is to accept e-mail messages from the windstream.com domain – this may be exactly what you want. You can send the address to individuals outside of your team and allow them to create threads without having to grant them access to your Team space. But you may not want that – go back to that pane where you got the channel e-mail address. Click to “See advanced settings for more options” – you can set the channel to accept messages only from Team members:

Think it’s kind of crazy that every Team member can adjust these settings? Vote for my idea on the Teams UserVoice site 🙂

Did you know … you can quickly start a web meeting from within a Microsoft Teams channel discussion?

Sometimes text conversations become cumbersome – a topic really takes off, and there’s a lot of typing. A LOT of typing! Sometimes it’s easier to just take a few minutes and talk about the subject instead of typing back and forth. In Microsoft Teams, just click the “Meet now” icon at the bottom of the channel.

This will bring up a page that lets you start an unscheduled meeting (or schedule a meeting, if people aren’t available right now to discuss the subject). You can add a subject so attendees know which thread you want to discuss. Click “Meet now” and …

Voila – you’ve started a meeting with audio (and video, if participants choose).