Tag: Anya

Owl Backpack – Done!

Anya’s backpack is done! The embroidered eyes turned out really well, and his wings flap a bit as she walks.

IMG_20160906_223634

I think the piping turned out really well, and the side pockets work well (had a little bag of pretzels in there). I used little push button cord locks — Anya thinks they look like ladybugs. It’d be really cute if they made them in red with black dots to *really* look like ladybugs).

IMG_20160904_014152

I moved the strap mount points – the bag didn’t sit properly when the straps were attached at the seam between the semi-circle and the rectangle. Moving the straps up to the top seam had the bag hanging nicely off her back.

IMG_20160904_014200


Pinwheel Dress – Part 1

I’ve started piecing together Anya’s Pinwheel Dress — all of the pieces are cut out, and the strips for the bias tape are sewn together. I’ve got one of the bias strips folded and pressed too — so I was able to affix it to the bottom of the dress layer. Right now, the flounce at the bottom and the bias tape are pinned on so I could visualize the dress. I wanted a really simple white dress with a dark colored bias binding. The binding is a marbled maroon fabric, although that detail is completely lost in the photos. I don’t know that the marbling comes across well in person either – we’ll see.

20160212_002139

This is the hemline – both the dress and tunic have a similar hemline. When worn together, they create a two layer flounce.

20160212_002151

Here’s a view of the trim with a little better lighting – it’s a maroon fabric with a marbled design on it.

20160213_113001

Anya’s Easter Dress

My mom asked me if I’d make a dress for Aisha – she’d buy the pattern and fabric, and I’d provide the labor. It is a really cute pattern, and the size range is incredible. The dress pattern for Aisha’s size 7 dress includes the size 4 that I use for Anya. I figured I’d make the same dress in a different fabric for Anya’s Easter dress to give me some practice using the pattern (and my new serger!!!) before making something to give away.

Looking at the pattern web page, I really liked one of the fabrics pictured. I e-mailed their contact address and immediately was provided a link to the fabric. Bonus, it is on clearance. I looked at the “how much fabric do I need” chart and worked out how much fabric I’d need — rounded up because it’s a fairly large print, and I wanted to have enough fabric to ensure I could get flowers and butterflies visible on the dress.

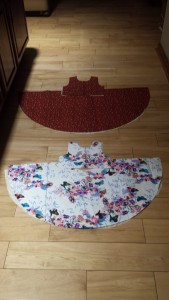
I printed the pattern — each size is a different layer in the PDF file, so you don’t have a bunch of confusing lines intersecting. Awesome idea, one I hope more pattern designers implement. Once all of the pieces were cut out, I laid the dresses out just to get an idea what they’d look like.

20160123_214618

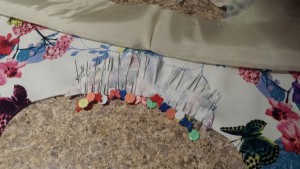
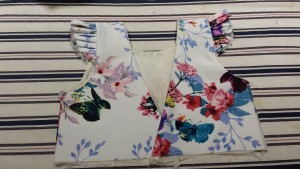
Getting the little sleeve gathered and affixed to the dress took a LOT of pins!

20160125_001936

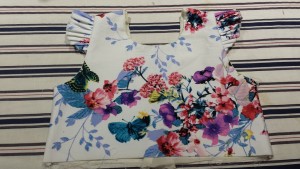
Stitched the front & back together, with the little sleeves sandwiched between the fabric and the lining … turned it right-side-out and we’ve got a dress top.

20160125_214412 20160125_214348

The bottom is a circle skirt – it gets attached to the bodice. I still need to serge the fabrics along the waist seam … other than that, the dress is done!

20160129_003016 20160129_003042

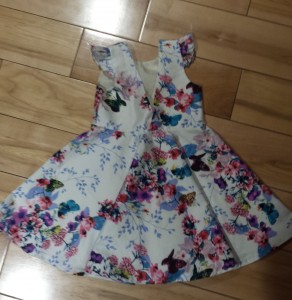
I think it looks awesome. And Anya loves wearing it – dancing around and spinning. And I’ve got her Easter dress ready to go two months early!

Realized, once I was finished, that I literally had enough fabric to make a second size 4 dress. I had added the “dress” yards and the “lining” yards together. D’oh! Feel slightly less silly because my mom did the exact same thing … There’s not enough extra fabric to do both a size 4 and a size 7 … but there’s plenty to make a skirt and the dress. Each girl is going to get a skirt from the other’s left-over fabrics.

The Imaginarium

I am just starting to set up a craft room. I got the DIGNITET curtain wire from Ikea; the fabrics are wrapped around cardboard backing boards used for comic book storage. Each one is hung with two RIKTIG clips. The curtain wire holds a LOT of fabrics. Since the craft room doesn’t get much natural light, I’m not worried about fading. Dust is a concern, though. Next step is to get some containers for my yarn and thread. Anyway, here’s the craft room:

20160116_162606_Bellus Rd


Anya’s 3rd Birthday Cake!

I have no idea what made me decide to make my first ever angel food cake for Anya’s birthday — so many things that could have gone wrong with such a delicate cake. But eh, what’s life without some risk (well, and I could always make a quick carob “wacky” cake).

Whipped the egg whites and castor sugar – along with some hazelnut extract

DSC_8247

And then very gently folded in the flour mixture — I used a silicon spatula, and I was rather surprised how fluffy the batter was after adding the flour. I was really worried that it would deflate. The batter is incredibly sweet — it’s basically sugar suspended in whipped egg white and enough flour to keep it together. Uncooked, it tastes a little like spun sugar.

DSC_8249

Then I very carefully scooped it into a bundt pan (yeah, wrong kind of pan … but I didn’t have time to get the proper pan posted to me after I realized it wasn’t something you could just buy anywhere). Very gently placed the pan in the oven, and left the vicinity for an hour.

DSC_8251

Voila! We got an angel food cake! It is a super sweet cake, but it went very well with the lemon curd (which also used all of those egg yolks left over after making the cake!).

DSC_8256

And it was very tasty!

Independence Day Skirt

WooHoo! I finished another sewing project — this one is Anya’s 4th of July skirt. It’s a fabric from Northcott’s Stonehenge Stars & Strips line (20159-30). I think the fabric is not so flag-like that it looks silly on the 364 other days of the year, but it is right festive enough for the holiday.

DSC_7152

Progress

And we are almost done with the Easter dress (just in time too)!

DSC_6167

I had quite a time making the straps. Trying to turn the right side out, I wouldn’t get the layers right and ended up with two tubes sewn together at the seam. I finally stitched the two fabrics around a metal straw and then pushed the fabric through the straw. That worked surprisingly well.

I still want to make a wider belt, but the only thing that *needs* to be done is stitching the straps in place. They are pinned, at the moment, so I could get the proper length.

Too bad it will be so cold on Easter day – we’ll need sweaters!