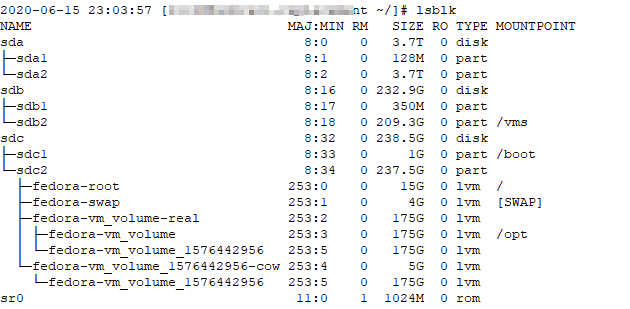
A ‘pretty’ view is output with lsblk
Although pvdisplay gives you a little more info about the LVM.
A ‘pretty’ view is output with lsblk
Although pvdisplay gives you a little more info about the LVM.
We had a strange problem with our DSL modem a year or so ago — immediately after a firmware update got pushed to us. If something was plugged into a switch port, the whole thing became inaccessible. Only by unplugging all of the network cables and rebooting the thing would it stay online. Strange thing, though, is we were able to put it in bridge mode, plug something in, and have a network. Unfortunately, speed tests came back between 10 and 20 meg … it worked, we could still watch movies, VPN into work, listen to music … but something was clearly not right. In researching the issue, I’d come across a lot of other people who experienced dramatic reduction in speed when they switched their ISP’s device to bridge mode. Coupled with the fact our emergency spare access point, which got promoted to “access point for half of the house” was flaky and IPL’d every couple of days.
Since I’m able to download the DSL modem firmware from work, we’ve wanted to flash the DSL modem … well, basically ever since we came online after the problem occurred. Someone’s always doing something that precludes dropping the Internet for an hour … but, yesterday, it was time. Scott was working on the local network, Anya’s got plenty of books, and I had an hour to spare. Hard reset the DSL modem (you cannot access the admin page in transparent bridge mode), flashed it with the most recent firmware we’ve approved for use, and voila … it’s all working again. I even brought up ISC DHCPD on the internal server so we can add as many static addresses as we want without concern for nvram usage. Scott hard reset the other access point, updated its firmware, and returned it to its position on the other side of the house. Perfect! We’ve now got two access points that stay online. Except — the Actiontec T3200 has no way to define a static route!? I’m sure 99% of their customers don’t care, but when we bought our new server, I set the libvirt VMs up on their own network. Not for any good reason, that was just the configuration I found in all of the online documentation I reviewed.
While I could shell into the Asus and add a route (even include that command in the j-whatever script that executes on boot), that didn’t let traffic from the Internet in to our reverse proxy or mail server. I needed to move the VMs onto a bridge that used the routable internal subnet. And thus began my re-IP’ing nightmare.
Step #1 — Add a bridge network that exists on the internal subnet. Sounds straight-forward enough, but several iterations just tanked the server’s network. At one point, we could reboot the server and have connectivity, reboot again and get nowhere. I cleared out everything I had added, rebooted, and at least had the main server online. With the X display redirected to my laptop, I used nm-connection-editor to create a bridge and the slave device. Disabled stp manually (nmcli connection modify vmbridge bridge.stp no), but I used the GUI for everything else. I’m certain it’s possible to do this all through nmcli … but it was an exercise in frustration (and I’m a big fan of CLI stuff to start with). I used the magic-me-a-bridge wizard, clicked ‘add’ for its device, ran through the magic-me-a-slave-device wizard, added a new temporary IP address to the bridge, dropped the previously-used Ethernet (wired) interface, and brought the bridge online. Voila, network. I added the IP address from the Ethernet interface to the bridge. I’m certain this isn’t The Right Thing To Do(TM), and it’s quite possible that I could safely drop the temporary IP I’d put on the bridge to maintain access to the server. But after eleven hours of problems getting to this state, I’m loathe to rock this boat.
Step #2 — Add a bridge to the libvirt config. Create an XML file with the bridge definition
 2020-06-10 12:21:32 [user@host ~/]# cat bridge.xml
<network>
    <name>vm-bridge</name>
    <forward mode="bridge"/>
    <bridge name="vmbridge"/>
</network
Then use net-define to create a bridge based on your config (virsh net-define bridge.xml). Start your bridge (virsh net-start vm-bridge) and, assuming everything works well, set it to autostart (virsh net-autostart vm-bridge).
Step #3 — The next step *should* be to move your VMs to the new bridge — this involves updating the IP addresses … since I won’t be able to access the servers until that is done, I’ll need the GUI to connect into each server. Unfortunately, my next step actually was to get virt-manager working again when it freaks out. At some point, I had a virt-manager session shut down improperly or something. Attempts to launch virt-manager resulted in the error “Error starting Virtual Machine Manager: g-io-error-quark: Timeout was reached ” … which isn’t particularly helpful. Killing the virt-manager PIDs and restarting libvirtd (systemctl restart libvirtd) restored the management interface.
Step #4 — Move the VMs to your new bridge and change the IPs for the new subnet. I used virt-manager to switch the network interface to my new bridge, booted each server, and updated the IP in the OS. This is somewhere that statically assigning IP’s through DHCP would have made things a little simpler … but updating the IP on Fedora and Windows is straight-forward enough.
Step #5 — Getting Exchange back online. Most documentation tells you Exchange doesn’t care about its IP — which is not exactly true. I knew I would have to edit a few configurations to reflect the new subnet — my mailertable records for internal routing, bindings within Apache HTTPD config files, the Exchange send connector smarthost (set-sendconnector -identity “Connector Name” -SmartHosts “[w.x.y.z]”) since my sendmail server’s IP changed too

And update the binding for the Exchange receive connector. Wasn’t sure why I bound the receive connector to the specific IP interface, so I bound it to all interfaces on port 25. Now that everything’s set up and ports all show up as open … I’m ready to clear through the queued mail. A quick “sendmail -q -v” command and …. uhh, that’s no good. I’m getting “451 4.7.0 Temporary server error. Please try again later. PRX3”
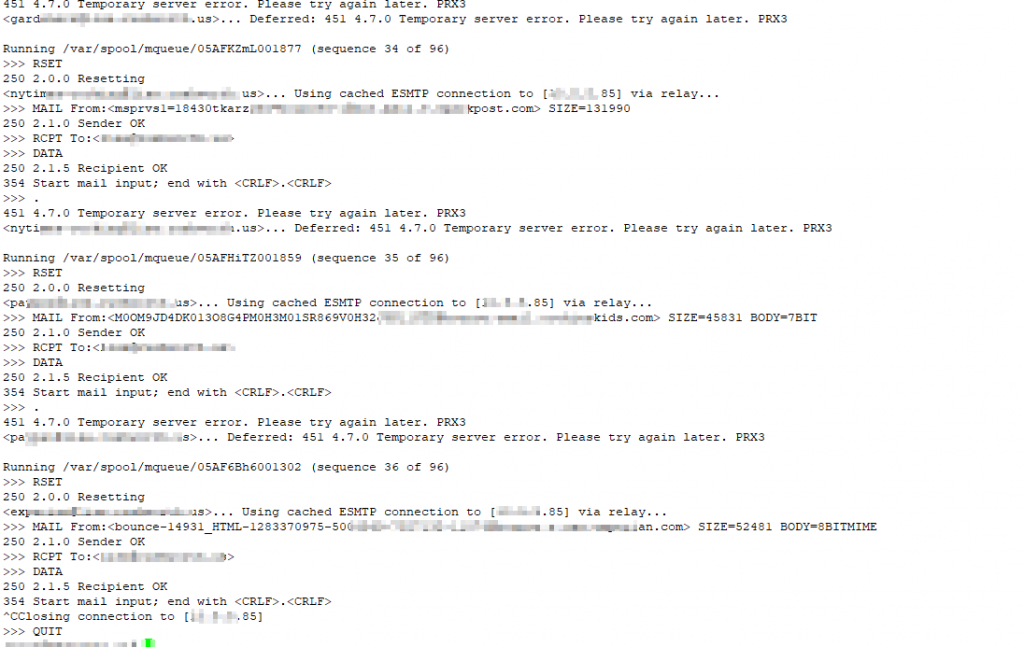
I realized that my previous config had the receive connector bound to a specific IP address for a reason. While changing it to 0.0.0.0 saves a config step if I have to re-IP again, Exchange doesn’t work well when the SMTP server is bound to all interfaces. I had to bind it to the specific IP (set-receiveconnector -identity “Server\Connector Name” -Bindings “w.x.y.z:25″,”[::]:25”) … the IPv6 binding may need to be specific, too, if you actually use IPv6. I don’t … so it’s not.

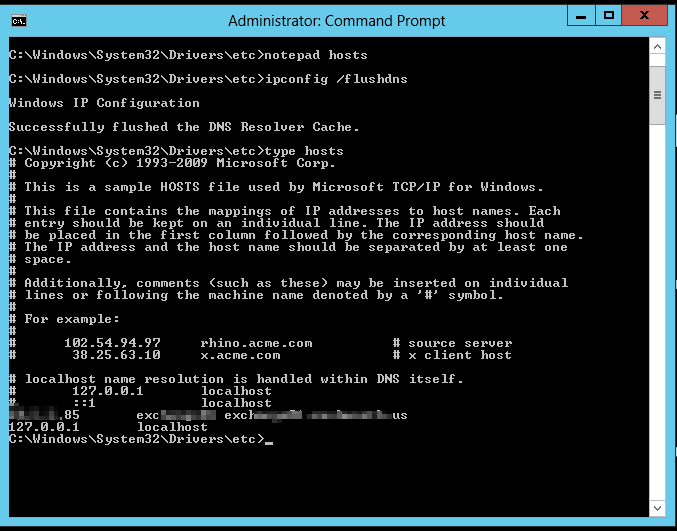
One final thing to remember — Exchange likes to have a hosts entry for itself. No idea — some Linux-based apps have the same quirk, so I never bothered to investigate farther. Update the hosts file, flush the dns cache (ipconfig /flushdns), and finally I’ve got mail dropping into my mailbox.
I’ve finally returned to the state I was in yesterday afternoon. Well, I went from 10-20 meg speed tests to 50-80 meg speed tests. Upload went from 1-3 to 8-10, too. My Internet speed is very fast 🙂

Another benefit of the proliferation of technology. We’ve had cell phone video capturing an array of violence for years (I recall rulings from the 90’s about your right to record police activity, although the smartphone-everywhere phenomenon is more recent), but “what’s different this time” may be the availability of publishing platforms — document repositories, web platforms, mass communication. Not just phone video capturing an array of violence, a public spreadsheet aggregating information for all to view. Visualizations based on the data. Sunlight, as it were. And, possibly, national news organizations tired enough of being branded an ‘enemy of the state’ that they’re airing these egregious acts. This will force Americans, hopefully a large majority, to experience how others experience police interactions.
While I academically knew people got brutalized for nothing or for crimes where violence lacks proportional response (tase an armed guy who just shot three people at the park, reasonable. tase a guy who jaywalked, WTF?!). But it was academic knowledge. The most startling thing about the videos I’ve seen since Memorial day is how common it is to have a grown man kneeling on the neck of a suspect. The number of people choking out that they cannot breathe. The absolute lack of provocation that leads to violent police response. The fact these videos are broadcast on the national news.
Otherwise how does a significant portion of upper/middle class White Americans experience police interactions otherwise? There’s the traffic violation no one enjoys (fine, increased insurance rates) but more of a ‘hate the messenger’ scenario than a legitimately unpleasant *police* experience. There’s TV where shows generally cast police in a very positive light. Even when you watch a show where police run someone down, you’re not seeing someone innocently taking their kid to the park get run down and tased because someone in a blue shirt kited a check at the bodega last week. You get the cop’s point of view about why the person is obviously guilty (side note — Cops got cancelled). Other than that? Not much experience. I live in a small town, and the cops will cruise by the park when I have my daughter there. Just making sure I’m safe. If they do more than wave, it’s “stop by and chat” or “hey, want to check out the lights and siren”. The Chief eats lunch with the kids, and we see officers at community events.
Among friends, my experience with police is on the bad side of the spectrum. And it’s never been *bad*. I used to get lightly harassed by the police. I drove a small, flashy, convertible sports car. And had a friend who lived in “the bad part of town”. My friend was in her 90’s. Her family had the land grant signed by Andrew Jackson on three 100-acre parcels. Her family had lived on the property for almost 200 years, and she wasn’t moving just because “the bad part of town” happened to have moved in. I’d get stopped driving down to visit her — certainly, I was there to buy recreational drugs. It surprised me that police seemed to expect people to waive their rights — I know the plain view doctrine, but you want to check in the boot of my car? Get a warrant! The occasional officer would take me up on the offer, and we’d all wait around. A K9 unit would stop by, and we’d chat while the dog smelled absolutely nothing interesting around my car. Eventually they’d get a warrant because, evidently, young white chick with a bit of money driving around the SW side of town is cause (a line of through I never bothered to pursue because there was no fruit on that tree, poisoned or not). And then they’d find the “car box” (air pump, paper towels, handful of crescent wrenches, a driver and socket set, and a few screw drivers), spare tire, shop manual, and heap-o air that I kept in the boot. Total waste of time, but I wasn’t in danger.
Scott accidentally hit the wrong key combination when attempting to comment out a block of code and brought up some clipboard viewer; and, in attempting to identify what he hit, I came across published keyboard shortcuts for Windows and Linux (I still haven’t found the key combo he hit, so I suspect he hit a desktop manager shortcut). There are a few time savers in the list:
And whatever you type will be duplicated at each cursor. To leave multi-cursor mode, simply click elsewhere within the document — you’ll have one cursor where you clicked.
If you want multiple cursors on discontiguous lines, hold the Alt key as you click — a cursor will appear each location you click (not at the end of the line where you have clicked, literally the location at which you clicked — including multiple cursors per line.) If you add a cursor in the wrong location, click it again to clear that cursor.
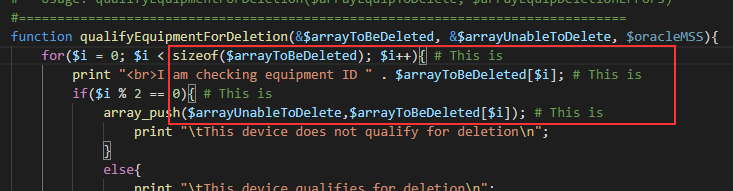
We wanted to be able to bulk-load diversity sets into MSS. While the documentation has several additional fields in the CIRCUIT table that claim to be updated when a circuit is a member of a diversity set (SPECIAL_ROUTING_CODE_IO_FAC, SPECIAL_ROUTING_CODE_SECLOC, and SPECIAL_ROUTING_CODE_TYPE), I’ve found these fields to remain NULL when sets are created through the MSS GUI.
To create a diversity set, an API call will be made. The following values would be used for each interaction with the API.
| Parameter | Description | Required? | Field | Table | Action |
|---|---|---|---|---|---|
| strDiversitySetName | User-defined name of the diversity set (32 character limit) | YES | DS_DVRSTY_SET_NM | asap.ds_dvrsty_set | INSERT |
| charDiversitySetTypeCode | Type of diversity to maintain for the set. Valid values are ‘2’, ‘3’, and ‘4’ | YES | DS_DVRSTY_SET_TYPE_CD | asap.ds_dvrsty_set | INSERT |
| n/a | The user account that made the most recent change to the row. This will always be g9953576. | n/a | LAST_MODIFIED_USER_ID | asap.ds_dvrsty_set | INSERT |
| n/a | The timestamp when the last change to the row occurred | n/a | LAST_MODIFIED_DATE | asap.ds_dvrsty_set | INSERT |
Adding circuits to the newly created diversity set requires the Oracle-generated sequence, DS_DVRSTY_SET_ID, which is created by the previous call. To add circuits to the diversity set, an API call will be made. The following values would be used for each interaction with the API.
| Parameter | Description | Required? | Field | Table | Action |
|---|---|---|---|---|---|
| iDiversitySetID | Diversity Set ID from asap.ds_dvrsty_set | YES | DS_DVRSTY_SET_ID | ds_dvrsty_set_circuit | INSERT |
| iDiversitySetSequence | Circuit sequence number within diversity set | YES | DS_DVRSTY_SET_SEQ | ds_dvrsty_set_circuit | INSERT |
| iCircuitDesignID | Unique identifier for circuit | YES | CIRCUIT_DESIGN_ID | ds_dvrsty_set_circuit | INSERT |
| charPrimaryRouteIndicator | Indicates if the circuit is the primary route circuit. Valid values are ‘Y’ and ‘N’ | YES | DS_PRIMARY_ROUTE_IND | ds_dvrsty_set_circuit | INSERT |
| charExcludeIndicator | Indicates whether this circuit within the Diversity Set is excluded from the diversity requirement | YES | DS_EXCLUDE_IND | ds_dvrsty_set_circuit | INSERT |
| n/a | The user account that made the most recent change to the row. This will always be g9953576. | n/a | LAST_MODIFIED_USERID | ds_dvrsty_set_circuit | INSERT |
| n/a | The timestamp when the last change to the row occurred | n/a | LAST_MODIFIED_DATE | ds_dvrsty_set_circuit | INSERT |
| n/a | Indicates circuit belongs to a diversity set. This value will always be ‘Y’ | n/a | DS_DIVERSITY_IND | circuit | UPDATE |
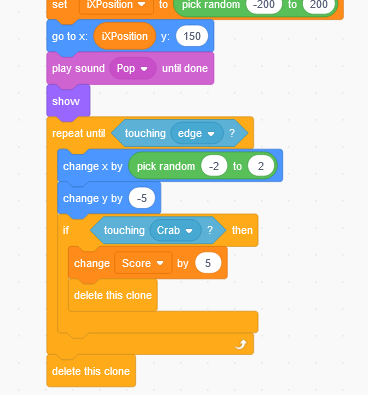
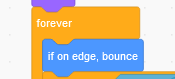
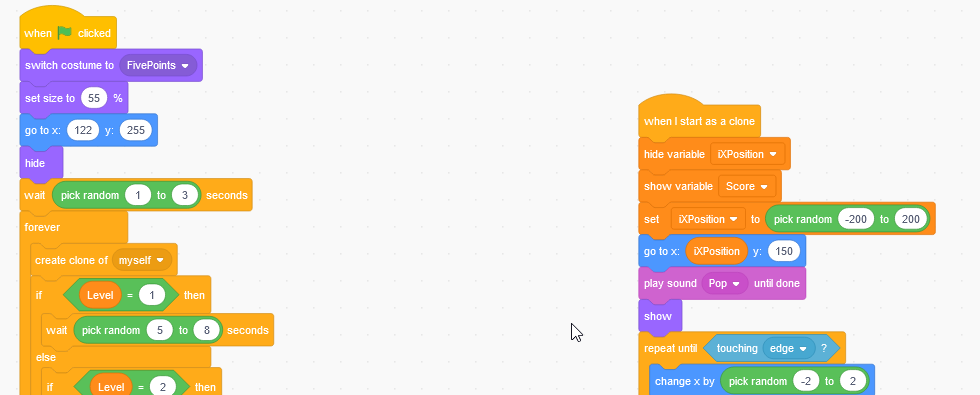
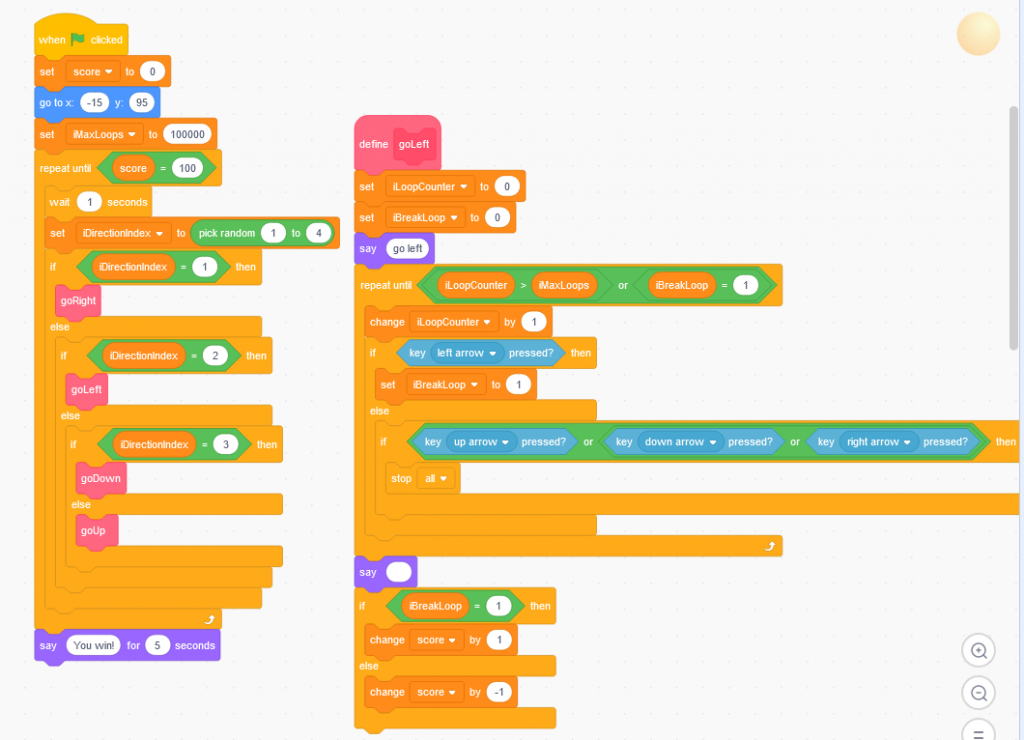
A few of the books I got for Anya are introductions to programming — Python, C++, and this GUI block-based system called Scratch. She likes using Python because Scott and I use it, but she absolutely adores Scratch. She has A Beginner’s Guide To Coding (Marc Scott) that I picked up from Book Outlet (I get a bonus 10$ when someone uses my referral link) for a couple of bucks. We’ve got a studio of our games online, and she’s excited to share the games with family members.
Tricks we’ve leaned so far:
I had a request to drop data from a SQL query into an Excel spreadsheet — the initial request had a column that included different text depending on row data. Since Box::Spout deals well with huge volumes of data (I write millions of rows in some reports), I use it pretty exclusively. Writing data to each column individually means I’ve got to retain a list of column names, and I would rather not do that. I can dump the column names into a header row then dump the entire database row into the next spreadsheet row. This works since a 1:1 correlation between database rows and Excel rows. I’ll go through after the fact and update a specific cell based on data in other cells, but I don’t want to insert a column.
Luckily, there’s an easy way to add a placeholder column to my database output:
SELECT DISTINCT MAX(DLR1.ISSUE_NBR) MAX_ISSUE_NBR, DLR.ISSUE_NBR, ‘MatchIndicator’ as “MatchIndicator”, DLR.EQUIPMENT_ID, EQ.EQUIPMENT_ID, C.CIRCUIT_DESIGN_ID, C.EXCHANGE_CARRIER_CIRCUIT_ID, C.STATUS, C.RATE_CODE, C.SERVICE_TYPE_CATEGORY, C.SERVICE_TYPE_CODE, NL.LOCATION_ID, NL.CLLI_CODE, DLR.LOCATION, DLR.BLOCK_IND
I’ve got a few drop-downs that I’ve added filtering on the drop-down – start typing and you’ll see the options that match your string. But I needed to mirror an application functionality where you select a category and are then presented with a list of options that fit the category.
Here’s the drop-down selector for the categories
    echo "      <div class=\"row\">\n";
    echo "          <div class=\"col-md-12 col-sm-12 col-lg-12 col-xs-12\">\n";
    echo "              <div class=\"row\">\n";
    echo "                  <div class=\"row\">\n";
    echo "                      <div class=\"col-md-2 col-sm-2 col-lg-2 col-xs-2 text-left\">\n";
    echo "                          <span><strong>Animal Category:</strong></span>\n";
    echo "                      </div>\n";
    echo "                      <div class=\"col-md-10 col-sm-10 col-lg-10 col-xs-10 text-left form-group\">\n";
    echo "                          <select name=\"strAnimalType\" id=\"strAnimalType\" readonly/> \n";
    echo "                              <option class=\"NoSelection\" value=\"-----\">-----</option>\n";
    echo "                              <option class=\"Feline\" value=\"201\">Feline</option>\n";
    echo "                              <option class=\"Canine\" value=\"202\">Canine</option>\n";
    echo "                              <option class=\"Equine\" value=\"203\">Equine</option>\n";
    echo "                              <option class=\"Other\" value=\"204\">Other</option>\n";
    echo "                          </select>\n";
    echo "                      </div>\n";
    echo "                  </div>\n";
And here’s the drop-down selector I want to filter based on category — there are a lot of options. The class for each option includes the category selectors that will include the option in the drop-down.
    echo "      <div class=\"row\">\n";
    echo "          <div class=\"col-md-12 col-sm-12 col-lg-12 col-xs-12\">\n";
    echo "              <div class=\"row\">\n";
    echo "                  <div class=\"row\">\n";
    echo "                      <div class=\"col-md-2 col-sm-2 col-lg-2 col-xs-2 text-left\">\n";
    echo "                          <span><strong>Pet Breed:</strong></span>\n";
    echo "                      </div>\n";
    echo "                      <div class=\"col-md-10 col-sm-10 col-lg-10 col-xs-10 text-left form-group\">\n";
    echo "                          <select name=\"strPetBreed\" id=\"strPetBreed\" readonly/> \n";
    echo " <option value=\"-----\" class=\"selectors All\">-----</option>\n";
    echo " <option value=\"101\" class=\"selectors Feline\">Domestic Shorthair</option>\n";
    echo " <option value=\"1275\" class=\"selectors Feline\">Flame Point Siamese</option>\n";
    echo " <option value=\"1069\" class=\"selectors Equine\">Arabian</option>\n";
    echo " <option value=\"1071\" class=\"selectors Equine\">Tennessee Walking Horse</option>\n";
    echo " <option value=\"1072\" class=\"selectors Other\">Chicken</option>\n";
    echo " <option value=\"1073\" class=\"selectors Other\">Snake</option>\n";
    echo " <option value=\"1074\" class=\"selectors Canine\">Australian Shepherd</option>\n";
    echo " <option value=\"1075\" class=\"selectors Feline\">Burmese</option>\n";
    echo " <option value=\"1076\" class=\"selectors Canine\">Siberian Husky</option>\n";
    echo " <option value=\"1077\" class=\"selectors Feline\">Sphinx</option>\n";
    echo " <option value=\"1078\" class=\"selectors Other\">Rabbit</option>\n";
    echo "                          </select>\n";
    echo "                      </div>\n";
    echo "                  </div>\n";
    echo "              </div>\n";
    echo "          </div>\n";
    echo "      </div>\n";
In the JavaScript, I’ve got a quick function that repopulates the rather long drop-down menu based on the selected category
// Filter strPetBreed options based on strAnimalCategory value
$(document).ready(function () {
    var allOptions = $('#strPetBreedoption')
    $('#strAnimalCategory').change(function () {
        $('#strPetBreed option').remove()

        var classN = $('#strAnimalCategory option:selected').prop('class');
        var optsCat = allOptions.filter('.' + classN);
        $.each(optsCat, function (i, j) {
            $(j).appendTo('#strPetBreed');
        });

        var optsAll = allOptions.filter('.All');
        $.each(optsAll, function (i, j) {
            $(j).prependTo('#strPetBreed');
        });

    });
});
Since it’s possible there are options you’d want to always appear (in my case, it’s just the “—–” to indicate no selection has been made … but there could be real items that fall into each category too), I’ve got an “All” classification that will get popped onto the top of the list.
For future reference, this is an example unit file for running a NodeJS server with systemd. The NodeJS code we use reads from a local MariaDB, so I’ve added a service dependency for the database server.
Create /etc/systemd/system/nodeserver.service
[Unit]
Description=SiteName Node.js Server
Requires=After=mariadb.service

[Service]
ExecStart=/path/to/binary/for/node /path/to/nodeJS/html/server.js
WorkingDirectory=/path/to/nodeJS/html
Restart=always
RestartSec=30
StandardOutput=syslog
StandardError=syslog
SyslogIdentifier=nodejs-sitename
User=web-user
Group=www-group

[Install]
WantedBy=multi-user.target
Use systemctl daemon-reload to register the new unit file, then “systemctl start nodeserver.service” to start the service. Assuming everything works properly, use “systemctl enable nodeserver.service” to have the service start on boot.