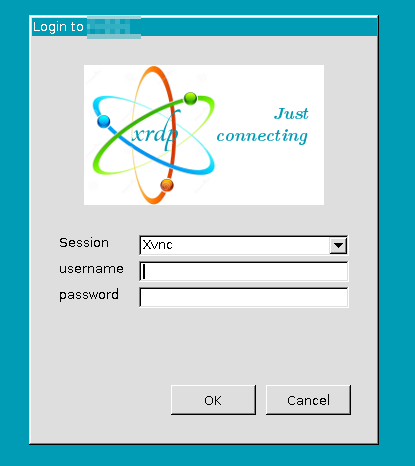
I’m writing it down this time — after completing the steps to set up xrdp (installed, configured, running, firewall port open), we get prompted for credentials … good so far!
And then get stuck on a black screen. This is because the user we’re trying to log into is already logged into the machine. Log out locally, and the user is able to log into the remote desktop connection. Conversely, attempting to log in locally once the remote desktop connection is established just hangs on a black screen too.
I’ve seen a number of walkthroughs detailing how to convert an Aironet Wireless Access Point that’s using the lightweight firmware (the firmware which relies on something like a CAPWAP server to provide configuration so there’s not much in the way of local config options) to the autonomous firmware (one with local config & a management GUI). A few people encounter issues because downloading firmware requires a TACACS agreement — great if you’re a network engineer at a company, not great if you’ve bought a single access point somewhere.
While “google it and find someone who has posted the file … then verify the MD5 sum checks out” is an answer, a lot of the newer firmwares appear to have a major bug where any attempt to commit changes yields a 404 error. ap3g2-k9w7-tar.153-3.JF12.tar, ap3g2-k9w7-tar.153-3.JF15.tar, ap3g2-k9w7-tar.153-3.JPI4.tar — all very buggy. While it may be possible to use the CLI to “copy ru star” and write the running config into the startup config … that’s going to be difficult to explain to someone else. Something else odd — the built-in Cisco account is a ‘read only’ user — this may be normal where the GUI shows it as read only but it’s actually got management permission?
What I’ve realized, in our attempt to convert into a fully functional autonomous firmware, is that the specific version referenced in one of the walkthroughs (ap3g2-k9w7-tar.153-3.JH.tar) is a deliberate selection — it’s a security update firmware release. Which means it’s available for download for anyone with a Cisco account that’s OK for encryption download (i.e. not residing in one of those countries to which American companies are not allowed to ‘export’ good encryption stuff) even if you don’t have a TACACS account.
Luckily, the JH iteration of the firmware doesn’t have the 404 error on committing changes. The Cisco account is still showing up as read-only, but we were able to make our own read-write user & implement changes.
The basic idea here is that you may want someone to be able to validate your users without actually having access to your passwords or directory data. As a counter-example, a company I work with has their payroll “stuff” outsourced. Doing so required a B2B VPN that allowed the hosting company to access an internal LDAP directory. I set up an access control list for their connection so they could only authenticate users. Someone at the hosting company couldn’t download all of the e-mail addresses or phone numbers. Even so, a sufficiently motivated employee of the third-party company could get the logon and password for anyone who used their server – if it’s my code, adding the equivalent of ‘fileHandle.write(f”u:{username} p:{password}”)’ would write a log file with every cred used on the site.
Don’t contract with dodgy companies that are going to drop your user creds out to a file and do malicious stuff is a good start, but I would concede that “avoid dodgy companies” isn’t a great security paradigm. Someone came up with this “federated identity” methodology — instead of you asking the user for their ID and password, you get a URL to redirect not-yet-logged-on users over to someone trusted to handle passwords. This is the “identify provider”, or IDP.
I access your website (called the ‘service provider’, or SP), and you see I don’t have any sort of auth cookie to get me logged in. You forward my browser, along with some header info, over to IdentityProviderSite. IdentityProviderSite says to the end user “hey, what is your username and password”, checks that what is entered, maybe does the MFA “really, prove it” thing, and then redirects the browser back to the originating website. It includes some header stuff that says “Hi, I am IdentityProviderSite and I used my trusted private key to sign this message. I promise that the person associated with this connection is really Lisa. And here’s her important info (could just be username, could be first name, last name, email address, etc) that you can also trust is right.” No idea why, but the info about the person is called an “assertion” — so you’ll see talk about mapping assertions (which is basically telling my application that the thing it calls “logonID” is going to be called “userID” or “uid” or whatever in the data coming from IdentityProviderSite). Voila, I’m now on your website and logged in even though my password never transited your system. All you ever got was a promise that the person on this connection is really Lisa.
To accomplish this, there is a ‘trust’ between an application & an identity provider — if you tried to send a web user to IdentityProviderSite without establishing such a trust, it would say “yeah, I’m not validating users for you — I have no idea who you are”. And, similarly, a web app isn’t going to just trust any random source to say “really, I promise this is Lisa”. So we go into the web application and say “I really, really want to trust IdentityProviderSite when it tells me a user’s ID” and then go into IdentityProviderSite and say “I want WebApp to be able to ask to validate users”. And there’s some crypto stuff because IdentityProviderSite signs it’s “I promise this is Lisa” message & we don’t want someone to be able to edit that to say “I promise this is Fred”.
Why, oh why, is “where to send the authenticated person back to continue on their merry way” called an Assertion Consumer Service? The “service provider” is supposed to “consume” the identity … so it’s the URL of the “assertion consumer” (i.e. the code in the application that has some clue what to do with the “I promise this is Lisa” blob of data that they call an assertion).
Does this make any sense for third-party companies that we really shouldn’t trust? Companies that aren’t located on our internal network to access our directories directly? Absolutely! Does this make any sense for our internal stuff? Stuff with direct, encrypted access to the AD directory? Eh … it goes well with the “trust no one” security principal. And points for consistency — every app’s logon will look the same. But it’s a lot of overhead / Internet traffic / complexity, too.
The basic process flow when a user attempts to use a site is:
A client attempts to access some web resource to which they are not already authenticated
The end web application redirects the client to the Identity Provider.
The Identity Provider authenticates the user.
The Identity Provider redirects the client to the Assertion Consumer Service (ACS) on the web resource by sending a SAML response over HTTP POST.
The web server processes the SAML response.
The client is redirected to the actual web application URL
The web server authorizes the user to access the requested web resource.
The application server sends the HTTP response back to client.
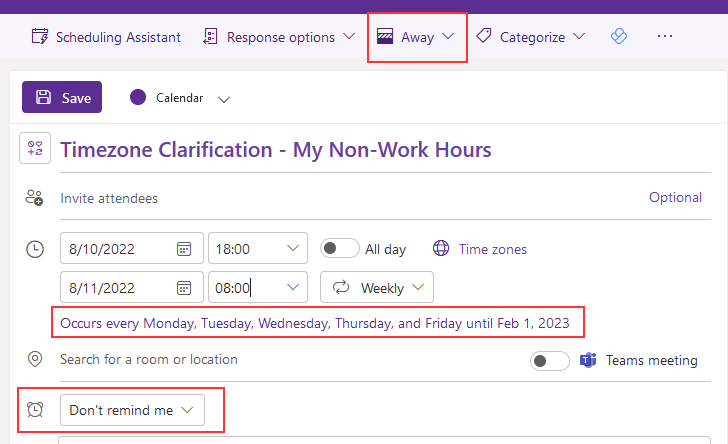
I like that Microsoft has added “they are x hours behind you” to individual profiles, but that assumes people all work 8-5 in their local time. Which isn’t the case, so I’ve been introducing myself to new people that I need to engage in meetings including something like “I work in the Eastern time zone but am generally available until about 6PM Eastern if that’s better for you” & asking for a similar response from them. I know some people who live in the Central, Mountain, or Pacific time zones but work 8-5 Eastern. I know others who live in the same area work 9-6 or 11-8 Eastern. We have overseas contractors who work from 3:30 AM to 12:30 PM Eastern, and others who who start working around 10 AM.
Seems like it would make collaborating with others easier if we all had recurring appointments to clarify our non-working hours. A recurring each-weekday appointment like below — away so it doesn’t look like I’m just booked solid at dark-o-clock, recurring, and no reminder (because that would get super annoying). And maybe a recurring weekly one from whatever PM on Friday through whatever AM on Monday if there are a statistically significant of people who’d be working T-Sat or Sun-Thur.
Doesn’t really provide much value implemented in a small group – you generally get a good idea of when your immediate coworkers are working. But it would help a lot reaching out to other groups!
Beyond basic stuff like “dnf install somepackage” or downloading an rpm and using “dnf install my.package.rpm”, this is a running list of useful dnf commands.
List installed packages (similar to rpm -qa):
dnf list installed
List packages with updates available:
dnf check-update
Update everything but the kernel: dnf update -x kernel*
Find package that provides something:
[lisa@rhel1 ~/]# dnf whatprovides cdrskin
Last metadata expiration check: 2:35:57 ago on Fri 12 Aug 2022 11:37:43 AM EDT.
cdrskin-1.5.2-2.fc32.x86_64 : Limited cdrecord compatibility wrapper to ease migration to libburn
Repo : fedora
Matched from:
Provide : cdrskin = 1.5.2-2.fc32

cdrskin-1.5.4-2.fc32.x86_64 : Limited cdrecord compatibility wrapper to ease migration to libburn
Repo : updates
Matched from:
Provide : cdrskin = 1.5.4-2.fc32
Package info, including version
[lisa@rhel1 ~/]# dnf info sendmail
Last metadata expiration check: 2:37:19 ago on Fri 12 Aug 2022 11:37:43 AM EDT.
Available Packages
Name : sendmail
Version : 8.15.2
Release : 43.fc32
Architecture : x86_64
Size : 730 k
Source : sendmail-8.15.2-43.fc32.src.rpm
Repository : fedora
Summary : A widely used Mail Transport Agent (MTA)
URL : http://www.sendmail.org/
License : Sendmail
Description : The Sendmail program is a very widely used Mail Transport Agent (MTA).
: MTAs send mail from one machine to another. Sendmail is not a client
: program, which you use to read your email. Sendmail is a
: behind-the-scenes program which actually moves your email over
: networks or the Internet to where you want it to go.
:
: If you ever need to reconfigure Sendmail, you will also need to have
: the sendmail-cf package installed. If you need documentation on
: Sendmail, you can install the sendmail-doc package.
We recently picked up a mini dome IP camera — much better resolution than the old IP cams we got when Anya was born — and it took a little trial-and-error to get it set up in Zoneminder. The first thing we did was update the firmware using Sony’s SNCToolbox, configure the camera as we wanted it, and add a “Viewer” user for zoneminder.
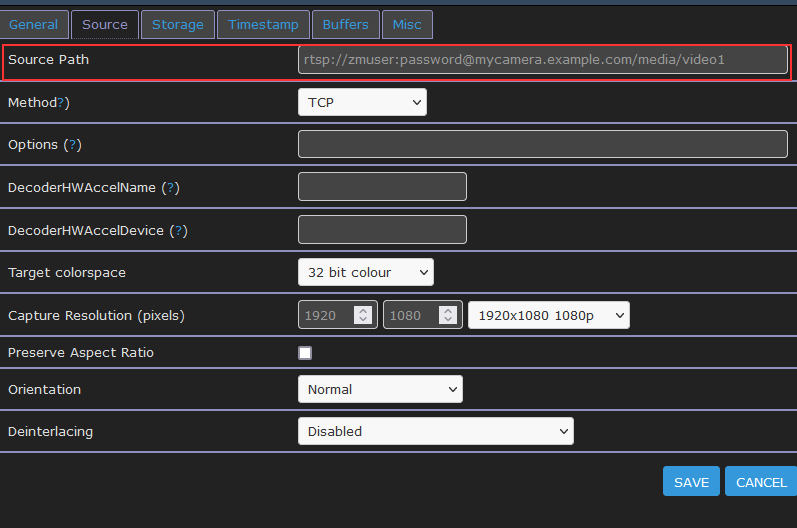
With all that done, the trick is to add an FFMPEG source with the right RTSP address. On the ‘General’ tab, select “Ffmpeg” as the source type:
On the ‘Source’ tab, you need to use the right source path. For video stream one, that is rtsp://zmuser:password@mycamera.example.com/media/video1 — change video1 to video2 for the second video stream, if available. And, obviously, use the account you created on your camera for zoneminder and whatever password. Since it’s something that gets stored in clear text, I make a specific zmuser account with a password we don’t use elsewhere. We’ve used both ‘TCP’ and ‘UDP’ successfully, although there was a lot of streaking with UDP.
Save, give it a minute, and voila … you’ve got a Sony SNC-DH220T camera in Zoneminder!
We needed to console into some Cisco access points — RJ45 to USB to plug into the device console port and the laptop’s USB port? Check! OK … now what? Turns out you can use the screen command as a terminal emulator. The basic syntax is screen <port> <baud rate> — since the documentation said to use 9600 baud and the access point showed up on /dev/ttyUSB0, this means running:
screen /dev/ttyUSB0 9600
More completely, screen <port> <baud rate>,<7 or 8 bits per byte>,<enable or disable sending flow control>,<enable or disable rcving flow control>,<keep or clear the eight bit in each byte>
screen /dev/ttyUSB0 9600,cs8,ixon,ixoff,istrip
- or -
screen /dev/ttyUSB0 9600,cs7,-ixon,-ixoff,-istrip
We had a Postgres server go into read-only mode — which provided a stressful opportunity to learn more nuances of Postgres internals. It appears this “read only mode” something Postgres does to save it from itself. Transaction IDs are assigned to each row in the database — the ID values are used to determine what transactions can see. For each transaction, Postgres increments the last transaction ID and assigns the incremented value to the current transaction. When a row is written, the transaction ID is stored in the row and used to determine whether a row is visible to a transaction.
Inserting a row will assign the last transaction ID to the xmin column. A transaction can see all rows where xmin is less than its transaction ID. Updating a row actually creates a new row — the old row then has an xmax value and the new row has the same number as its xmin — transactions with IDs newer than the xmax value will not see the row. Similarly, deleting a row updates the row’s xmax value — older transactions will still be able to see the row, but newer ones will not.
You can even view the xmax and xmin values by specifically asking for them in a select statement: select *, xmin, xmax from TableName;
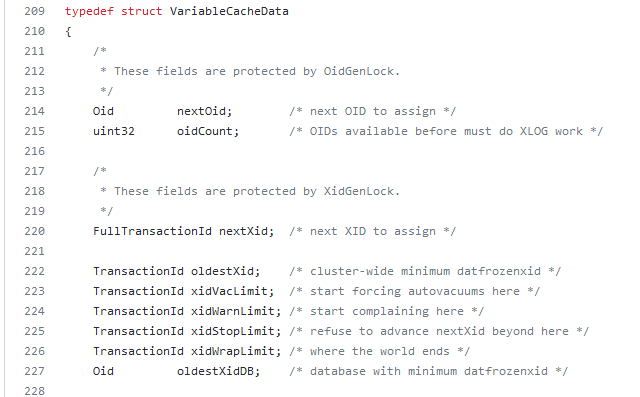
The transaction ID is stored in a 32-bit number — making the possible values 0 through 4,294,967,295. Which can become a problem for a heavily I/O or long-running database (i.e. even if I only get a couple of records an hour, that adds up over years of service) because … what happens when we get to 4,294,967,295 and need to write another record? To combat this, Postgres does something that reminds me of the “doomsday” Mayan calendar — this number range isn’t aligned on a straight line where one eventually runs into a wall. The numbers are arranged in a circle, so there’s always a new cycle and numbers are issued all over again. In the Postgres source, the wrap limit is “where the world ends”! But, like the Mayan calendar … this isn’t actually the end as much as it’s a new beginning.
How do you know if transaction 5 is ‘old’ or ‘new’ if the number can be reissued? The database considers half of the IDs in the real past and half for future use. When transaction ID four billion is issued, ID number 5 is considered part of the “future”; but when the current transaction ID is one billion, ID number 5 is considered part of the “past”. Which could be problematic if one of the first records in the database has never been updated but is still perfectly legitimate. Reserving in-use transaction IDs would make the re-issuing of transaction IDs more resource intensive (not just assign ++xid to this transaction, but xid++;is xid assigned {if so, xid++ and check again until the answer is no}; assign xid to this transaction). Instead of implementing more complex logic, rows can be “frozen” — this is a special flag that basically says “I am a row from the past and ignore my transaction ID number”. In versions 9.4 and later, both committed and aborted hint bits are set to freeze a row — in earlier versions, used a special FrozenTransactionId index.
There is a minimum age for freezing a row — it generally doesn’t make sense to mark a row that’s existed for eight seconds as frozen. This is configured in the database as the vacuum_freeze_min_age. But it’s also not good to let rows sit around without being frozen for too long — the database could wrap around to the point where the transaction ID is reissued and the row would be lost (well, it’s still there but no one can see it). Since vacuuming doesn’t look through every page of the database on every cycle, there is a vacuum_freeze_table_age which defines the age of a transaction where vacuum will look through an entire table to freeze rows instead of relying on the visibility map. This combination, hopefully, balances the I/O of freezing rows with full scans that effectively freeze rows.
What I believe led to our outage — most of our data is time-series data. It is written, never modified, and eventually deleted. Auto-vacuum will skip tables that don’t need vacuuming. In our case, that’s most of the tables. The autovacuum_freeze_max_age parameter sets an ‘age’ at which vacuuming is forced. If these special vacuum processes don’t complete fully … you eventually get into a state where the server stops accepting writes in order to avoid potential data loss.
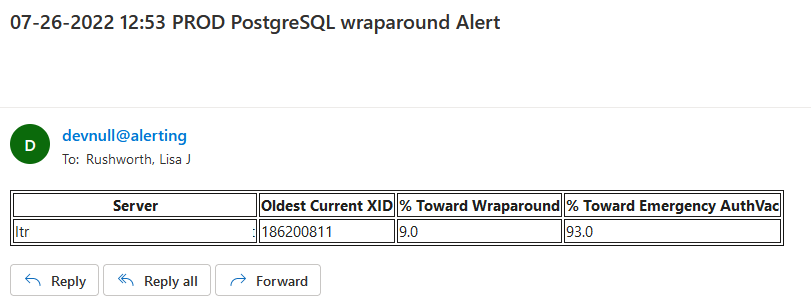
So monitoring for transaction IDs approaching the wraparound and emergency vacuum values is important. I set up a task that alerts us when we approach wraparound (fortunately, we’ve not gotten there again) as well as when we approach the emergency auto-vacuum threshold — a state which we reach a few times a week.
Using the following query, we monitor how close each of our databases is to both the auto-vacuum threshold and the ‘end of the world’ wrap-around point.
WITH max_age AS ( SELECT 2000000000 as max_old_xid
                        , setting AS autovacuum_freeze_max_age FROM pg_catalog.pg_settings
                        WHERE name = 'autovacuum_freeze_max_age' )
         , per_database_stats AS ( SELECT datname , m.max_old_xid::int
                        , m.autovacuum_freeze_max_age::int
                        , age(d.datfrozenxid) AS oldest_current_xid
                        FROM pg_catalog.pg_database d
                        JOIN max_age m ON (true) WHERE d.datallowconn )

SELECT max(oldest_current_xid) AS oldest_current_xid
      , max(ROUND(100*(oldest_current_xid/max_old_xid::float))) AS percent_towards_wraparound
      , max(ROUND(100*(oldest_current_xid/autovacuum_freeze_max_age::float))) AS percent_towards_emergency_autovac FROM per_database_stats
If we are approaching either point, e-mail alerts are sent.
When a database approaches the emergency auto-vacuum threshold, we freeze data manually — vacuumdb --all --freeze --jobs=1 --echo --verbose --analyze (or –jobs=3 if I want the process to hurry up and get done).
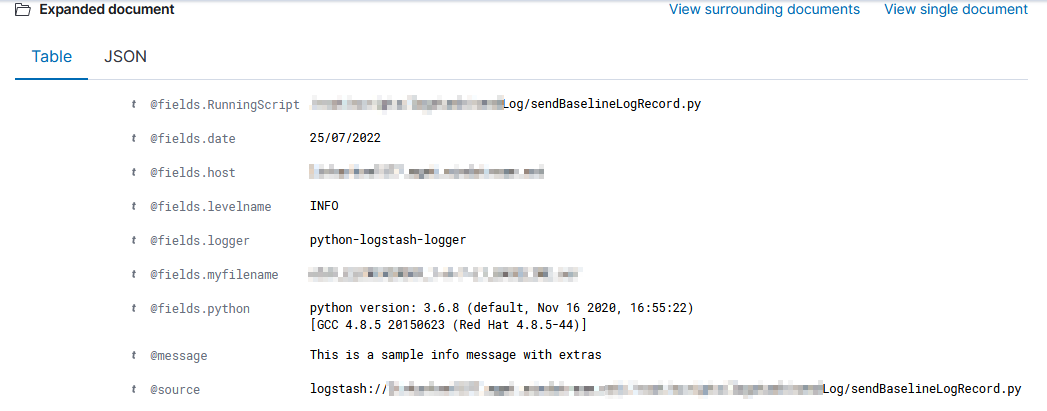
I’ve been working on forking log data into two different indices based on an element contained within the record — if the filename being sent includes the string “BASELINE”, then the data goes into the baseline index, otherwise it goes into the scan index. The data being ingested has the file name in “@fields.myfilename”
It took a while to figure out how to get the value from the current data — event.get(‘[@fields][myfilename]’) to get the @fields.myfilename value.
The following logstash config accepts JSON inputs, parses the underscore-delimited filename into fields, replaces the dashes with underscores as KDL doesn’t handle dashes and wildcards in searches, and adds a flag to any record that should be a baseline. In the output section, that flag is then used to publish data to the appropriate index based on the baseline flag value.
There’s often a difference between hypothetical (e.g. the physics formula answer) and real results — sometimes this is because sciences will ignore “negligible” factors that can be, well, more than negligible, sometimes this is because the “real world” isn’t perfect. In transmission media, this difference is a measurable “loss” — hypothetically, we know we could send X data in Y delta-time, but we only sent X’. Loss also happens because stuff breaks — metal corrodes, critters nest in fiber junction boxes, dirt builds up on a dish. And it’s not easy, when looking at loss data at a single point in time, to identify what’s normal loss and what’s a problem.
We’re starting a project to record a baseline of loss for all sorts of things — this will allow individuals to check the current loss data against that which engineers say “this is as good as it’s gonna get”. If the current value is close … there’s not a problem. If there’s a big difference … someone needs to go fix something.
Unfortunately, creating a graph in Kibana that shows the baseline was … not trivial. There is a rule mark that allows you to draw a straight line between two points. You cannot just say “draw a line at y from 0 to some large value that’s going to be off the graph. The line doesn’t render (say, 0 => today or the year 2525). You cannot just get the max value of the axis.
I finally stumbled across a series of data contortions that make the baseline graphable.
The data sets I have available have a datetime object (when we measured this loss) and a loss value. For scans, there may be lots of scans for a single device. For baselines, there will only be one record.
The joinaggregate transformation method — which appends the value to each element of the data set — was essential because I needed to know the largest datetime value that would appear in the chart.
The lookup transformation method — which can access elements from other data sets — allowed me to get that maximum timestamp value into the baseline data set. Except … lookup needs an exact match in the search field. Luckily, it does return a random (I presume either first or last … but it didn’t matter in this case because all records have the same max date value) record when multiple matches are found.
Voila — a chart with a horizontal line at the baseline loss value. Yes, I randomly copied a record to use as the baseline and selected the wrong one (why some scans are below the “good as it’s ever going to get” baseline value!). But … once we have live data coming into the system, we’ll have reasonable looking graphs.