Did you know … Excel can convert between units of measure?

Spend enough time reading temperature probe data, and you get to where you just know 23 is room temperature, and 82 is going to cook the CPU. And sure you can type “23 C in F” into Google and get the Fahrenheit equivalent, but that’s hardly efficient with a long list of values. You could look up the formula and have Excel perform the computation, too. But did you know Excel can convert between many units of measure without you finding the conversion formula?

Excel’s CONVERT() function allows you to display values in whatever unit is most familiar to you. Usage is convert(CellToConvert,OriginalUnits,DesiredUnits)

Voila – the values in your chosen unit.

If you use the units of measure in column headers, you can use the header cells as the current and desired unit of measure values — remember to use the $ anchors, otherwise copying your formula will not yield the right answer!

Did you know … Connectors can be used to display external information in Microsoft Teams Channels?

Microsoft Teams is a single workspace that provides access to a vast array of resources. You’ve got links to important web sites, posts from other Team members, discussion surrounding shared documents … but did you know posts can automatically be created from external systems?

Why? Well … doing so allows Teams to simplify finding and distributing information. Instead of having ten people subscribed to a vendor newsletter or five people trying to remember to check a web site for information, the information comes to every Team member directly in their Teams application.

You can turn vendor-provided patch and outage notifications via RSS or Twitter into Teams posts. Google Analytics data for your site can appear in Teams posts. Jenkins has an Office365 connector that reports pipeline information in Teams posts. Browse the available connectors to see what is useful in your group.

“Best practice” recommendation: some of these connectors rely solely on Microsoft’s Internet connection to an Internet-accessible resource – as in the example I present below. These connectors are essentially self-documenting because you can view the Connector configuration to determine the URL with which the connector communicates. Many connectors, however, use web hooks registered within your application or user credentials to access the remote system. In the “Files” or “Wiki” section of the channel in which the Connector is used, create a document detailing any configuration that was done – instructions for creating a web hook in your system, which account was used to access the remote system (don’t write the password in the document!).

For connectors that require user credentials, do not use a personal account. Create a new account for your Teams feed. Twitter, for example, requires a user account to follow other accounts or hashtags. Were I to use my Twitter account in the configuration … if I transfer ownership of the Team space to someone else, they’re inheriting a configuration with my account; but I’m not going just hand my password over to them. Even if ownership of the Team space never changes, we could cease seeing updates next time I change my Twitter password. Or decide to close my account. Or … point being, if you have a non-user account, the Team owners can maintain control of the account and any changes to it.

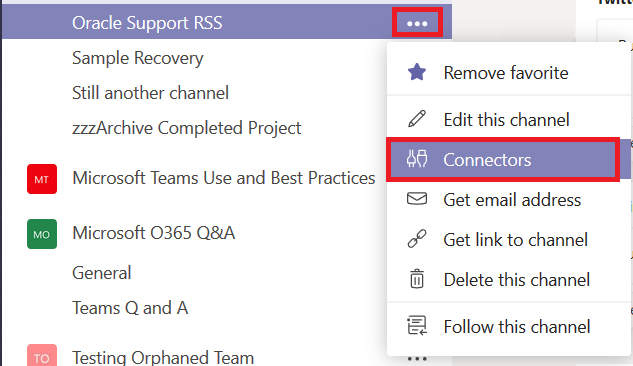
Using Connectors: Decide where you want the data posted – this can be a dedicated channel created just for this connector or it can be an existing one. Click the hamburger menu next to the channel into which you want messages posted. Select “Connectors”.
Browse through the list. Or type in the “Search” box to locate a specific connector. Click “Add” next to the connector you want to use.
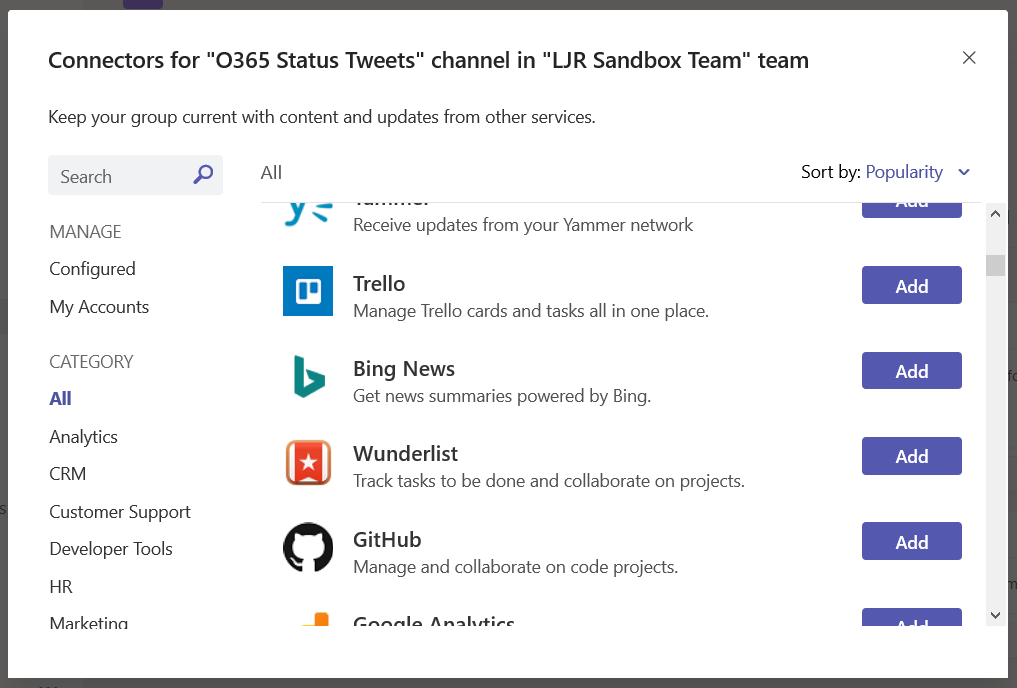
Setup will vary depending on the connector selected – the Jenkins connector provides a URL to paste into your server config, Twitter asks for credentials and individuals or hashtags you want to follow in the channel. In this example, I am adding an RSS data feed.

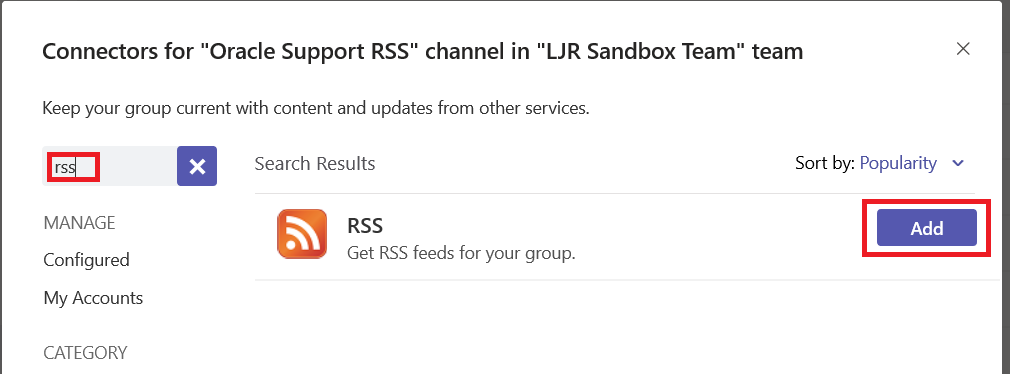
Type ‘rss’ in the search dialog. If this is the first time you’ve used the connector within this Team space, click “Add”.
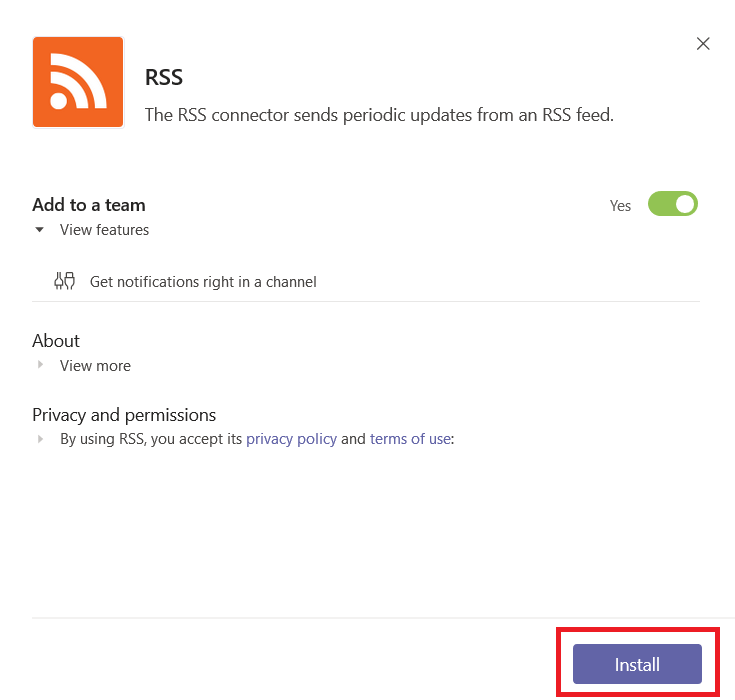
In this case, there’s not much on the next screen – read the privacy and terms of use statements.  Assuming the connector permits your intended use and you agree to all of their terms, click “Install”.
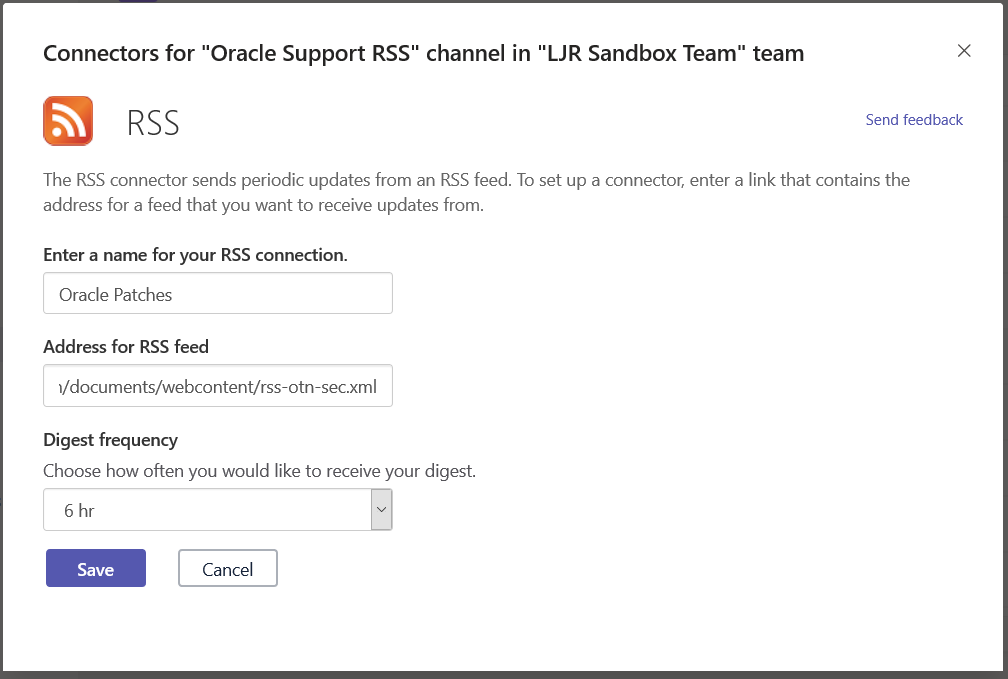
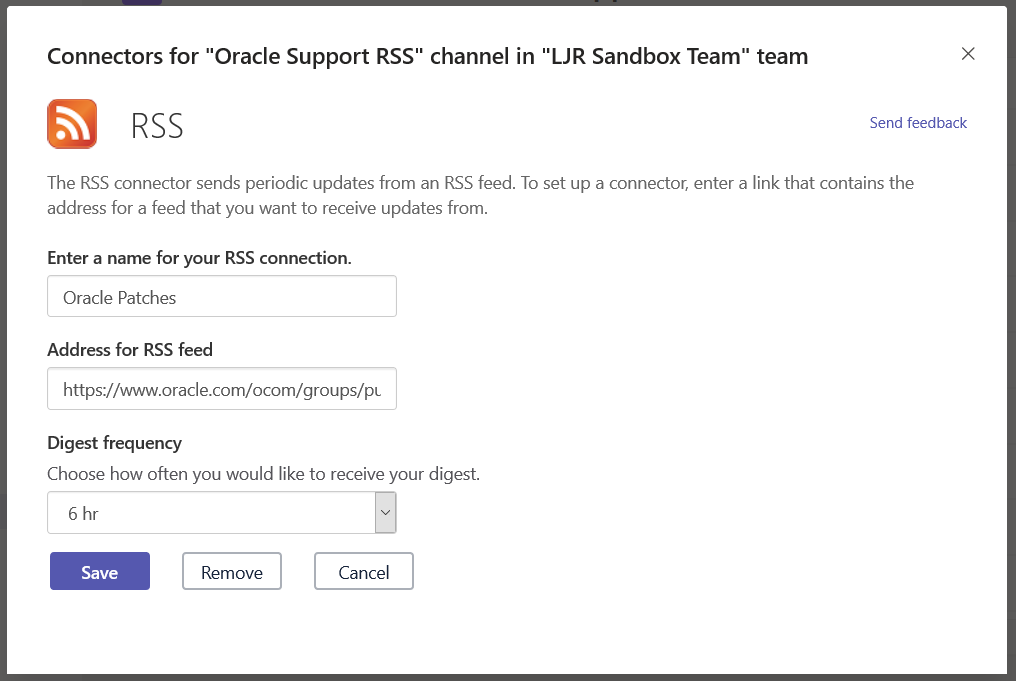
Enter a name for the connector, paste in the RSS feed URL, and select how often you want Teams to check for new data in the feed. Click “Save”
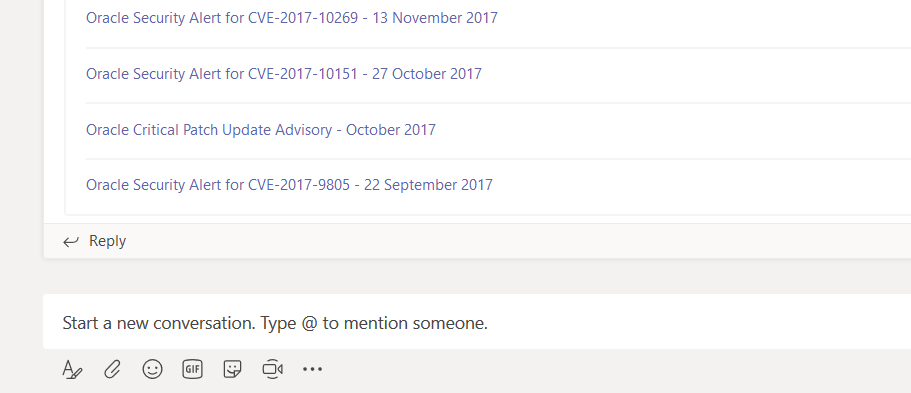
A post will be created in your channel with data from the RSS feed. Some feeds will provide information, some just provide a link. And when new data is posted to the RSS feed, a new post will be created in your Teams space.
If you need to make a change to an existing connector, click the hamburger menu next to the channel on which the connector is configured. Select “Connectors”.

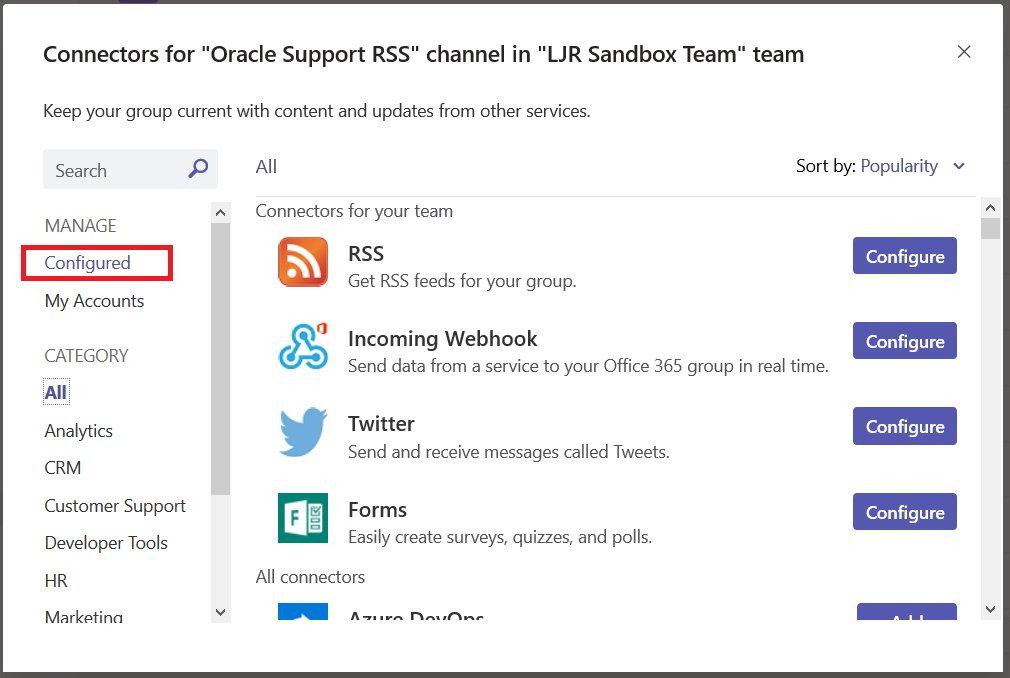
In the left-hand column, select “Configured”
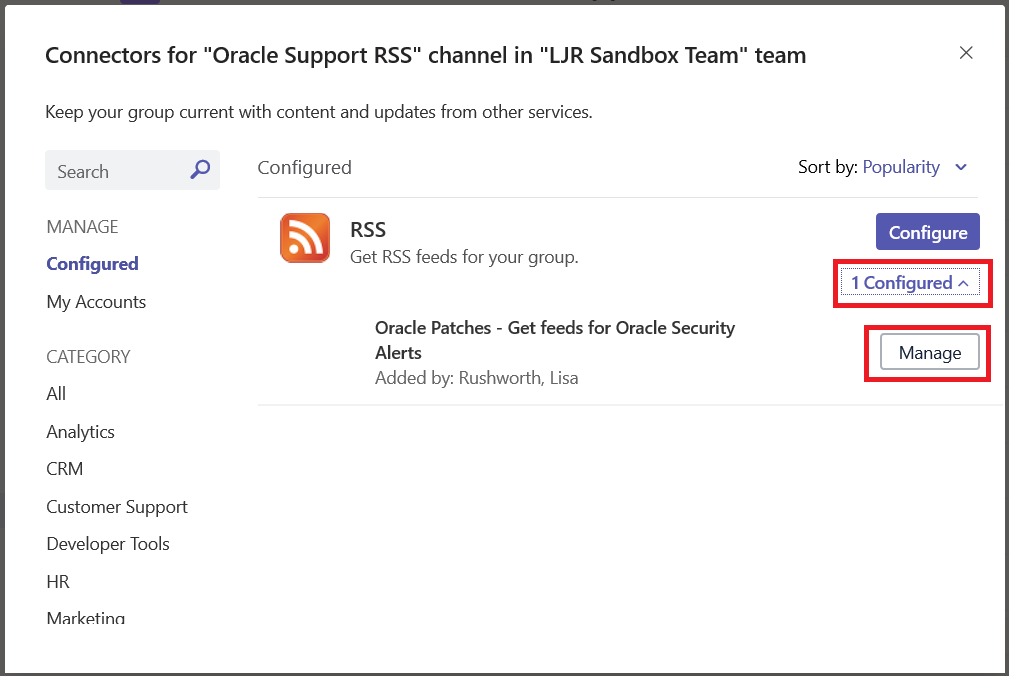
The “Configure” button will set up another connector on the channel. Instead, click the “# Configured” link below the “Configure” button. Then click “Manage” for the connector you want to manage.
Make whatever changes you need to make and click save. Or click “Remove” to remove the connector from the channel.
Did you know … you can automatically dismiss past Outlook calendar reminders?

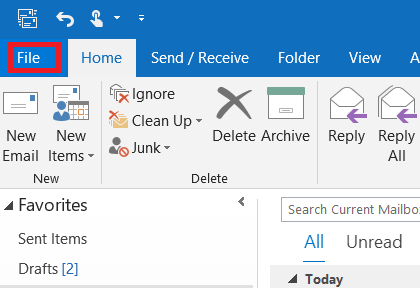
Sometimes opening Outlook and getting reminders for, say, the meetings you missed when you were out sick yesterday is quite helpful. But frequently, reminders for old events are just an annoyance. Like when you create past-dated meetings to remind yourself of what you were doing and forgot to select ‘None’ as the reminder time. That’s not just me, right? Did you know you can automatically dismiss reminders for past calendar events? From your Outlook client, click the file tab of the Outlook ribbon bar

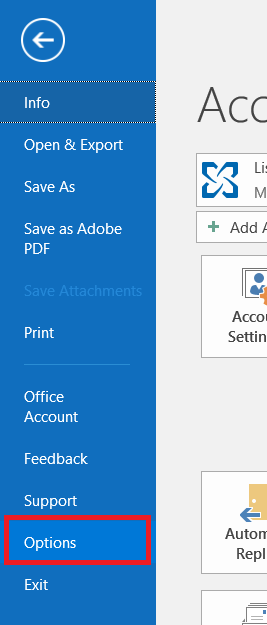
Select “Options”

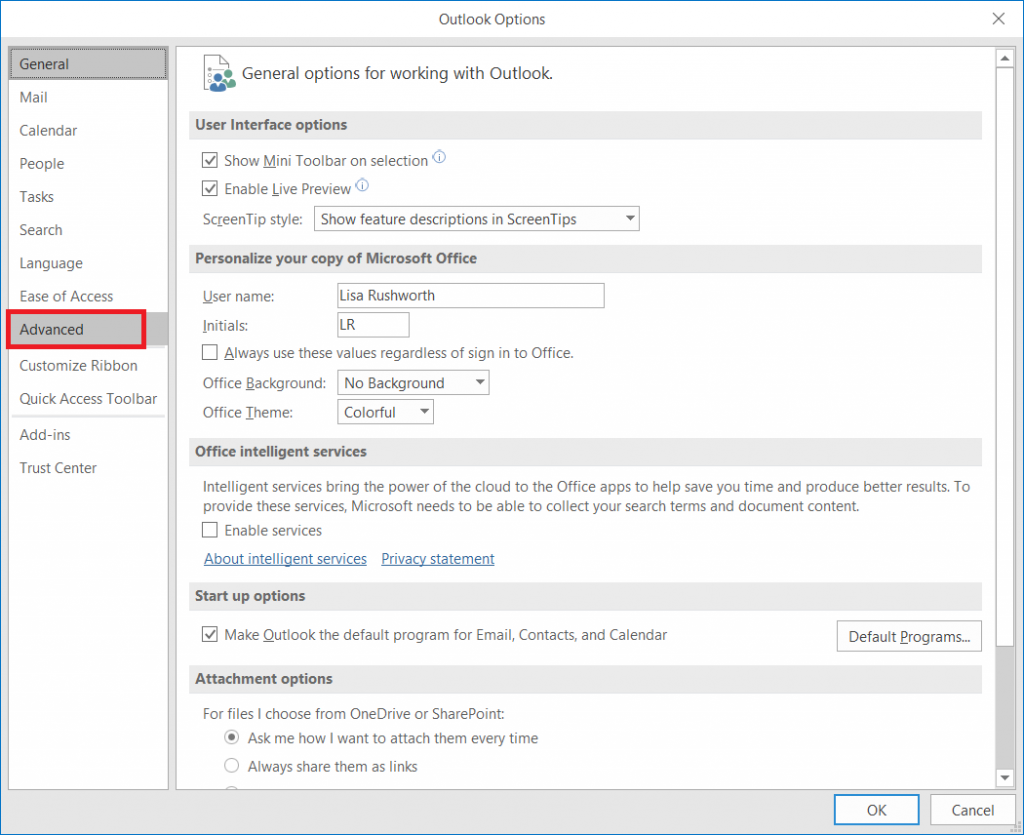
On the new window that appear, select “Advanced”

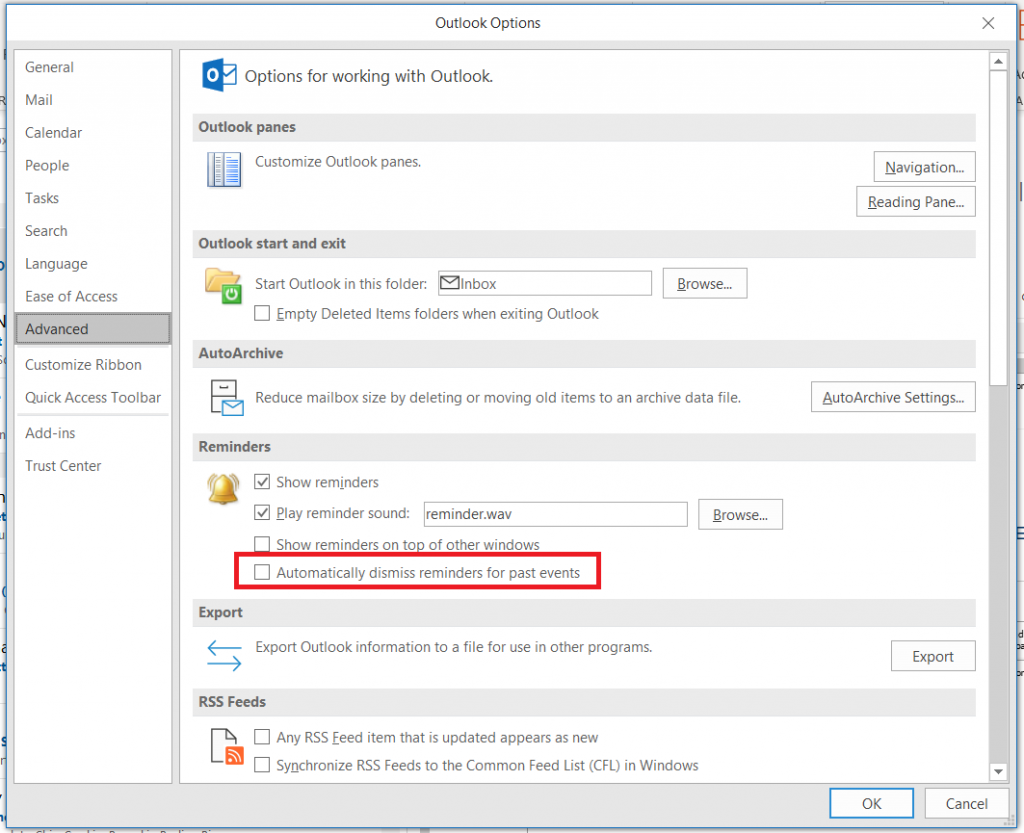
In the “Reminders” section, you’ll see a check-box to “Automatically dismiss reminders for past calendar events” – by default, this is unchecked. If you would like to avoid reminders for old meetings, click to check it then click OK.


Did you know … you can set image transparency in Word, PowerPoint, Excel, and Outlook?

When you wanted to use an image as the background for a document, you often needed an image editor to lighten the picture – the image was too dark for dark text to be legible but too light for white text. Or you’d compose your PowerPoint slide with the image in one frame and the text in another.

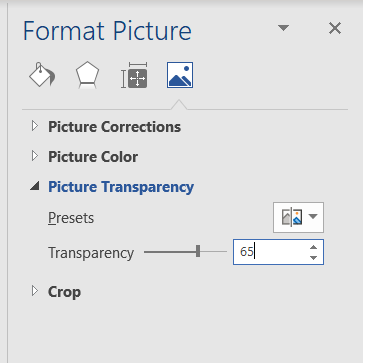
Did you know, in the latest Office 365 Update, Microsoft added a feature that allows you to create faded background images within Word, PowerPoint, Excel, and Outlook? Within one of these programs, insert a picture into your work. Select the image. From the Picture Tools Format ribbon, click on Transparency

You can select one of the pre-set transparency levels or click on “Picture Transparency Options …” for finer control of the transparency level.

Move the slider (or type a number) to adjust the transparency level – 100% is invisible, 0% is the original image.

Voila – you’ve got a background image and legible text.

There are a lot of other image effects available – the vignette is the “soft edge oval” from the “Picture Styles” section of the ribbon bar. Many of the effects I’ve traditionally used Photoshop or Gimp to apply are also available in the “Adjust” section, so click around and check it out!

Did you know … you can draw attention to Teams posts?

Before I tell you how – don’t be the person who flags every single message as urgent. Not because it’s annoying (although it is), but because it’s hard to single something out for attention if YOU ALREADY MARK EVERYTHING URGENT AND USE HUGE, BOLD, RED LETTERS AND END WITH !!!!!!!!!! If everything is urgent, you don’t have a classification for super urgent things.

OK, now that I’ve done my quasi-civic duty and at least tried to avoid having big red icons next to 97% of the messages I see …

You can use @ mentions to draw individuals’ or groups’ attention to a specific post. In the message, type @ and then begin typing either an individual’s name or the Team’s name. The @ mention can be included anywhere in the message – it doesn’t have to come first.

Team members using the desktop or mobile client will get a banner message alerting them that they have been mentioned in a post.

All clients will have a little logo along the right-hand side of the message indicating either a group

Or individual mention.

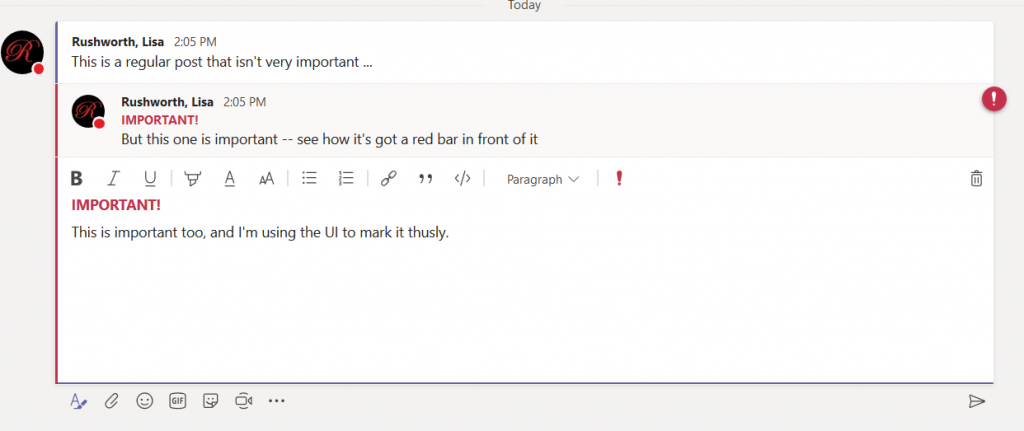
If you want to draw attention to an item without banner messages, you can also mark a post as important. When you are typing your message, click on the “Format” button when typing the message.

Then click the exclamation point. (For anyone who prefers keyboard shortcuts – use ctrl-shift-i)

And you’ll see both the red bar along the left and the IMPORTANT! designation atop the message.

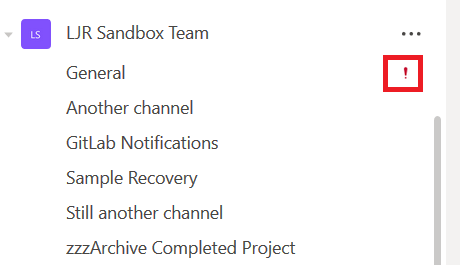
Team members will see an exclamation point marking channels with important messages too.

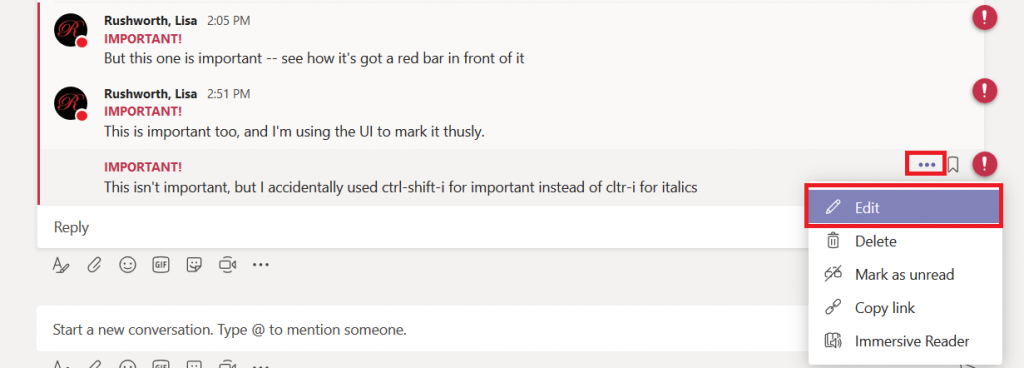
If you accidently mark a message as important (keyboard users who type ctrl-i for italics can get both ctrl and shift occasionally), click the hamburger menu next to your post and select Edit.

Click the exclamation point again to remove the important designation.

Voila, the message no longer has an over-inflated sense of self-worth. Or my typo.

Fact-free discourse

The migrant caravan illegally invading the United States has been a gigantic heap of “alternative facts” — or, for the old fashioned, inaccuracies and lies. Is there anything to gain from proving individual tenants of Trump’s argument to be the abject falsehoods that they are? People walking from Southern Mexico are not at the US border. 5,800 US military personnel, *they* are at the border in what I am sure is a fairly expensive political stunt. But people hiking across Mexico have a few weeks of walking ahead of them.

And what exactly are they doing that is wrong?? How many people know step #1 of the asylum process? Here it is — from the US Department of Homeland Security website. To apply for asylum, you need to be physically present in the US or seeking entry into the US at a port of entry. So … people who want to request asylum in the US that head to a port of entry are, wait, following the legal process.

But while there are a bevy of proximal arguments being made, the distal complaint is essentially “we don’t like other, keep them out”. So I wonder about the efficacy of of providing actual facts to counter the litany of alternative ones. Are there people rooting for militarization of the border who will change their mind when they realize asylum seekers showing up at a port of entry are following the proper process? Or will they come up with some new “fact” to heap on the pile.

Cloudy ROI

I often have trouble seeing the value behind cloud offerings — but most cloud migrations I’ve seen have done 1:1 replacement of locally hosted servers with cloud hosted servers. The first two years, the cloud hosted servers are cheaper (although that’s some dodgy accounting as we’re assuming no workforce changes as a result of outsourcing servers and depreciation of the owned asset is not considered). The third year, though, is a break-even point. General Depreciation System considers computers a five-year property, but there are accounting practices to handle fully depreciated assets. It remains on the balance sheet as a cost, it’s accumulated depreciation is listed as a accumulated depreciation contra asset item. When you *do* stop using the asset, the accumulated depreciation account is debited for the full depreciated amount, the fixed asset account is credited with its full cost. Point being I can continue using a computer asset after five years. Cloud hosted servers make financial sense for a company that tends towards “bleeding edge” implementations (buying the new whatever next year), but for a company that buys a server or application and then uses it for a decade … you’re simply turning capital expense into a greater ongoing operating expense. Which … good this year, but bad in the long term.

Now for a smaller company that doesn’t have a dedicated IT department, and that doesn’t actually need the capacity provided by a single modern server … externally hosting resources is financially beneficial. A web site, e-mail, chat-based customer service? All make sense to host externally. You don’t have to own half a dozen servers, make sure they’re backed up, etc. But I don’t see the cost benefit at enterprise levels unless (1) you want to build data centers close to customers without the expense of actually building a data center. For instance, opening your services to customers in the EU … getting a data center set up in, say, Germany isn’t a quick proposition. As your business grows, it may become “worth it” to invest money into a European data center. But cloud-hosted computers from some major provider who already has a presence there provides quick time-to-market and minimizes up-front cost. Some countries may have a laborious process for prospective businesses too — a process the cloud hosting provider has already navigated. Or you (2) plan a substantial workforce reduction. If someone else is backing up, patching, and monitoring systems … you don’t need people performing those duties. Since a cloud-hosting provider is able to leverage those employees across far more servers than you’d need — there’s a place where scale produces a cost benefit. But, strangely, I don’t see companies reducing IT operations staff after moving to the cloud. This may be a long-term goal to ensure the enthusiasm of staff for the move — it’s not particularly enticing to put six months of work into a project that ensures my job goes away. Or this may just be a thing — move to the cloud and still have twenty ops employees.
Ruffling Foot

I got some really nice corduroy fabric a few years ago with the idea of making Anya one of those tiered skirts where each layer is progressively larger than the other and gathered along the previous layer. It’s a simple enough process — decide how thick you want each tier to be and cut the fabric into strips that width + 2x a seam allowance. Once you’ve got a bunch of strips, attach them to create a really really long strip of fabric.

Take a wider strip of fabric and fold the top to form to encase an elastic band. Now comes the tricky part — getting the two pieces of fabric in the ruffler foot. There’s a long metal strip at the front that shoves the fabric to ruffle it — you want the long strip of fabric, right side facing up, under this strip. The bottom of the skirt, you want over this metal strip — it’s not going to be ruffled — and facing down. Both pieces of fabric are slipped under the foot at the back. Now sew — it’s a little jerky as the long strip of fabric gets pulled into the gathering mechanism. Once you make it all the way around the skirt, cut the long strip & attach the two ends of the tier. Then do it all over again — get the long strip into the gathering mechanism, get the bottom of the skirt above the gathering mechanism, both pieces of the fabric under the foot, and sew. Add tiers until the skirt is the desired length. Fold the bottom of the skirt up to form a hem. I went over the seams between each tier with my serger.

And we’ve got a skirt!

Most ruffling feet have settings where you can select how many stitches between a gather (I used 6) and the depth of the gather (I used a small gather because I wanted a subtle effect, not a pleated skirt).

Halloween 2018 – Unicorn Hood

Making a horn turned out to be a LOT harder than it seemed. Taking a heavy piece of paper and folding it into a cone was easy enough. I stuffed it with polyfil to give it some form. But how do you make it sparkly? I wanted to wrap the thing in a gold lamé fabric, but getting it all held together just wasn’t working.

Plan G (or so) was spray-on glue and glitter. I’m going to have to coat this thing in some clear sealant so she’s not a unicorn sprinkling glitter everywhere she goes. But it’s a horn!

Did you know … Microsoft Teams provides both public and semi-private Team spaces?

You’ve used Microsoft Teams to collaborate with individuals assigned to a project, and even created Team spaces for ad hoc groups to work on a problem. But what if you want to discuss the office’s community outreach program or plan the next employee engagement activity? Microsoft Teams is a perfect place to host that collaboration too.

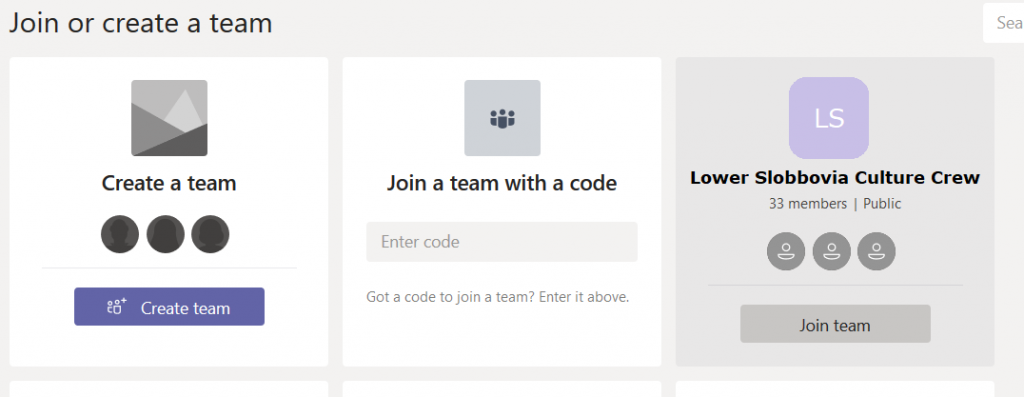
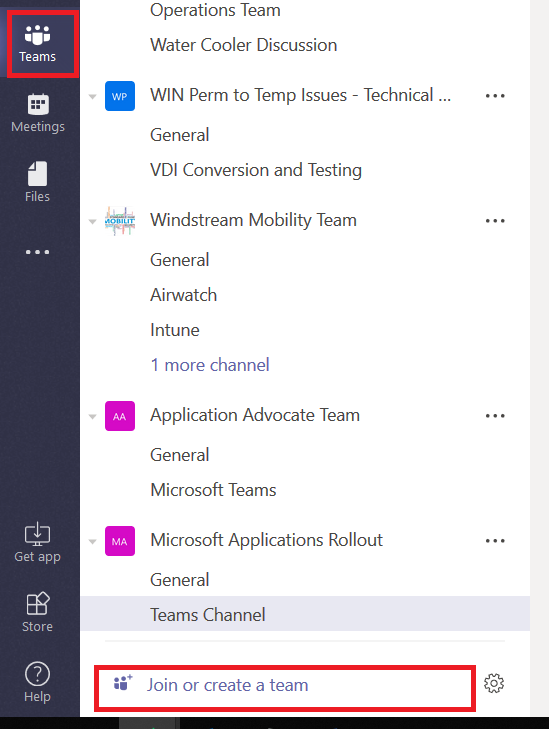
You can create a public Team space – a public Team allows anyone to join without requiring approval. This is great if you do not need to verify qualifications before allowing someone to join a Team. From the “Teams” tile, click on “Join or create a team” at the bottom of your Team list.

Click “Create team”

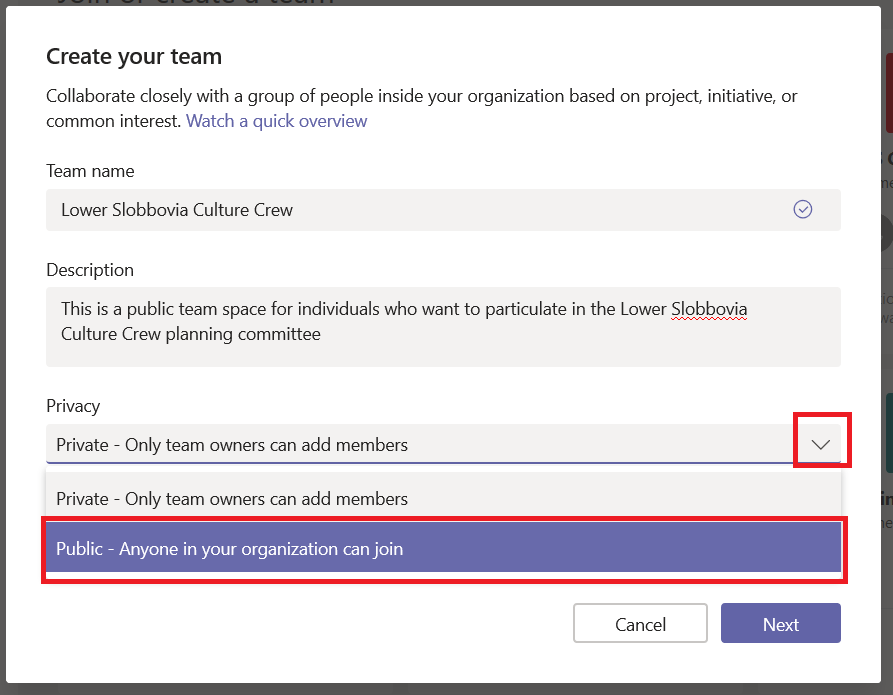
Provide a team name and description so potential members know it’s something that interests them. Now under “Privacy”, click the down arrow and select “Public – Anyone in your organization can join”.

Click Next. You can start your team by adding some members, or you can click “Skip” and let members add themselves. Voila, you’ve got a public team. (Well, give it a few minutes … there’s some background magic that needs to complete). When people click “Join or create a team”, your team will show up in the Team gallery (they may need to search for it – and as of 25 October 2018 it’s a “begins with” search … so Slobbovia will not find my team, but “Lower” or “Lower Slobbovia” will). As soon as they click “Join team”, they will be added as a member of your team.


What if you don’t want your team to be that public? Say we only want people who actually work in East Slobbovia to join up. Then leave the Privacy setting at “Private – Only team owners can add members”. This means your new Team won’t appear on the “Create or join a team” Team list …

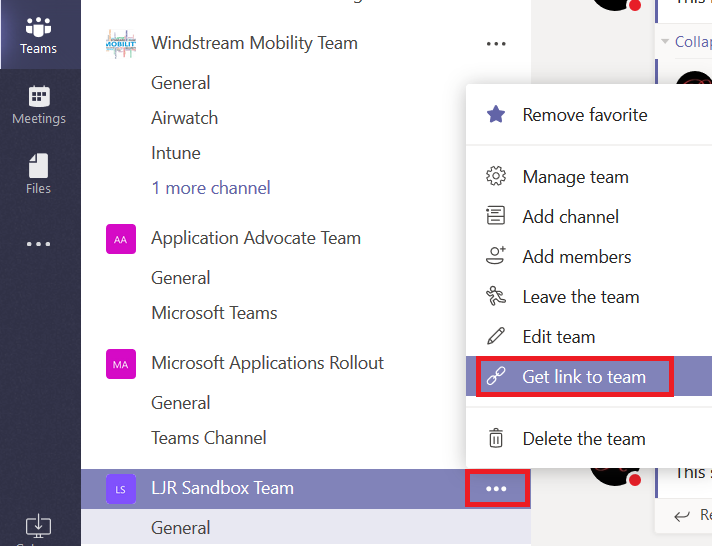
From the hamburger menu next to the team name, select “Get link to team”

The URL will be displayed in a new pane – click “Copy” and you’ll have the URL in your clipboard.

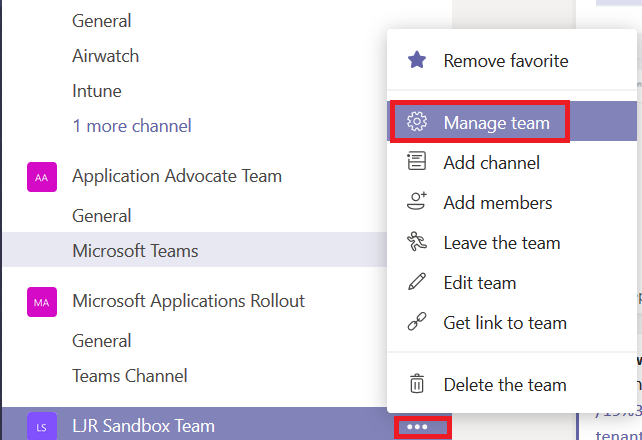
Publicize your URL — you could post it to Stream, have the link included in a local newsletter message, e-mail it to potential Team members … however you let people know about the URL. When someone follows the URL, a membership request will appear on the Team. From the hamburger menu next to the team name, select “Manage team”

Click on the “Pending Requests” tab

You’ll see, well, the pending requests. Click accept to add the person to your team, or click deny if you prefer.

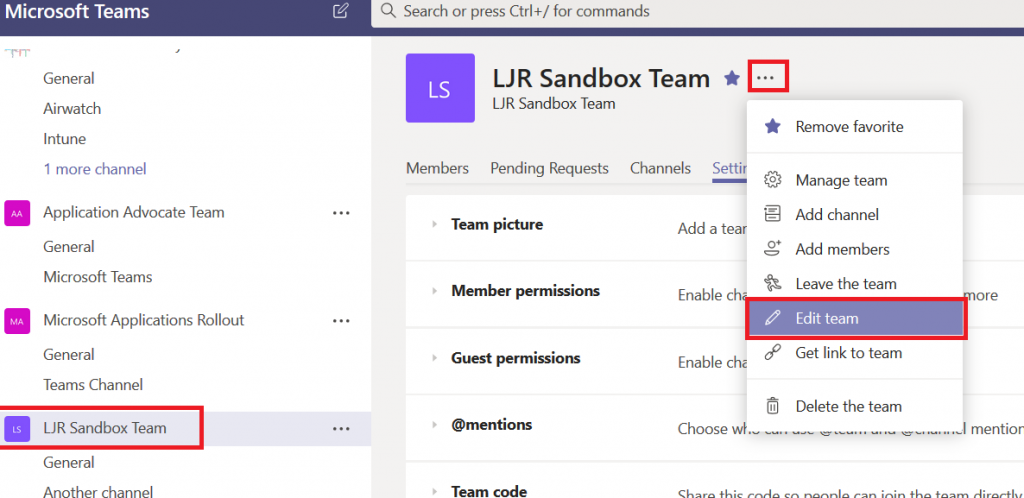
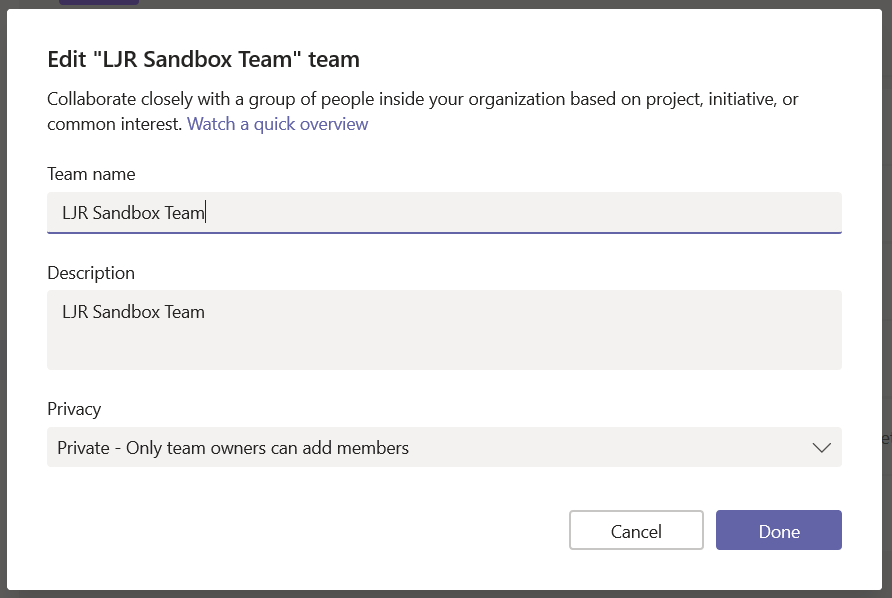
Changing the settings – If you change your mind, that’s OK too. In your Teams list, click on the Team itself (not the hamburger menu next to it, and not one of the channels under it. Then click on the hamburger menu next to the team name in the right-hand pane. Select “Edit team”.

You can change the privacy settings and click “Done”

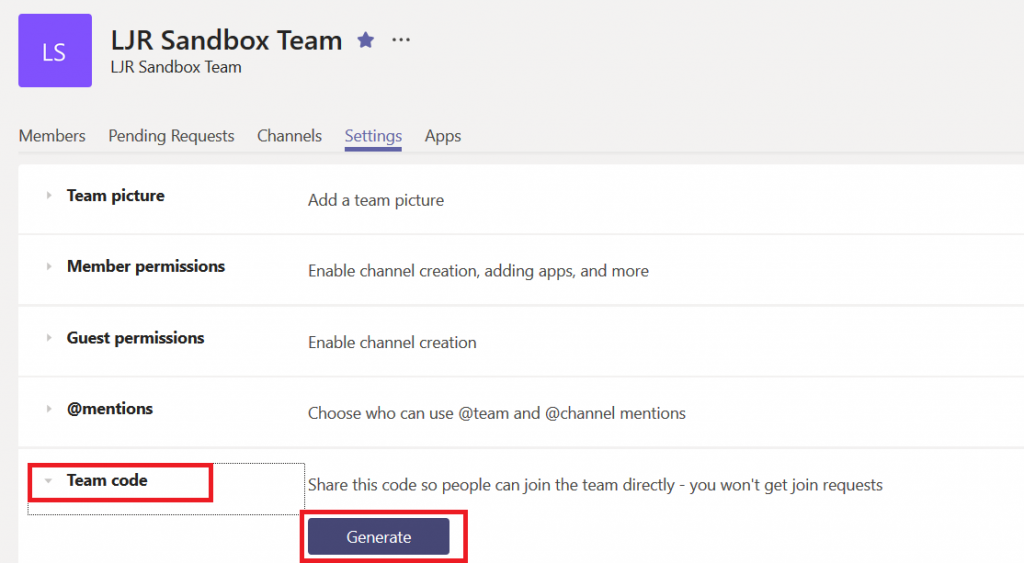
Bonus option … for those of you who have stuck with me this far! You can create a code for your team that allows invited individuals to join the team without waiting for your approval. Click the hamburger menu next to the team name and select “Manage Team”. On the “Settings” tab, expand the “Team code” section. Click “Generate”

Now there’s a code associated with your team.

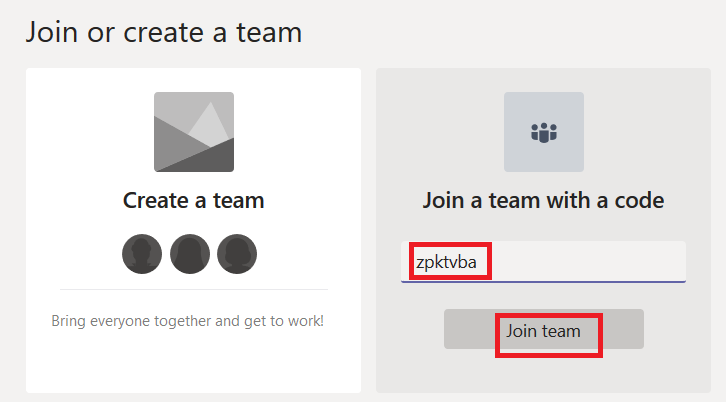
Individuals who have the code can go to the Teams gallery and enter the code in the tile that says “Join a team with a code”