Run:
journalctl -o short-iso-precise
Results:
2018-09-19T23:30:11.651010-0400 linux05.domain.ccTLD process[PID]: Log message here.
Run:
journalctl -o short-iso-precise
Results:
2018-09-19T23:30:11.651010-0400 linux05.domain.ccTLD process[PID]: Log message here.
The graphical interface on a Fedora 28 laptop was unavailable — buggered up video device/driver. Change to what used to be called run level 3, and we could not log in! We know the root password, but it would not take it. Single user is password protected too — and we were unable to log in there.
Normal recovery process:
Get to the grub menu, highlight the kernel you want to boot, and hit ‘e’ to edit it. Scroll down. On line that starts with linux16, change “rhgb quiet” to say “rd.break enforcing=0”
ctrl-x to boot
Once you get a shell:
mount -o remount,rw /sysroot
chroot /sysroot
Voila, you’ve got access to your files. Use vi to edit whatever has the box seriously screwed up (passwd if your problem is that you don’t know the root password) and you’re set. We reset the root password just in case. Aaaand … we still couldn’t log in on init 1 or init 3! And at this point I was feeling stubborn about getting logged into the box.
Now you can tweak up the system so it is not using sulogin when booting into single user mode but that isn’t a good way to install network-sourced packages. For some reason, we had to disable selinux before we could log into anything other than the graphical target. I’m sure there is a policy we could have tweaked, but it was far easier to disable the thing, boot into the multi-user target, sort the video driver, and then boot into the graphical target.
A few years ago, I implemented a custom password filter in Active Directory. At some point, it began accepting passwords that should be rejected. The updated code is available at https://github.com/ljr55555/OpenPasswordFilter and the following is the approach I used to isolate the cause of the failure.
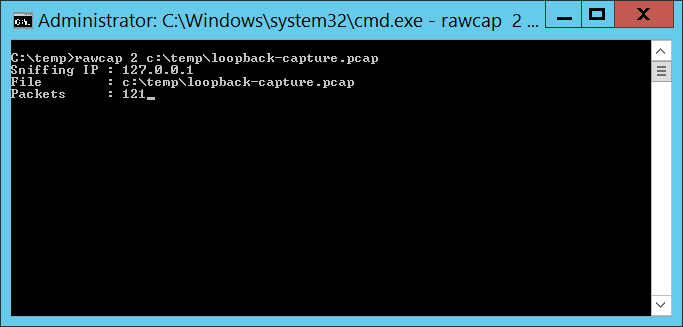
Technique #1 — Netcap on the loopback There are utilities that allow you to capture network traffic across the loopback interface. This is helpful in isolating problems in the service binary or inter-process communication. I used RawCap because it’s free for commercial use. There are other approaches too – or consult the search engine of your choice.
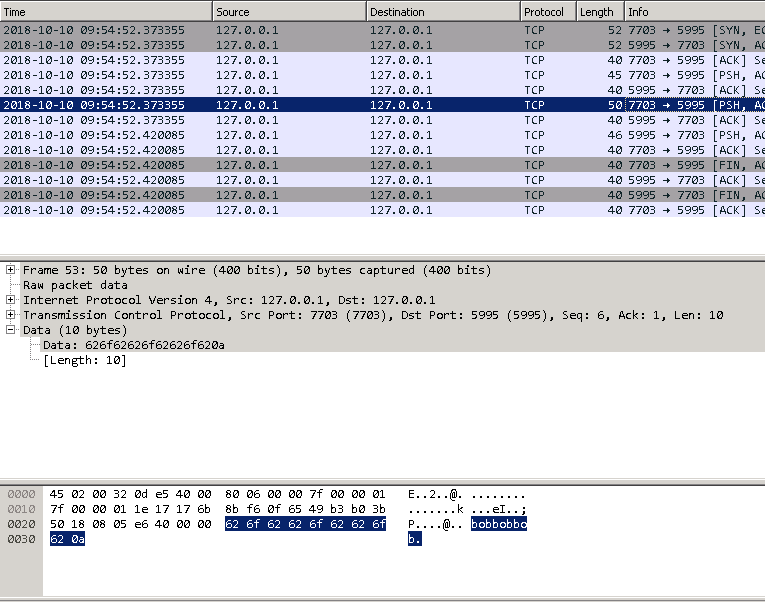
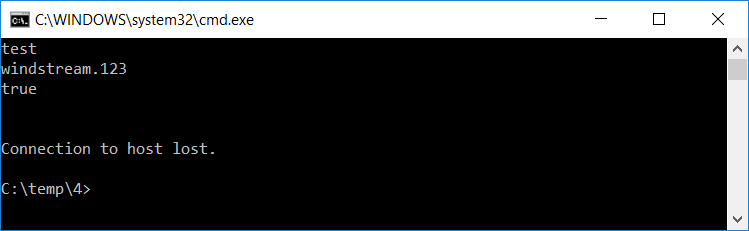
The capture file can be opened in Wireshark. The communication is done in clear text (which is why I bound the service to localhost), so you’ll see the password:
And response
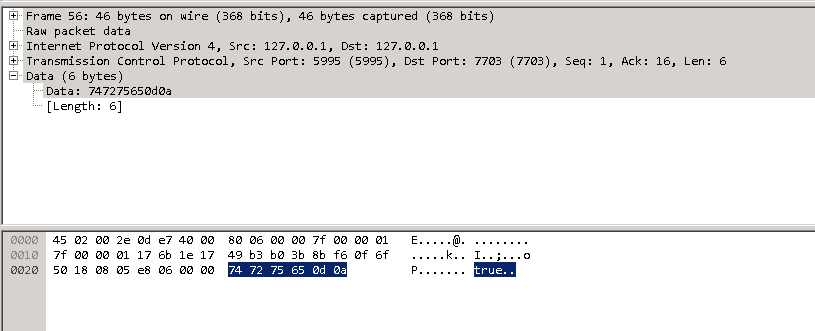
To ensure process integrity, the full communication is for the client to send “test\n” then “PasswordToTest\n”, after which the server sends back either true or false.
Technique #2 — Debuggers Attaching a debugger to lsass.exe is not fun. Use a remote debugger — until you tell the debugger to proceed, the OS is pretty much useless. And if the OS is waiting on you to click something running locally, you are quite out of luck. A remote debugger allows you to use a functional operating system to tell the debugger to proceed, at which time the system being debugged returns to service.
Install the SDK debugging utilities on your domain controller and another box. Which SDK debugging tool? That’s going to depend on your OS. For Windows 10 and Windows Server 2012 R2, the Windows 10 SDK (Debugging Tools For Windows 10) work. https://docs.microsoft.com/en-us/windows-hardware/drivers/debugger/debugger-download-tools or Google it.
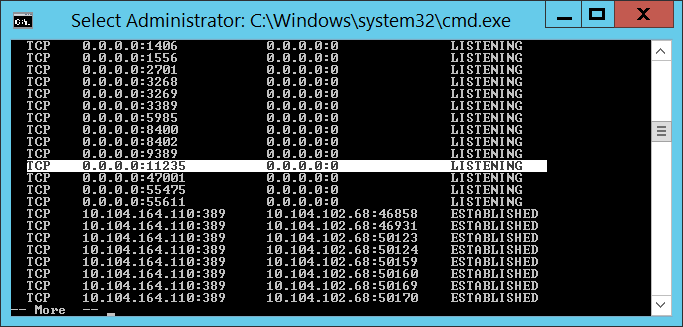
On the domain controller, find the PID of LSASS and write it down (472 in my example). Check the IP address of the domain controller (10.104.164.110 in my example).
From the domain controller, run:
dbgsrv.exe -t tcp:port=11235,password=s0m3passw0rd
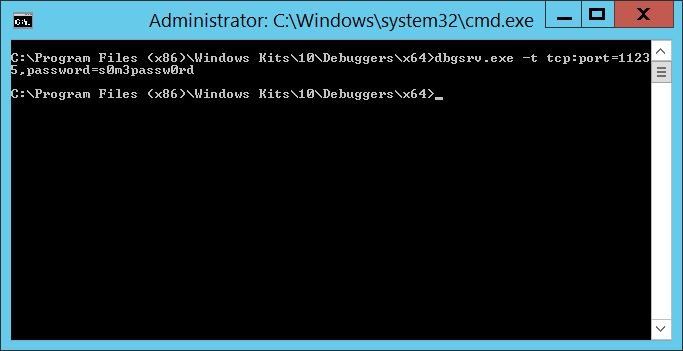
Where port=11235 can be any un-used port and password=s0m3passw0rd can be whatever string you want … you’ve just got to use the same values when you connect from the client. Hit enter and you’ve got a debugging server. It won’t look like it did anything, but you’ll see the port bound on netstat
And the binary running in taskman

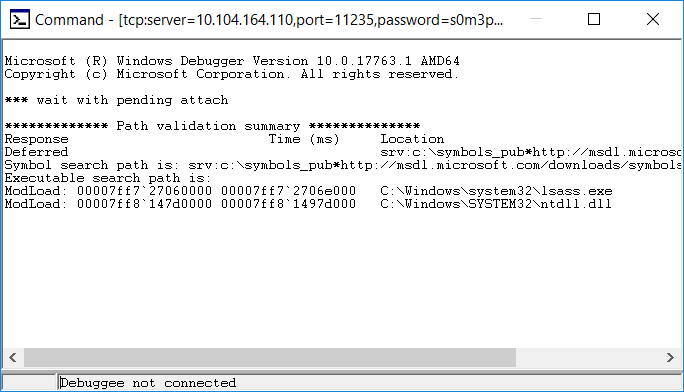
From the other box, run the following command (substituting the correct server IP, port, password, and process ID):
windbg.exe -y “srv:c:\symbols_pub*http://msdl.microsoft.com/downloads/symbols” -premote tcp:server=10.104.164.110,port=11235,password=s0m3passw0rd -p 472
This attaches your WinDBG to the debugging server & includes an internet-hosted symbol path. Don’t worry when it says “Debugee not connected” at the bottom – that just means the connection has not completed. If it didn’t connect at all (firewall, bad port number, bad password), you’d get a pop-up error indicating that the initial connection failed.
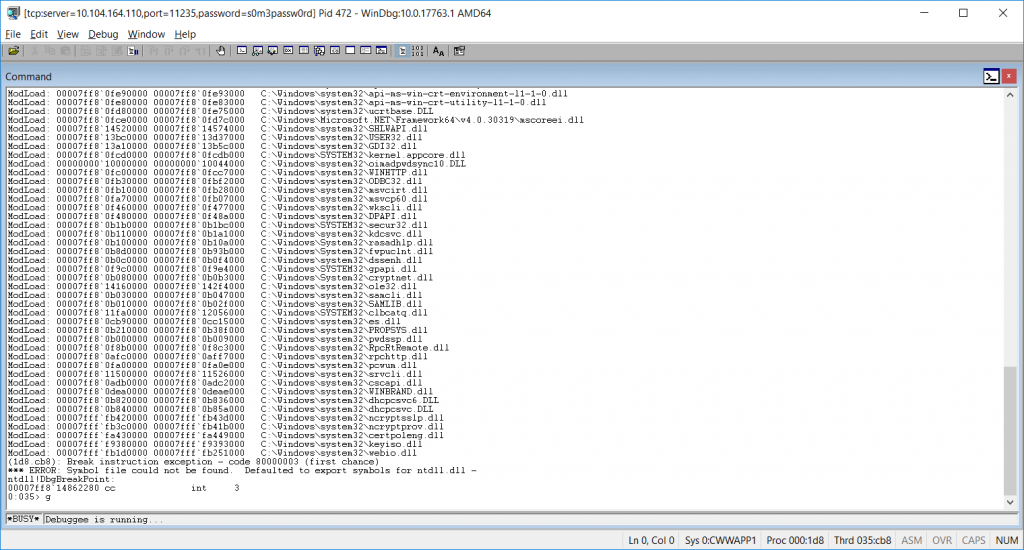
Wait for it … this may take a long time to load up, during which time your DC is vegged. But eventually, you’ll be connected. Don’t try to use the DC yet – it will just seem hung, and trying to get things working just make it worse. Once the debugger is connected, send ‘g’ to the debugger to commence – and now the DC is working again.
Down at the bottom of the command window, there’s a status (0:035> below) followed by a field where you enter commands. Type the letter g in there & hit enter.

The status will then say “Debuggee is running …” and you’re server is again responsive to user requests.
When you reach a failing test, pause the debugger with a break command (Debug=>Break, or Ctrl-Break) which will veg out the DC again. You can view the call stack, memory, etc.
To search the address space for an ASCII string use:
!for_each_module s -[1]a ${@#Base} L?${@#Size} "bobbob"
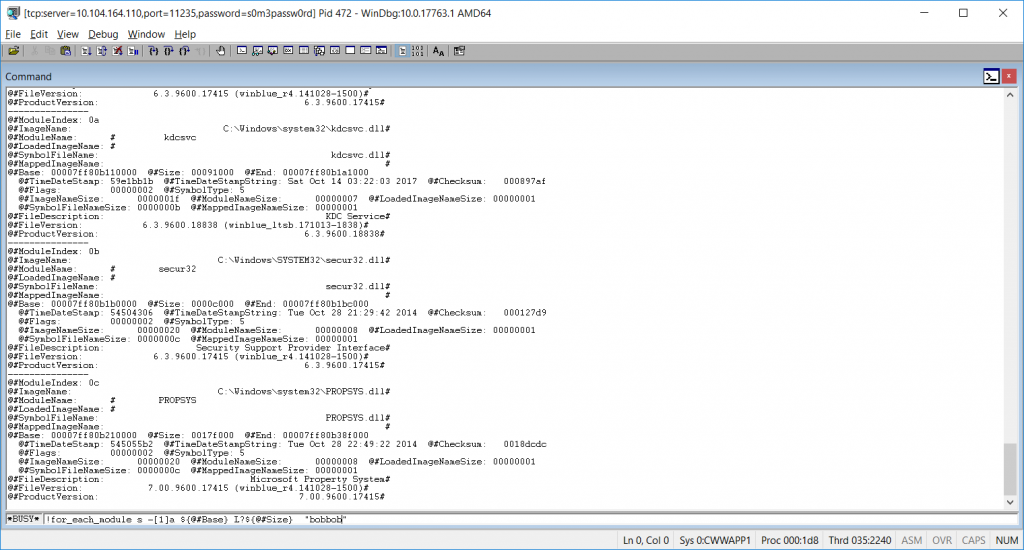
Where “bobbob” is the password I had tested.
Alternately, run the “psychodebug” build where LARGEADDRESSAWARE is set to NO and you can search just the low 2-gig memory space (32-bit process memory space):
s -a 0 L?80000000 "bobbob"
* The true/false server response is an ASCII string, not a Boolean. *
Once you have found what you are looking for, “go” the debugger (F5, Debug=>Go, or ‘g’) to restore the server to an operational state. Break again when you want to look at something.
To disconnect, break and send “qd” to the debugger (quit and detach). If you do not detach with qd, the process being debugged terminates. Having lsass.exe terminate really freaks out the server, and it will go into an auto-recovery “I’m going to reboot in one minute” mode. It’ll come back, but detaching without terminating the process is a lot nicer.
Technique #3 – Compile a verbose version. I added a number of event log writes within the DLL (obviously, it’s not a good idea in production to log out candidate passwords in clear text!). While using the debugger will get you there eventually, half an hour worth of searching for each event (the timing is tricky so the failed event is still in memory when you break the debugger) … having each iteration write what it was doing to the event log was FAAAAAR simpler.
And since I’m running this on a dev DC where the passwords coming across are all generated from a load sim script … not exactly super-secret stuff hitting the event log.
Right now, I’ve got an incredibly verbose DLL on APP556 under d:\tempcsg\ljr\2\debugbuild\psychodebug\ … all of the commented out event log writes from https://github.com/ljr55555/OpenPasswordFilter aren’t commented out.
Stop the OpenPasswordFilter service, put the verbose DLL and executables in place, and reboot. Change some passwords, then look in the event viewer.
ERROR events are actual problems that would show up either way. INFORMATION events are extras. I haven’t bothered to learn how to properly register event sources in Windows yet 🙂 You can find the error content at the bottom of the “this isn’t registered” complaint:
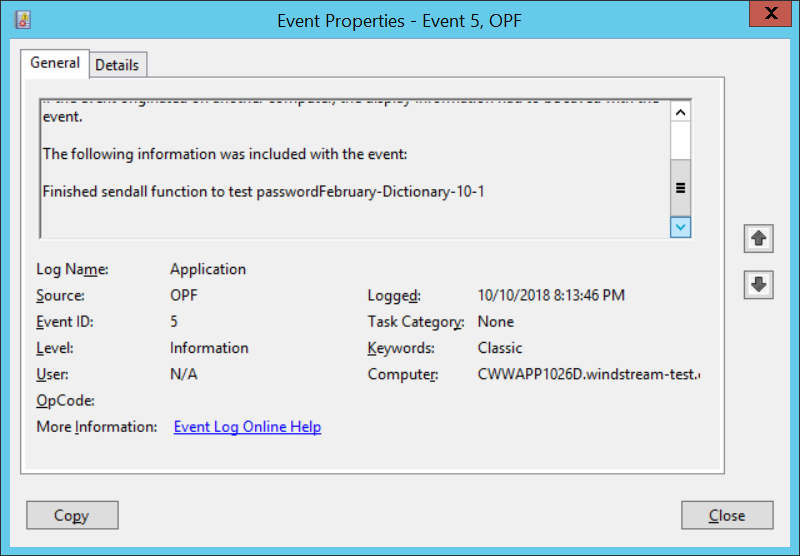
You will see events for the following steps:
DLL starting CreateSocket
About to test password 123paetec123-Dictionary-1-2
Finished sendall function to test password123paetec123-Dictionary-1-2
Got t on test of paetec123-Dictionary-1-2
The final line will either say “Got t” for true or “Got f” for false.
Technique #4 – Running the code through the debugger. Whilst there’s no good way to get the “Notification Package” hook to run the DLL through the debugger, you can install Visual Studio on a dev domain controller and execute the service binary through the debugger. This allows you to set breakpoints and watch variable values as the program executes – which makes it a whole lot easier than using WinDBG to debug the production code.
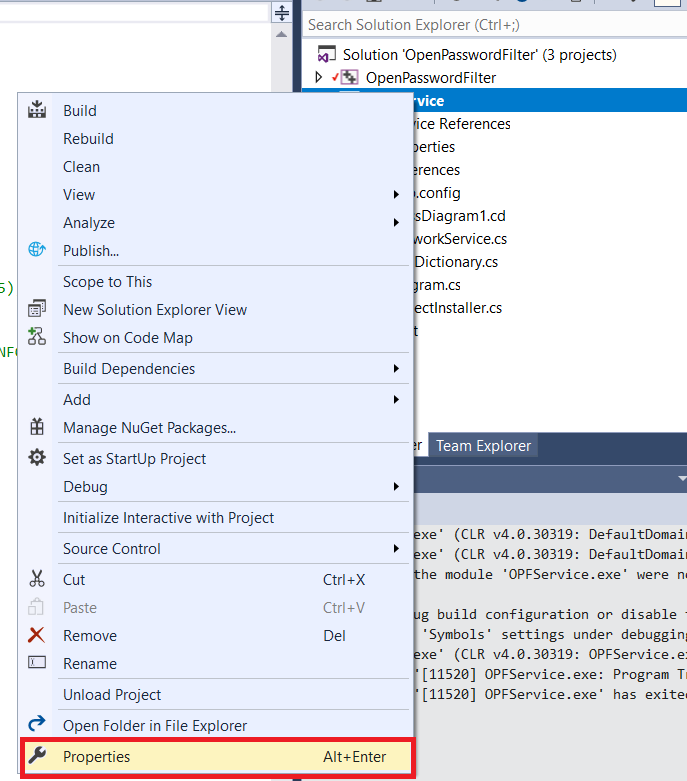
Grab a copy of the source code – we’re going to be making some changes that should not be promoted to production, so I work on a temporary copy of the project and delete the copy once testing has completed.
Open the project in Visual Studio. Right-click OPFService in the “Solution Explorer” and select “Properties”
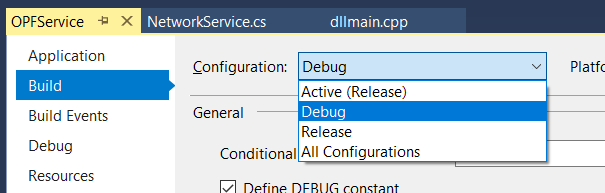
Change the build configuration to “Debug”
Un-check “Optimize code” – code optimization is good for production run, but it will wipe out variable values when you want to see them.
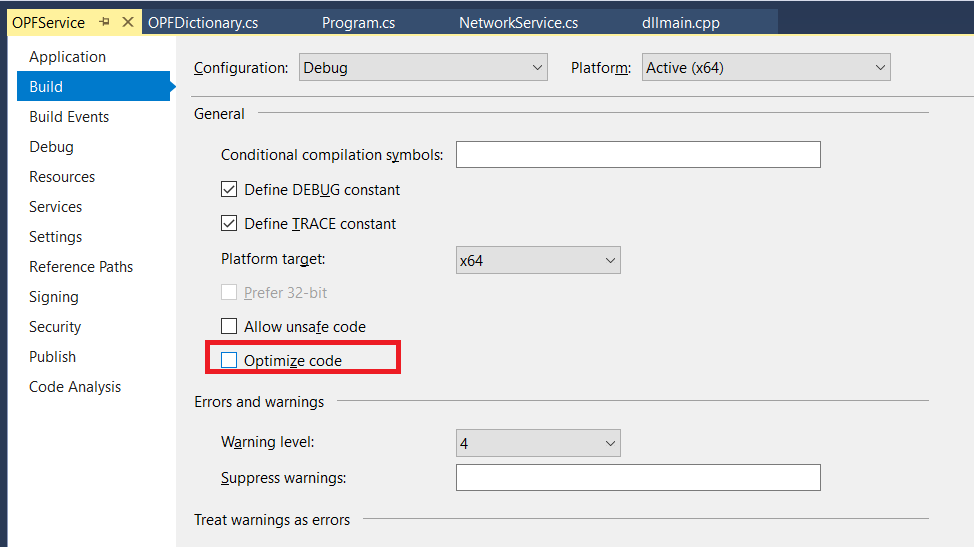
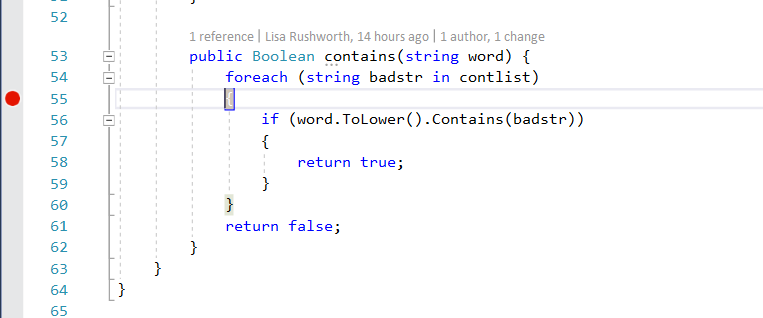
Set a breakpoint on execution – on the OPFDictionary.cs file, the loop checking to see if the proposed word is contained in the banned word list is a good breakpoint. The return statements are another good breakpoint as it pauses program execution right before a password test iteration has completed.
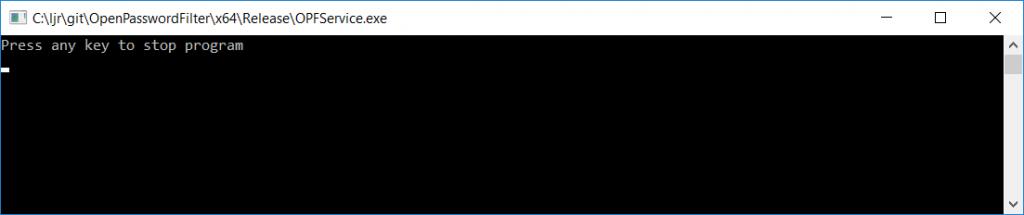
Build the solution (Build=>Build Solution). Stop the Windows OpenPasswordFilter service.
Launch the service binary through the debugger (Debug=>Start Debugging).
Because the program is being run interactively instead of through a service, you’ll get a command window that says “Press any key to stop the program”. Minimize this.
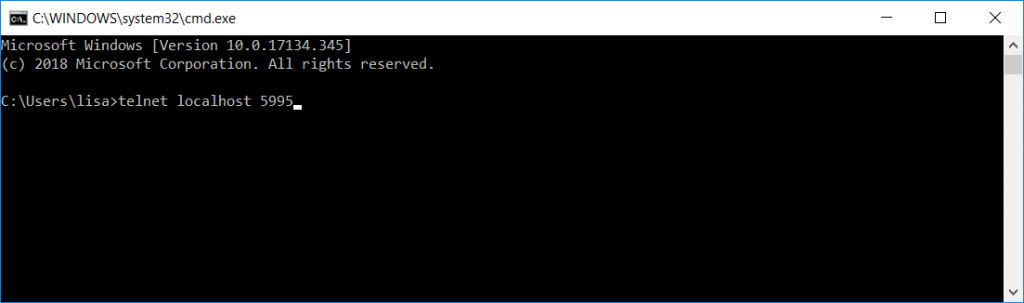
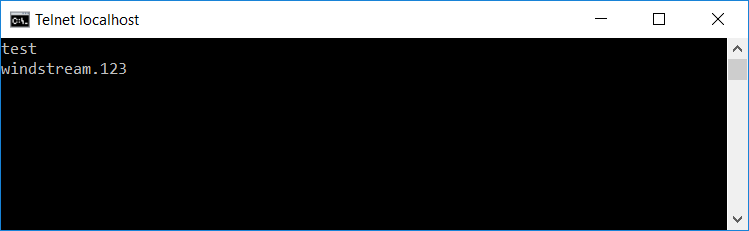
From a new command prompt, telnet to localhost on port 5995 (the telnet client is not installed by default, so you may need to use “Turn Windows features on or off” and enable the telnet client first).
Once the connection is established, use CTRL and ] to get into the telnet command prompt. Type set localecho … now you’ll be able to see what you are typing.
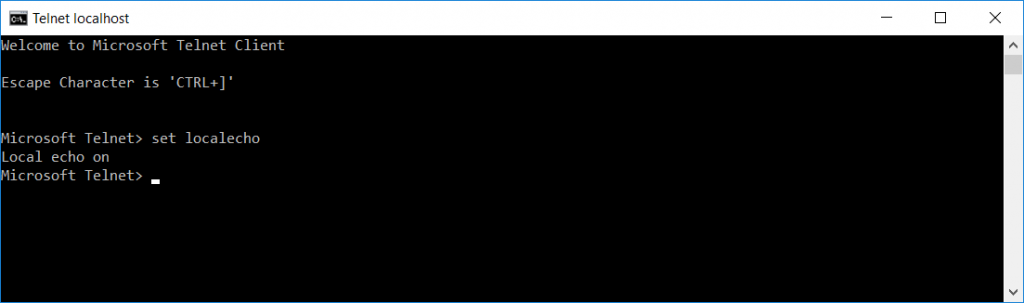
Hit enter again and you’ll return to the blank window that is your telnet client. Type test and hit enter. Then type a candidate password and hit enter.
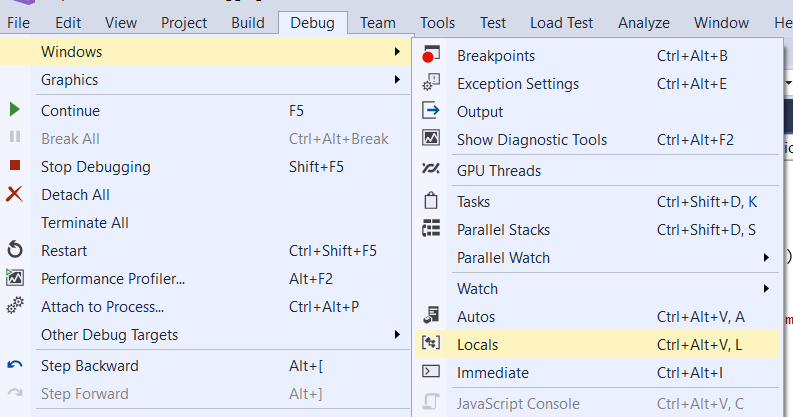
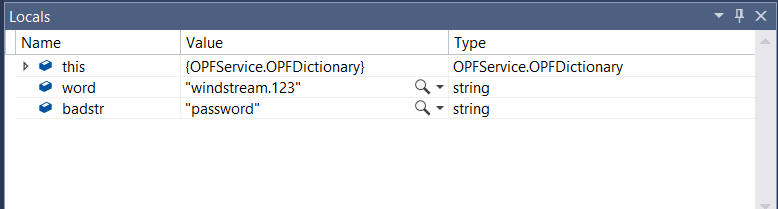
Program execution will pause at the breakpoint you’ve set. Return to Visual Studio. Select Debug =>Window=>Locals to open a view of the variable values
View the locals at the breakpoint, then hit F5 if you want to continue.
If you’re set breakpoints on either of the return statements, program execution will also pause before the return … which gives you an opportunity to see which return is being used & compare the variable values again.
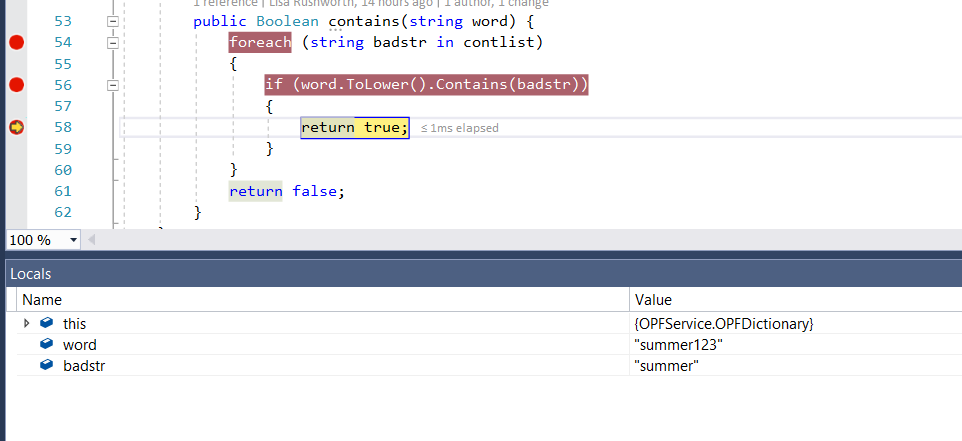
In this case, I submitted a password that was in the banned word list, so the program rightly evaluated line 56 to true and returns true.
We occasionally have to re-home our shell scripts, which means updating any static path values used within scripts. It’s quick enough to build a sed script to convert /old/server/path to /new/server/path, but it’s still extra work.
The dirname command works to provide a dynamic path value, provided you use the fully qualified path to run the script … but it fails spectacularly whens someone runs ./scriptFile.sh and you’re trying to use that path in, say, EXTRA_JAVA_OPTS. The “path” is just . — and Java doesn’t have any idea what to do with “-Xbootclasspath/a:./more/path/goes/here.jar”
Voila, realpath gives you the fully qualified file path for /new/server/path/scriptFile.sh, ./scriptFile.sh, or even bash scriptFile.sh … and the dirname of a realpath is the fully qualified path where scriptFile.sh resides:
#!/bin/bash
DIRNAME=`dirname $(realpath "$0")`
echo ${DIRNAME}
Hopefully next time we’ve got to re-home our batch jobs, it will be a simple scp & sed the old crontab content to use the new paths.
Yeah, I know there aren’t actually run levels anymore. The systemd equivalent of running init 3 to boot into console mode is
systemctl isolate multi-user.target
And the equivalent of running init 5 to boot into GUI mode is
systemctl isolate graphical.target
This is a one-time thing, not a config change. If you want to permanently switch to console mode you’d use systemctl set-default multi-user.target
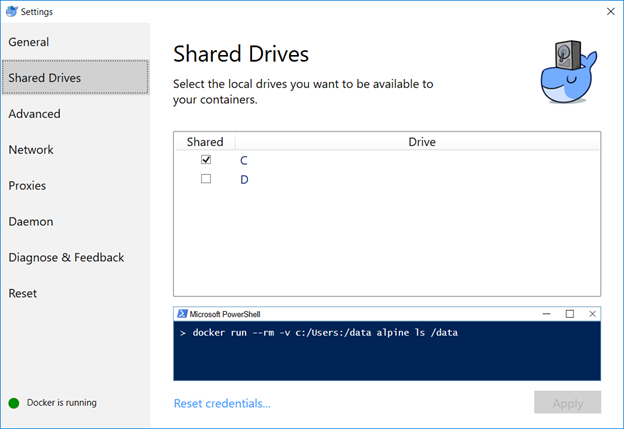
You can use a pre-built docker container (the “long term support” iteration is published as jenkins/jenkins:lts) or perform a local installation from https://jenkins.io/download/, add a package repo to your package manager config (http://pkg.jenkins-ci.org/redhat-stable/jenkins.repo for RedHat-based systems), or build it from the source repo. In this sandbox example, I will be using a Docker container.
Map the /var/Jenkins_home value to something. This allows you to store user-specific data on your local drive, not within the Docker image. In my case, c: is shared in Docker and I’m using c:\docker\jenkins\jenkins_home to store the data.
I have a java cacerts file mounted to the container as well – my CA chain has been imported into this file, and the default password, changeit, is used. This will allow Java to trust internally signed certificates. The keystore password appears as part of the process (i.e. anyone who can run commands like “ps aux” or “ps -efww” will see this value, so while security best practices dictate the default password should be changed … don’t change it to something like your root password!).
We can now start the Docker container:
docker run -p 8080:8080 -p 50000:50000 -v /c/docker/jenkins/jenkins_home:/var/jenkins_home -v /c/docker/jenkins/cacerts:/usr/lib/jvm/java-8-openjdk-amd64/jre/lib/security/cacerts jenkins/jenkins:lts
Once the container is running, you can visit the management web site (http://localhost:8080) and install the modules you want – or just take the defaults (you’ll end up with ‘stuff’ you don’t need … I don’t use subversion, for instance, and don’t really need a plugin for it). For a sandbox, I accept the defaults and then use Jenkins => Manage Jenkins => Manage Plug-ins to remove obviously unnecessary ones. And add any that may be needed (e.g. if you are using Visual Studio solution files, add in the MSBuild plugin).
Configuring Authentication (LDAP)
First install the appropriate plug-in – referrals cause authentication problems when using AD as the LDAP authentication source, if you are using AD for authentication … use the Active Directory plugin).
Manage Jenkins => Configure Global Security. Under access control, select the radio button for “LDAP” or “Active Directory”. Configuration is implementation specific.
AD:
Click the button to expand the advanced configuration. You should not need to specify a domain controller if service records for the domain are present in DNS. The “Site” should be “UserAuth”. For the Bind DN, you can use your userid (user@domain.ccTLD or domain\uid format) with your password. Or you can create a dedicated service account – for a “real world” implementation, you would want a dedicated service account (using *your* account means you’ll need to update your Jenkins config whenever you change your password … and when you forget this update, auth fails).
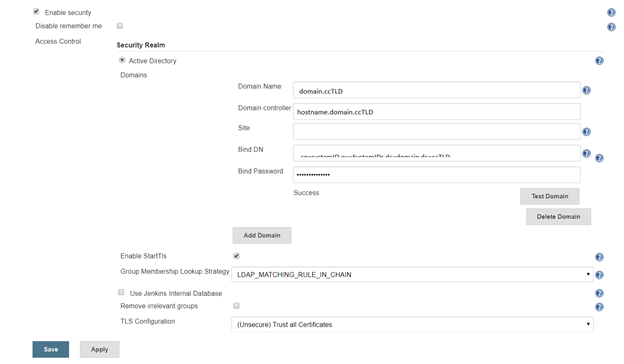
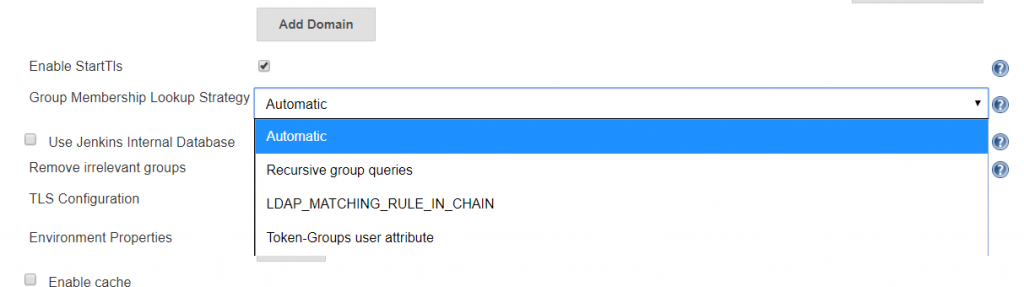
A note about the group membership lookup strategy:
For some reason, Jenkins assumes recursive group memberships will be used (e.g. there is a “App XYZ DevOps Team” that is placed into the “Jenkins Users” group, and “Jenkins Users” is assigned authorizations within the system). Bit of a shame that “none” isn’t an option for cases where there isn’t hierarchical group membership being built out.
There are three lookup strategies available: recursive group queries, LDAP_MATCHING_RULE_IN_CHAIN, and Toke-Groups user attribute. There have been bugs in the “Automatic” strategy that caused timeout failures. Additionally, the group list returned by the three strategies is not identical … so it is possible to have inconsistent authorization results as different strategies are used. To ensure consistent behaviour, I select a specific strategy.
Token-Groups: If you are not using Distribution groups within Jenkins to assign authorization (and you probably shouldn’t since it’s a distribution group, not a security group), you can select the Token-groups user attribute to handle recursive group membership. Token-groups won’t work if you are using distribution groups within Jenkins, though, as only security groups show up in the token-groups attribute.
LDAP_MATCHING_RULE_IN_CHAIN: OID 1.2.840.113556.1.4.1941, LDAP_MATCHING_GROUP_IN_CHAIN is an extended matching operator (something Microsoft added back in Windows 2003 R2) that can be used in LDAP filters:
(member:1.2.840.113556.1.4.1941:=cn=Bob,ou=ResourceUsers,dc=domain,dc=ccTLD)
This operator has known issues with high fan-outs and can cause hangs while data is retrieved. It is, however, a more efficient way of handling recursive group memberships. If your Jenkins groups contain only users, you will not encounter the known issue. If you are using nested groups, my personal recommendation would be to test each option and time logon activities … but if you do not wish to perform a test, this is a good starting option.
Recursive Group Queries: Jenkins issues a new LDAP query for each group – a lot of queries, but straight-forward queries. This is my last choice – i.e. if everything else hangs and causes poor user experience, try this selection.
For Active Directory domains that experience slow authentication through the AD plug-in regardless of the selected recursion scheme, I’ve set up the LDAP plug-in (it does not handle recursive group memberships) but it’s not a straight-forward configuration.
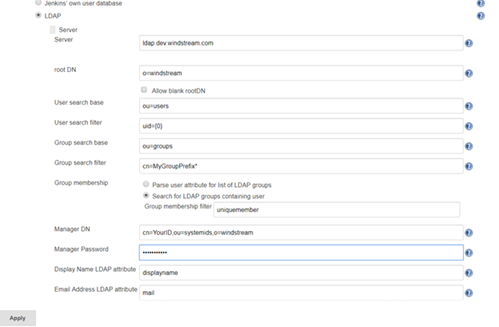
LDAP:
Click the button to expand the advanced server configuration. Enter the LDAP directory connection details. I usually start with clear text LDAP. Once the clear text connection tests successfully, the certificate trust can be established.
You can add a group search filter, but this is not required. If you request your group names start with a specific string, e.g. my ITSS CSG organization’s Jenkins server might use groups that start with ITSS-CSG-Jenkins, you can add a cn filter here to restrict the number of groups your implementation looks through to determine authorization. My filter, for example, is cn=ITSS-CSG-Jenkins*
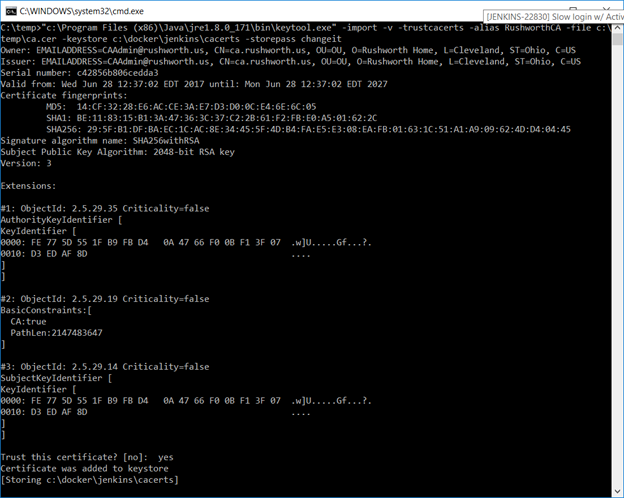
Once everything is working with clear text, load the Root and Web CA public keys into your Java instance’s cacerts file (if you have more than once instance of Java and don’t know which one is being used … either figure out which one is actually being used or repeat the keytool commands for each cacerts file on your machine).
In the Docker container, the file is /usr/lib/jvm/java-8-openjdk-amd64/jre/lib/security/cacerts and I’ve mapped in from a locally maintained cacerts file that already contains our public keys for our CA chain.
Before saving your changes, make sure you TEST the connection.
Under Authorization, you can add any of your AD/LDAP groups and assign them rights (make sure your local back door account has full rights too!).
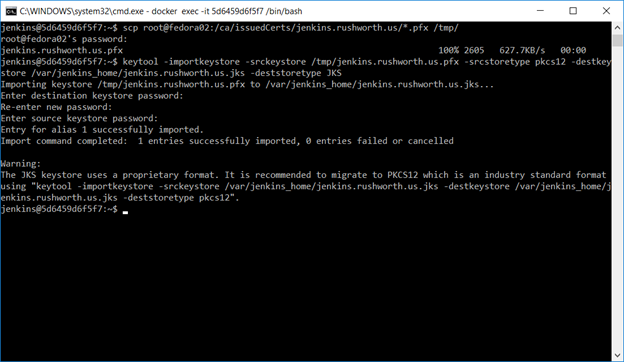
Finally, we want to set up an SSL web site. Request a certificate for your server’s hostname (make sure to include a SAN if you don’t want Chrome to call your cert invalid). Shell into the Docker instance, cd into $JENKINS_HOME, and scp the certificate pfx file.
Use the keytool command to create a JKS file from this PFX file – make sure the certificate (PFX) and keystore (JKS) passwords are the same.
Now remove the container we created earlier. Don’t delete the local files, just “docker rm <containerid>” and create It again
docker run –name jenkins -p 8443:8443 -p 50000:50000 -v /c/docker/jenkins/jenkins_home:/var/jenkins_home -v /c/docker/jenkins/cacerts:/usr/lib/jvm/java-8-openjdk-amd64/jre/lib/security/cacerts jenkins/jenkins:lts –httpPort=-1 –httpsPort=8443 –httpsKeyStore=/var/jenkins_home/jenkins.cert.file.jks –httpsKeyStorePassword=keystorepassword
Voila, you can access your server using an HTTPS URL. If you review the Jenkins documentation, they prefer leaving the Jenkins web server on http and using something like a reverse proxy to perform SSL offloading. This is reasonable in a production environment, but for a sandbox … there’s no need to bring up a sandbox Apache server just to configure a reverse proxy. Since we’re connecting our instance to the real user passwords, sending passwords around in clear text isn’t a good idea either. If only you will be accessing your sandbox (i.e. http://localhost) then there’s no need to perform this additional step. The server traffic to the LDAP / AD directory for authentication is encrypted. This encryption is just for the client communication with the web server.
Using Jenkins – System Admin Stuff
There are several of “hidden” URLs that can be used to control the Jenkins service (LMGTFY, basically). When testing and playing with config parameters, restarting the service was a frequent operation, so I’ve included two service restart URLs here:
https://jenkins.example.com:8443/safeRestart ==> enter quiet mode, wait for running builds to complete, then restart
https://jenkins.example.com:8443/restart ==> Restart not so cleanly
Multiple discussions about creating a more fault tolerant authentication scheme within Jenkins exist on their ‘Issues’ site. Currently, you cannot use local accounts if the directory service is unavailable. Not a big deal if you’re on the company network and using one of our highly available directory solutions. Bit of a shocker, though, if your sandbox environment is on your laptop and you try to play with the instance when not on the company network. In production implementations, this would be a DR consideration (dependency on the directory being recovered). In a cloud-hosted implementation, this creates a dependency on network connectivity into the company.
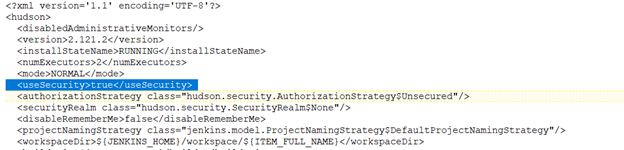
As an emergency solution, you can disable security on your Jenkins installation. I’d also get some sort of firewall rule (OS-based or hardware firewall) to restrict console access to a trusted terminal server or workstation. To disable security, stop Jenkins. Edit the config.xml file in $JENKINS_HOME, and ifnd the <useSecurity> section. Change ‘true’ to ‘false’ and start Jenkins. You’ll be able to access the console without credentials.
Updating Jenkins Image
General practice for updating an application is not to update a container. Instead, download an updated image and recreate the container with the new image. I store the container initialization command along with the folder to which image directories are mapped. My file system has /path/to/docker/storage/AppName that contains a text file with the initialization command and folder(s) that are mapped into the container. This avoids having to find the proper initialization parameters when I upgrade the container.
To update the container, pull a new image, stop the container, remove the container, and create it again. That is:
docker stop jenkins
docker pull jenkins/jenkins:lts
docker rm jenkins
<whatever you used to create the container>
I got Zoneminder 1.31.45 (which includes the new CakePHP framework that doesn’t use what have become reserved words in PHP7) working with the openHAB ZoneMinder binding (which relies on data from the API at /zm/api/configs/view/ATTR_NAME.json). There are two options, ZM_PATH_ZMS and ZM_OPT_FRAME_SERVER which now return bad parameter errors when attempting to retrieve the config using /view/. Looking through the database update scripts, it appears both of these parameters were removed at ZoneMinder 1.31.1
ZM_PATH_ZMS was removed from the Config database and placed in a config file, /etc/zm/conf.d/01-system-paths.conf. There is a PR to “munge” this value into the API so /viewByName returns its value … but that doesn’t expose it through /view.
ZM_OPT_FRAME_SERVER appears to have been eliminated as a configuration option.
You cannot simply re-insert the config options into the database, as ZoneMinder itself loads the ZM_PATH_ZMS value from the config file and then proceeds to use it. When it attempts to load config parameters from the Config table and encounters a duplicate … it falls over. We were unable to view our video through the ZoneMinder server.
*But* editing /usr/share/zoneminder/www/includes/config.php (exact path may vary, list the files from your package install and find the config.php in www/includes) to include an if clause around the section that loads config parameters from the database, and only loading the parameter when the Name is not ZM_PATH_ZMS (bit in yellow below) avoids this overlapping config value.
$result = $dbConn->query( 'select * from Config order by Id asc' );
if ( !$result )
   echo mysql_error();
   $monitors = array();
   while( $row = dbFetchNext( $result ) ) {
      if ( $defineConsts )
      // LJR 2018-08-18 I inserted this config parameter into DB to get OH2-ZM running, and need to ignore it in the ZM web code
      if( strcmp($row['Name'],'ZM_PATH_ZMS') != 0){
         define( $row['Name'], $row['Value'] );
      }
   $config[$row['Name']] = $row;
   if ( !($configCat = &$configCats[$row['Category']]) ) {
      $configCats[$row['Category']] = array();
      $configCat = &$configCats[$row['Category']];
   }
   $configCat[$row['Name']] = $row;
}
Once the ZoneMinder web site happily ignores the presence of ZM_PATH_ZMS from the database config table, you can insert it and ZM_OPT_FRAME_SERVER (an option which appears to have been removed at ZoneMinder 1.31.1) back into the Config table. **Important** — change the actual value of ZM_PATH_ZMS to whatever is appropriate for your installation. In my ZoneMinder installation, /cgi-bin-zm is the cgi-bin directory, and /cgi-bin-zm/nph-zms is the ZMS binary.
From a MySQL command line:
use zm; #Assuming your zoneminder database is actually named zm
INSERT INTO `Config` VALUES (225,'ZM_PATH_ZMS','/cgi-bin-zm/nph-zms','string','/cgi-bin-zm/nph-zms','relative/path/to/somewhere','(?^:^((?:[^/].*)?)/?$)',' $1 ','Web path to zms streaming server',' The ZoneMinder streaming server is required to send streamed images to your browser. It will be installed into the cgi-bin path given at configuration time. This option determines what the web path to the server is rather than the local path on your machine. Ordinarily the streaming server runs in parser-header mode however if you experience problems with streaming you can change this to non-parsed-header (nph) mode by changing \'zms\' to \'nph-zms\'. ','hidden',0,NULL);
INSERT INTO `Config` VALUES (226,'ZM_OPT_FRAME_SERVER','0','boolean','no','yes|no','(?^i:^([yn]))',' ($1 =~ /^y/) ? \"yes\" : \"no\" ','Should analysis farm out the writing of images to disk',' In some circumstances it is possible for a slow disk to take so long writing images to disk that it causes the analysis daemon to fall behind especially during high frame rate events. Setting this option to yes enables a frame server daemon (zmf) which will be sent the images from the analysis daemon and will do the actual writing of images itself freeing up the analysis daemon to get on with other things. Should this transmission fail or other permanent or transient error occur, this function will fall back to the analysis daemon. ','system',0,NULL);
Now restart ZoneMinder and the OH2 ZoneMinder binding. We’ve got monitors on the ZoneMinder web site, we are able to view the video stream, and OH2 picks up alarms from the ZoneMinder server.
If you re-run zmupdate.pl, it will remove these two records from the Config table. If you upgrade ZoneMinder, the change to the PHP file will be reverted.
When we updated our openHAB server to Fedora 28 and changed to a non-root user, the openhab user was unable to create lock files in /run/lock. As an interim fix, we just changed the permission on the lock folder to allow the openhab account to create files. As a more elegant solution, I’ve built the nrjavaserial JAR file from the source in NeuronRobotics’ repository.
The process to build and use a JAR built from this source follows. Before attempting to build the nrjavaserial jar from source, ensure you have gradle (which will install a LOT of additional packages), lockdev, lockdev-devel, some jdk, and some jdk-devel (I used java-1.8.0-openjdk-1.8.0.181-7.b13.fc28.x86_64 and java-1.8.0-openjdk-devel-1.8.0.181-7.b13.fc28.x86_64 because they were already installed for other projects).
# Set ossrhUsername and ossrhPassword values for the account used to build the project – username and password can be null
[lisa@server ~]# cat ~/.gradle/gradle.properties
ossrhUsername=
ossrhPassword=
# Grab the source
[lisa@server ~]# git clone https://github.com/NeuronRobotics/nrjavaserial.git
# Build the project
[lisa@server ~]# cd nrjavaserial
[lisa@server nrjavaserial]# make linux64 # assuming you’ve got 64-bit linux
# Voila, a jar file
[lisa@server nrjavaserial]# cd build/libs
[lisa@server libs]# ll
total 852
-rw-r–r– 1 root root 611694 Aug 16 10:08 nrjavaserial-3.14.0.jar
-rw-r–r– 1 root root 170546 Aug 16 10:08 nrjavaserial-3.14.0-javadoc.jar
-rw-r–r– 1 root root 85833 Aug 16 10:08 nrjavaserial-3.14.0-sources.jar
Before installing the newly built nrjavaserial-3.14.0.jar into openHAB, ensure you have lockdev installed on your Fedora machine and add your openhab user account to the lock group.
# Verify the lockdev folder was created
[lisa@server ~]# ll /run/lock/
total 4
-rw-r–r– 1 root root 22 Aug 10 15:35 asound.state.lock
drwx—— 2 root root 60 Aug 10 15:30 iscsi
drwxrwxr-x 2 root lock 140 Aug 16 12:19 lockdev
drwx—— 2 root root 40 Aug 10 15:30 lvm
drwxr-xr-x 2 root root 40 Aug 10 15:30 ppp
drwxr-xr-x 2 root root 40 Aug 10 15:30 subsys
# Add the openhab user to the lock group
[lisa@server ~]# usermod -a -G lock openhab
The openhab user account can now write to the /run/lock/lockdev folder. Install the new jar file into openHAB. When you restart openHAB, verify lock files are created as expected.
[lisa@server ~]# ll /run/lock/lockdev/
total 20
-rw-rw-r– 5 openhab openhab 11 Aug 16 12:19 LCK…31525
-rw-rw-r– 5 openhab openhab 11 Aug 16 12:19 LCK..ttyUSB-5
-rw-rw-r– 5 openhab openhab 11 Aug 16 12:19 LCK..ttyUSB-55
-rw-rw-r– 5 openhab openhab 11 Aug 16 12:19 LK.000.188.000
-rw-rw-r– 5 openhab openhab 11 Aug 16 12:19 LK.000.188.001
When we upgraded to Fedora 28 on our server, ZoneMinder ceased working because some CakePHP function names could no longer be used. To resolve the issue, I ended up running a snapshot build of ZoneMinder that included a newer build of CakePHP. Version 1.31.45 instead of 1.30.4-7 on the repository.
All of our cameras showed up, and although the ZoneMinder folks seem to have a bug in their SQL query when building out the table of event counts on the main page (that is, all of my monitors have blank instead of event counts and my apache log is filled with
[Wed Aug 15 12:08:37.152933 2018] [php7:notice] [pid 32496] [client 10.5.5.234:14705] ERR [SQL-ERR 'SQLSTATE[42000]: Syntax error or access violation: 1064 You have an error in your SQL syntax; check the manual that corresponds to your MariaDB server version for the right syntax to use near 'and E.MonitorId = '13' ),1,NULL)) as EventCount1, count(if(1 and ( and E.Monito' at line 1', statement was 'select count(if(1 and ( E.MonitorId = '13' ),1,NULL)) as EventCount0, count(if(1 and ( and E.MonitorId = '13' ),1,NULL)) as EventCount1, count(if(1 and ( and E.MonitorId = '13' ),1,NULL)) as EventCount2, count(if(1 and ( and E.MonitorId = '13' ),1,NULL)) as EventCount3, count(if(1 and ( and E.MonitorId = '13' ),1,NULL)) as EventCount4, count(if(1 and ( and E.MonitorId = '13' ),1,NULL)) as EventCount5 from Events as E where MonitorId = ?' params:13]
… it works.
Until Scott checked openHAB, where all of the items are offline. Apparently the openHAB ZoneMinder binding is using the cgi-bin stuff to get the value of ZM_PATH_ZMS. A config option which was removed from the database as part of the upgrade process.
Upgrading database to version 1.31.1
Loading config from DBNo option 'ZM_DIR_EVENTS' found, removing.
No option 'ZM_DIR_IMAGES' found, removing.
No option 'ZM_DIR_SOUNDS' found, removing.
No option 'ZM_FRAME_SOCKET_SIZE' found, removing.
No option 'ZM_OPT_FRAME_SERVER' found, removing.
No option 'ZM_PATH_ARP' found, removing.
No option 'ZM_PATH_LOGS' found, removing.
No option 'ZM_PATH_MAP' found, removing.
No option 'ZM_PATH_SOCKS' found, removing.
No option 'ZM_PATH_SWAP' found, removing.
No option 'ZM_PATH_ZMS' found, removing.
 207 entries
Saving config to DB 207 entries
Upgrading DB to 1.30.4 from 1.30.3
The calls from openHAB yield 404 errors in the access_log
10.0.0.5 - - [15/Aug/2018:09:38:04 -0400] "GET /zm/api/configs/view/ZM_PATH_ZMS.json HTTP/1.1" 404 1751 "-" "Jetty/9.3.21.v20170918"
Unfortunately they’ve changed the URL to get these values — it’s “munged” from the config file as the parameters are no longer stored to the Config table.
http://zoneminder.domain.ccTLD/zm/api/configs/view/ZM_PATH_ZMS.json
is now
http://zoneminder.domain.ccTLD/zm/api/configs/viewByName/ZM_PATH_ZMS.json
So … that’s a problem!
I’ll prefix this saga with the fact my sad story is implementation specific (i.e. relevant to those using Fedora, RHEL, or CentOS). I know Ubuntu has its own history with handling locks, and I’m sure other distros do as well. But I don’t know the history there, nor do I know how they currently manage locking.
We switched our openHAB installation to use a systemd unit file to run as a service and changed the execution to a non-root user. Since we knew the openhab service account needed to be a member of dialout and tty, and we’d set the account up properly, we expected everything would work beautifully.
Aaaand … neither ZWave for ZigBee came online. Not because it couldn’t access the USB devices, but because the non-root user could not lock the USB devices. From journalctl, we see LOTS of error messages that are not reflected in openHAB:
-- Logs begin at Sun 2017-04-30 14:28:12 EDT, end at Sun 2018-08-12 19:10:32 EDT. --
Aug 12 18:36:19 server.domain.ccTLD start.sh[7448]: check_group_uucp(): error testing lock file creation Error details:Permission deniedcheck_lock_status: No permission to create lock fi>
Aug 12 18:36:19 server.domain.ccTLD start.sh[7448]: RXTX fhs_lock() Error: opening lock file: /var/lock/LCK..ttyUSB-55: Permission denied. FAILED TO OPEN: No such file or directory
Aug 12 18:36:19 server.domain.ccTLD start.sh[7448]: [34B blob data]
Aug 12 18:36:19 server.domain.ccTLD start.sh[7448]: check_group_uucp(): error testing lock file creation Error details:Permission deniedcheck_lock_status: No permission to create lock fi>
Aug 12 18:36:19 server.domain.ccTLD start.sh[7448]: RXTX fhs_lock() Error: opening lock file: /var/lock/LCK..ttyUSB-5: Permission denied. FAILED TO OPEN: No such file or directory
Aug 12 18:36:19 server.domain.ccTLD start.sh[7448]: [34B blob data]
Aug 12 18:36:19 server.domain.ccTLD start.sh[7448]: check_group_uucp(): error testing lock file creation Error details:Permission deniedcheck_lock_status: No permission to create lock fi>
Aug 12 18:36:19 server.domain.ccTLD start.sh[7448]: RXTX fhs_lock() Error: opening lock file: /var/lock/LCK..ttyUSB1: Permission denied. FAILED TO OPEN: No such file or directory
Aug 12 18:36:19 server.domain.ccTLD start.sh[7448]: [34B blob data]
Aug 12 18:36:19 server.domain.ccTLD start.sh[7448]: check_group_uucp(): error testing lock file creation Error details:Permission deniedcheck_lock_status: No permission to create lock fi>
Aug 12 18:36:19 server.domain.ccTLD start.sh[7448]: RXTX fhs_lock() Error: opening lock file: /var/lock/LCK..ttyUSB0: Permission denied. FAILED TO OPEN: No such file or directory
Aug 12 18:36:19 server.domain.ccTLD start.sh[7448]: [34B blob data]
Aug 12 18:36:19 server.domain.ccTLD start.sh[7448]: check_group_uucp(): error testing lock file creation Error details:Permission deniedcheck_lock_status: No permission to create lock fi>
Aug 12 18:36:19 server.domain.ccTLD start.sh[7448]: RXTX fhs_lock() Error: opening lock file: /var/lock/LCK..ttyS31: Permission denied. FAILED TO OPEN: No such file or directory
Aug 12 18:36:19 server.domain.ccTLD start.sh[7448]: [34B blob data]
Aug 12 18:36:19 server.domain.ccTLD start.sh[7448]: check_group_uucp(): error testing lock file creation Error details:Permission deniedcheck_lock_status: No permission to create lock fi>
Aug 12 18:36:19 server.domain.ccTLD start.sh[7448]: RXTX fhs_lock() Error: opening lock file: /var/lock/LCK..ttyS30: Permission denied. FAILED TO OPEN: No such file or directory
Aug 12 18:36:19 server.domain.ccTLD start.sh[7448]: testRead() Lock file failed
Aug 12 18:36:19 server.domain.ccTLD start.sh[7448]: check_group_uucp(): error testing lock file creation Error details:Permission deniedcheck_lock_status: No permission to create lock fi>
Aug 12 18:36:19 server.domain.ccTLD start.sh[7448]: RXTX fhs_lock() Error: opening lock file: /var/lock/LCK..ttyS29: Permission denied. FAILED TO OPEN: No such file or directory
Aug 12 18:36:19 server.domain.ccTLD start.sh[7448]: testRead() Lock file failed
Aug 12 18:36:19 server.domain.ccTLD start.sh[7448]: check_group_uucp(): error testing lock file creation Error details:Permission deniedcheck_lock_status: No permission to create lock fi>
Aug 12 18:36:19 server.domain.ccTLD start.sh[7448]: RXTX fhs_lock() Error: opening lock file: /var/lock/LCK..ttyS28: Permission denied. FAILED TO OPEN: No such file or directory
Aug 12 18:36:19 server.domain.ccTLD start.sh[7448]: testRead() Lock file failed
Aug 12 18:36:19 server.domain.ccTLD start.sh[7448]: check_group_uucp(): error testing lock file creation Error details:Permission deniedcheck_lock_status: No permission to create lock fi>
Aug 12 18:36:19 server.domain.ccTLD start.sh[7448]: RXTX fhs_lock() Error: opening lock file: /var/lock/LCK..ttyS27: Permission denied. FAILED TO OPEN: No such file or directory
Aug 12 18:36:19 server.domain.ccTLD start.sh[7448]: testRead() Lock file failed
Aug 12 18:36:19 server.domain.ccTLD start.sh[7448]: check_group_uucp(): error testing lock file creation Error details:Permission deniedcheck_lock_status: No permission to create lock fi>
Aug 12 18:36:19 server.domain.ccTLD start.sh[7448]: RXTX fhs_lock() Error: opening lock file: /var/lock/LCK..ttyS26: Permission denied. FAILED TO OPEN: No such file or directory
Aug 12 18:36:19 server.domain.ccTLD start.sh[7448]: testRead() Lock file failed
Aug 12 18:36:19 server.domain.ccTLD start.sh[7448]: check_group_uucp(): error testing lock file creation Error details:Permission deniedcheck_lock_status: No permission to create lock fi>
Aug 12 18:36:19 server.domain.ccTLD start.sh[7448]: RXTX fhs_lock() Error: opening lock file: /var/lock/LCK..ttyS25: Permission denied. FAILED TO OPEN: No such file or directory
Aug 12 18:36:19 server.domain.ccTLD start.sh[7448]: testRead() Lock file failed
Aug 12 18:36:19 server.domain.ccTLD start.sh[7448]: check_group_uucp(): error testing lock file creation Error details:Permission deniedcheck_lock_status: No permission to create lock fi>
Aug 12 18:36:19 server.domain.ccTLD start.sh[7448]: RXTX fhs_lock() Error: opening lock file: /var/lock/LCK..ttyS24: Permission denied. FAILED TO OPEN: No such file or directory
Aug 12 18:36:19 server.domain.ccTLD start.sh[7448]: testRead() Lock file failed
And now my old-school Linux/Unix knowledge totally screws me over — I expected a uucp group with write access to /run/lock. Except … there’s no such group. Evidently in RHEL 7.2, they started using a group named lock with permission to /var/lock to differentiate between serial devices (owned by uucp) and lock files. Nice bit of history, that, but Fedora and RedHat don’t do that anymore either.
Having a group with write permission was deemed a latent privilege escalation vulnerability, and they played around with having a lockdev binary writing files to /run/lock/lockdev, the creation and configuration of lockdev was moved into systemd, and then removed from systemd in favor of approaches [flock(), for instance].
RXTX has a hard-coded path based on OS version — that is what is used to create the lock file. And as the /run/lock folder is writable only by the owner, root … that is what is failing.
#if defined(__linux__)
/*
	This is a small hack to get mark and space parity working on older systems
	https://bugzilla.redhat.com/bugzilla/show_bug.cgi?id=147533
*/
#	if !defined(CMSPAR)
#		define CMSPAR 010000000000
#	endif /* CMSPAR */
#
#	define DEVICEDIR "/dev/"
#	define LOCKDIR "/var/lock"
#	define LOCKFILEPREFIX "LCK.."
#	define FHS
#endif /* __linux__ */
Which is odd because I see a few threads about how nrjavaserial has been updated and as soon as the newer nrjavaserial gets bundled into the application, locking will all be sorted. And there’s an open issue for exactly the problem we are having … which explains why I’m not seeing something different in their source code. Digging around more, it looks like they didn’t actually change the hardcoded paths but rather added support for liblockdev. Which prompted my hypothesis that simply installing the lockdev package would magically sort the issue. It did not.
In the interim, though, we can just add write permission for /run/lock thorough the config file /usr/lib/tmpfiles.d/legacy.conf — the distro creates the lock directory owned by root:root. Original config lines:
d /run/lock 0755 root root -
L /var/lock - - - - ../run/lock
We can create the folder as owned by the lock group group and add group write permissions (realizing that creates the potential for privilege escalation attacks). Updated config lines:
#d /run/lock 0755 root root -
d /run/lock 0775 root lock -
L /var/lock - - - - ../run/lock
Adding the openhab account to the lock group allows the LCK.. files to be created.
[lisa@server run]# usermod -a -G lock openhab
[lisa@server run]# id openhab
uid=964(openhab) gid=963(openhab) groups=963(openhab),5(tty),18(dialout),54(lock)
Either reboot to reprocess legacy.conf or manually change the ownership & permissions on /run/lock. Either way, confirm that the changes are successful.
[lisa@server run]# chown root:lock /run/lock
[lisa@server run]# chmod g+w lock
[lisa@server lock]# ll /run | grep lock
drwxrwxr-x  7 root           lock             200 Aug 13 14:03 lock
If you manually set the permissions, restart openHAB. Our devices are online, and we have lock files:
[lisa@seerver lock]# ll
total 12
-rw-r--r-- 1 root root 22 Aug 10 15:35 asound.state.lock
drwx------ 2 root root 60 Aug 10 15:30 iscsi
-rw-r--r-- 1 openhab openhab 11 Aug 13 14:03 LCK..ttyUSB-5
-rw-r--r-- 1 openhab openhab 11 Aug 13 14:03 LCK..ttyUSB-55
drwxrwxr-x 2 root lock 40 Aug 10 15:30 lockdev
drwx------ 2 root root 40 Aug 10 15:30 lvm
drwxr-xr-x 2 root root 40 Aug 10 15:30 ppp
drwxr-xr-x 2 root root 40 Aug 10 15:30 subsys