Quick script to list interface info for the VMs
#!/bin/bash
for vm in $(virsh list --name); do
    echo "Interfaces for VM: $vm"
    virsh domiflist "$vm"
    echo "--------------------------------"
done
Quick script to list interface info for the VMs
#!/bin/bash
for vm in $(virsh list --name); do
echo "Interfaces for VM: $vm"
virsh domiflist "$vm"
echo "--------------------------------"
done
I lost access to all of my Linux servers at work. And, unlike the normal report where nothing changed but xyz is now failing, I knew exactly what happened. A new access request had been approved about ten minutes previously. Looking at my ID, for some reason adding a new group membership changed account gid number to that new group. Except … that shouldn’t have actually dropped my access. If I needed the group to be my primary ID, I should have been able to use newgrp to switch contexts. Instead, I got prompted for a group password (which, yes, is a thing. No, no one uses it).
The hosts were set up to authenticate to AD using LDAP, and very successfully let me log in (or not, if I mistyped my password). They, however, would only see me as a member of my primary group. Well, today, I finally got a back door with sufficient access to poke around.
Turns out I was right — something was improperly configured so groups were not being read from the directory but rather implied from the gid value. I added the configuration parameter ldap_schema to instruct the server to use member instead of memberUid for memberships. I used rfc2307bis as that’s the value I was familiar with. I expect “AD” could be used as well, but figured we were well beyond AD 2008r2 and didn’t really want to dig farther into the nuanced differences between the two settings.
ldap_schema (string)
Specifies the Schema Type in use on the target LDAP server. Depending on the selected schema, the default attribute names retrieved from the servers may vary. The way that some attributes are handled may also differ.
Four schema types are currently supported:
The main difference between these schema types is how group memberships are recorded in the server. With rfc2307, group members are listed by name in the memberUid attribute. With rfc2307bis and IPA, group members are listed by DN and stored in the member attribute. The AD schema type sets the attributes to correspond with Active Directory 2008r2 values.
When sending configuration files to other people for reference, I like to redact any credential-type information … endpoints that allow you to post data without creds, auth configs, etc. Sometimes I replace the string with REDACTED and sometimes I just drop the line completely.
Make a copy of the config files elsewhere, then run sed
# Retain parameter but replace value with REDACTED
sed -i 's|http_post_url: "https://.*"|post_url: "REDACTED"|' *.yaml

# Remove line from config
sed -i '/authorization: Basic/d' *.yaml
We upgraded Anya’s laptop to Fedora 40, and Skype has evidently moved from an installable RPM to a snap package. Which didn’t work with the firewall rules we built earlier in the year (video and audio calls would not connect); and, worse, nothing logs out. Looks like the netfilter kernel logging isn’t enabled
![]()
Enabled the logging:
echo 1 | sudo tee /proc/sys/net/netfilter/nf_log_all_netns
And, voila, we’ve got log records from nftables. And now Skype works … so I don’t know what to add. Sigh!
Column is an interesting command – it will turn delimited text into, well, columns. Simply tell it you want a table (-t) and indicate what separator to use (-s). Optionally, you can add table column headers
[lisa@linux01 ~/]# cat /etc/group | column -t -s :
root              x  0      root,lisa
bin               x  1
daemon            x  2
...
passim            x  987
Alternately, you can use -J to get JSON-formatted output. Here you need the –table-columns as a comma delimited list of column names:
[lisa@linux01 ~/]# cat /etc/group | column -J -s : --table-columns "group,password,gid,members"
{
   "table": [
      {
         "group": "root",
         "password": "x",
         "gid": "0",
         "members": "root,lisa"
      },{
         "group": "bin",
         "password": "x",
         "gid": "1",
         "members": null
      },{
         "group": "daemon",
         "password": "x",
         "gid": "2",
         "members": null
      },{
         "group": "passim",
         "password": "x",
         "gid": "987",
         "members": null
      }
   ]
}
Which can then be parsed with jq
[lisa@linux01 ~/]# cat /etc/group | column -J -s : --table-columns "group,password,gid,members" | jq '[.table[] | {group: .group, members: .members}]'
[
  {
    "group": "root",
    "members": "root,lisa"
  },
  {
    "group": "bin",
    "members": null
  },
  {
    "group": "daemon",
    "members": null
  },
  {
    "group": "passim",
    "members": null
  }
]
This process presumes you have generated a signing key (/root/signing/MOK.priv and /root/signing/MOK.der) that has been registered for signing modules.
################################################################################
## Install from Repo and Sign Modules
################################################################################
yum install https://dl.fedoraproject.org/pub/epel/epel-release-latest-8.noarch.rpm
yum install kernel-devel

# Install kmod version of ZS
yum install https://zfsonlinux.org/epel/zfs-release-2-3$(rpm --eval "%{dist}").noarch.rpm
dnf config-manager --disable zfs
dnf config-manager --enable zfs-kmod
yum install zfs

# And autoload
echo zfs >/etc/modules-load.d/zfs.conf

# Use rpm -ql to list out the kernel modules that this version of ZFS uses -- 2.1.x has quite a few of them, and they each need to be signed
# Sign zfs.ko and spl.ko in current kernel
/usr/src/kernels/$(uname -r)/scripts/sign-file sha256 /root/signing/MOK.priv /root/signing/MOK.der /lib/modules/$(uname -r)/weak-updates/zfs/zfs/zfs.ko
/usr/src/kernels/$(uname -r)/scripts/sign-file sha256 /root/signing/MOK.priv /root/signing/MOK.der /lib/modules/$(uname -r)/weak-updates/zfs/spl/spl.ko
# And sign the bunch of other ko files in the n-1 kernel rev (these are symlinked from the current kernel)
/usr/src/kernels/$(uname -r)/scripts/sign-file sha256 /root/signing/MOK.priv /root/signing/MOK.der /lib/modules/4.18.0-513.18.1.el8_9.x86_64/extra/zfs/avl/zavl.ko
/usr/src/kernels/$(uname -r)/scripts/sign-file sha256 /root/signing/MOK.priv /root/signing/MOK.der /lib/modules/4.18.0-513.18.1.el8_9.x86_64/extra/zfs/icp/icp.ko
/usr/src/kernels/$(uname -r)/scripts/sign-file sha256 /root/signing/MOK.priv /root/signing/MOK.der /lib/modules/4.18.0-513.18.1.el8_9.x86_64/extra/zfs/lua/zlua.ko
/usr/src/kernels/$(uname -r)/scripts/sign-file sha256 /root/signing/MOK.priv /root/signing/MOK.der /lib/modules/4.18.0-513.18.1.el8_9.x86_64/extra/zfs/nvpair/znvpair.ko
/usr/src/kernels/$(uname -r)/scripts/sign-file sha256 /root/signing/MOK.priv /root/signing/MOK.der /lib/modules/4.18.0-513.18.1.el8_9.x86_64/extra/zfs/unicode/zunicode.ko
/usr/src/kernels/$(uname -r)/scripts/sign-file sha256 /root/signing/MOK.priv /root/signing/MOK.der /lib/modules/4.18.0-513.18.1.el8_9.x86_64/extra/zfs/common/zcommon.ko
/usr/src/kernels/$(uname -r)/scripts/sign-file sha256 /root/signing/MOK.priv /root/signing/MOK.der /lib/modules/4.18.0-513.18.1.el8_9.x86_64/extra/zfs/zstd/zzstd.ko

# Verify they are signed now
modinfo -F signer /usr/lib/modules/$(uname -r)/weak-updates/zfs/zfs/zfs.ko
modinfo -F signer /usr/lib/modules/$(uname -r)/weak-updates/zfs/spl/spl.ko

modinfo -F signer /lib/modules/4.18.0-513.18.1.el8_9.x86_64/extra/zfs/avl/zavl.ko
modinfo -F signer /lib/modules/4.18.0-513.18.1.el8_9.x86_64/extra/zfs/icp/icp.ko
modinfo -F signer /lib/modules/4.18.0-513.18.1.el8_9.x86_64/extra/zfs/lua/zlua.ko
modinfo -F signer /lib/modules/4.18.0-513.18.1.el8_9.x86_64/extra/zfs/nvpair/znvpair.ko
modinfo -F signer /lib/modules/4.18.0-513.18.1.el8_9.x86_64/extra/zfs/unicode/zunicode.ko
modinfo -F signer /lib/modules/4.18.0-513.18.1.el8_9.x86_64/extra/zfs/zcommon/zcommon.ko
modinfo -F signer /lib/modules/4.18.0-513.18.1.el8_9.x86_64/extra/zfs/zstd/zzstd.ko

# Reboot
init 6

# And we've got ZFS, so create the pool
zpool create pgpool sdc
zfs create zpool/zdata
zfs set compression=lz4 zpool/zdata

zfs get compressratio zpool/zdata
zfs set mountpoint=/zpool/zdata zpool/zdata
What happens if you only sign zfs.ko? All sorts of errors that look like there’s some sort of other problem — zfs will not load. It will tell you the required key is not available
May 22 23:42:44 sandboxserver systemd-modules-load[492]: Failed to insert 'zfs': Required key not available
Using insmod to try to manually load it will tell you there are dozens of unknown symbols:
May 22 23:23:23 sandboxserver kernel: zfs: Unknown symbol ddi_strtoll (err 0)
May 22 23:23:23 sandboxserver kernel: zfs: Unknown symbol spl_vmem_alloc (err 0)
May 22 23:23:23 sandboxserver kernel: zfs: Unknown symbol taskq_empty_ent (err 0)
May 22 23:23:23 sandboxserver kernel: zfs: Unknown symbol zone_get_hostid (err 0)
May 22 23:23:23 sandboxserver kernel: zfs: Unknown symbol tsd_set (err 0)
But the real problem is that there are unsigned modules so … there are unknown symbols. But not because something is incompatible. Just because the module providing that symbol will not load.
This process presumes you have generated a signing key (/root/signing/MOK.priv and /root/signing/MOK.der) that has been registered for signing modules.
# Install prerequisites
dnf install --skip-broken epel-release gcc make autoconf automake libtool rpm-build libtirpc-devel libblkid-devel libuuid-devel libudev-devel openssl-devel zlib-devel libaio-devel libattr-devel elfutils-libelf-devel kernel-devel-$(uname -r) python3 python3-devel python3-setuptools python3-cffi libffi-devel git ncompress libcurl-devel

dnf install --skip-broken --enablerepo=epel --enablerepo=powertools python3-packaging dkms

# Clone OpenZFS repo
git clone https://github.com/openzfs/zfs
cd zfs
# generally stay in the main branch, but if you want to use the latest then check out the staging branch
# git checkout zfs-2.2.5-staging
./autogen.sh
./configure
make
make install

# Sign the kernel modules
/usr/src/kernels/$(uname -r)/scripts/sign-file sha256 /root/signing/MOK.priv /root/signing/MOK.der /lib/modules/$(uname -r)/extra/zfs.ko
/usr/src/kernels/$(uname -r)/scripts/sign-file sha256 /root/signing/MOK.priv /root/signing/MOK.der /lib/modules/$(uname -r)/extra/spl.ko

# And verify the modules are signed
modinfo -F signer /usr/lib/modules/$(uname -r)/extra/zfs.ko
modinfo -F signer /usr/lib/modules/$(uname -r)/extra/spl.ko
The new servers being built at work use SecureBoot — something that you don’t even notice 99% of the time. But that 1% where you are doing something “strange” like trying to use OpenZFS … well, you’ve got to sign any kernel modules that you need to use. Just installing them doesn’t work — they won’t load.
To sign a kernel module, first you need to create a signing key and use mokutil to import it into the machine owner key store.
cd /root
mkdir signing
cd signing
openssl req -new -x509 -newkey rsa:2048 -keyout MOK.priv -outform DER -out MOK.der -nodes -days 36500 -subj "/CN=MyOrg/"

mokutil --import MOK.der
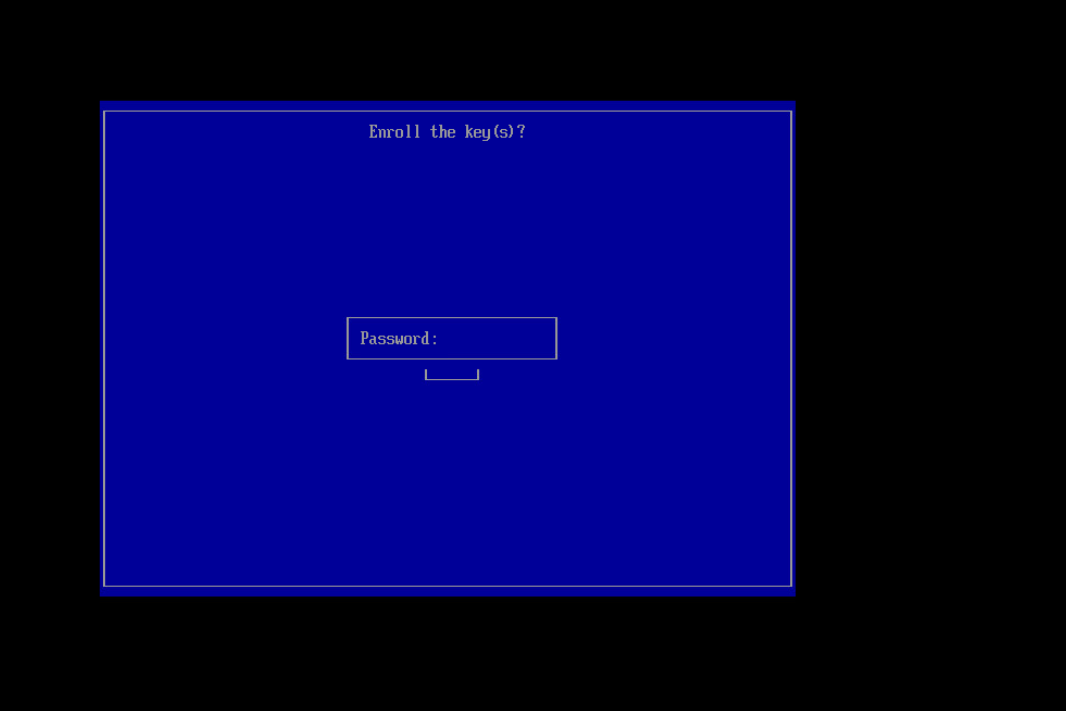
When you run mokutil, you will set a password. This password will be needed to complete importing the key to the machine.

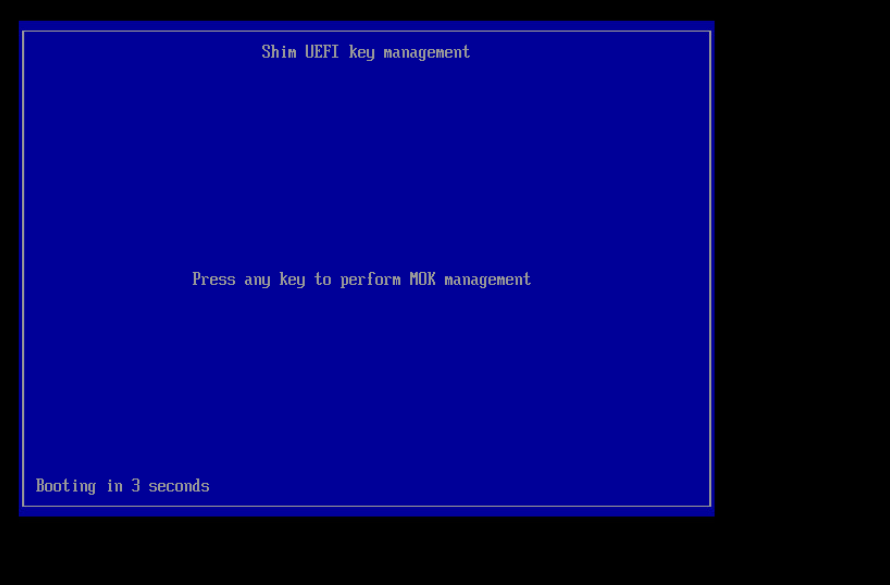
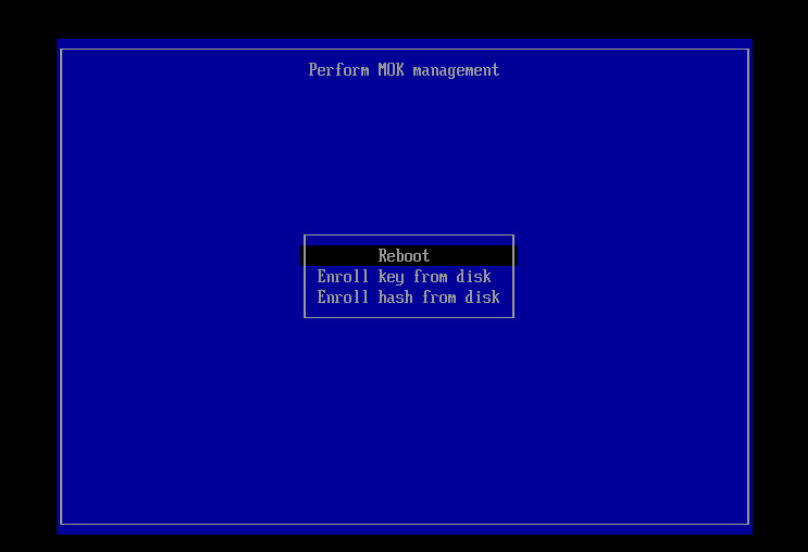
Get access to the console — out of band management, vSphere manager, stand in front of the server. Reboot, and there will be a “press any key” screen for ten seconds that begins the import process. Press any key!
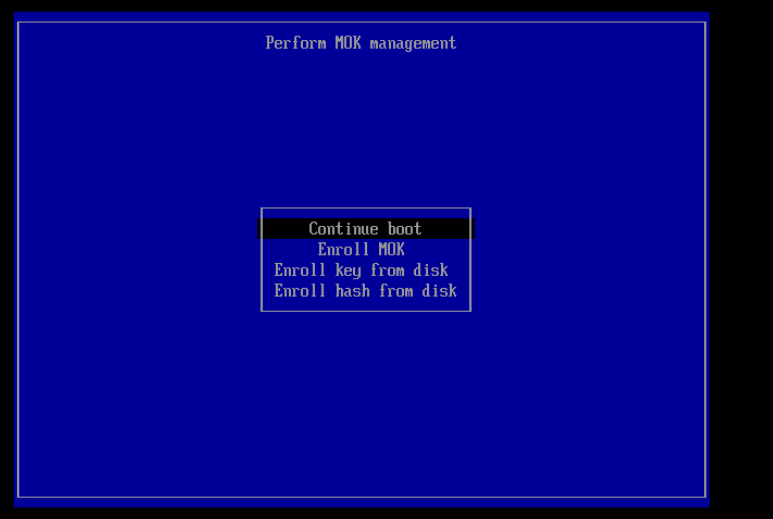
Select “Enroll MOK”
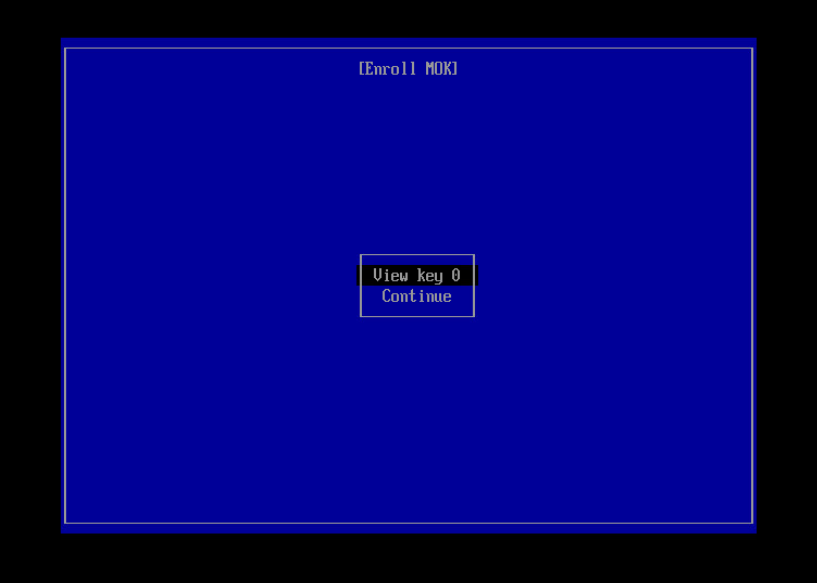
View the key and verify it is the right one, then use ‘Continue’ to import it
Enter the password used when you ran mokutil
Then reboot
To verify your key has been successfully enrolled:
mokutil --list-enrolled
I often need to quickly see if a cert is going to expire — I’ve got nice monitoring scripts too, but something that I can run from the command line right now
echo -n Q | openssl s_client -connect $HOST:$PORT | openssl x509 -noout -dates
RedHat is phasing out ZFS – there are several reasons for this move, but primarily ZFS is a closed source Solaris (now Oracle) codebase. While OpenZFS exists, it’s not quite ‘the same’. RedHat’s preferred solution is Virtual Data Optimizer (VDO). This page walks through the process of installing PostgreSQL and creating a database cluster on VDO and installing TimescaleDB extension on the database cluster for RedHat Enterprise 8 (RHEL8)
Before we create a VDO disk, we need to install it
yum install vdo kmod-kvdo |
Then we need to create a vdo – here a VDO named ‘PGData’ is created on /dev/sdb – a 9TB volume on which we will hold 16TB
vdo create --name=PGData --device=/dev/sdb --vdoLogicalSize=16T |
Check to verify that the object was created – it is /dev/mapper/PGData in this instance
vdo list |
Now format the volume using xfs.
mkfs.xfs /dev/mapper/PGData |
And finally add a mount point
# Create the mount point foldermkdir /pgpool# Update fstab to mount the new volume to that mount pintcat /etc/fstab/dev/mapper/PGData /pgpool xfs defaults,x-systemd.requires=vdo.service 0 0# Load the updated fstabsystemctl daemon-reload# and mount the volumemount -a |
it should be mounted at ‘/pgpool/’
The main reason for using VDO with Postgres is because of its compression feature – this is automatically enabled, although we may need to tweak settings as we test it.
We now have a place in our pool where we want our Postgres database to store its data. So let’s go ahead and install PostgreSQL,
here we are using RHEL8 and installing PostgreSQL 12
# Install the repository RPM:dnf install -y https://download.postgresql.org/pub/repos/yum/reporpms/EL-8-x86_64/pgdg-redhat-repo-latest.noarch.rpmdnf clean all# Disable the built-in PostgreSQL module:dnf -qy module disable postgresql# Install PostgreSQL:dnf install -y postgresql12-server |
Once the installation is done we need to initiate the database cluster and start the server . Since we want our Postgres to store data in our VDO volume we need to initialize it into our custom directory, we can do that in many ways,
In all cases we need to make sure that the mount point of our zpool i.e., ‘/pgpool/pgdata/’ is owned by the ‘postgres’ user which is created when we install PostgreSQL. We can do that by running the below command before running below steps for starting the postgres server
mkdir /pgpool/pgdatachown -R postgres:postgres /pgpool |
Customize the systemd service by editing the postgresql-12 unit file and updateding the PGDATA environment variable
vdotest-uos:pgpool # grep Environment /usr/lib/systemd/system/postgresql-12.service# Note: avoid inserting whitespace in these Environment= lines, or you mayEnvironment=PGDATA=/pgpool/pgdata |
and then initialize, enable and start our server as below
/usr/pgsql-12/bin/postgresql-12-setup initdbsystemctl enable postgresql-12systemctl start postgresql-12 |
Here ‘/usr/pgsql-12/bin/’ is the bin directory of postgres installation you can substitute it with your bin directory path.
or
We can also directly give the data directory value while initializing db using below command
/usr/pgsql-12/bin/initdb -D /pgpool/pgdata/ |
and then start the server using
systemctl start postgresql-12 |
Now we have installed postgreSQL and started the server, we will install the Timescale extension for Postgres now.
add the time scale repo with below command
tee /etc/yum.repos.d/timescale_timescaledb.repo <<EOL[timescale_timescaledb]name=timescale_timescaledbbaseurl=https://packagecloud.io/timescale/timescaledb/el/8/\$basearchrepo_gpgcheck=1gpgcheck=0enabled=1gpgkey=https://packagecloud.io/timescale/timescaledb/gpgkeysslverify=1sslcacert=/etc/pki/tls/certs/ca-bundle.crtmetadata_expire=300EOLsudo yum update -y |
then install it using below command
yum install -y timescaledb-postgresql-12 |
After installing we need to add ‘timescale’ to shared_preload_libraries in our postgresql.conf, Timescale gives us ‘timescaledb-tune‘ which can be used for this and also configuring different settings for our database. Since we initialize our PG database cluster in a custom location we need to point the direction of postgresql.conf to timescaledb-tune it also requires a path to our pg_config file we can do both by following command.
timescaledb-tune --pg-config=/usr/pgsql-12/bin/pg_config --conf-path=/pgpool/pgdata/postgresql.conf |
After running above command we need to restart our Postgres server, we can do that by one of the below commands
systemctl restart postgresql-12 |
After restarting using one of the above commands connect to the database you want to use Timescale hypertables in and run below statement to load Timescale extension
CREATE EXTENSION IF NOT EXISTS timescaledb CASCADE; |
you can check if Timescale is loaded by passing ‘\dx’ command to psql which will load the extension list.
in order to configure PostgreSQL to allow remote connection we need to do couple of changes as below