Month: June 2019

Drawing a rectangle/square (or ellipse/circle) in Gimp

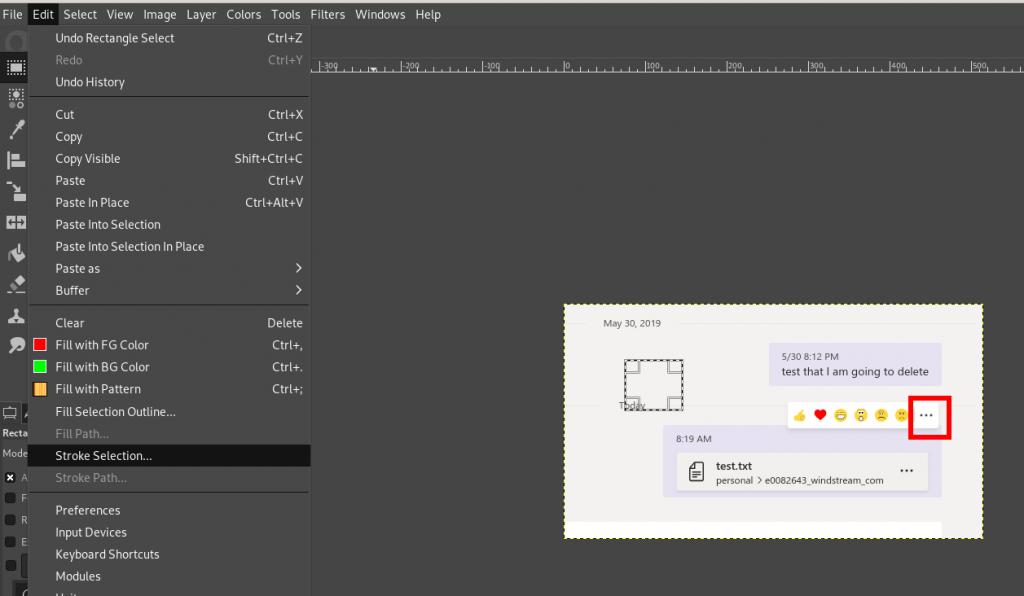
I finally installed the larger hard drive to my laptop (1TB SSD!!), and I now have enough space for a Windows partition, a Linux partition, and a data partition that is used by both systems. I’ve always had a handful of items on my “Linux misses” list, and image editing is one of them. I use Gimp in both Linux & Windows when I want to do “fancy” image editing — especially blurring out text when composing documentation — but I love the simplicity of MS Paint for adding text and shapes to images (my red “click this one” and purple “look at this section” rectangles). And there’s no readily obvious way to just draw a rectangle in Gimp. At one point, I had a whatever-it-is plugin/macro/function that allowed me to draw all sorts of complex shapes. But, really, I just want to put a red rectangle on a screen print. Found it!

Use the selection tool to draw a rectangle or ellipse; from the “Edit” menu, select “Stroke Selection”. This adds a pencil/paintbrush stroke along the selection boundary.

Iterating through files/folders with spaces in name using find in bash

Ran into a problem using Sphinx to document some Python modules and scripts that Scott put together for OpenHAB. They’re making some changes to the files to get Sphinx to process them, thus making copies of the original code. Problem is, some of the folders just weren’t showing up in the copy. Needed to change IFS in order to tokenize the find results into full paths that don’t break on spaces in file or folder names.

SAVEDIFS=$IFS
IFS=$(echo -en "\n\b")

for DIRNAME in $(find "$COMMUNITY_DIR" -maxdepth 1 -type d 2>/dev/null); do
     echo $DIRNAME
done
IFS=$SAVEDIFS

Did you know … there are now reactions in Teams?

If you hover your mouse over the upper right-hand corner of a post – where the little thumbs-up used to be

You’ll see a reaction bar. Click one of the emojis to “react” to a post.

Now you’ll see reactions on a post instead of just thumbs-up.

When a post receives different reactions, you’ll see icons for each reaction and a number showing you how many people selected each reaction.

Did you know … you can post announcements in Teams?

Teams announcements are another way to bring attention to a specific post. This doesn’t address the desire to pin a post so it’s always visible in the channel (click the link and vote if that’s something you want to do too).

When you are in the advanced editor (click “Format” or use Ctrl-Shift-I), you will see a drop-down to change conversation posts to an announcement.

When creating an announcement, the editor will have a banner at the top. You can put text in the banner and customize the banner background. Click either the color selector or the image selector in the bottom right-hand corner of the banner.

You can upload a custom image – you’ll want something that is a long, horizontal rectangle. Select “Upload an image” and select the file you want to use as the background.

You’ll probably need to crop the image – you can adjust which portion of the image is shown and zoom into the image as needed. Click “Done” to accept your crop selections.

Compose the rest of the message as normal – you can add a sub-heading and any of the message content available in regular posts. Post the announcement

The post will have a little megaphone logo (this doesn’t show up as a filter option yet, but I expect it will be added in the future) and the banner will make your post stand out in the conversation listing.

They make your post stand out with a caveat – just like marking all of your posts as important, announcements lose their efficacy when every post is an announcement. Use sparingly!


Git Commands

There are a few git commands that we use when working with the OpenHAB and helper library repositories. The OpenHAB Eclipse project sets uses a split push/pull repository where the *fetch* repo is the organization and the *push* repo is your personal repo. This is reasonable because you do not have permissions to write to the organizational repository. You can use the same split-repository setup for other projects. Clone the project either from the organization’s repo, and then change the push URL to your personal repository.

# Show list of remotes
[lisa@linux ~]# git remote -v
origin https://github.com/openhab-scripters/openhab-helper-libraries (fetch)
origin https://github.com/openhab-scripters/openhab-helper-libraries (push)

# Set push remote to PERSONAL repository
[lisa@linux ~]# git remote set-url –push origin https://github.com/ljr55555/openhab-helper-libraries

# Show list of remotes — verification step
[lisa@linux ~]# git remote -v
origin https://github.com/openhab-scripters/openhab-helper-libraries (fetch)
origin https://github.com/ljr55555/openhab-helper-libraries (push)

While the split repository setup prevents accidentally attempting to push changes to a repo to which you lack write access, I find it a little confusing. Instead, I add specific repos for ORG (the organizational repo) and my personal repo.
The drawback to this configuration is that you *can* attempt to push changes directly to the organization repo — which will either yield an error because you lack access or will inadvertently publish code in the org repo because you don’t lack access.

# Add ORG repo with organizational repo URL
[lisa@linux ~]# git remote add ORG https://github.com/openhab-scripters/openhab-helper-libraries
# Add LJR repo with personal fork URL
[lisa@linux ~]# git remote add LJR https://github.com/ljr55555/openhab-helper-libraries
[lisa@linux ~]# git remote -v
LJR https://github.com/ljr55555/openhab-helper-libraries (fetch)
LJR https://github.com/ljr55555/openhab-helper-libraries (push)
ORG https://github.com/openhab-scripters/openhab-helper-libraries (fetch)
ORG https://github.com/openhab-scripters/openhab-helper-libraries (push)
origin https://github.com/openhab-scripters/openhab-helper-libraries (fetch)
origin https://github.com/ljr55555/openhab-helper-libraries (push)

# Scenario: Someone has updated ORG master branch
# I want to incorporate those changes into PERSONAL master branch and push them into my repo
[lisa@linux ~]# git checkout master # Switch to your local master branch
[lisa@linux ~]# git fetch ORG/master # Get changes from Organization master
[lisa@linux ~]# git rebase ORG/master # Apply those changes to local master
[lisa@linux ~]# git push –force LJR master # Overwrite personal repo master with updated info

# Scenario: Someone has updated ORG master branch.
# I want to incorporate those changes in PERSONAL lucid-migration branch
[lisa@linux ~]# git checkout master # Switch to your local master branch
[lisa@linux ~]# git fetch ORG/master # Get changes from Organization master
[lisa@linux ~]# git rebase ORG/master # Apply those changes to local master
[lisa@linux ~]# git checkout lucid-migration # Switch back to your local lucid-migration branch
[lisa@linux ~]# git rebase –preserve-merges master # Rebase your local lucid-migration (checked out branch) onto local master
[lisa@linux ~]# git push –force-with-lease LJR lucid-migration # Overwrite personal repo lucid-migration branch with updated info


And a few misc commands that I want to remember
# Check username and email
[lisa@linux ~]# git config –list

# Set username and e-mail address
[lisa@linux ~]# git config –global user.name “FIRST_NAME LAST_NAME”
[lisa@linux ~]# git config –global user.email “MY_NAME@example.com”

# merge gone bad, bail!
[lisa@linux ~]# git merge –abort

# Forgot to add sign-off on commit
[lisa@linux ~]# git commit –amend
Finding Block ID

I upgraded my Fedora kernel to 5.1 and the secondary disk mounted to /var disappeared. I use the old-school device notation in fstab;  when a disk comes up with a different name, the partition fails to mount. I wanted to change fstab to use a UUID. But first I needed to find the UUID. Enter blkid

[root@linux123 ~]# blkid /dev/sdb1
/dev/sdb1: LABEL=”mnt-var” UUID=”50545e50-75c5-45q5-95b5-34f5456515d5″ TYPE=”ext4″ PARTUUID=”m50525d5-05″

The command output includes the device UUID which is used instead of the /dev/sdb# string.

#/dev/sdb1                                                                           /var ext4 nodev,nosuid 0 2
UUID=50545e50-75c5-45q5-95b5-34f5456515d5 /var ext4 nodev,nosuid 0 2

Rebooted and my partition mounted.

Using sed to insert lines into a file

I’ve used sed to replace file content — use a regex to replace the sendmail.cf line that routes mail directly with a smarthost directive

sed -i -e 's/^DS/DS\\\[mailTWB.example.com\\\]/' $strSendmailDirectory/etc/mail/sendmail.cf

But I’ve needed to prepend text to a file. Turns out sed acn do that. In fact, you can insert strings at any line number. Using “sed -i ‘5s;^;StringsToInsert\n;’ filename.xtn will insert “StringsToInsert\n” at line 5. To prepend text to a file, use “1s”

[lisa@fedora tmp]# cat test.txt;sed -i ‘5s;^;NewLine1\nNewLine2\n;’ test.txt;cat test.txt
Line 1
Line 2
Line 3
Line 4
Line 5
Line 6
**********
Line 1
Line 2
Line 3
Line 4
NewLine1
NewLine2
Line 5
Line 6
**********


I’ve also come across an oddity in the Win32 sed — the method I usually use to blow away everything after a newline for some reason blows away everything after the first line. Works fine on RHEL7 and Fedora29, so the quick solution is “run it from the Linux box”.

C:\temp>cat input.txt
line 1
line 2

line 3
line 4
line 5
C:\temp>sed -i ‘/^$/q’ input.txt&cat input.txt
line 1

Did you know … you can delete files shared in Teams chats?

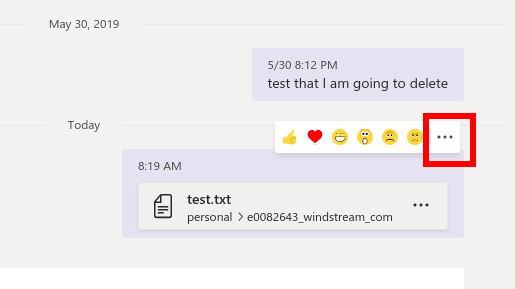
Deleting a file shared in a Teams space is straight-forward — go to the “Files” tab, click the ellipsis next to the file name, and select “Delete”. But when you do the same thing with files shared through Chat … there’s no delete option. If you click the ellipsis on the file’s card in the chat dialogue, still no delete option. That’s not because files cannot be deleted — how to delete chat files is just non-intuitive.

Hover your mouse over the message that was posted when your shared the file. You’ll see the reaction toolbar and another ellipsis. Click on that ellipsis.

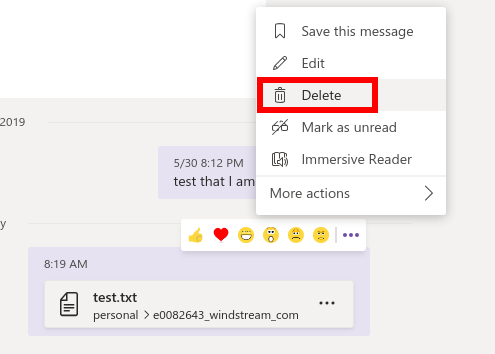
Here’s the option to delete the message. Deleting the message about the file deletes the file from the “Files” tab in the chat.

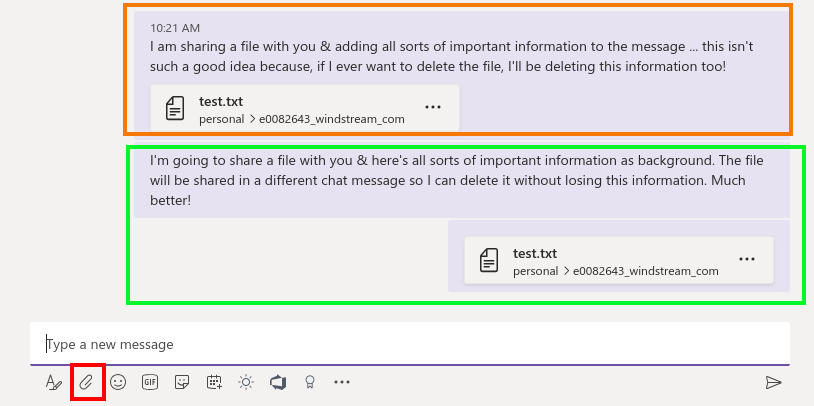
When you use the “Files” tab to share a file, a new conversation item is created. But, when you use the little paperclip at the bottom of the message composition dialogue to share a file … your file and message text can be combined into one item (upper rectangle with text and a file combined in one chat post). Not a problem until you want to remove the file from your chat and have to delete the conversation text too.


While it makes a lot of sense to provide context to a file — why are you sharing this, what am I meant to be doing with it — I recommend posting the context message and then posting a blank message into which the file is attached (lower rectangle with two independent chat posts). To delete test.txt in this scenario, I can hover my mouse over the post with the file, delete it, and leave the text within the chat history.

Note: Chat files are shared from OneDrive. You can select an existing OneDrive file, and files you upload through Teams are stored in the “Microsoft Teams Chat Files” folder of your OneDrive. Because it’s possible that you’ve shared the same file with multiple individuals, or that you still want the file even though it’s no longer shared with a specific person, deleting a file from the Teams chat does not delete it from OneDrive. If the file is no longer needed, make sure you remove the file from OneDrive as well.