Month: October 2018

Kernel Updates In GNOME

Since I usually do not install X11 ‘stuff’ on my Linux hosts — using the console interface — I do not have any experience installing kernel updates on “desktop” type systems. Evidently, the best practice is to drop out of the GUI into what I’d call init 3 then install the kernel updates. You can get random hangs and malfunctions when you attempt to update the kernel whilst in the graphic console.

Did you know … OneDrive for Business Retains Document History?

Have you ever really messed up a document? Like “man, I wish I could go back to what I had last week, because this is just W.R.O.N.G” messed up? Even if that’s just me, files can become unusable without perfectly human err’ing – ransomware encrypts the file, a colleague removes that paragraph you spent hours getting just right. Did you know that you can restore earlier versions of files stored to OneDrive for Business?

How? From the https://portal.office.com site, select OneDrive

Click the three dots that aren’t quite a hamburger menu – the ones between the file name and the modified date.

On the menu which appears, select “Version History”

A complete version history of the file will be displayed

You can select “Restore” to replace the “current” file with the selected version, or you can select “Open File” to view the file without replacing the “current” file. Voila!

Did you know … you can prevent meetings from being forwarded?

Have you ever had an attendee forward a meeting that was supposed to be confidential? Microsoft Exchange will notify you when a meeting attendee has forwarded your meeting; unless you are really close on that time machine project, what’s done is done. Unless … did you know that you can prevent the meeting from being forwarded? 

* The forwarding restriction is enforced on the mail client, so attendees outside the company may still be able to forward the meeting request. Additionally, there are ways to circumvent this forwarding restriction – e.g. meeting content can still be copied and pasted into a new appointment item. While restricting forwarding is a way to convey the confidentiality of the meeting and deter casual forwarding, this doesn’t guarantee eyes-only security.

How do I do it?

Right now, you can only restrict meeting forwarding when using the Outlook client on Windows or the Web – Mac, iOS, and Android client users will need to use the Web client.  

Outlook for Windows

This feature has not been deployed to all of the Office 365 channels as of this writing. The screen-shots below were created using an Office 365 installation with the monthly update channel. The semi-annual channel is slated to be updated in March 2019, so use Outlook Web until then!

Create a new meeting:

On the ribbon bar, select “Meeting”. You can restrict forwarding under the “Response Options” button.

Outlook Web

Create a new meeting:

Once you have added an attendee, a gear icon will be displayed above the attendee list.

Click the gear icon – by default, meetings can be forwarded. You can click “Allow forwarding” to prevent the meeting from being forwarded to others.

What does the recipient see?

Exchange Online recipients using Outlook Web will see a banner indicating that forwarding is disabled. The forward option will be grayed out.

Exchange online recipients using Outlook with the Monthly update channel will see the banner as well. Those will the semi-annual update channel will not see any indication that they cannot forward the invitation … in fact, their client will seemingly let them forward the meeting. But Exchange Online will refuse the message and they will get a non-delivery report indicating that the meeting could not be forwarded.

Recipients outside of Exchange online not notice any change — Gmail, for example, happily allows me to forward the meeting request.

Halloween 2018 – Unicorn Mane

I’m making a rainbow mane and tail for Anya’s unicorn custom. To make the mane, I took a piece of cardboard twice as long as I want the mane to be. Folded it in half and laid a piece of white ribbon over the fold (clipped it in place at first). And then wrapped yarn around the thing. A lot of yarn 🙂

Once the yarn was wrapped in the order she wanted, hand-stitched the yarn to the ribbon. After the yarn was attached, I cut the bottom. Stitching the ribbon onto the fur hood, we’ve got a mane.

Halloween 2018 – Unicorn Ears

Anya wants to be a unicorn for Halloween this year — I got some awesome white “fur” and made a shirt and pants from the same patterns I used for her lion costume last year. I just need a different headpiece and tail. I think I’m going to use the hood from a poncho pattern that I’ve got. Attach a mane, some ears, and a horn … voila, a unicorn.

To make the ears, I cut a basic form from comic book board (half-back … what I use to wrap and store my fabric pieces), glued a piece of pink satin to each piece of cardboard, and then wrapped the back with a cut of furry fabric. The fur is glued onto the pink satin. Lots of clips to hold the thing in place while the glue set …

Recovering A Seriously Screwed Up Fedora System

The graphical interface on a Fedora 28 laptop was unavailable — buggered up video device/driver. Change to what used to be called run level 3, and we could not log in! We know the root password, but it would not take it. Single user is password protected too — and we were unable to log in there.

Normal recovery process:

Get to the grub menu, highlight the kernel you want to boot, and hit ‘e’ to edit it. Scroll down. On line that starts with linux16, change “rhgb quiet” to say “rd.break enforcing=0”
ctrl-x to boot

Once you get a shell:
mount -o remount,rw /sysroot
chroot /sysroot

Voila, you’ve got access to your files. Use vi to edit whatever has the box seriously screwed up (passwd if your problem is that you don’t know the root password) and you’re set. We reset the root password just in case. Aaaand … we still couldn’t log in on init 1 or init 3! And at this point I was feeling stubborn about getting logged into the box.

Now you can tweak up the system so it is not using sulogin when booting into single user mode but that isn’t a good way to install network-sourced packages. For some reason, we had to disable selinux before we could log into anything other than the graphical target. I’m sure there is a policy we could have tweaked, but it was far easier to disable the thing, boot into the multi-user target, sort the video driver, and then boot into the graphical target.

Debugging An Active Directory Custom Password Filter

A few years ago, I implemented a custom password filter in Active Directory. At some point, it began accepting passwords that should be rejected. The updated code is available at https://github.com/ljr55555/OpenPasswordFilter and the following is the approach I used to isolate the cause of the failure.


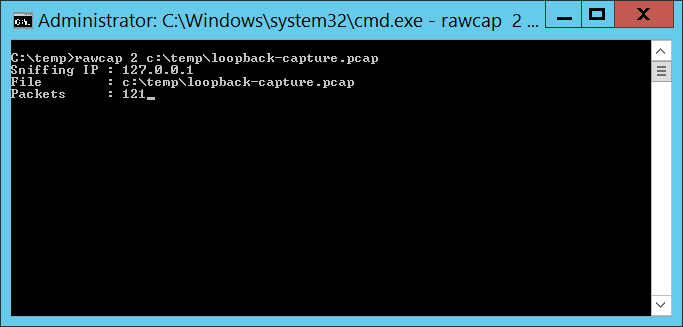
Technique #1 — Netcap on the loopback There are utilities that allow you to capture network traffic across the loopback interface. This is helpful in isolating problems in the service binary or inter-process communication. I used RawCap because it’s free for commercial use. There are other approaches too – or consult the search engine of your choice.

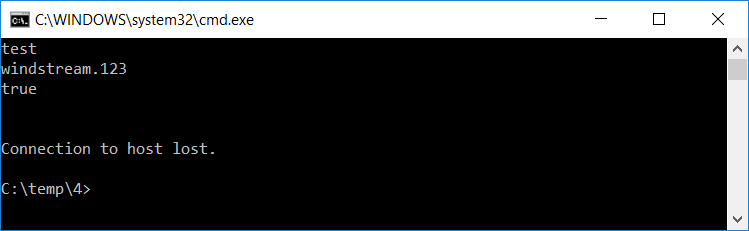
The capture file can be opened in Wireshark. The communication is done in clear text (which is why I bound the service to localhost), so you’ll see the password:
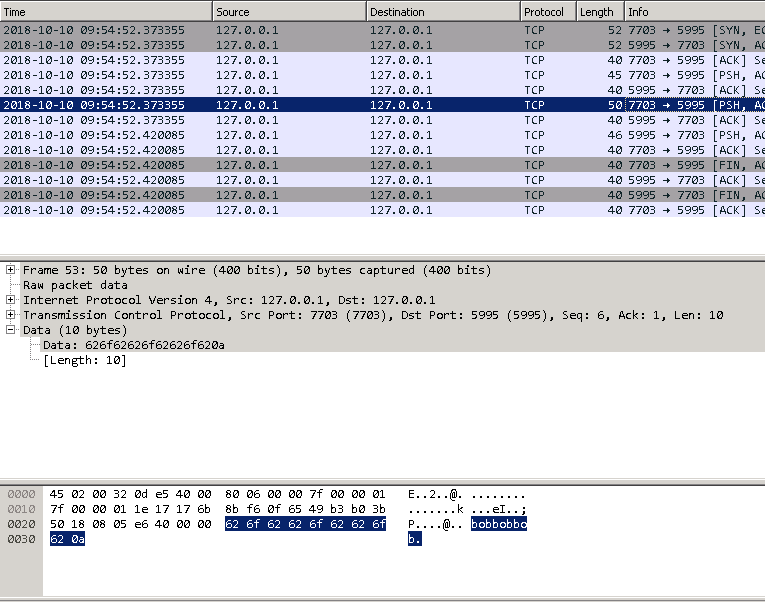
And response

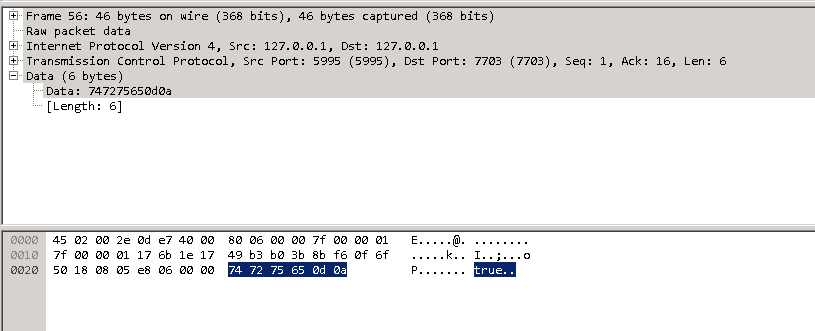
To ensure process integrity, the full communication is for the client to send “test\n” then “PasswordToTest\n”, after which the server sends back either true or false.

Technique #2 — Debuggers Attaching a debugger to lsass.exe is not fun. Use a remote debugger — until you tell the debugger to proceed, the OS is pretty much useless. And if the OS is waiting on you to click something running locally, you are quite out of luck. A remote debugger allows you to use a functional operating system to tell the debugger to proceed, at which time the system being debugged returns to service.

Install the SDK debugging utilities on your domain controller and another box. Which SDK debugging tool? That’s going to depend on your OS. For Windows 10 and Windows Server 2012 R2, the Windows 10 SDK (Debugging Tools For Windows 10) work. https://docs.microsoft.com/en-us/windows-hardware/drivers/debugger/debugger-download-tools or Google it.

On the domain controller, find the PID of LSASS and write it down (472 in my example). Check the IP address of the domain controller (10.104.164.110 in my example).

From the domain controller, run:

dbgsrv.exe -t tcp:port=11235,password=s0m3passw0rd

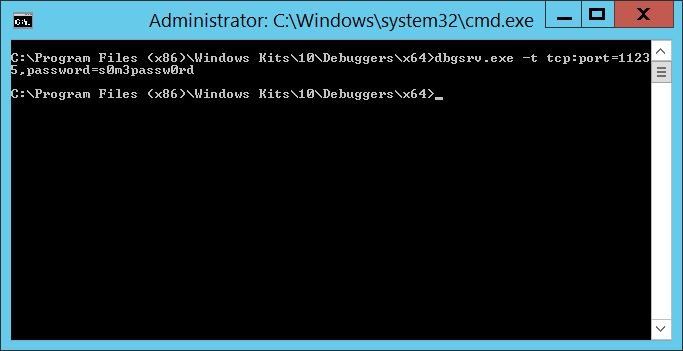
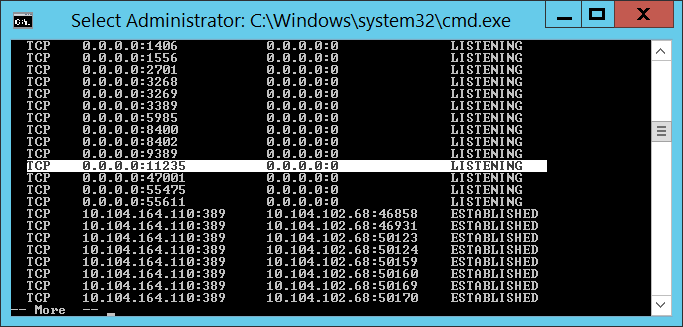
Where port=11235 can be any un-used port and password=s0m3passw0rd can be whatever string you want … you’ve just got to use the same values when you connect from the client. Hit enter and you’ve got a debugging server. It won’t look like it did anything, but you’ll see the port bound on netstat

And the binary running in taskman

From the other box, run the following command (substituting the correct server IP, port, password, and process ID):

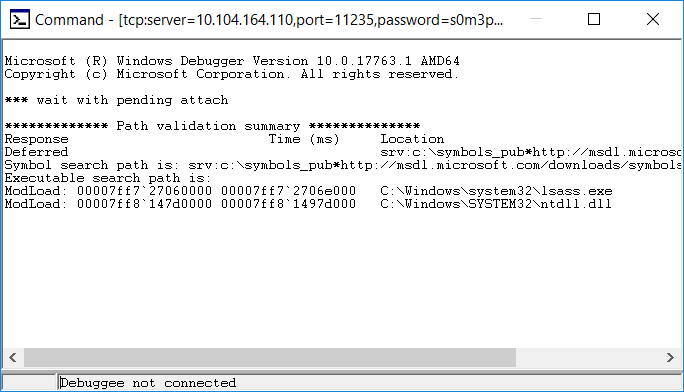
windbg.exe -y “srv:c:\symbols_pub*http://msdl.microsoft.com/downloads/symbols” -premote tcp:server=10.104.164.110,port=11235,password=s0m3passw0rd -p 472

This attaches your WinDBG to the debugging server & includes an internet-hosted symbol path. Don’t worry when it says “Debugee not connected” at the bottom – that just means the connection has not completed. If it didn’t connect at all (firewall, bad port number, bad password), you’d get a pop-up error indicating that the initial connection failed.

Wait for it … this may take a long time to load up, during which time your DC is vegged. But eventually, you’ll be connected. Don’t try to use the DC yet – it will just seem hung, and trying to get things working just make it worse. Once the debugger is connected, send ‘g’ to the debugger to commence – and now the DC is working again.

Down at the bottom of the command window, there’s a status (0:035> below) followed by a field where you enter commands. Type the letter g in there & hit enter.

The status will then say “Debuggee is running …” and you’re server is again responsive to user requests.

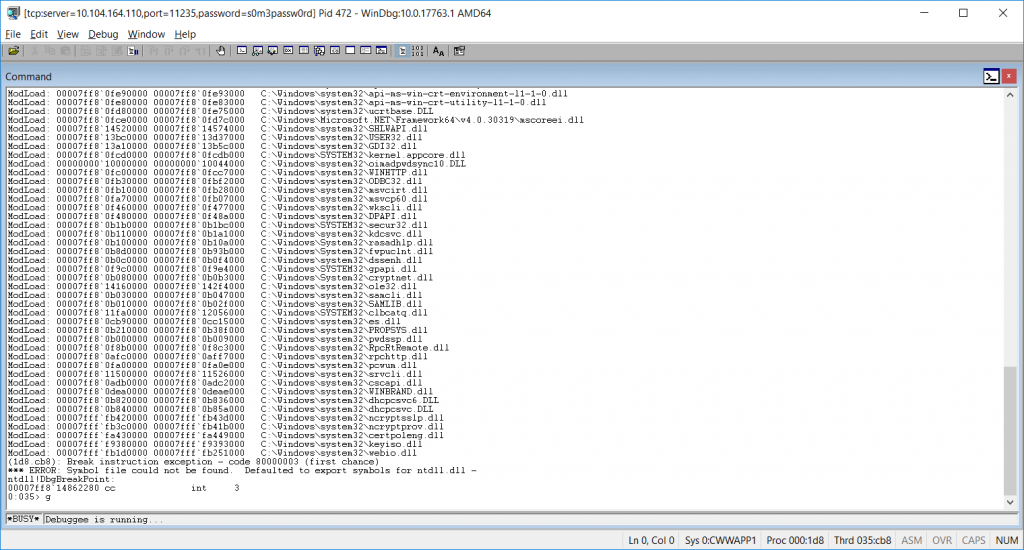
When you reach a failing test, pause the debugger with a break command (Debug=>Break, or Ctrl-Break) which will veg out the DC again. You can view the call stack, memory, etc.

To search the address space for an ASCII string use:

!for_each_module s -[1]a ${@#Base} L?${@#Size}  "bobbob"

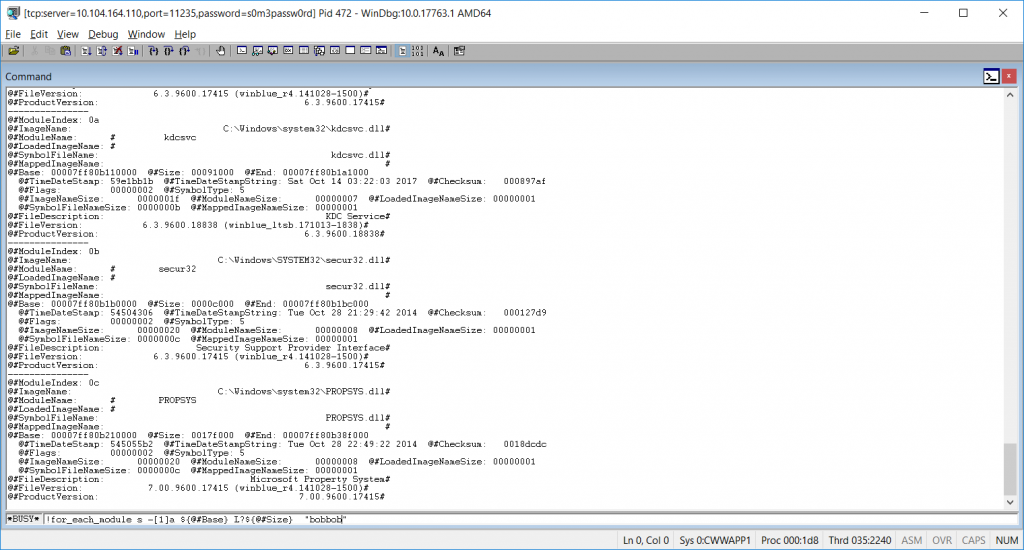
Where “bobbob” is the password I had tested.

Alternately, run the “psychodebug” build where LARGEADDRESSAWARE is set to NO and you can search just the low 2-gig memory space (32-bit process memory space):

s -a 0 L?80000000 "bobbob"

* The true/false server response is an ASCII string, not a Boolean. *

Once you have found what you are looking for, “go” the debugger (F5, Debug=>Go, or  ‘g’) to restore the server to an operational state. Break again when you want to look at something.

To disconnect, break and send “qd” to the debugger (quit and detach). If you do not detach with qd, the process being debugged terminates. Having lsass.exe terminate really freaks out the server, and it will go into an auto-recovery “I’m going to reboot in one minute” mode. It’ll come back, but detaching without terminating the process is a lot nicer.

Technique #3 – Compile a verbose version. I added a number of event log writes within the DLL (obviously, it’s not a good idea in production to log out candidate passwords in clear text!). While using the debugger will get you there eventually, half an hour worth of searching for each event (the timing is tricky so the failed event is still in memory when you break the debugger) … having each iteration write what it was doing to the event log was FAAAAAR simpler.

And since I’m running this on a dev DC where the passwords coming across are all generated from a load sim script … not exactly super-secret stuff hitting the event log.

Right now, I’ve got an incredibly verbose DLL on APP556 under d:\tempcsg\ljr\2\debugbuild\psychodebug\ … all of the commented out event log writes from https://github.com/ljr55555/OpenPasswordFilter aren’t commented out.

Stop the OpenPasswordFilter service, put the verbose DLL and executables in place, and reboot. Change some passwords, then look in the event viewer.

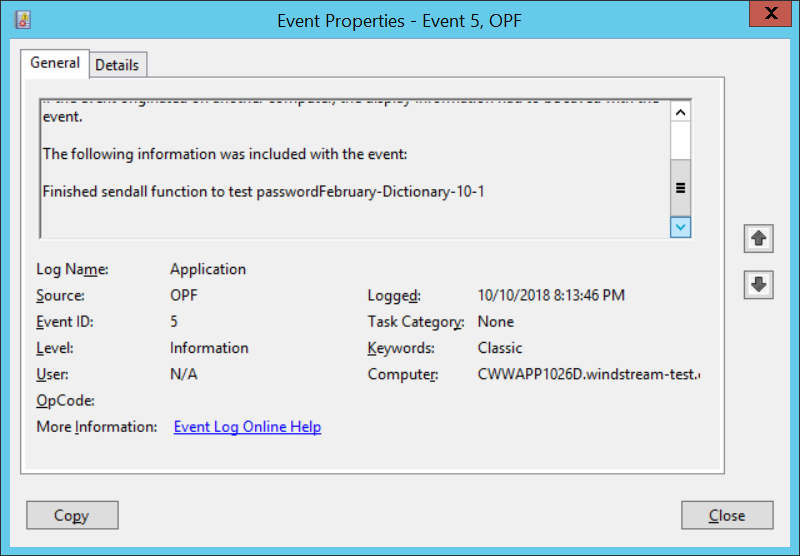
ERROR events are actual problems that would show up either way. INFORMATION events are extras. I haven’t bothered to learn how to properly register event sources in Windows yet 🙂 You can find the error content at the bottom of the “this isn’t registered” complaint:

You will see events for the following steps:

DLL starting CreateSocket

About to test password 123paetec123-Dictionary-1-2

Finished sendall function to test password123paetec123-Dictionary-1-2

Got t on test of paetec123-Dictionary-1-2

The final line will either say “Got t” for true or “Got f” for false.

Technique #4 – Running the code through the debugger. Whilst there’s no good way to get the “Notification Package” hook to run the DLL through the debugger, you can install Visual Studio on a dev domain controller and execute the service binary through the debugger. This allows you to set breakpoints and watch variable values as the program executes – which makes it a whole lot easier than using WinDBG to debug the production code.

Grab a copy of the source code – we’re going to be making some changes that should not be promoted to production, so I work on a temporary copy of the project and delete the copy once testing has completed.

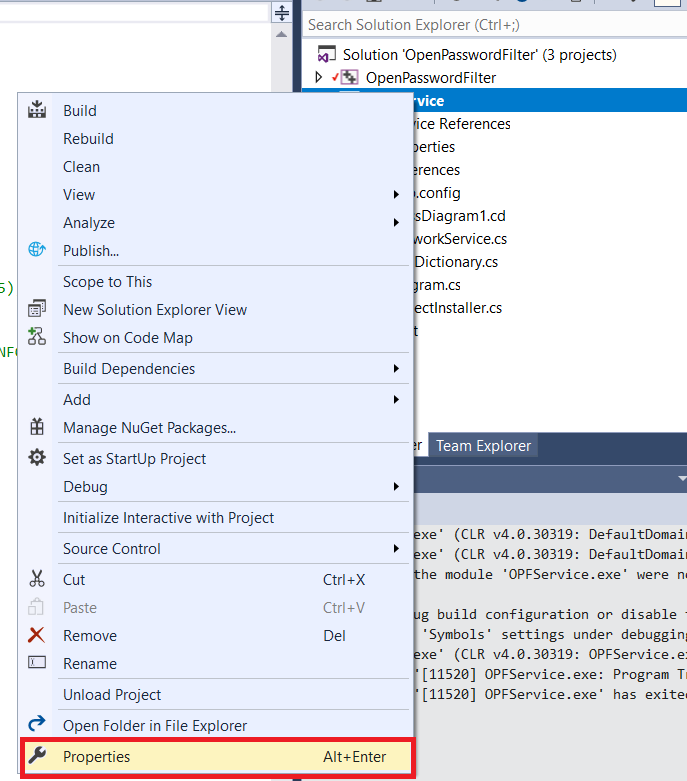
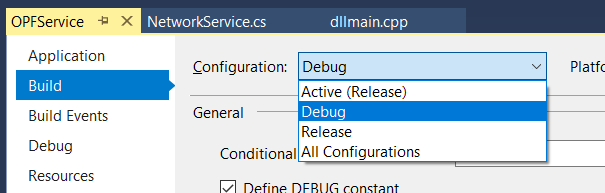
Open the project in Visual Studio. Right-click OPFService in the “Solution Explorer” and select “Properties”

Change the build configuration to “Debug”

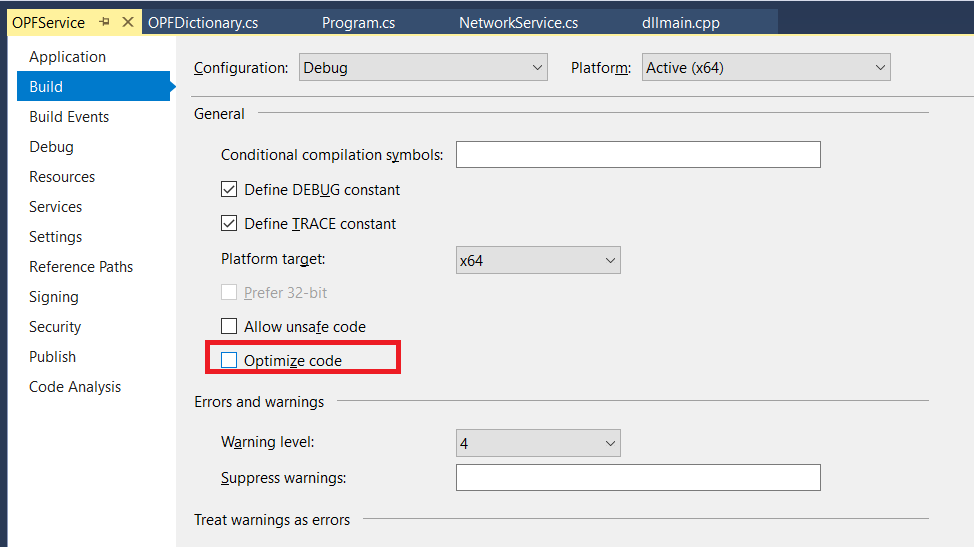
Un-check “Optimize code” – code optimization is good for production run, but it will wipe out variable values when you want to see them.

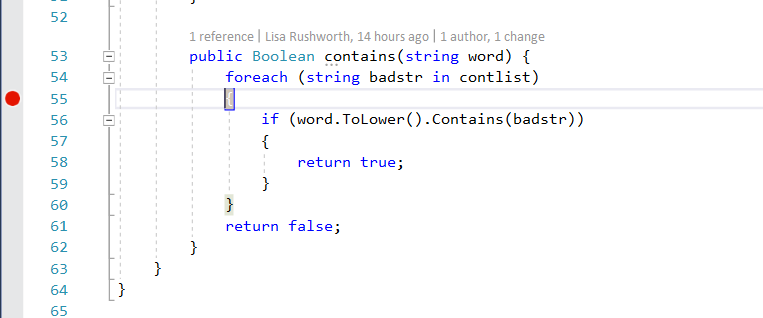
Set a breakpoint on execution – on the OPFDictionary.cs file, the loop checking to see if the proposed word is contained in the banned word list is a good breakpoint. The return statements are another good breakpoint as it pauses program execution right before a password test iteration has completed.

Build the solution (Build=>Build Solution). Stop the Windows OpenPasswordFilter service.

Launch the service binary through the debugger (Debug=>Start Debugging).

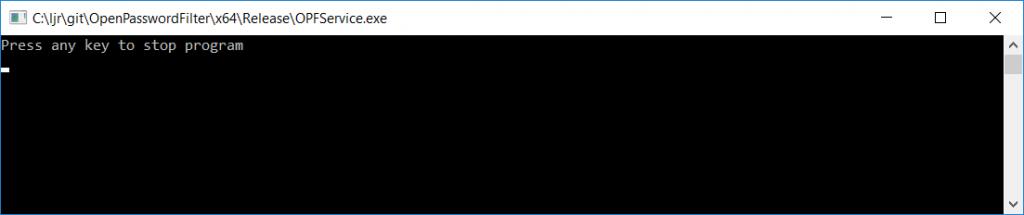
Because the program is being run interactively instead of through a service, you’ll get a command window that says “Press any key to stop the program”. Minimize this.

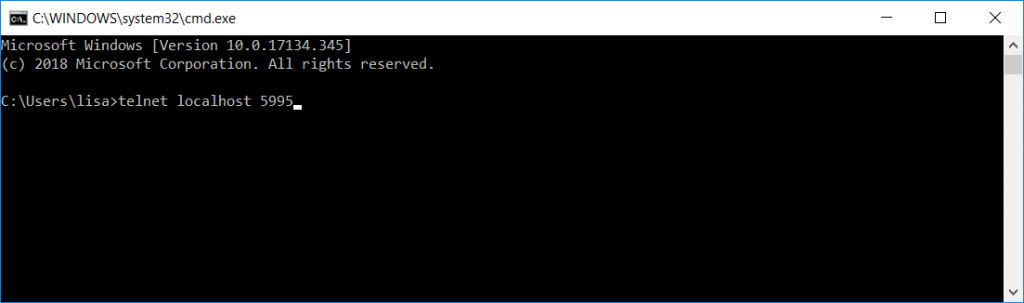
From a new command prompt, telnet to localhost on port 5995 (the telnet client is not installed by default, so you may need to use “Turn Windows features on or off” and enable the telnet client first).

Once the connection is established, use CTRL and ] to get into the telnet command prompt. Type set localecho … now you’ll be able to see what you are typing.

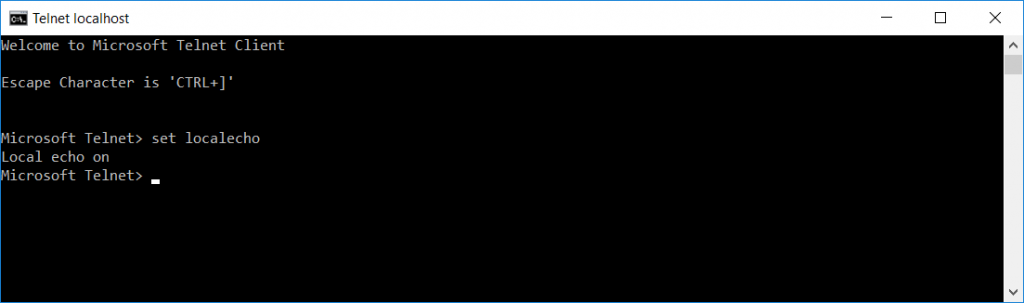
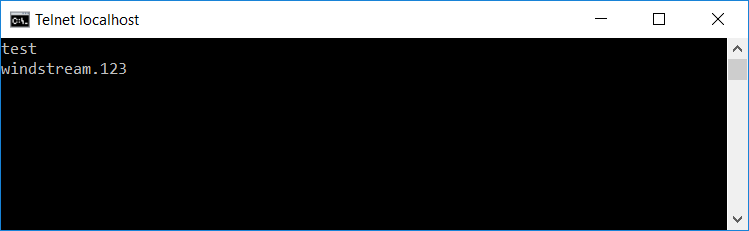
Hit enter again and you’ll return to the blank window that is your telnet client. Type test and hit enter. Then type a candidate password and hit enter.

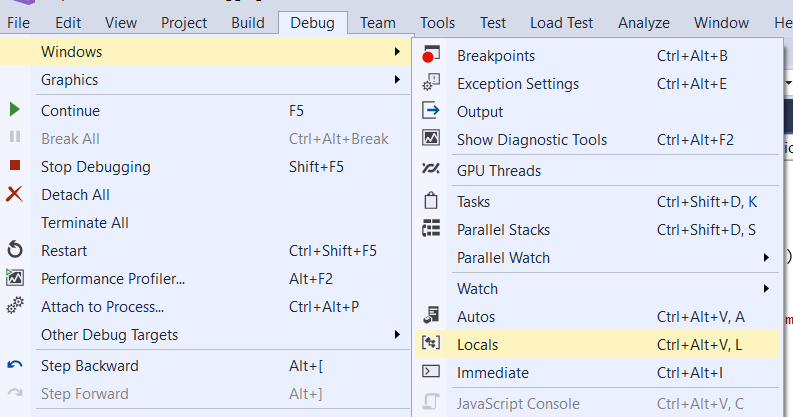
Program execution will pause at the breakpoint you’ve set. Return to Visual Studio. Select Debug =>Window=>Locals to open a view of the variable values

View the locals at the breakpoint, then hit F5 if you want to continue.

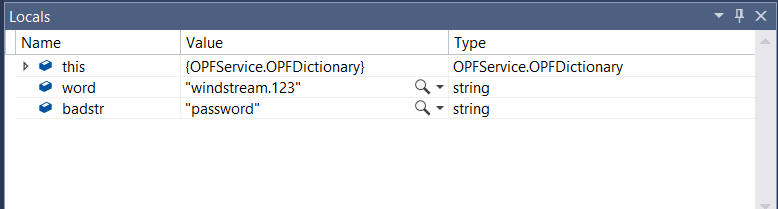
If you’re set breakpoints on either of the return statements, program execution will also pause before the return … which gives you an opportunity to see which return is being used & compare the variable values again.

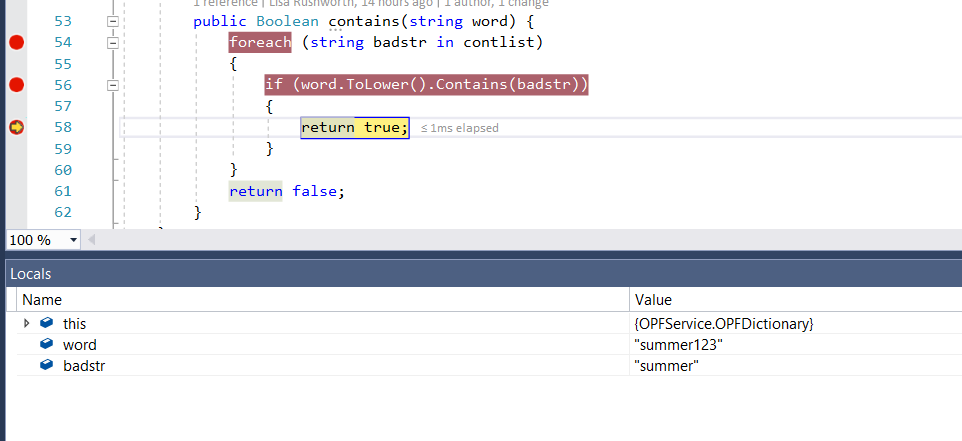
In this case, I submitted a password that was in the banned word list, so the program rightly evaluated line 56 to true and returns true.

Did you know? … Sub-Addressing

There are all sorts of reasons you need to provide your e-mail address to random Internet strangers – purchasing products, registering for a conference, signing up for a newsletter. Unfortunately, disseminating your address across the internet can lead to an inundation of unwanted email.

In addition to spam filters to filter out unwanted mail, Exchange Online supports “sub-addressing”. A sub-address is a slightly modified version your e-mail address that can customize your address for every situation – just before the ‘@’ symbol in your e-mail address, put a plus and then some unique text. It will look like Your.N.Ame+SomeIdentifier@company.ccTLD instead of Your.N.Ame@company.ccTLD.

When signing up for a Microsoft newsletter, I can tell them my e-mail address is Lisa.Rushworth+MicrosoftSecuritySlate@company.ccTLD and messages sent to that address will be delivered to my mailbox. When I sign up for the NANPA code administration newsletter, I can tell them my e-mail address is Lisa.Rushworth+NANPACodeAdmin@company.ccTLD.

Should you start receiving unwanted solicitations to the sub-address, you can then create a rule to delete messages sent to that address. You can even exclude messages from the intended sender from the deletion rule – allowing, for example, messages from the NANPA Code Admin newsletter to reach your mailbox whilst blocking anyone else from using the address.

You can also alert the person to whom you provided the address that their contact list may have been compromised.

Shell Script: Path To Script

We occasionally have to re-home our shell scripts, which means updating any static path values used within scripts. It’s quick enough to build a sed script to convert /old/server/path to /new/server/path, but it’s still extra work.

The dirname command works to provide a dynamic path value, provided you use the fully qualified path to run the script … but it fails spectacularly whens someone runs ./scriptFile.sh and you’re trying to use that path in, say, EXTRA_JAVA_OPTS. The “path” is just . — and Java doesn’t have any idea what to do with “-Xbootclasspath/a:./more/path/goes/here.jar”

Voila, realpath gives you the fully qualified file path for /new/server/path/scriptFile.sh, ./scriptFile.sh, or even bash scriptFile.sh … and the dirname of a realpath is the fully qualified path where scriptFile.sh resides:

#!/bin/bash
DIRNAME=`dirname $(realpath "$0")`
echo ${DIRNAME}

Hopefully next time we’ve got to re-home our batch jobs, it will be a simple scp & sed the old crontab content to use the new paths.