PingID is another external authentication source that looks to be replacing ADFS at work in the not-too-distant future. Unfortunately, I’ve not been able to get anyone to set up the “other side” of this authentication method … so the documentation is untested. There is an Apache Integration Kit available from PingID (https://www.pingidentity.com/en/resources/downloads/pingfederate.html). Documentation for setup is located at https://docs.pingidentity.com/bundle/pingfederate-apache-linux-ik/page/kxu1563994990311.html
Alternately, you can use OAuth2 through Apache HTTPD to authenticate users against PingID. To set up OAuth, you’ll need the mod_auth_openidc module (this is also available from the RedHat dnf repository). You’ll also need the client ID and secret that make up the OAuth2 client credentials. The full set of configuration parameters used in /etc/httpd/conf.d/auth_openidc.conf (or added to individual site-httpd.conf files) can be found at https://github.com/zmartzone/mod_auth_openidc/blob/master/auth_openidc.conf
As I am not able to register to use PingID, I am using an alternate OAUTH2 provider for authentication. The general idea should be the same for PingID – get the metadata URL, client ID, and secret added to the oidc configuration.
Setting up Google OAuth Client:
Register OAuth on Google Cloud Platform (https://console.cloud.google.com/) – Under “API & Services”, select “OAuth Consent Screen”. Build a testing app – you can use URLs that don’t go anywhere interesting, but if you want to publish the app for real usage, you’ll need real stuff.
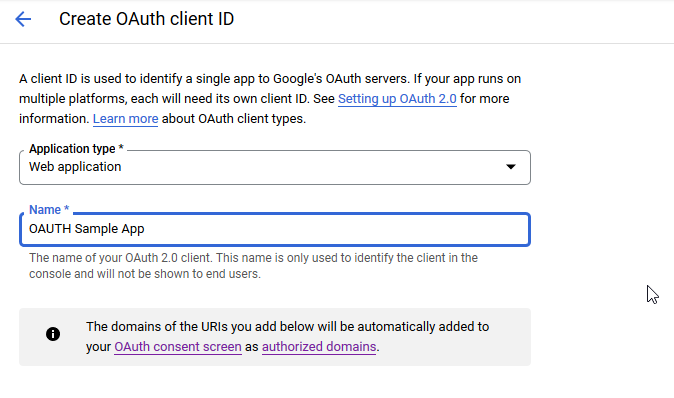
Under “API & Services”, select “Credentials”. Select “Create Credentials” and select “OAuth Client ID”
Select the application type “Web application” and provide a name for the connection
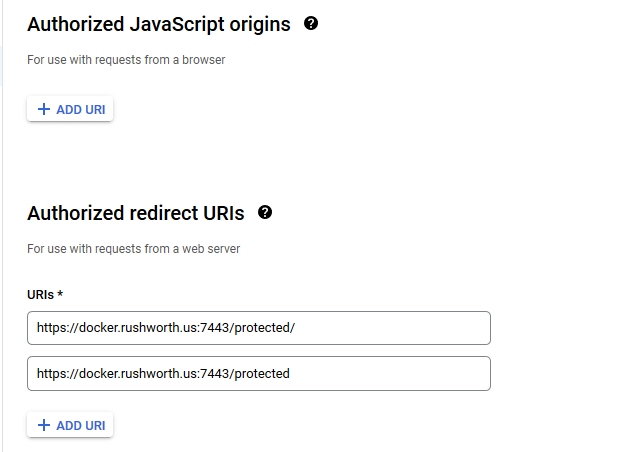
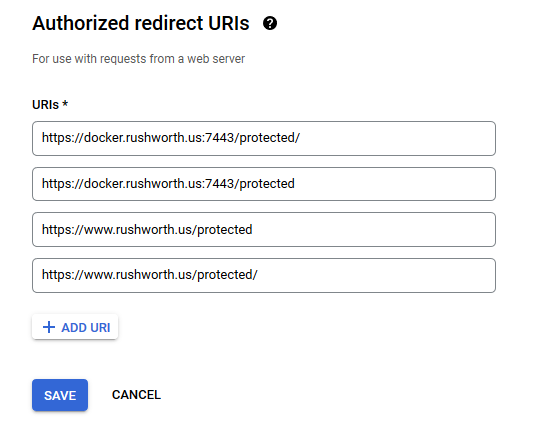
You don’t need any authorized JS origins. Add the authorized redirect URI(s) appropriate for your host. In this case, the internal URI is my docker host, off port on 7443. The generally used URI is my reverse proxy server. I’ve had redirect URI mismatch errors when the authorized URIs don’t both include and exclude the trailing slash. Click “Create” to complete the operation.
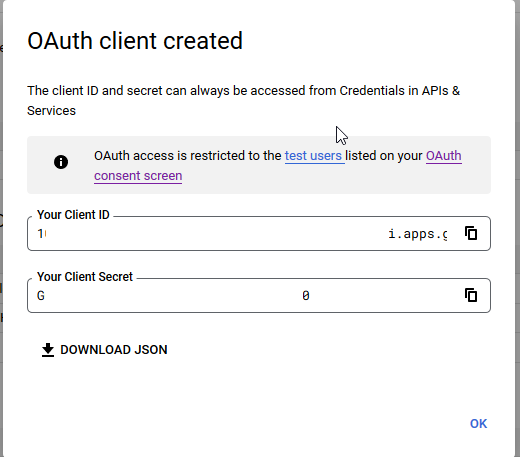
You’ll see a client ID and secret – stash those as we’ll need to drop them into the openidc config file. Click “OK” and we’re ready to set up the web server.
Setting Up Apache HTTPD to use mod_auth_openidc
Clone the mod_auth_openidc repo (https://github.com/zmartzone/mod_auth_openidc.git) – I made one change to the Dockerfile. I’ve seen general guidance that using ENV to set DEBIAN_FRONTEND to noninteractive is not ideal, so I replaced that line with the transient form of the directive:
ARG DEBIAN_FRONTEND=noninteractive
I also changed the index.php file to
RUN echo "<html><head><title>Sample OAUTH Site</title><head><body><?php print $_SERVER['OIDC_CLAIM_email'] ; ?><pre><?php print_r(array_map(\"htmlentities\", apache_request_headers())); ?></pre><a href=\"/protected/?logout=https%3A%2F%2Fwww.rushworth.us%2Floggedout.html\">Logout</a></body></html>" > /var/www/html/protected/index.php
Build an image:
docker build -t openidc:latest .
Create an openidc.conf file on your file system. We’ll bind this file into the container so our config is in place instead of the default one. In my example, I have created “/opt/openidc.conf”. File content included below (although you’ll need to use your client ID and secret and your hostname). I’ve added a few claims so we have access to the name and email address (email address is the logon ID)
Then run a container using the image. My sandbox is fronted by a reverse proxy, so the port used doesn’t have to be well known.
docker run --name openidc -p 7443:443 -v /opt/openidc.conf:/etc/apache2/conf-available/openidc.conf -it openidc /bin/bash -c "source /etc/apache2/envvars && valgrind --leak-check=full /usr/sbin/apache2 -X"
* In my case, the docker host is not publicly available. I’ve also added the following lines to the reverse proxy at www.rushworth.us
ProxyPass /protected https://docker.rushworth.us:7443/protected
ProxyPassReverse /protected https://docker.rushworth.us:7443/protected
Access https://www.rushworth.us/protected/index.php (I haven’t published my app for Google’s review, so it’s locked down to use by registered accounts only … at this time, that’s only my ID. I can register others too.) You’ll be bounced over to Google to provide authentication, then handed back to my web server.
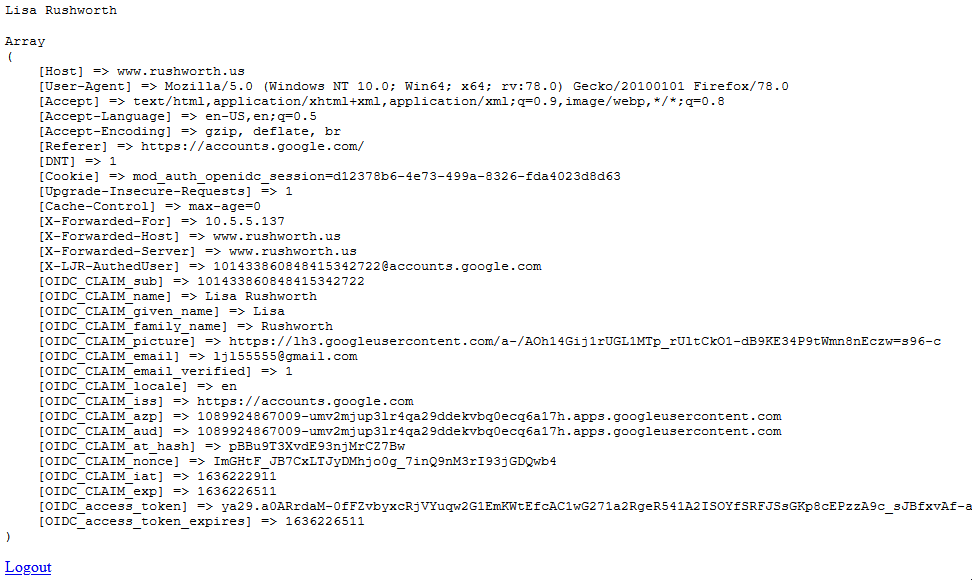
We can then use the OIDC_CLAIM_email — $_SERVER[‘OIDC_CLAIM_email’] – to continue in-application authorization steps (if needed).
openidc.conf content:
LogLevel auth_openidc:debug

LoadModule auth_openidc_module /usr/lib/apache2/modules/mod_auth_openidc.so

OIDCSSLValidateServer On

OIDCProviderMetadataURL https://accounts.google.com/.well-known/openid-configuration
OIDCClientID uuid-thing.apps.googleusercontent.com
OIDCClientSecret uuid-thingU4W

OIDCCryptoPassphrase S0m3S3cr3tPhrA53
OIDCRedirectURI https://www.rushworth.us/protected
OIDCAuthNHeader X-LJR-AuthedUser
OIDCScope "openid email profile"

<Location /protected>
     AuthType openid-connect
     Require valid-user
</Location>

OIDCOAuthSSLValidateServer On
OIDCOAuthRemoteUserClaim Username