Category: Sewing

Art Smock

I am about halfway through constructing Anya’s art smock using the pattern I found on thediymommy.com.  I had quite a bit of the laminated fabric from making her backpack, and searched for something that would use it. We happened across this smock and it looked like it would use almost all of the remaining fabric. (Wasn’t wrong – from the one yard of fabric, I have a 16″square).

Other than my inability to machine-stitch bias tape, this is a really quick project. Couple hours – even with a tiny helper. I find it easier to cut fabric to a pattern if the paper pattern isn’t cut right along the line, so I leave a half inch overhang around the pattern. It works just as well, though, to have overhang that continually varies from 1/8″ up to an inch. And Anya loves that she can do some of the cutting for our crafts.

Once we printed and cut the paper pattern, I cut the two pieces of laminated cotton. Sewed the two pieces together at the shoulder – since laminate does not seem fray, I used a simple straight stitch instead of the serger. I had cut quite a lot of bias strips to make piping for the bag. Double folded the strips to create bias tape for the edging and started pinning it in place.img_20161111_195246

The front of the bias tape is stitched on, and now I’m hand-stitching the back of the bias tape. Some day I’ll learn this “stitch in the ditch” technique 🙂

img_20161111_230842

Project Stack – Update

Halloween Circle Skirt – Completed! Circle skirts are *super* quick projects. I have a circle pattern that I re-use each time. Double-fold the bottom hem (pressing after each fold) and stitch the hem in place. Cut a 5″ wide strip of fabric a few inches longer than the inner circle circumference.  Serge it along both long sides. Placing wrong sides together, I sew the rectangular strip to the inner circle (this stitch ends up being right along the serger threads). Once the two ends meet, I serge them together. I then cut a 2″ wide strip of non-roll elastic to Anya’s waist size, overlap the ends by 1/2″ and stitch it together along the edges of the overlap and then sew an X inside the rectangle. Insert the elastic into the waistband fabric, fold the fabric over, and stitch the three layers (outer waistband fabric, circle skirt, inner waistband fabric) together. About 3/4 of the way through, I gather the already sewed part of the waistband on the elastic so the 1/4 that has not yet been sewed is straight and flat. Voila, one circle skirt.

Halloween bag – Almost done! I’m still stitching the letters onto the bag.

Halloween costume – I had to re-do the bodice (it was too wide), but should be able to finish off the back hook-and-loop closure this weekend. Need to make a hoop skirt and add some embellishment to the skirt.


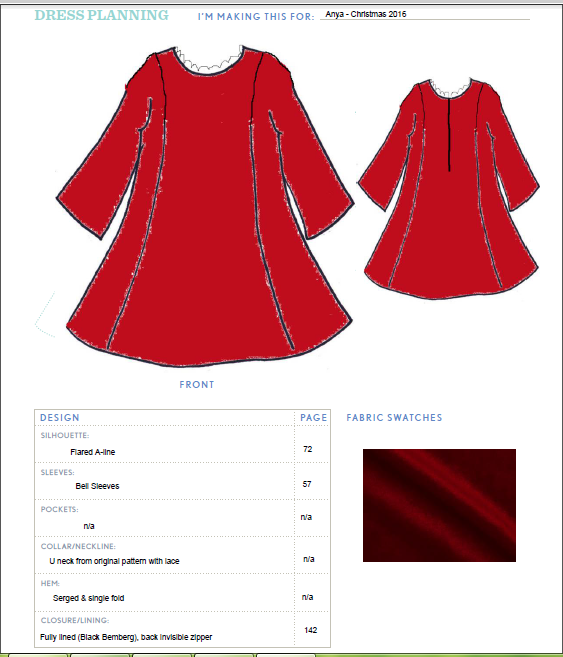
Christmas Dress – Initial Planning

I purchased a really interesting book called the Building Block Dress. Ever notice a designer sells ten different patterns that are all tweaks of the same dress? Evidently that’s actually a thing in fashion design — you really do have a base pattern and all of your “looks” are modifications of this base. Makes sense from both a manufacturing and a design standpoint. Cars are designed the same way — there’s an underlying chassis upon which a lot of different variations are bolted. This book teaches you to make your own modifications. Which means you don’t need to buy the three different almost-the-same patterns, but rather you can purchase one and modify components as needed.

The book includes a “dress planning” template — for me, “planning” has generally been an e-mail to a few friends or a blog post about the pattern I’m using and the fabrics I am considering. Selecting different components and drawing the dress is new for me … but I’ve got my first dress planned! Now I just need to get Anya’s Halloween costume sorted so I can work on other projects 🙂

anyachristmasdress-buildingblockdressworksheet

Halloween Bag

Early this year, I purchased a kit to make a Halloween tote bag for Anya. I had tried piecing it together several times, but stitching a straight line at exactly 1/4″ is not my forte. My last attempt, though, used a sewing machine foot that has a guide for a seam allowance of exactly 1/4″. WooHoo! I was able to get the little blocks pieced together. I want to get some of the rainbow spider web fabric to make a Halloween skirt next year too.

Now I’m almost finished with the bag — just need to stitch the letters. I didn’t quite follow the instructions. Or maybe I just didn’t understand the instructions. It seemed to me like the exterior and the fusible fleece were quilted, but the bag interior was not. I sandwiched all three layers and did my quilting. I also used my serger to make the side seams. That seemed like a more durable solution.

Front (oops, I still need to remove the chalk lines I used to quilt the bottom portion!)

img_20160930_235405

And back:

img_20160930_235412

Quick Anya Blanket – Getting Started

I decided to make Anya a quick (not pieced and not really quilted) blanket since it’s starting to get a little cold at night. I purchased 2.5 yards of a border print fabric (the stars continue up to the top selvage edge). It is folded in half along its length, so the front and back are more or less the same.

foxwoods

I used a thicker polyester batting to make a nice warm snuggly blanket. I am always surprised by how thin polyester batting is. I’d had feather and wool blankets throughout my life, and I think there is some psychological effect by having a thick, heavy blanket. But the polyester is actually warmer, so practicality won out over impression … so I looked for the thickest polyester batting I could find.

Sewing Machine Feet

I am amassing a collection of sewing machine feet – some of which are more useful than others 🙂

1/4″ zigzag foot — works for anything, isn’t perfect for anything. I guess if I only had one foot, this would be it. Took me a long time to realize what made it a zigzag foot — the opening for the needle is a wide oval which allows you to adjust the needle position far left or far right (or use the widest zig-zag you’ve got). The *foot* doesn’t do anything ziggy or zaggy – it just has space for the needle to pass through if you’re using a zigzag stitch. Bit of a d’oh moment when I figured that one out.

1/4″ “quilting” foot with guide – I have trouble sewing in a straight line. I know this is a newbie problem, but it doesn’t make for nice looking projects. If I go through the process of chalking out straight lines, it’s better but still not perfect. I actually purchased this foot to get to the “free shipping” level at a sewing parts store and put it into a storage case for about eighteen months. I recently started an Ohio Star quilt for Anya and a Halloween tote … both of which I ended up ripping and resewing quite frequently because of uneven seam allowances. I remembered this foot and tried it out. Perfect straight lines. Corners that meet up! I’ve even used this foot for Anya’s backpack (straight lines on the straps!) and some clothing. For the clothing — 1/2″ seam allowance, I’ve basted a line at 1/4″ and then lined the baste stitching up with the guide for the real seam. Hokey, but it worked. I like this guide so well that I’ve purchased a foot with an adjustable guide. It is scheduled to arrive next week, so I haven’t actually used it. But I’m excited to try it.

Gathering/ruffling foot – Yup, I got the cheapest eBay one I could find and waited a few weeks while it posted from China. One distinct advantage of being a novice is that you aren’t prepared to judge quality – and while it’s possible you won’t have much use for the cheap junk because it is cheap junk … you might also avoid spending a lot of money on something that just isn’t useful. For the 60$’s I was seeing these at … I’d have to be in the bed-skirt business before I even thought about buying one. But for 5$, it was worth a try. I thought I’d get a lot of use out of this when I was making a tutu last year. Didn’t work at all for that – the thin strips of netting didn’t get picked up properly. I basted each strip by hand and gathered them by hand. I still plan to make a tiered corduroy skirt for Anya this Autumn, and I think the foot will work out better for that type of project (gather fabric #1 against fabric #2). Hopefully!

Invisible zipper foot – Another “cheapest eBay had” purchase. Kind of like my 1/4″ foot with a guide, this lets the invisible zipper run along a channel so you know you’ve got a straight line. Total niche item – if you aren’t installing invisible zippers … no need to get one. I bought my foot along with the first invisible zipper I purchased. I like it a lot because the channel keeps my line of stitches straight, but I could see a more experienced machine operator not needing one of these.

Regular zipper/cording foot – I got this in the store at Joann mid-way through making Anya’s backpack. I was able to make my own piping, attach it, and attach the zipper beautifully. I’ll use it again to attach the sleeping bag zipper. Another niche item, but I’ve been getting a lot of use out of it lately because of a few specific projects.

Walking foot – I got this to stitch the quilting on Anya’s Ohio Star quilt. It’s quilting design is just blocks that run along the blocks. I could do something really fancy, but I wanted her to be able to use the quilt before it got cold. I like it for this use – I was able to quilt my simple design quite well (although it’s a little challenging to move the crib-sized quilt along my sewing table … I cannot imagine doing a Queen or Cali-King sized quilt on the little machine.


Feet I don’t have:

Teflon foot or Roller foot – Not buying this foot was a bit of ignorance on my part. Anya’s backpack is lined with a laminated cotton fabric. I ordered the fabrics, insulation, and zipper … had everything ready to go, and then wondered if you needed to do anything special with laminated fabrics. Big thing is don’t pin them where you don’t want to see holes. I’d also read that it was difficult to sew laminated fabric without a Teflon foot. Oops! Her first day of preschool was only a couple of weeks away, and I didn’t want to lose a week waiting for a foot to arrive. I could not, however, find a low shank one of these in a reasonable driving radius. Or a snap-on one coupled with a snap-on to low shank adapter. Figured I’d try stitching up her backpack without it, and I didn’t have a problem. Most of the seams are wrong-side of two layers of laminate … which means I was stitching along the cotton side. There were a few places where the plastic part was facing the presser foot and I didn’t have any issues. I still might pick up an adapter so I can attach snap-on feet to my low shank machine

Button hole – I got a little geeky about sewing the button holes on Anya’s Christmas shirt. I own buttonhole gimp, twist, and wax … and sewed each hole by hand. Which was fine for five buttons on a super-special shirt. I’m sure I’d research machine-made button holes if I were doing this more often.

Open toe – used for freehand embroidery. My mom said the guy at the sewing machine store where she picked up her old Kenmore was amazing at freehand embroidery on the machines. I do hand embroidery in a hoop (I love Darice’s spring tension hoops!) and cannot imagine even trying to freehand a design on a machine. Then again, I cannot imaging paying a heap of money for a new snazzy computer controlled embroidering machine either. For now, Anya’s got fairly simple hand-stitched t-shirts.

Rolled hem – I use my serger for rolled hems, so no need for another rolled hem method. Same thing for overlocking feet.

Blind hem – Can’t say I’ve even seen a blind hem. May research them some day, but no pressing need.


Anya’s Halloween Costume: Decision and fabric acquisition

Anya has gotten infatuated with princesses and doctors — so it was a bit of a toss-up which one she’d want to make for this year’s Halloween costume. But princess costumes are shiny and sparkly, whereas doctor costumes are … well, scrubs and maybe a white lab coat if you are feeling fancy. Sure there’s a stethoscope and maybe a bag. But I really should have been able to guess which would be more appealing in the end.

We’ll be making a Belle-like costume this year. I found a yellow/gold jacquard fabric that I’ll use for the dress:

dressfabric

And I picked up a sparkly net fabric to use for accents.

netfabric

I want to research the difference between using a lot of panels individually gathered and making a long circle skirt gathered along radial lines. The circle skirt would eliminate a LOT of seams, but I don’t know how the panels will look. Might have to take a little circle and see how it looks when it is gathered.

I am planning to use the same bodice from her Easter dress – it fit well, and I already have the pattern printed. I may make a long-sleeved version to be more seasonally appropriate.