Tag: docker

Accessing MobyVM (And adding an exposed port to an existing Docker container)

I needed to map an addition port into an existing Docker container. Now I know the right thing to do is to create a new container and do it right this time but GitLab’s container has problems running on the Windows Docker Desktop. Permission-based problems that I’m not particularly included to attempt to sort out just to run a simple sandbox. Which means I’d need to drop my config file back in place & recreate my sandbox projects. And since I’m using CI/CD variables which don’t export … recreating the sandbox projects is a bit of a PITA.

On Linux, I can fix this by editing the config.v2.json and hostconfig.json files … but this is Windows running a funky Hyper-V Linux. And it turns out you can access the files on this MobyVM.

docker run -it --rm --privileged --pid=host justincormack/nsenter1

Now I’m able to cd into /var/lib/docker/containers, find the full ID for my GitLab container and cd into it, and edit the two config files. If it is running, you need to stop the container prior to editing the config files.

config.v2.json — add the port to “ExposedPorts”

chStdin”:false,”AttachStdout”:false,”AttachStderr”:false,”ExposedPorts”:{“22/tcp”:{},”443/tcp”:{},”80/tcp”:{},”4567/tcp”:{}},”Tty”:fal…

hostconfig.json — add the port to “PortBindings”

ult”,”PortBindings”:{“22/tcp”:[{“HostIp”:””,”HostPort”:”22″}],”443/tcp”:[{“HostIp”:””,”HostPort”:”443″}],”80/tcp”:[{“HostIp”:””,”HostPort”:”80″}],”4567/tcp”:[{“HostIp”:””,”HostPort”:”4567″}]},”Res…


Stop the Windows Docker service, start it, then start the container again. Voila! The new port for the container registry is there without recreating the container.

Docker Desktop for Windows – Bind Mounts

I’ve been trying to set up a Docker container running an older CentOS, Apache, and PHP version as a sandbox for work. This would allow me to update code on my local computer, test changes, and then pull the changes to the development server for UAT testing. Setting up the base container was easy enough — installed a VM, tar’d off the system, and imported it as a Docker image. There’s a lot of optimization that could/should be done, but I was aiming for proof of concept at this stage.

I am using bind mounts for the website configuration and code — the website conf file in conf.d, the SSL certificates, and the vhtml folder which houses the web code. This means I can tweak the site config & code in my IDE, reload Apache in Docker, and validate my changes. It worked great until I connected to the company VPN. Attempting to access the mounted data just hangs. Nothing. Drop the VPN, and the files are there again.

There are two problems — firstly, the default VPN configuration does not allow access to local network resources. And, it seems, the Docker NAT is a local network resource. We use Cisco AnyConnect. In the settings, I checked off “Allow local (LAN) access when using VPN (if configured)”. Note the if configured — the server-side settings need to allow use of local resources when connected via VPN. Fortunately, people with WiFi printers complained about having to disconnect the VPN every time they wanted to print something; and accessing local resources is permitted in our profile.

Unfortunately, I still couldn’t access files on my mount points. Docker Desktop shared out my drive, and the server network mounts the CIFS share. With my domain credentials. An Active Directory domain which is most certainly not registered in the VPN DNS servers.

[root@5542506m1a5e /]# mount
overlay on / type overlay (rw,relatime,lowerdir=/var/lib/docker/overlay2/l/QMCCTMGPBHQFW66ARPWHSQMWQL:/var/lib/docker/overlay2/l/IQ2YIH47ZXTN55PGH3BWUKFPTT,upperdir=/var/lib/docker/overlay2/d072c94532976a4196174751c57359139501739001e7b9d50de59041c768a307/diff,workdir=/var/lib/docker/overlay2/d072c94532976a4196174751c57359139501739001e7b9d50de59041c768a307/work)
proc on /proc type proc (rw,nosuid,nodev,noexec,relatime)
...
//10.0.75.1/D on /etc/httpd/certs type cifs (rw,relatime,vers=3.02,sec=ntlmsspi,cache=strict,username=myuid,domain=mydomain,uid=0,noforceuid,gid=0,noforcegid,addr=10.0.75.1,file_mode=0755,dir_mode=0777,iocharset=utf8,nounix,serverino,mapposix,nobrl,mfsymlinks,noperm,rsize=1048576,wsize=1048576,echo_interval=60,actimeo=1)
...
tmpfs on /sys/firmware type tmpfs (ro,relatime)

To use the share when connected via the VPN, I needed to use the credentials of a local account here. Beyond creating a local administator-level account, you may need to add read/write permissions for that new account to your %userprofile% directory — inheritence is generally disabled & only the individual user has access to the folder.

Once there’s a local account set up to work, you’ve got to tell Docker to use it. In the settings, select “Shared Drives”. Use “Reset credentials” to open a prompt for the logon credentials that will be used to mount the shared volume.

o

Start the Docker container, VPN into the company network, and I’ve got a fully functional sandbox in a Docker container.

Cleaning Up Unused Docker Images

I’ve been using Docker for quite some time, but never had unused container images. This is partially because I installed a new hard drive and started from a blank slate, but also because I haven’t needed to use many different images to build my containers.

I’ve changed jobs recently and wanted to set up a container to mirror our web server. Which meant trying to get a CentOS 6.8 container going. Except there isn’t one from Cent anymore. And I don’t exactly trust random-dude-from-the-Internet’s OS. Download it and poke around without running it, sure … but that’s not a platform on which I can do my development.

And that means I’ve got a few images that I do not need. To view the list of images, use “docker images -a”


D:\docker>docker images -a
REPOSITORY TAG IMAGE ID CREATED SIZE
openhab/openhab snapshot 8a4749c86ff3 4 weeks ago 527MB
docker4w/nsenter-dockerd latest 2f1c802f322f 9 months ago 187kB
centos/php-56-centos7 latest 92ed8b3a7cb4 15 months ago 617MB

13652604711/centos6.8-ssh latest 59ab169b5158 2 years ago 289MB

Then use “docker rmi imagename” to remove any unnecessary ones.

D:\docker>docker rmi centos/php-56-centos7
Untagged: centos/php-56-centos7:latest
Untagged: centos/php-56-centos7@sha256:f3c95020fa870fcefa7d1440d07a2b947834b87bdaf000588e84ef4a599c7546
Deleted: sha256:92ed8b3a7cb4d56d3a1c58386d966f22736010a292a81a72dddbc4ffc7cae3fd
Deleted: sha256:bdcb229c59ed69d26750cd0d24362670e1fa2ae9be6ef19aa3e7c5571a4a8503
Deleted: sha256:90eb7fca62f6c0febd9cc21544269029ff231f39f16054ba6b0ca93ec1037d97
Deleted: sha256:cdcf05e149fc6cb2801f7f93dce3acb54465fe6c46a16dd6135aa74d79bedffa
Deleted: sha256:139498a5907a4d17cf07b1400bdbdb4db5e9f1ac4e3985aac2b374eaa712d5fb
Deleted: sha256:5f0780b14e43db37e84162e0045657203ac1e9fb531cc3e879fa464eda013e79
Deleted: sha256:7e117241875497974bb56f09e6340e142a9acaa11af76917afab345acc25b5c1
Deleted: sha256:4b170488c295918f4d7618c2cd0b9b428d55ec952dd6a715593e3af34e538d94
Deleted: sha256:1e889f7360c52d1b20f93335382290445e4f257f08ccef01694837572842e95f
Deleted: sha256:43e653f84b79ba52711b0f726ff5a7fd1162ae9df4be76ca1de8370b8bbf9bb0

D:\docker>docker rmi 13652604711/centos6.8-ssh
Untagged: 13652604711/centos6.8-ssh:latest
Untagged: 13652604711/centos6.8-ssh@sha256:41bbe66ac18f199efac325d0d4bcb5d0390ec501ca82d6d1ce223df8a050be3a
Deleted: sha256:59ab169b5158a172079e2a89442936bc49292ea951f2eb9acb688a0ee34f95e1
Deleted: sha256:12d850520660ec9de87e84735a7067e663db282245502820f09dae5c937a93d2
Deleted: sha256:6b5c6954e3d511934786375730a068d0f013dcc99356a341a8c5d268a3b1cf3d

Quick OpenHAB2 Apt Install In Docker Ubuntu Container

# Set up docker image — exposes OpenHAB web on your port 8080
docker run -p 8080:8080 -dit –name UbuntuOH2 ubuntu:latest

# Shell into the container
docker exec -it UbuntuOH2 /bin/bash

# From within the container, run:
apt update
apt install sudo
apt install vim
apt install wget
apt install gnupg
apt install apt-transport-https

# Repo for Zulu Java
echo ‘deb http://repos.azulsystems.com/debian stable main’ > /etc/apt/sources.list.d/zulu.list

# Repo for OpenHAB2 stable build
wget -qO – ‘https://bintray.com/user/downloadSubjectPublicKey?username=openhab’ | apt-key add –
apt-key adv –keyserver hkp://keyserver.ubuntu.com:80 –recv-keys 0xB1998361219BD9C9
echo ‘deb https://dl.bintray.com/openhab/apt-repo2 stable main’ | tee /etc/apt/sources.list.d/openhab2.list

apt-get update
apt-get install zulu-8
apt-get install openhab2
apt-get install openhab2-addons

/etc/init.d/openhab2 start

# OpenHAB will be accessible on your IP at 8080. E.g. http://10.10.10.123:8080.
# docker start/stop UbuntuOH2

Kubernetes Sandbox With Minikube

A scaled down sandbox can be used to gain experience with the applications and techniques used to deploy containerized applications and microservices. This sandbox will be built on a Windows 10 laptop, but the same components can be run on Linux variants.

Prerequisites:

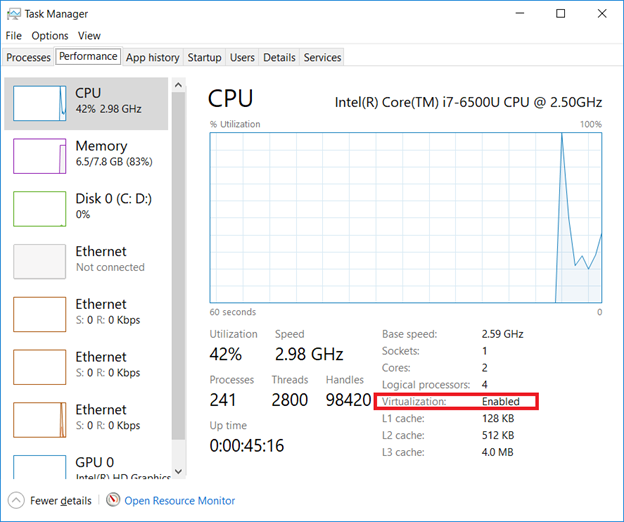
Verify Virtualization is enabled:

Open Task Manager (taskman.exe) and ensure the virtualization extensions have been enabled.

If virtualization is disabled, boot into the system config (start menu => settings => update & security => recovery, click “Restart now” under “Advanced startup”)

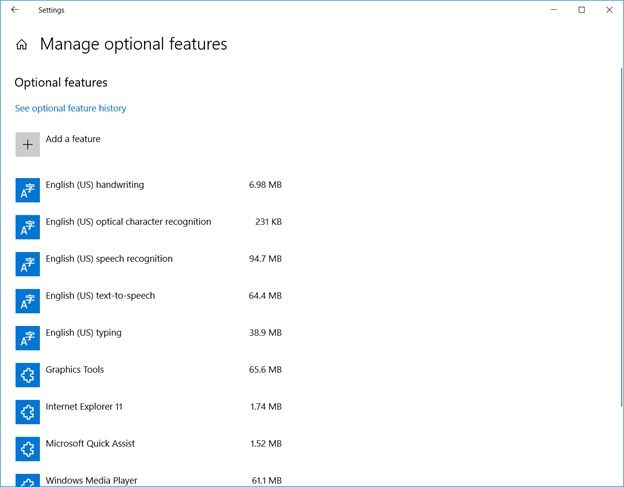
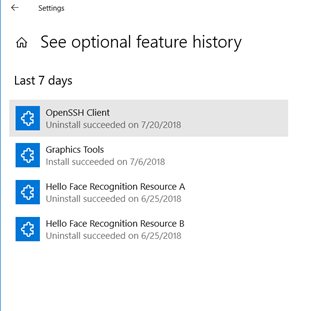
Uninstall the Windows OpenSSH client

Click ‘Start’ and type “Manage optional features” – within the installed feature list, find “OpenSSH Client”. If present, remove it.
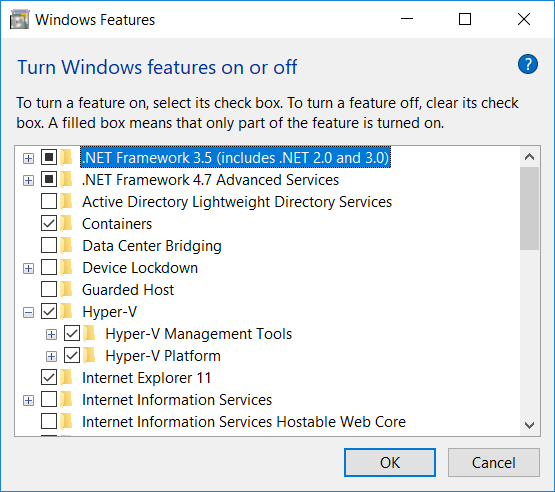
Enable Hyper-V

Enable the Hyper-V Windows feature (Control Panel => Programs => Programs and Features, “Turn Windows features on or off” and check both Hyper-V components).

Add Virtual Switch To Hyper-V

In the Hyper-V Manager, open the “Virtual Switch Manager”. Create a new External virtual switch. Record the name used for your new virtual switch.


Install Minikube

View https://storage.googleapis.com/kubernetes-release/release/stable.txt and record the version number. The current stable release version is v1.11.1

Modify the URL http://storage.googleapis.com/kubernetes-release/release/v#.##.#/bin/windows/amd64/kubectl.exe to use the current stable release version. Current URL is http://storage.googleapis.com/kubernetes-release/release/v1.11.1/bin/windows/amd64/kubectl.exe

Create a folder %ProgramFiles%\Minikube and add this folder to your PATH variable.

Download kubectl.exe from the current release URL to %ProgramFiles%\Minikube

Download the current Minikube release from https://github.com/kubernetes/minikube/releases (scroll down to the “Distribution” section, locate the Windows/amd64 link, and save that binary as %ProgramFiles%\Minikube\minikube.exe). ** v0.28.1 was completely non-functional for me (and errors were related to existing issues on the minikube GitHub site) so I used v0.27.0

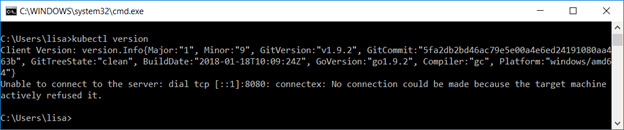
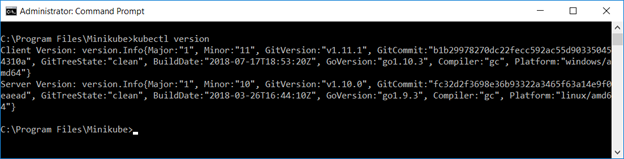
Verify both are functional. From a command prompt (run as administrator) or Powershell (again run as administrator), run “kubectl version” and verify the output includes a client version

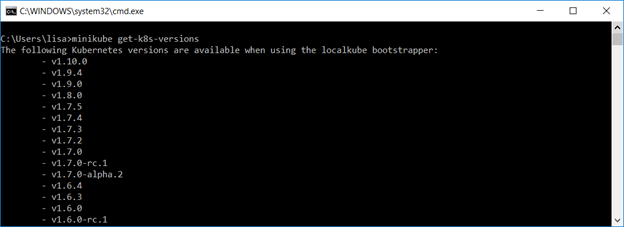
Run “minikube get-k8s-versions” and verify there is output.

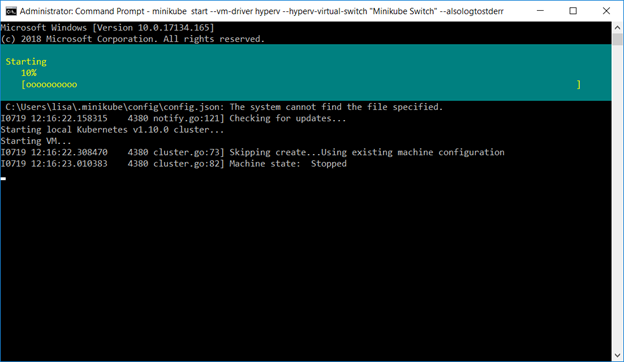
Configure the Minikube VM using the Hyper-V driver and switch you created earlier.

minikube start –vm-driver hyperv –hyperv-virtual-switch “Minikube Switch” –alsologtostderr

Once everything has started, “kubectl version” will report both a client and server version.

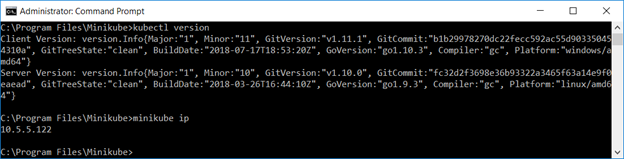
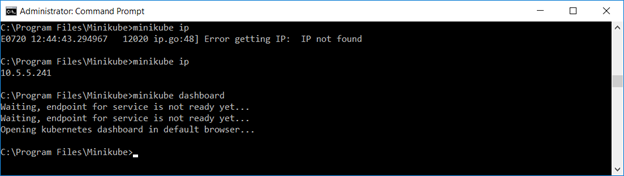
You can use “minikube ip” to ascertain the IP address of your cluster

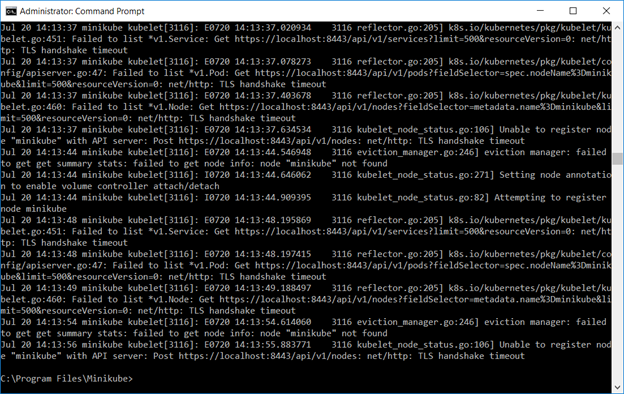
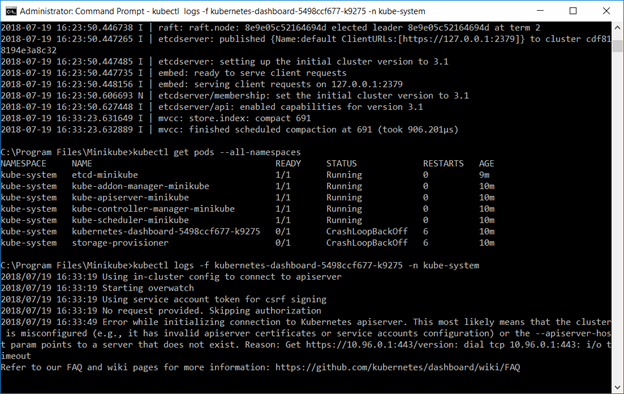
If the cluster services fail to start, there are a few log locations.

Run “minikube logs” to see the log information from the minikube virtual machine

Use “kubectl get pods –all-namespaces” to determine which component(s) fail, then use “kubectl logs -f name -n kube-system” to review logs to determine why the component failed to start.

If you need to connect to the minikube Hyper-V VM, the username is docker and the password is tcuser – you can ssh into the host or connect to the console through the Hyper-V Manager.

Before the management interface comes online, you can use view the status of the containers using the docker command line utilities on the minikube VM.

$ docker ps

CONTAINER ID        IMAGE                        COMMAND                  CREATED              STATUS              PORTS               NAMES

7d8d66b5e465        af20925d51a3                 “kube-apiserver –ad…”   About a minute ago   Up About a minute                       k8s_kube-apiserver_kube-apiserver-minikube_kube-system_0f6076ada4273000c4b2f846f250f3f7_3

bb4be8d267cb        52920ad46f5b                 “etcd –advertise-cl…”   7 minutes ago        Up 7 minutes                            k8s_etcd_etcd-minikube_kube-system_0199781185b49d6ff5624b06273532ab_0

d6be5d6ae360        9c16409588eb                 “/opt/kube-addons.sh”    7 minutes ago        Up 7 minutes                            k8s_kube-addon-manager_kube-addon-manager-minikube_kube-system_3afaf06535cc3b85be93c31632b765da_1

b5ddf5d1ff11        ad86dbed1555                 “kube-controller-man…”   7 minutes ago        Up 7 minutes                            k8s_kube-controller-manager_kube-controller-manager-minikube_kube-system_d9cefa6e3dc9378ad420db8df48a9da5_0

252d382575c7        704ba848e69a                 “kube-scheduler –ku…”   7 minutes ago        Up 7 minutes                            k8s_kube-scheduler_kube-scheduler-minikube_kube-system_2acb197d598c4730e3f5b159b241a81b_0

421b2e264f9f        k8s.gcr.io/pause-amd64:3.1   “/pause”                 7 minutes ago        Up 7 minutes                            k8s_POD_kube-scheduler-minikube_kube-system_2acb197d598c4730e3f5b159b241a81b_0

85e0e2d0abab        k8s.gcr.io/pause-amd64:3.1   “/pause”                 7 minutes ago        Up 7 minutes                            k8s_POD_kube-controller-manager-minikube_kube-system_d9cefa6e3dc9378ad420db8df48a9da5_0

2028c6414573        k8s.gcr.io/pause-amd64:3.1   “/pause”                 7 minutes ago        Up 7 minutes                            k8s_POD_kube-apiserver-minikube_kube-system_0f6076ada4273000c4b2f846f250f3f7_0

663b87989216        k8s.gcr.io/pause-amd64:3.1   “/pause”                 7 minutes ago        Up 7 minutes                            k8s_POD_etcd-minikube_kube-system_0199781185b49d6ff5624b06273532ab_0

7eae09d0662b        k8s.gcr.io/pause-amd64:3.1   “/pause”                 7 minutes ago        Up 7 minutes                            k8s_POD_kube-addon-manager-minikube_kube-system_3afaf06535cc3b85be93c31632b765da_1


This allows you to view the specific logs for a container that is failing to launch

$ docker logs 0d21814d8226

Flag –admission-control has been deprecated, Use –enable-admission-plugins or –disable-admission-plugins instead. Will be removed in a future version.

Flag –insecure-port has been deprecated, This flag will be removed in a future version.

I0720 16:37:07.591352       1 server.go:135] Version: v1.10.0

I0720 16:37:07.596494       1 server.go:679] external host was not specified, using 10.5.5.240

I0720 16:37:08.555806       1 feature_gate.go:190] feature gates: map[Initializers:true]

I0720 16:37:08.565008       1 initialization.go:90] enabled Initializers feature as part of admission plugin setup

I0720 16:37:08.690234       1 plugins.go:149] Loaded 10 admission controller(s) successfully in the following order: NamespaceLifecycle,LimitRanger,ServiceAccount,NodeRestriction,DefaultTolerationSeconds,DefaultStorageClass,MutatingAdmissionWebhook,Initializers,ValidatingAdmissionWebhook,ResourceQuota.

I0720 16:37:08.717560       1 master.go:228] Using reconciler: master-count

W0720 16:37:09.383605       1 genericapiserver.go:342] Skipping API batch/v2alpha1 because it has no resources.

W0720 16:37:09.399172       1 genericapiserver.go:342] Skipping API rbac.authorization.k8s.io/v1alpha1 because it has no resources.

W0720 16:37:09.407426       1 genericapiserver.go:342] Skipping API storage.k8s.io/v1alpha1 because it has no resources.

W0720 16:37:09.445491       1 genericapiserver.go:342] Skipping API admissionregistration.k8s.io/v1alpha1 because it has no resources.

[restful] 2018/07/20 16:37:09 log.go:33: [restful/swagger] listing is available at https://10.5.5.240:8443/swaggerapi

[restful] 2018/07/20 16:37:09 log.go:33: [restful/swagger] https://10.5.5.240:8443/swaggerui/ is mapped to folder /swagger-ui/

[restful] 2018/07/20 16:37:52 log.go:33: [restful/swagger] listing is available at https://10.5.5.240:8443/swaggerapi

[restful] 2018/07/20 16:37:52 log.go:33: [restful/swagger] https://10.5.5.240:8443/swaggerui/ is mapped to folder /swagger-ui/


Worst case, we haven’t really done anything yet and you can start over with “minikube delete”, then delete the .minikube directory (likely located in %USERPROFILE%), and start over.

Once you have updated the Hyper-V configuration and started the cluster, you should be able to access the kubernetes dashboard
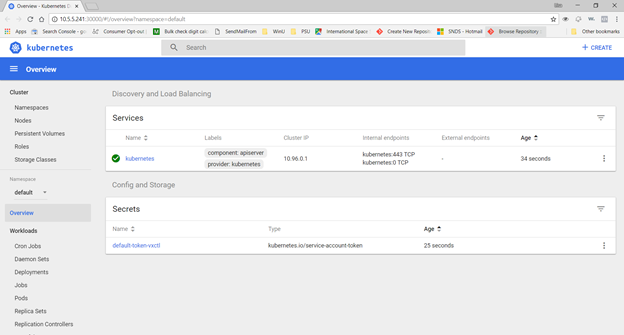
Actually using it

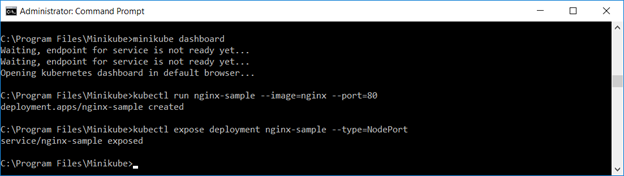
Now that you have minikube running, you can access the dashboard via a web URL – or just type “minikube dashboard” to have the site launched in your default browser.

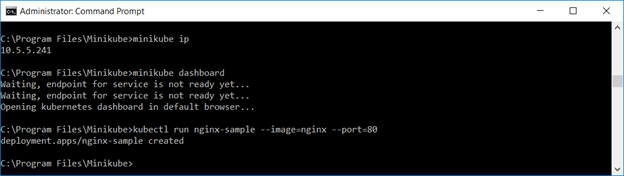
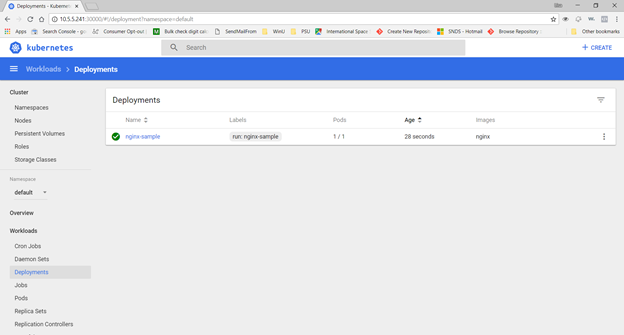
Create a deployment – we’ll use the nginx sample image here

Voila, under Workloads => Deployments, you should see this test deployment (if the Pods column has 0/1, the image has not completely started … wait for it!)

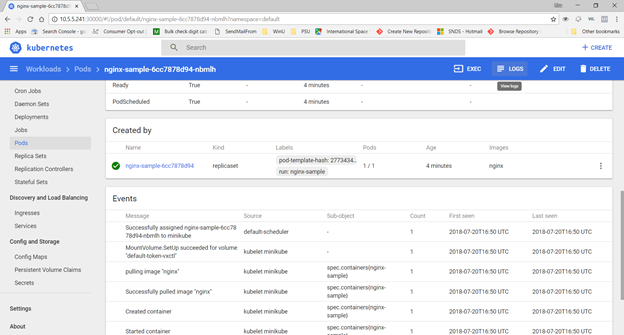
Under Workloads=>Pods, you can select the sample. In the upper right-hand corner, there are buttons to shell into the Pod as well as view logs from the Pod.

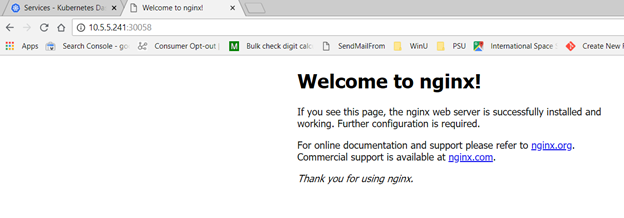
Expose the deployment as a service. You can use the web GUI to verify the service or “kubectl describe service servicename

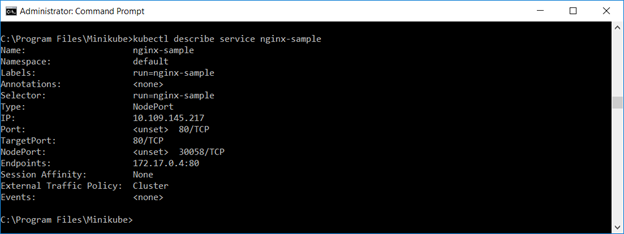
Either method provides the TCP port to access the service. Access the URL in a browser. Voila, a web site:

Viewing the Pod logs should now show the web server access logs.

That’s all fine and good, but there are dozens of other ways to bring up a quick web server. Using Docker directly. Magic cloudy hosting services. A server with a web server on it. K8 allows you to quickly scale the deployment – specify the number of replicas you want and you’ve got them:

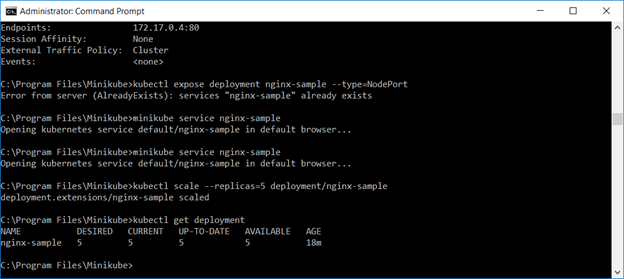
Describing the service, you will see multiple endpoints.

What do I really have?

You’ve got containers – either your own container for your application or some test container. Following these instructions, we’ve got a test container that serves up a simple web page.

You’ve got a Pod – one or more containers are run in a Pod. A pod exists on a single machine, so all containers within a Pod share resources. This is good thing if the containers interact with each other (shared resources speed up this communication), but it’s a bad thing if the containers have no correlation but run high I/O functions (shared resources create contention for this communication).

You’ve got a deployment – a managed group of Pods. Each application or microservice will have a deployment. The deployment keeps the desired number of instances running – if an instance is not healthy, it is terminated and a new instance spawned. You can resize the deployment on a schedule, or you can use load metrics to manage capacity.

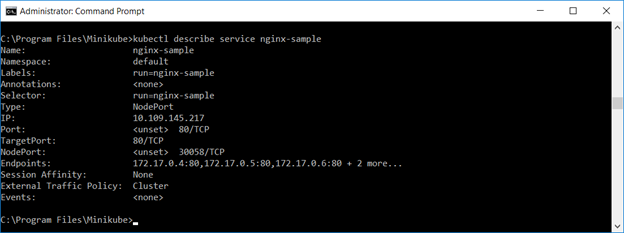
You’ve got services – services map resources running within pods to internal or external access. The service has an IP address and port for client access, and requests are load balanced across healthy, running Pods. In our case, we are using NodePort, and “kubectl describe service ngnix-sample” will provide the port number.

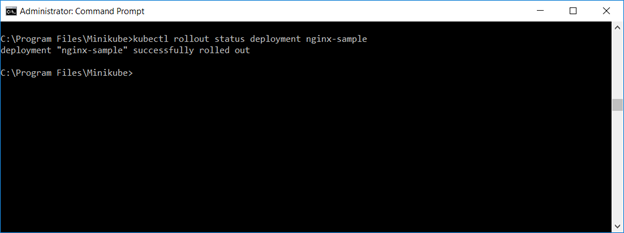
Because client access is performed through the service, you can perform “rolling updates” by setting a new image (and even roll back if the newly deployed image is malfunctioning). To roll a new image into service, use “kubectl set image deployments/ngnix-sample ngnix-sample=something/image:v5”. Using “kubectl get pods”, you can see replicas come online with the new image and ones with the old image terminate. Or, for a quick summary of the rollout status, run “kubectl rollout status deployment nginx-sample”

If the new container fails to load, or if adverse behavior is experienced, you can run “kubectl rollout undo deployment nginx-sample” to revert to the previous working container image.

When you are done with your sandbox, you can stop it using “minikube stop”, and “minikube start” will bring the sandbox back online.

A “real world” deployment would have multiple servers (physical, virtual, or a combination thereof) essentially serving as a resource pool. You wouldn’t manually scale deployments either.

Notice that the dashboard – and all of its administrative functions – are open to the world. A “real world” deployment would either include something like OpenUnison to authenticate through ADFS or some web hook that performs LDAP authentication and provides an access token.

And there’s no reason to use kubectl to manually deploy updates. Commit your changes into the git repository. Jenkins picks up the changes, runs the Maven build and tests, and creates a Docker build. The final step within the Jenkins workflow is to perform the image rollout. This means you can have a new image deployed within minutes (actual time depends on the build/test time) of committing code to a repo.

Creating An OpenHAB 2.3.0 Snapshot Docker Container

We found quick instructions for creating a Docker container for the OpenHAB 2.3.0 snapshot. These instructions evidently presuppose some basic knowledge of building Docker containers, so I thought I’d write the “I don’t know what I am doing” version of the instructions. Beyond the obvious download & install Docker, then make sure it’s functional (service starts).

The linked Dockerfile is not the only thing you need. Go up a level — you need both the Dockerfile and entrypoint.sh files. Create a directory somewhere and grab these two files. Then build the container using

docker build -t oh2imagename .

I used a short, alpha-numeric only name for my image. When I used slashes as in the example, the container would not start. Then make the folders you want to map into OpenHAB2:

mkdir /some/path/to/openhab/addons
mkdir /some/path/to/openhab/conf
mkdir /some/path/to/openhab/userdata

The instructions conflate local users/groups with in-container users/groups. You do not need to create a local user. You do need to indicate the uidNumber and gidNumber for the openhab user and group. Even if you do create the local user and group, then change the /some/path/to/openhab permissions to provide full access to the user … you may well not be able to access the files. That is SELinux, not a file permission issue. The quick/dirty solution is to start the container with the privileged flag:

--privileged=true

Alternately, consult the Universal Archive of All IT Knowledge and figure out how to allow the docker service to write files where you want them. And how to access USB devices if you are trying to use something like a ZWave dongle. We went with the privileged route 🙂 The –name option is just the container name. The –net uses the host network for container communications instead of the bridge network. Saves mapping ports, although you could easily use the bridge network and map out the handful of OpenHab specific ports. The -d runs the container in detached mode. The -e sets some environment flags (used by the user/group creation script that runs upon container startup). The –tty (or -t) attaches a console. Not really used here.

docker run --privileged --name oh2containername --net=host --tty -d -e USER_ID=5555 \
 -e GROUP_ID=5555 oh2imagename

Ideally, your OpenHAB2 instance will be running. Use “docker ps” to list out the running containers. If you don’t see a container with the name supplied above … then something went wrong. You can use “docker history oh2containername” to view a quick history, but “docker logs oh2containername” will probably provide more useful information. We encountered file permission issues (as noted above, due to SELinux) which prevented the initial container setup from running. Once that was sorted, the container showed up in the running container list.

You’re ready to use it — you can access the web console using your computer’s IP address (assuming you set this container up in the host network and not the bridge — if you used the bridge, you can use “docker inspect oh2containername” and look for IPAddress under NetworkSettings) on the default port. You can ssh into the Karaf console with the default user/password on the default port. Or you can shell into the container.

docker exec -it oh2containername /bin/bash

This is a bash shell running on the OH2 container — you’ll find a lot of ‘stuff’ hasn’t been installed, and your normal command aliases won’t be present. But it’s a shell on the server and can be used to start/stop OH2.

Apache HTTP Sandbox With Docker

I set up a quick Apache HTTPD sandbox — primarily to test authentication configurations — in Docker today. It was an amazingly quick process.

Install an image that has an Apache HTTPD server:    docker pull httpd
Create a local file system for Apache config files (c:\docker\httpd\httpd.conf for main config, c:\docker\httpd\conf.d for all of the extras like ssl.conf and php.conf, plus web sites), and c:\docker\httpd\vhtml for the web site content)
Launch the container: docker run -detach –publish 80:80 –publish 443:443 –name ApacheWebServer –restart always -v /c/docker/httpd/httpd.conf:/etc/httpd/conf/httpd.conf:ro -v /c/docker/httpd/conf.d/:/etc/httpd/conf.d/:ro -v /c/docker/httpd/vhtml/:/var/www/vhtml/:ro httpd

Shell into it (docker exec -it ApacheWebServer bash) to look around, or just access http://localhost from the Docker host.

Creating a Docker Image

There are a lot of pre-built images available on Docker Hub — most recent OS builds, Apache, MariaDB, there’s even an Oracle Enterprise database server. If you’ve got a fairly recent OS, you can start from that base image and use Dockerfile (or in a CI/CD pipeline, the before_script) to install additional components. But if your OS is out-of-date … you still need a test platform that matches production! You can create your own Docker image without using a base.

First, you need a server. This can be your current dev box (or your current prod box, but I avoid touching the prod boxes!). It can be a new install. Either way, you need a server. Log in and su to root. Then tar off the installation:

tar -czf /image/centos51.tgz ./ --exclude /image

Once you’ve got a tar of the server, scp the tar to whatever computer is running your docker client. Import the image to Docker. (You can tag the image and upload it to a registry, if you’ve got one.)

docker load centos51.tgz sampleproject/cent51

Finally, start a container based on the image:

docker run -p 80:80 -p 443:443 -v /data/docker/certs:/etc/httpd/certs -v /data/docker/conf.d/SampleProjectSite.conf:/etc/httpd/conf.d/SampleProjectSite.conf -v /data/git/SampleProjectCode:/var/www/vhtml/SampleProject/html -dit --name SampleProject sampleproject/cent51 /bin/bash


Kerberos Authentication on Tomcat

I finally got around to testing out TomCat 8 and setting up Kerberos authentication for a “single sign-on” experience (i.e. it re-uses the domain logon Kerberos token to authenticate users). This was all done in a docker image, so the config files can be stashed and re-used by anyone with Docker.

First you need an account – on the account properties page, the DES encryption needs to be unchecked and the two AES ones need to be checked. The account then needs to have a service principal name mapped to it. That name will be based on the URL used to access the site. In my case, my site is http://lisa.example.com:8080 (SPNs don’t mind http/https or port numbers) so my SPN is HTTP/lisa.example.com … to set the SPN, run

setspn -A HTTP/lisa.example.com sAMAccountNameOfMyNewlyCreatedAccount

Then generate the keytab:

ktpass /out .\lisa.example.com.keytab /mapuser sAMAccountNameOfMyNewlyCreatedAccount@EXAMPLE.COM /princ HTTP/lisa.rushworth.us@EXAMPLE.COM /pass P@ssw0rdG03sH3r3

** Note about keytabs – there is a KVNO (key version number) associated with a keytab file. When security-related attributes on the account are changed, the KVNO is incremented. Aaaand you need a new keytab. This means you need to be able to get a new keytab if you plan on changing the account password, but it also means that tweaking account settings can render your keytab useless. Get the account all sorted (check off password never expires if that’s what you want, check off user cannot change password, etc) and then generate the keytab.

While you’re working on getting the SPN and keytab stuff sorted, get docker installed and running on your box. I use Docker CE (free) on my Windows laptop, and I’ve had to disable the firewall to allow access from external clients. I would expect a rule (esp one allowing anything to make an inbound connection to 8080/tcp!) would sort it, but I’ve always had the port show as filtered until the firewall is turned off. YMMV.

I create a folder for files mapped into docker containers (i.e. c:\docker) and sub-folders for each specific container. All of the files from TomcatKerberosConfigFiles are unzipped into that folder. The test website is named lisa.rushworth.us and is either set up in DNS or added to c:\windows\system32\drivers\etc\hosts on the client(s) that will access the site. And, of course, there’s a client machine somewhere logged onto the domain. You are going to need to tweak my config files for your domain.

In jaas.conf — I have debug on. Good for testing and playing around, bad for production use. Also you’ll need your SPN and keytab file name

principal="HTTP/lisa.example.com@EXAMPLE.COM"
keyTab="/usr/local/tomcat/conf/lisa.example.com.keytab"

In krb5.conf — the encryption is about the only thing you can keep. Use your hostnames and domain name (REALM). If you have multiple domain controllers, you can have more than one “kdc = ” line in the realms.

[libdefaults]
default_realm = EXAMPLE.COM
default_keytab_name = /usr/local/tomcat/conf/lisa.rushworth.us.keytab
default_tkt_enctypes = aes128-cts rc4-hmac des3-cbc-sha1 des-cbc-md5 des-cbc-crc
default_tgs_enctypes = aes128-cts rc4-hmac des3-cbc-sha1 des-cbc-md5 des-cbc-crc
permitted_enctypes = aes128-cts rc4-hmac des3-cbc-sha1 des-cbc-md5 des-cbc-crc
forwardable=true

[realms]
RUSHWORTH.US = {
kdc = exchange01.example.com:88
master_kdc = exchange01.example.com:88
admin_server = exchange01.example.com:88
}

[domain_realm]
example.com= EXAMPLE.COM
.example.com= EXAMPLE.COM

In web.xml – Roles may need to be sorted around (I’m not much of a TomCat person, LMGTFY if you want to do something with roles). Either way, the realm needs to be changed to yours

<realm-name>EXAMPLE.COM</realm-name>

Once Docker is running and the files are updated with your domain info, install the tomcat:8.0 image from the default repository. Start the container mapping all of the custom config files where they go:

docker run -detach --publish 8080:8080 --name tomcat8 --restart always -v /c/docker/tomcat8/tomcat-users.xml:/usr/local/tomcat/conf/tomcat-users.xml:ro -v /c/docker/tomcat8/lisa.example.com.keytab:/usr/local/tomcat/conf/lisa.example.com.keytab:ro -v /c/docker/tomcat8/krb5.conf:/usr/local/tomcat/conf/krb5.conf:ro -v /c/docker/tomcat8/jaas.conf:/usr/local/tomcat/conf/jaas.conf:ro -v /c/docker/tomcat8/web.xml:/usr/local/tomcat/webapps/examples/WEB-INF/web.xml:ro -v /c/docker/tomcat8/context.xml:/usr/local/tomcat/webapps/examples/WEB-INF/context.xml:ro -v /c/docker/tomcat8/logging.properties:/usr/local/tomcat/conf/logging.properties:ro -v /c/docker/tomcat8/spnego-r9.jar:/usr/local/tomcat/lib/spnego-r9.jar:ro -v /c/docker/tomcat8/login.conf:/usr/local/tomcat/conf/login.conf:ro -v /c/docker/tomcat8/testAuth.jsp:/usr/local/tomcat/webapps/examples/testAuth.jsp:ro tomcat:8.0

A couple of useful things about Docker — the container ID is useful

C:\docker\tomcat8>docker ps
CONTAINER ID IMAGE COMMAND CREATED STATUS PORTS NAMES
4e06b32e1ca8 tomcat:8.0 "catalina.sh run" 12 minutes ago Up 12 minutes 0.0.0.0:8080->8080/tcp, 0.0.0.0:8888->8080/tcp tomcat8

But most commands seem to let you use the ‘friendly’ name you ascribed to the container. Running “docker inspect” will give you details about the container – including its IP address. I’ve found different images use different settings: some map to localhost on my box, some get an IP address within my DHCP range.

C:\docker\tomcat>docker inspect tomcat8 | grep IPAddress
"SecondaryIPAddresses": null,
"IPAddress": "172.17.0.2",

Since this is an image that maps to localhost on my box, I need the lisa.example.com hostname to resolve to my laptop’s IP address. For simplicity, I did this by editing the c:\windows\system32\drivers\etc\hosts file.

Shell into the container:

docker exec -it tomcat8 bash

Update your packages and install the kerberos client utilities:

root@4e06b32e1ca8:/usr/local/tomcat/conf# apt-get update
root@4e06b32e1ca8:/usr/local/tomcat/conf# apt-get install krb5-user

Then test that your keytab is working:

root@4e06b32e1ca8:/usr/local/tomcat/conf# kinit -k -t ./lisa.example.com.keytab HTTP/lisa.example.com@EXAMPLE.COM
root@4e06b32e1ca8:/usr/local/tomcat/conf# klist
Ticket cache: FILE:/tmp/krb5cc_0
Default principal: HTTP/lisa.example.com@EXAMPLE.COM

Valid starting Expires Service principal
07/08/2017 18:27:38 07/09/2017 04:27:38 krbtgt/EXAMPLE.COM@EXAMPLE.COM
renew until 07/09/2017 18:27:38

Assuming you don’t get errors authenticating using the Kerberos client utilities, try accessing the TomCat site. I’ve added a testAuth.jsp file to the examples webapp – it shows the logon method, user name, and what roles they have:

09-Jul-2017 15:42:55.734 FINE [http-apr-8080-exec-1] org.apache.catalina.authenticator.SpnegoAuthenticator.authenticate Unable to login as the service principal
java.security.PrivilegedActionException: GSSException: Defective token detected (Mechanism level: GSSHeader did not find the right tag)

Verify that your SPN is set to the same name being used to access the site. I’m not sure why the configured service principal name doesn’t supersede the user-entered hostname. But I got nothing but auth failures until I actually entered the hostname into my hosts file and used an address that matches the service principal name.

Git Deployment

I ‘inherited’ the Git server at work — which means I had to learn how the back end component of Git works (beyond my file-system based implementation where there are just clients and a disk location). It is not as complicated as I feared. The chap who had deployed the Git backend at work chose Bonobo — since he no longer works for the company, I cannot just ask why this particular implementation. It’s Windows based and priced in our 0$ budget, and I am certain these were selling points. It seems quite stripped down compared to GitHub too — none of the issue tracking / Wiki / chat about it features. Which, for what my department does, is fine. We are not software developers. We have a lot of internal code for task automation, we have some internal code for departmental web sites, and we have some sample code we hand out to other developers (i.e. someone wants to start using LDAP or ADFS authentication, we can give them a sample implementation in their language). There aren’t feature requests. Generally speaking, there aren’t simultaneous development tasks on a project.

Since I deciphered the server implementation at work, I wanted to set up a Git server at home too. The limited feature set of Bonobo was off-putting. I wanted integrated issue tracking. Looking at the available opensource and free options, I selected GitLab. As a sandbox — poke around the server, see how it works and what features it offers — I wanted something ready-to-go. I noticed that there is a Docker container for the project. I helped a few friends who were testing Docker as a development and deployment methodology (I’ve even suggested it for my employer’s internal development staff … being able to develop and run an application with an integrated web server *without* needing the Windows permissions and configuration for a web server (and doing it all over again when your computer is replaced) seemed efficient. But I’d never actually used a Docker container before. It is incredibly easy.

Install docker — a bit obvious, but that was the most time consuming part of the process. I elected to install it on my Windows laptop for expediency. If we decide not to use GitLab, I haven’t thrown a bunch of unnecessary binaries on the server. Lenovo, as a default, does not enable virtualisation. Getting into the BIOS config tool (shift then click the power button, keep holding shift whilst you click restart) was the most time consuming bit of the installation.

Once Docker is installed, pull the container from the Docker store (docker pull gitlab/gitlab-ce). Then run it (docker run –detach –hostname gitlab.rushworth.us –publish 443:443 –publish 80:80 –publish 22:22 –name gitlab –restart always –volume /srv/gitlab/config://c/gldata/etc –volume /srv/gitlab/logs:/var/log/gitlab –volume /srv/gitlab/data://c/gldata/data –volume /svr/docker/gitlab/gitlab://c/gldata/gitlab gitlab/gitlab-ce:latest). You can remap ports (e.g. publish 8443:443) if needed.

Not quite there yet — you’ve got to edit the container config (docker exec -it gitlab vi /etc/gitlab/gitlab.rb) for your environment. Set a valid external url (external_url ‘http://gitlab.rushworth.us’). I also enabled LDAP authentication to test that out.


gitlab_rails[‘ldap_enabled’] = true

###! **remember to close this block with ‘EOS’ below**
gitlab_rails[‘ldap_servers’] = YAML.load <<-‘EOS’
main: # ‘main’ is the GitLab ‘provider ID’ of this LDAP server
label: ‘LDAP’
host: ‘ADHostname.rushworth.us’
port: 636
uid: ‘sAMAccountName’
method: ‘ssl’ # “tls” or “ssl” or “plain”
bind_dn: ‘cn=UserID,ou=SystemAccounts,dc=domain,dc=ccTLD’
password: ‘AccountPasswordGoesHere’
active_directory: true
allow_username_or_email_login: false
block_auto_created_users: false
base: ‘ou=ResourceUsers,dc=domain,dc=ccTLD’
user_filter: ‘(&(sAMAccountName=*))’ # Can add attribute value to restrict authorized users to GitLab access, we leave open to all valid user accounts in the OU. Should be able to authorize based on group membership using linked attribute value like (&(memberOf=cn=group,ou=groupOU,dc=domain,dc=ccTLD))
attributes:
username: [‘uid’, ‘userid’, ‘sAMAccountName’]
email: [‘mail’, ’email’, ‘userPrincipalName’]
name: ‘cn’
first_name: ‘givenName’
last_name: ‘sn’

EOS


The default is to retain a lot of log files — 30 days! This might be reasonable in a corporate environment, but even for production at home … that’s a lot of space dedicated to log files.


logging[‘logrotate_frequency’] = “daily” # rotate logs daily
logging[‘logrotate_rotate’] = 3 # keep 3 rotated logs
logging[‘logrotate_compress’] = “compress” # see ‘man logrotate’
logging[‘logrotate_method’] = “copytruncate” # see ‘man logrotate’


And finally configure SMTP for outbound mail. We don’t use authentication on our SMTP server; it controls relay based on source IP. We do use starttls, but the certificate is not going to be trusted without additional configuration … so I set the ssl verify mode to none.


gitlab_rails[‘smtp_enable’] = true
gitlab_rails[‘smtp_address’] = “smtp.hostname.ccTLD”
gitlab_rails[‘smtp_port’] = 25
# gitlab_rails[‘smtp_user_name’] = “smtp user”
# gitlab_rails[‘smtp_password’] = “smtp password”
# gitlab_rails[‘smtp_domain’] = “example.com”
# gitlab_rails[‘smtp_authentication’] = “login”
gitlab_rails[‘smtp_enable_starttls_auto’] = true
# gitlab_rails[‘smtp_tls’] = false

###! **Can be: ‘none’, ‘peer’, ‘client_once’, ‘fail_if_no_peer_cert’**
###! Docs: http://api.rubyonrails.org/classes/ActionMailer/Base.html
gitlab_rails[‘smtp_openssl_verify_mode’] = ‘none’


Once the config has been updated, restart the container (docker restart gitlab).

Access the web site and you’ll be prompted to set a password for the admin user, root. You can click the ‘ldap’ tab and log in with Active Directory credentials. Fin.

If we deploy this for a production system, I would set up SSL on the web site and possibly externalize the GitLab database to MySQL. The external database is more of an academic experiment because we already use MySQL (and I still don’t want  to learn about vacuuming PostgreSQL).