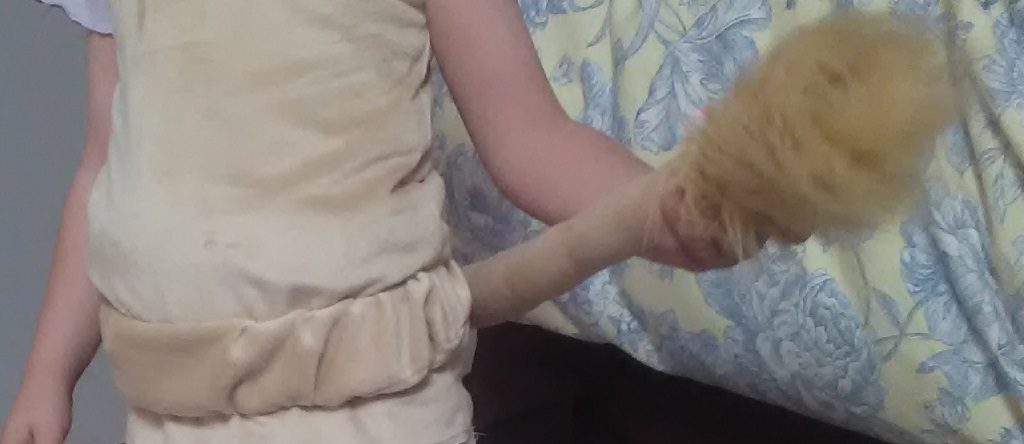
Category: Sewing

Baseball T-Shirt: Completed

I finished Anya’s baseball t-shirt!

I sketched a quick heart in Photoshop, and drew in two lines of baseball-style stitching. The image was printed on Transfer EZE ‘paper’ using our laser printer (which answered the question: can you laser print on this stuff?). I then took a little scrap of quilt batting and laid it on the shirt. Placed a scrap of white satin on top, then stuck the Transfer Eze print onto the satin. It adhered quite well to satin – was a little concerned!

Put it in a hoop and embroidered the red stitching to hold the whole thing in place. I then trimmed the satin about a quarter inch outside of the heart’s lines; the batting was trimmed to be about a quarter inch smaller than the satin. Finishing the project was just needle turn appliqueing the heart to the shirt (using what amounts to a really short satin stitch).

The quilt batting really enhances the stitch definition for the red lines, and it makes the whole design puff out a bit from the shirt.

Baseball Shirt

Anya’s preschool class has “baseball day” on Friday, and they are to wear their baseball shirts. It’s an interesting assumption that everyone has a baseball shirt to wear. Three years ago, I happened across an Indians t-shirt on post-season clearance. It was a size too large, but she grows. Beyond my “you cannot go wrong with a 4$ t-shirt” purchase, we don’t have anything baseball related. I don’t particularly want to pay inflated MLB-licensed in-season (and the Indians are doing well) prices.

I picked up a bunch of blank t-shirts for embroidered designs, so I decided to make Anya a baseball themed shirt. She chose the green shirt, and I drew a heart and added baseball stitching. The black and white image was printed on this Transfer Eze paper that I love. Then I cut out a slightly larger heart of white satin and a same-sized heart from a very thin quilt batting. Laid out the t-shirt, centered the quilt backing, then affixed the Transfer Eze heart to the satin and laid it on top of the batting. Going with the quilting principal of working from the center out to avoid bubbles, I started with the red stitching. Now I’m using a satin stitch around the edge to needle turn appliqué the whole thing onto the t-shirt.

Peppermint Swirl Dress

I started cutting the peppermint swirl dress. I cannot wait until fabric can be 3D printed (yes, I’ve seen Electroloom … but they went under, so don’t really count. I totally would have purchased one and started a custom fabric business. In the solid color realm, you could do some amazing pre-cut kits. Or white and hand dyed the printouts). This dress would be so much easier to make if you didn’t have to cut twenty eight little swirl strips 🙂

Wow does this use a LOT of fabric! Especially if you don’t think about it for a second first and cut the fabric folded wrong sides together. *Not* symmetrical. D’oh! So now I have to order another yard of the cream fabric. I’ll get the rest of the cream cut, all of the blue cut, and start assembling the dress. It’ll be 75% done before I actually need that last cream strip. I’m curious to write an algorithm to place the pieces on a length of fabric. It seems like the S-shaped combination of the two strip pieces could be nested to decrease the length of fabric required to get seven sets. Haven’t yet, so I’m getting two sets from a 44″ wide piece of fabric — cut the fabric in half and laid them together with both right sides up. Important, that.


Peppermint Swirl Dress

I came across a new pattern this weekend – the Peppermint Swirl Dress from Candy Castle Patterns – that I absolutely love. I can think of a lot of combinations that are holiday specific — red, white, and blue Independence Day dress, or a red and green Christmas dress. But didn’t want a wear-once dress.

It would also be great for a single color with gradients — take eight shades and arrange them 1 – 2 – 3 – 4 – 5 – 6 – 7 – 8 – 7 – 6 – 5 – 4 – 3 – 2 (loop back to #1 at the beginning). *But* this dress takes a lot of fabric. Like five yards for a 5 year old kid. At ten dollars a yard, it’s a fairly expensive dress using two or three fabrics. Even if I could get half yards for the skirt segments and use Kona cotton solids at 6$ a yard … that’s around 50$ for the skirt. Which, unfortunately, makes it a special occasion type of outfit.

Maybe as I get more fabric scraps, it would be a neat use-the-scraps project. But, for now, I wanted to get two colours that could be worn pretty much whenever. And I’d rather not spend 10$ a yard 🙂 So I began searching for closeout fabrics. There are a TON of cool closeouts in the 4$-5$ a yard range, but finding two that coordinated well … not so much. I thought about getting a print and then picking up a coordinating Kona locally. But then I came across a sale on marbled fabrics. I should have a blue and cream marbles in a week or so. I plan to use the blue as the dress top, make some piping with the cream fabric to go along the neckline, and use the cream fabric for the sash.

Blindly Following Instructions

I purchased a table runner kit after the holidays. I’ve never done paper piecing, but I like the Mariner’s Compass patterns. It’s a technique I wanted to learn; and I wanted a clean, modern table runner for our dining room. I didn’t see a whole lot of modern-looking quilted table runners.

I’ve watched a couple of online videos showing the paper piecing process, and thought I was ready to give it a try. Traced the A variant of the block four times, cut all of the fabric pieces, and got ready to sew. I was halfway done the first block when I realized that the instructions have a point made of a blue piece and a yellow piece. Not a darker and lighter blue or a darker and lighter yellow. Checked the B variant of the block – same thing.

Well, that’s not right! I can see the intended result and it’s clearly got points that have a shadow effect created by using a darker and lighter shade of the same color. And if you combine two of the block units, you’ll have nothing but yellow/blue points.

I ended up re-writing the fabric to be used – and realized that there isn’t actually a B variant of the block anywhere in the thing. It is 8 identical blocks. A dark blue, light yellow/dark yellow, then a light blue. That light blue connects to the dark blue on the next block.

One of the challenges of working on something new … I don’t know enough about what I’m doing to question the instructions. Until it becomes obvious (and I have to cut new pieces to re-do an entire block!)

Overlaying Fabrics

I played around with overlaying fabrics – I used an organza with a silver snowflake design over a deep blue satin. The resulting color is a much lighter icy blue (pretty much what I was going for).

I had a lot of trouble handling the fabric – I cut the circles and basted the two pieces together at the waist and hem. I then used the lower baste-line to fold and hem the skirt. That worked well. For some reason, though, I could NOT get the waistband to attach. I ended up catching the skirt in the serger and slicing the fabric. There’s a fairly large (3/4″ wide by 3″ long) gash that I had to patch up right along the band. Not something you notice when Anya is wearing it, I didn’t have enough fabric to cut new circles, and it would look worse if I spliced in an entire wedge of the skirt.

The organza material is a little plastic-y, and difficult to work with. My original idea was to do a rolled hem on the bottom of both materials. Couldn’t get a nice rolled hem on a straight piece of sample fabric … so that was out. Once the organza was combined with the satin, it was pretty easy to work with. It doesn’t drape like cotton, though (hence my problem with the serger).

The end result, however, looks really awesome. And Anya loves having a glittery silver snowflake skirt.

Anya’s Easter Dress (2017) – Almost Finished

In fitting this dress, I decided to split the dress into a top and skirt to produce an outfit Anya can put on herself. As a dress, it was a little tricky to get into. I considered putting a zipper in the back, but she wouldn’t be able to dress herself.

Since the skirt is basically a circle skirt, I added a wide waistband with 2″ elastic. Done.

I’ve extended the lining (attached a strip of cream Bemberg lining material to the navy fabric which stops at the top of the white fabric).

Anya’s Easter Dress (2017) – Getting Started

I started making Anya’s Easter dress using the Kinley Cascading Flounce Dress pattern from Simple Life Sewing Company. I’m using a bright-ish blue main fabric with white Fairy Frost (glittery silver on white) as the underskirt. I have a navy blue Bemberg lining on the bodice – it’s a little dark, but it was something I already owned 🙂

I’ve got the pieces cut and am ready to start assembling the dress tomorrow.

Serger (American Home AH100) Review

It’s been a little over a year since I bought my serger. I vacillated between a really expensive Juki with all sorts of features and not buying a serger … 800$, the cheapest price I found for the Juki — and that was from someone on eBay so may not have included a valid warranty, is a LOT of money. Especially for something you don’t know that you are going to use. And, honestly, I don’t know enough about sergers to say if the whole list of features is useful ‘stuff’ or just for such niche uses that I’d never encounter a use for them.

As I researched sergers, I came across an old list of serger recommendations for different user types. The Juki that I’d been considering was on there, but I was drawn to #5 on their list: American Home’s AH100. I didn’t find a lot of reviews for the product. I still wasn’t sure I’d use a serger at all. But I found one on Overstock for under 200$. That was a good enough deal to try it out.

I don’t sew enough to say I use the serger weekly, but I’ve gotten a good bit of use from the serger. Starting with Easter dresses last year – probably not the best project to learn on. When you get the machine, there’s a little bit of thread pulled through it. There is a sample and the tension settings used for the sample.

The machine isn’t too difficult to thread – I wouldn’t have paid 500$ to get an automatically threading machine! I’d read a technique where you clip the already-threaded threads off at the cone. You put the new cones on & tie each one to the old threads that are run through the machine. You set the tensions to the loosest setting and manually advance the machine to pull the new threads through. When the knots get to the needles, you need to clip the knot & thread the needle. I’d also read,, though, that threads can snap in the machine … so you should know how to thread your machine. I’ve fully re-threaded the AH100 three times — it takes a few minutes, but it gets done. I usually do the cut/tie/pull/cut through method of re-threading the machine, and that only takes a few seconds. The thread path is color coded, though, so it isn’t a problem if you have to re-thread the machine from nothing.

The base of the machine, on the left hand side, has a door that swings out so you can fit sleeves/trouser legs onto the machine. I’ve used that to assemble Anya’s circle skirts.

I’ve used the normal 4-thread stitch – quite a few different materials, and it certainly improves the look of the finished seam if you test the tension on some spare scraps. I’ve also changed over to the other plate and done a 3-thread rolled hem. I need to figure out how to use the flat-lock stitch to repair one of Anya’s pajamas. I haven’t encountered any situation where a more expensive serger would have been able to do something, and I am quite happy with my purchase.

The manual is sufficient – haven’t come across anything I had to Google yet. That’s the one down side to this machine – I see forums all over the place with Babylock, Janome, and Juki users talking about how to do XYZ on their machine. Supposedly the AH100 is the same thing as a Babylock Lauren (BL450A). The manuals seem to line up, so I believe this to be true. Anyway, it is possible I’d be able to find some Lauren users to help out … but I don’t see a lot of AH100 users discussing the intricacies of their machines online.