Category: Crafts

Ruffling Foot

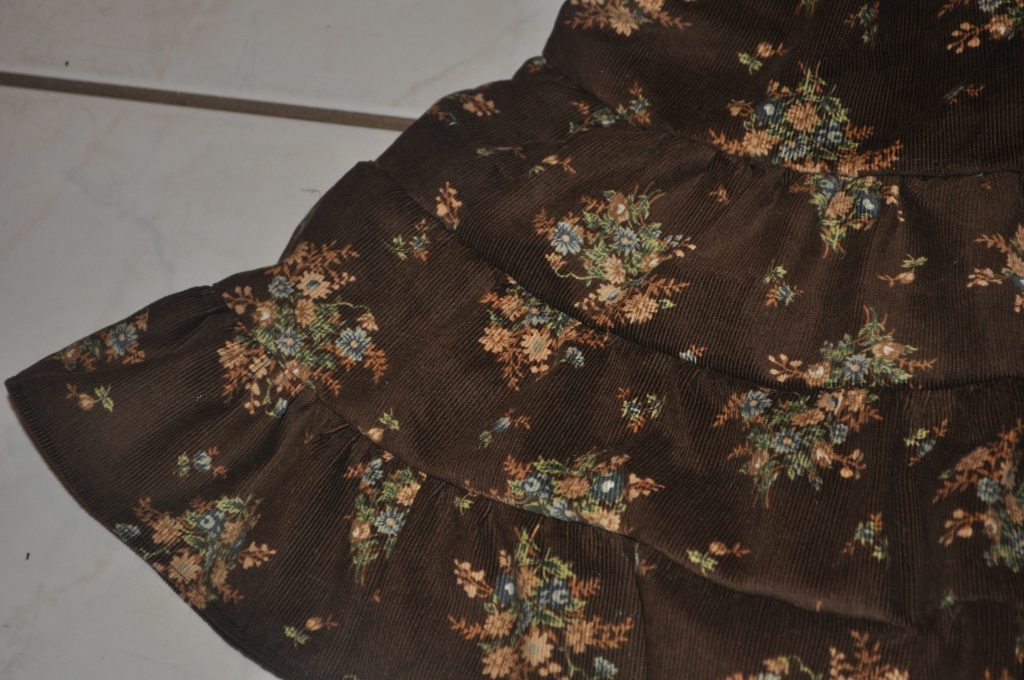
I got some really nice corduroy fabric a few years ago with the idea of making Anya one of those tiered skirts where each layer is progressively larger than the other and gathered along the previous layer. It’s a simple enough process — decide how thick you want each tier to be and cut the fabric into strips that width + 2x a seam allowance. Once you’ve got a bunch of strips, attach them to create a really really long strip of fabric.

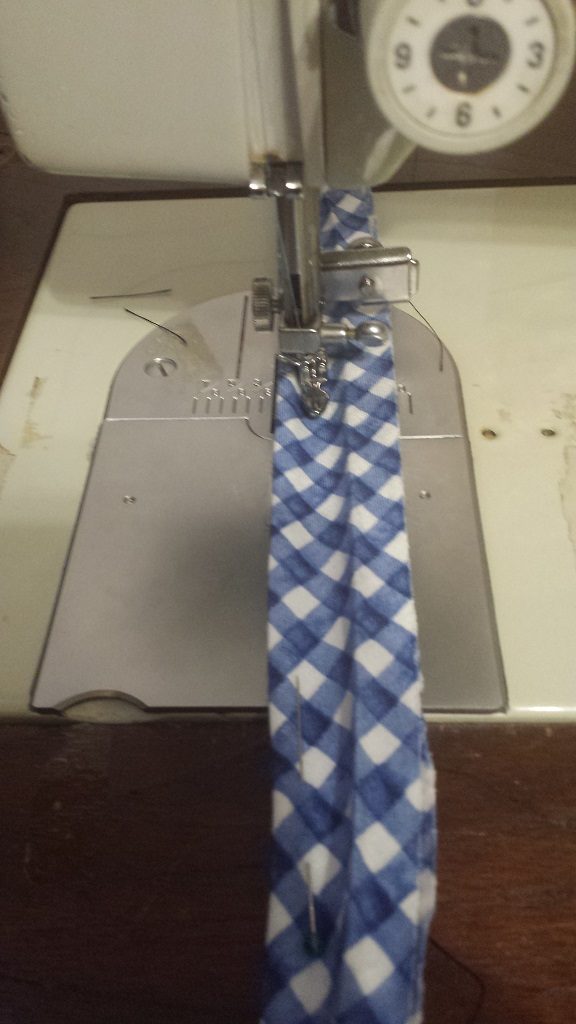
Take a wider strip of fabric and fold the top to form to encase an elastic band. Now comes the tricky part — getting the two pieces of fabric in the ruffler foot. There’s a long metal strip at the front that shoves the fabric to ruffle it — you want the long strip of fabric, right side facing up, under this strip. The bottom of the skirt, you want over this metal strip — it’s not going to be ruffled — and facing down. Both pieces of fabric are slipped under the foot at the back. Now sew — it’s a little jerky as the long strip of fabric gets pulled into the gathering mechanism. Once you make it all the way around the skirt, cut the long strip & attach the two ends of the tier. Then do it all over again — get the long strip into the gathering mechanism, get the bottom of the skirt above the gathering mechanism, both pieces of the fabric under the foot, and sew. Add tiers until the skirt is the desired length. Fold the bottom of the skirt up to form a hem. I went over the seams between each tier with my serger.

And we’ve got a skirt!

Most ruffling feet have settings where you can select how many stitches between a gather (I used 6) and the depth of the gather (I used a small gather because I wanted a subtle effect, not a pleated skirt).

Halloween 2018 – Unicorn Hood

Making a horn turned out to be a LOT harder than it seemed. Taking a heavy piece of paper and folding it into a cone was easy enough. I stuffed it with polyfil to give it some form. But how do you make it sparkly? I wanted to wrap the thing in a gold lamé fabric, but getting it all held together just wasn’t working.

Plan G (or so) was spray-on glue and glitter. I’m going to have to coat this thing in some clear sealant so she’s not a unicorn sprinkling glitter everywhere she goes. But it’s a horn!

Halloween 2018 – Unicorn Mane

I’m making a rainbow mane and tail for Anya’s unicorn custom. To make the mane, I took a piece of cardboard twice as long as I want the mane to be. Folded it in half and laid a piece of white ribbon over the fold (clipped it in place at first). And then wrapped yarn around the thing. A lot of yarn 🙂

Once the yarn was wrapped in the order she wanted, hand-stitched the yarn to the ribbon. After the yarn was attached, I cut the bottom. Stitching the ribbon onto the fur hood, we’ve got a mane.

Halloween 2018 – Unicorn Ears

Anya wants to be a unicorn for Halloween this year — I got some awesome white “fur” and made a shirt and pants from the same patterns I used for her lion costume last year. I just need a different headpiece and tail. I think I’m going to use the hood from a poncho pattern that I’ve got. Attach a mane, some ears, and a horn … voila, a unicorn.

To make the ears, I cut a basic form from comic book board (half-back … what I use to wrap and store my fabric pieces), glued a piece of pink satin to each piece of cardboard, and then wrapped the back with a cut of furry fabric. The fur is glued onto the pink satin. Lots of clips to hold the thing in place while the glue set …

Deodorant Recipe

There are two deodorant recipes I’ve found to be effective — the one without coconut oil is harder and stores better in the summer.

7 T shea butter
5 T arrowroot powder
3 T baking soda

OR

4 T shea butter
3 T coconut oil
5 T arrowroot powder
3 T baking soda

In the bowl of a double-boiler, melt the oil. In another bowl, mix the arrowroot powder and baking soda. Slowly pour powders into melted oil and stir to combine. Remove from heat and stir as it cools. When the mixture starts to thicken, scoop into container and allow to finish cooling.

Thread Painting – Butterfly Tshirt

I’ve seen various iterations of needle painting (thread painting, needle shading) and am finally trying it. While the technique isn’t difficult, it is seriously time consuming. Fortunately, Anya loves the butterfly thus far. I’ll probably make another shirt or two using this technique … but start with a size 6 or 7 shirt so she gets years of wearing it (and most of the embroidered shirts will either become a t-shirt quilt or appliqué patches on a larger shirt)

Pencil Pouch, Part 3

I finished Anya’s pencil pouch last night – she loves it!


With a special surprise:


She put her little toy cat into it to bring to kindergarten. A move that is especially goofy because I used to bring a toy cat to school with me (not my teacher’s favourite thing I did!) too.

When attaching the lining fabric, I left my 5″ gap along one of the hidden gussets. This means the generally visible interior seam is beautifully finished.


While the side gusset hides the hand-stitching in the gap:


Just like Anya’s backpack, I think the piping gives the pouch a finished look.


Pencil Pouch, Part 2

I finished quilting the pencil case exterior with a light blue thread. This thread from Missouri Star Quilt Company is fantastic. My machine is finicky, and some types of thread result in an ugly snarl on the bobbin thread side. There are a few tricks that help — proper thread tensions, realizing the bobbin thread comes off the right-hand side of the bobbin when it is inserted into the machine — but some threads are basically unusable. These stitches, however, are beautiful on both sides.


Next up – making the piping! If you have bias strips left over from other projects, homemade piping is easy and super cheap. I had about a yard and a half of blue checked double-fold bias tape from a quilt. I unfolded the tape to make a bias strip folded in half length-wise. I then took white 550 paracord (also on-hand from another project, otherwise you can find cotton cord that’s meant to be used in piping) and encased it in the bias strip. I pinned through the top of the cord to secure it to the fabric then used the edging/zipper foot to stitch along the cord, creating a loose piping. I hand-stitched the cord ends (paranoia, mostly … but it would really suck if the cord started to come out of the fabric casing!). The piping fabric shouldn’t be super taut at this point, but there shouldn’t be wrinkles or puckers. When the piping is inserted, the stitching will be closer to the paracord and make a nice firm piping.

Finished in part 3.

Pencil Pouch

We got Anya’s first school list, and it’s got the expected dozen glue sticks and half dozen boxes of crayons. But it also has a pencil pouch for art class. Seems like an opportunity to make something cute and practical. Perusing the Internet for pencil cases, I happened across a pattern for a zippered pencil pouch.

I wanted to use the flower presser foot to stitch flowers around the pouch, but mine doesn’t work! The throw on the sewing machine arm isn’t long enough to advance the ring. I quickly drew out a diamond pattern.

And am stitching it with a blue thread to match the piping fabric.

Continued in part 2.

Bed for Anya: Dimensions

Still trying to work through the dimensions for Anya’s new bed. A twin bed is like 38”x75” – thinking 80” long with the headboard/footboard. Along the 15.5’ wall, that leaves like 8’ for the stairs, open floor space, fish tank, and door swing. Even if we needed to go a little longer to get the headboard/footboard, it should fit.

It’s the other dimension that worries me. With a 38” bed & another ~3 feet for the desk area, that’s just over 6’ wide … which gives a 3’ walkway between the bed/desk and hearth. But I worry that 3’ for the desk and chair area is going to be cramped – kids desk chairs are about 2’ square, and a 12” desk seems really small. Although L shaped desks end up having a lot of space, and having that second layer for more storage … maybe a 12” desk isn’t bad. I’d make the shorter part of the ‘L’ wider for paperwork and books. But a laptop computer will fit fine on a 12” desk.

The other question is height. I thought about doing the under-bed area as a potential walk-in closet … but the ceiling is only like 8’ high. And you don’t want to hit your head getting into bed every night. So that’s pretty much out. Doing the desk at 42” high and the bed platform at 48” – gives a little 5” platform for the mattress, plus the mattress height. But a 4’ hideaway might seem cramped. I’d rather a 5’ hideaway (desk at like 55”) … but that leaves 3’ from the mattress platform to the ceiling. Mattress itself has depth too. Now I was going to do the mattress platform the same width as the mattress so you’d sit up & swing your legs over to the desk platform to stand up. Which gives you 3’5” and that seems uncomfortable. A 42” platform means there’s 4.5’ to the ceiling. Wondering about a desk platform that is 3’ and pretty much close to square on the vertical wall – with the two tiers, the desk itself is 4’ & there’s a foot between that top desk level and the ceiling. Then 4’ for the hideaway, which gives 4’ for bed/sitting and 5’ to stand up next to the bed. No good for a teenager, but we’re designing a kid’s bed/desk … I’m sure she’ll want something else when she’s older.

I think we’re going to try laying it out in cardboard this weekend to make sure the footprint is reasonable & the platform heights aren’t head-bonking.