Tag: microsoft teams

Did you know … you can add a “Share to Teams” button to your web content?

If you can add script tags to the page head, you can add a “Share to Teams” button on your web site. This can be used to allow employees to share internal sites to Teams, but it can also be used on public sites to allow visitors to post links to their Teams organization.

How? There are two steps – add “<script async defer src=”https://teams.microsoft.com/share/launcher.js” ></script>” in HEAD. The post that is made to Teams is *prettier* if you have  meta properties for title, description, and image within the linked page.

Then add a div with class “teams-share-button”. The “data-href” value is the URL to be shared. If you don’t want a page preview to render, you can set “data-preview” to false.

Sample page content:

<head>
    <title>Teams Share Test</title>
    <meta property="og:title" content="Lisa Rushworth Home Page">
    <meta property="og:description" content="Lisa Rushworth's Home Page">
    <meta property="og:image" content="https://www.rushworth.us/lisa/RedR.png" />
    <script async defer src="https://teams.microsoft.com/share/launcher.js" ></script>
</head>
<body bgcolor="black" text="white">
    <div class="content">
        <P>Here is the really cool information contained on this web site. It is so interesting that you want to share it to Teams.</P>
        <P>Click the Teams button at the bottom and you'll see a form that allows you to share the URL as a thread in a Teams channel.</P>
    </div>
    <div class="teams-share-button" data-href="https://www.rushworth.us/lisa/teamstest.php" data-preview="true">
    </div>
</body>

Visitors will see a small Teams logo in the teams-share-button div. To share the URL in Teams, they just need to click on the Teams logo.

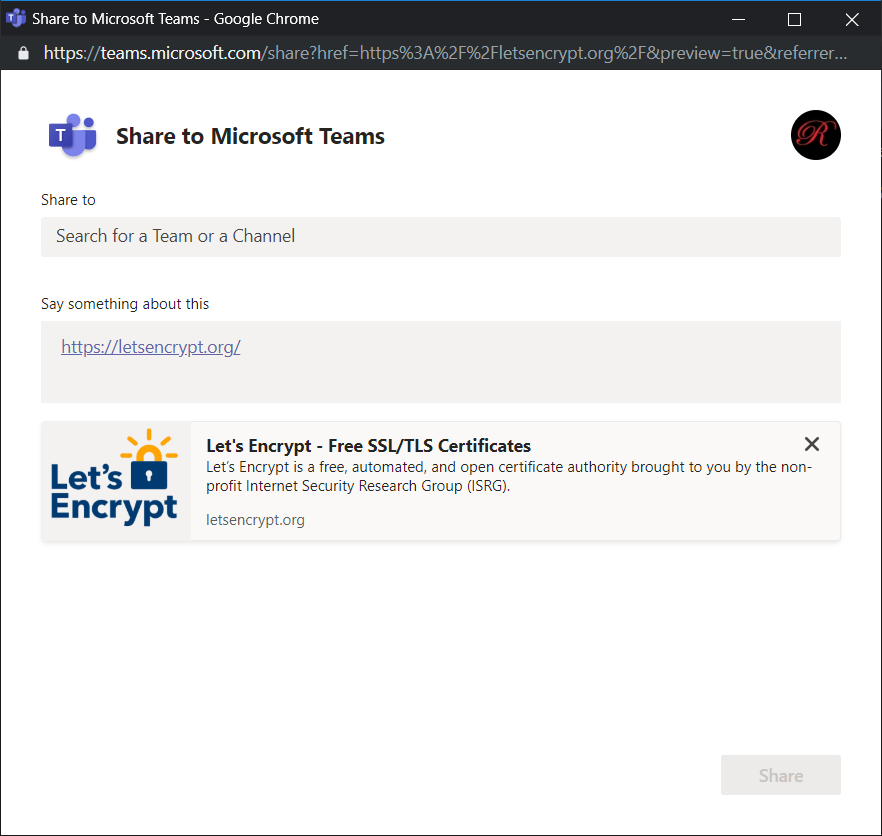
A new window will load. If the user is not logged into the Team web site, they will be prompted to log in. Once logged in, the share dialogue will be displayed. If your site has title, description, and icon meta tags, a preview card will be included at the bottom.

Click in the “Share to” field and type a Team or Channel name – Teams and Channels from the user’s organization will be displayed.

The user can add text to the thread. Click “Share” to share the link to the selected Teams channel.

A confirmation page will be displayed.

In Teams, a new thread will be created. This is the thread for my shared URL.

The URL used in the teams-share-button DIV doesn’t have to match the page on which it is used — I can add a ‘share to Teams’ button that posts any URL to Teams.
Did you know … you can customize Teams channel notifications?

Microsoft has created additional notification options in Microsoft Teams – and you can now customize those settings for individual channels to ensure you’re getting notifications when and were you want to see them.

To access your general notification settings, click on your avatar in the upper right-hand corner of the Teams window. Select “Settings”.

Click on “Notifications”. You will be presented with a long list of activities and can select the type of notification you wish to receive for each activity. Notice “Show only in feed” is now an option – this means new activity will appear in the “Activity” section of Teams but not display the big purple notification box (a.k.a. “the banner”) in the lower right-hand corner of your screen.

You can also customize notifications for individual channels – maybe you want a banner notification for a really important channel, or you don’t want to be notified about every reply to a message. Click the ellipsis next to the channel name and select “Channel notifications”

Here you can customize the notification you will receive for channel posts and at-mentions (you’ll still get notified about Team or individual at-mentions). You can also un-check the “Include all replies” box to get notified about new threads.

All of the channels that you followed previously will use your Teams-wide notification settings. Channels that you weren’t following will have notifications off. Newly created channels will have new post notifications turned off and channel mentions set to “Only show in feed”.

** If you still see “Follow” and not “Channel Notifications”, click on your avatar in the upper right-hand corner of the Teams app and select “Check for updates”. Once the updates have been applied, click the tip to “refresh” Teams.


Did you know … Microsoft Teams private chats can include 100 people?

In January, Microsoft expanded Teams Chats to 50 people. I’ve heard from a few individuals who wanted to be able to chat with more people — essentially to use Teams to send broadcast messages to a lot of people. Last week, Microsoft upped the limit for private chats to 100. Hopefully they’ll extend the Graph API to allow applications to initiate those chats because adding 100 people to a chat seems like it would take a while!

Did you know … there are now reactions in Teams?

If you hover your mouse over the upper right-hand corner of a post – where the little thumbs-up used to be

You’ll see a reaction bar. Click one of the emojis to “react” to a post.

Now you’ll see reactions on a post instead of just thumbs-up.

When a post receives different reactions, you’ll see icons for each reaction and a number showing you how many people selected each reaction.

Did you know … you can post announcements in Teams?

Teams announcements are another way to bring attention to a specific post. This doesn’t address the desire to pin a post so it’s always visible in the channel (click the link and vote if that’s something you want to do too).

When you are in the advanced editor (click “Format” or use Ctrl-Shift-I), you will see a drop-down to change conversation posts to an announcement.

When creating an announcement, the editor will have a banner at the top. You can put text in the banner and customize the banner background. Click either the color selector or the image selector in the bottom right-hand corner of the banner.

You can upload a custom image – you’ll want something that is a long, horizontal rectangle. Select “Upload an image” and select the file you want to use as the background.

You’ll probably need to crop the image – you can adjust which portion of the image is shown and zoom into the image as needed. Click “Done” to accept your crop selections.

Compose the rest of the message as normal – you can add a sub-heading and any of the message content available in regular posts. Post the announcement

The post will have a little megaphone logo (this doesn’t show up as a filter option yet, but I expect it will be added in the future) and the banner will make your post stand out in the conversation listing.

They make your post stand out with a caveat – just like marking all of your posts as important, announcements lose their efficacy when every post is an announcement. Use sparingly!


Did you know … you can delete files shared in Teams chats?

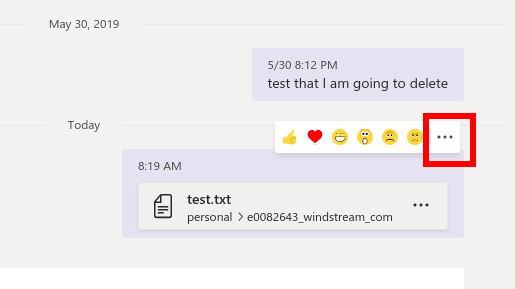
Deleting a file shared in a Teams space is straight-forward — go to the “Files” tab, click the ellipsis next to the file name, and select “Delete”. But when you do the same thing with files shared through Chat … there’s no delete option. If you click the ellipsis on the file’s card in the chat dialogue, still no delete option. That’s not because files cannot be deleted — how to delete chat files is just non-intuitive.

Hover your mouse over the message that was posted when your shared the file. You’ll see the reaction toolbar and another ellipsis. Click on that ellipsis.

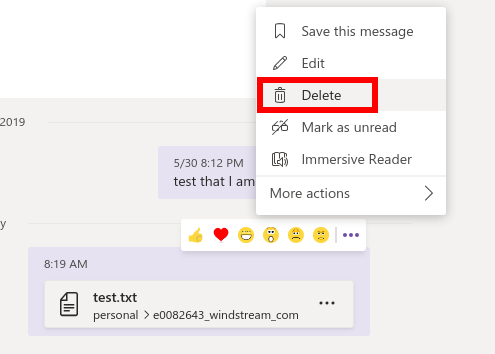
Here’s the option to delete the message. Deleting the message about the file deletes the file from the “Files” tab in the chat.

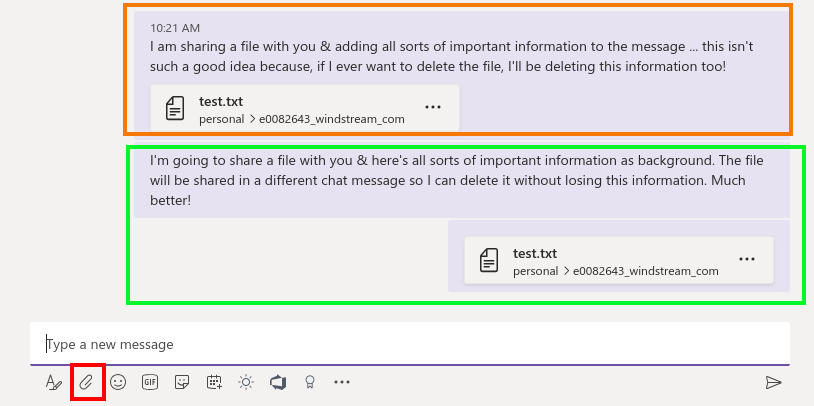
When you use the “Files” tab to share a file, a new conversation item is created. But, when you use the little paperclip at the bottom of the message composition dialogue to share a file … your file and message text can be combined into one item (upper rectangle with text and a file combined in one chat post). Not a problem until you want to remove the file from your chat and have to delete the conversation text too.


While it makes a lot of sense to provide context to a file — why are you sharing this, what am I meant to be doing with it — I recommend posting the context message and then posting a blank message into which the file is attached (lower rectangle with two independent chat posts). To delete test.txt in this scenario, I can hover my mouse over the post with the file, delete it, and leave the text within the chat history.

Note: Chat files are shared from OneDrive. You can select an existing OneDrive file, and files you upload through Teams are stored in the “Microsoft Teams Chat Files” folder of your OneDrive. Because it’s possible that you’ve shared the same file with multiple individuals, or that you still want the file even though it’s no longer shared with a specific person, deleting a file from the Teams chat does not delete it from OneDrive. If the file is no longer needed, make sure you remove the file from OneDrive as well.

Did you know … you can share your screen from the Teams web client in Chrome?

I use the Teams web client as my primary Teams application – I like it, but it’s also important to be able to identify where the web client falls short of full Teams functionality. There is one big “missing” feature to me – screen sharing. I can view shared screen, but I cannot remote control shared screens and cannot share my own screen.

But now you can share your screen in a Teams web client. You have to schedule a meeting, and you still cannot perform remote control operations in the web browser. But it’s awesome to be able to show someone what I’m working on or let a tech support engineer follow along as I reproduce an error.

To share your screen from a Chrome browser, first open https://teams.microsoft.com in Chrome. Schedule a meeting and join it. Open the sharing control panel.

Select “Screenshare”

Select the appropriate tab to share your entire screen, a single application, or a single Chrome tab. Select the screen/application/tab that you want to share and click “Share”.

Voila! You are sharing your screen. Click “Stop sharing” when you are done (or just disconnect from the meeting).


Did you know … you can “clean up” your Teams chat history?

My inbox has 7,582 messages in it. This fact doesn’t bother me at all because “Unread: 2” indicates what still needs to be addressed. I mark a message as unread to keep them in my “needs to be worked on” queue, so seeing thousands of messages in my inbox doesn’t feel like an overwhelming pile of outstanding requests.

Some people move messages from their inbox – either deleting the message or sorting it into an appropriate folder – and, for them, the item count is their “needs to be worked on” list. My mom is one of those people – she gets a little stressed out just seeing the pages (and pages, and pages!) of messages in my inbox.

I mention this because it never bothered me that the Teams chat list is cluttered with the last 30 days of private chats, chats from within meetings, Planner notifications. Nothing is in bold, there’s no activity indicator on the Chat tile … to me, that says “you’re all done here”.

But that’s not true for everyone. Some people see the pages of conversation history and subconsciously see a bunch of messages they still need to address. Or they see clutter — “when you’re done with it, put it away” and this isn’t away! If you don’t like to have dozens of finished conversations hanging out for a month, you can hide them. Hiding conversations does NOT delete the messages – if you receive a new message from the individual or address a new message to them, your previous chat history will still be there. Hidden chat messages are still displayed when you search for information. But hiding chats reduces the number of “recent” conversations displayed in Teams.

To hide a conversation, move your mouse over a listing and click the ellipsis which appears.

Select “Hide” from the menu.

The hidden chat record will no longer be listed in your recent conversation history. Repeat as needed with the rest of your chat history.

If the person sends you a new message, you will see an activity indicator on the “Chat” tile and the conversation will pop back into your recent conversation listing. If you address a new chat message to the person, the conversation will pop back into your recent conversation listing. You can hide the conversation again when you’ve finished the discussion.


Did you know … the Teams mobile client lets you configure you time?

Mobile access to the company’s communication platforms is convenient – and you can use Teams on your Android or iOS device. A training class or a trip out to a customer’s site no longer means you are disconnected from the day’s routine discussions. But sometimes I want to disconnect – watching my daughter’s gymnastics performance, my husband’s birthday dinner, listening to a band at the local club, painting en plein air at the local park. Oh, and certainly dark-o-clock when I’m sleeping. Configure “quiet hours”!

Tap the hamburger menu in the upper left-hand corner of the screen.

Tap “Notifications”

Tap “Quiet hours”

Move the “Quiet hours” slider to ‘on’

Select the times when you want Teams notifications to stop and resume. If you want to disable Teams notifications for entire days (regularly scheduled days off or temporarily for vacation days), tap “Quiet days”

Move the “Quiet days” slider to “On” and tap the days during which you wish to suppress notifications.

Return to the menu and you will see that quiet hours are scheduled.

During quiet hours (or days), the notifications logo will indicate that notifications are disabled and tell you when notifications will resume.

The hamburger menu on the Teams app will also indicate that notifications are temporarily suspended.


Did you know … you can use Microsoft’s Whiteboard in your Teams meetings?

Microsoft Whiteboard, in Teams, is currently a public preview. Like other previews available in the Office 365 ecosystem, there will be glitches and things that don’t work properly. If something isn’t working quite right, turn off the preview and verify the problem persists before reporting an issue. You can submit feedback directly to Microsoft through their UserVoice site, but previews are not supported by Microsoft.

Now that the warning bit is out of the way – we’ve been using the Whiteboard for a week and the only oddity I’ve encountered occurs when both a Whiteboard and desktop are shared simultaneously. You must keep minimizing the Whiteboard to view the shared desktop.

How do you use a Microsoft Whiteboard in your meeting? When you are in a meeting, click on the “Sharing Tray” in the meeting tool bar.

In the “Whiteboard” column, select “Microsoft Whiteboard”

A whiteboard will be opened and shared with everyone on the call. To draw on the Whiteboard, select “Inking mode”

Click on a pen (or the eraser) along the right-hand side to select a pen color.

Draw on the screen. Click on the blue check-mark to leave inking mode. To close the whiteboard, click “Stop presenting”.

After the meeting, how do you access the Whiteboard? Visit https://whiteboard.microsoft.com – the Whiteboard will be stored for the person who initiated the Whiteboard in the meeting. To share it with others who had attended, click the ellipses on the Whiteboard preview.

Select “Invite”

Select “Create sharing link” and paste the link into the Teams meeting chat.

Team members can use the link to view the Whiteboard.

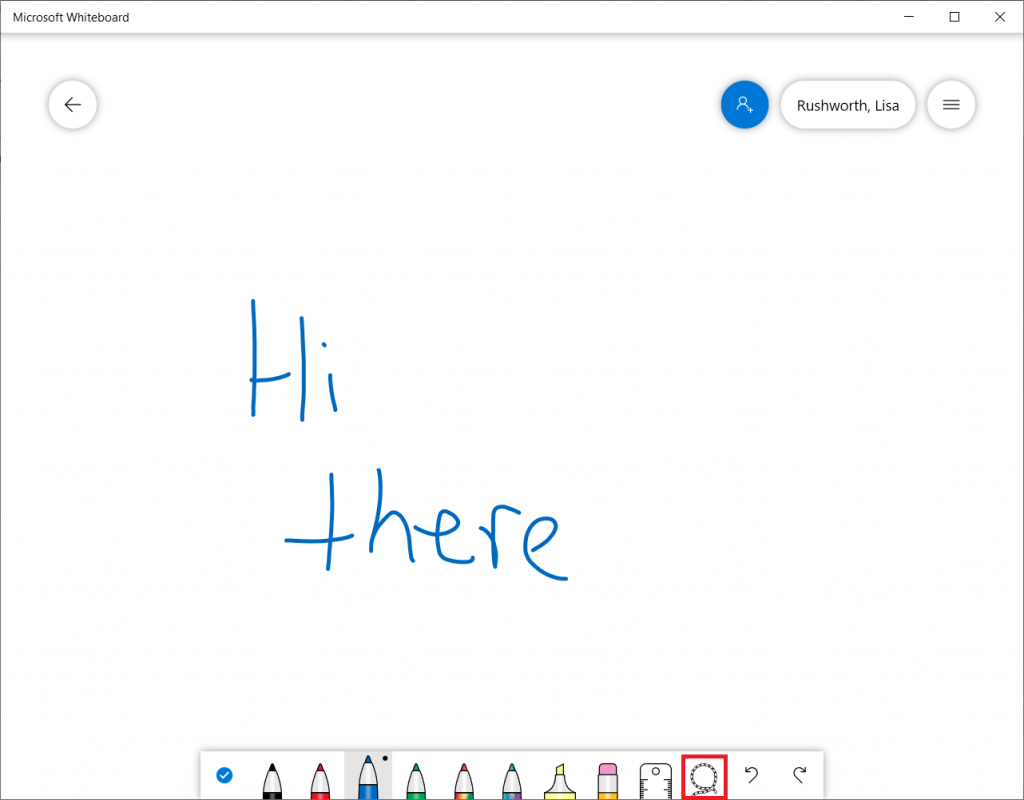
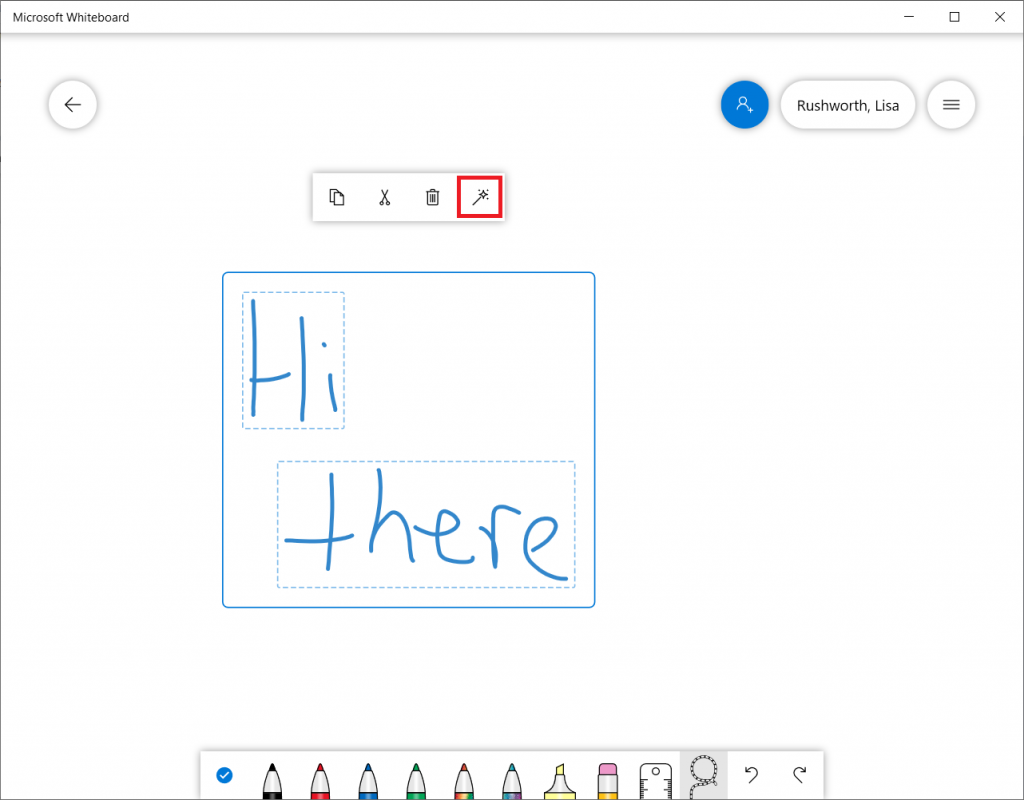
Whiteboards from Teams meetings are also available through the Whiteboard app. The app expands on the basic Whiteboard functionality available in Teams or online. In the app, you can select text ink and convert it to more readable text. Use the lasso tool to select a region of text ink.

Click on the magic wand

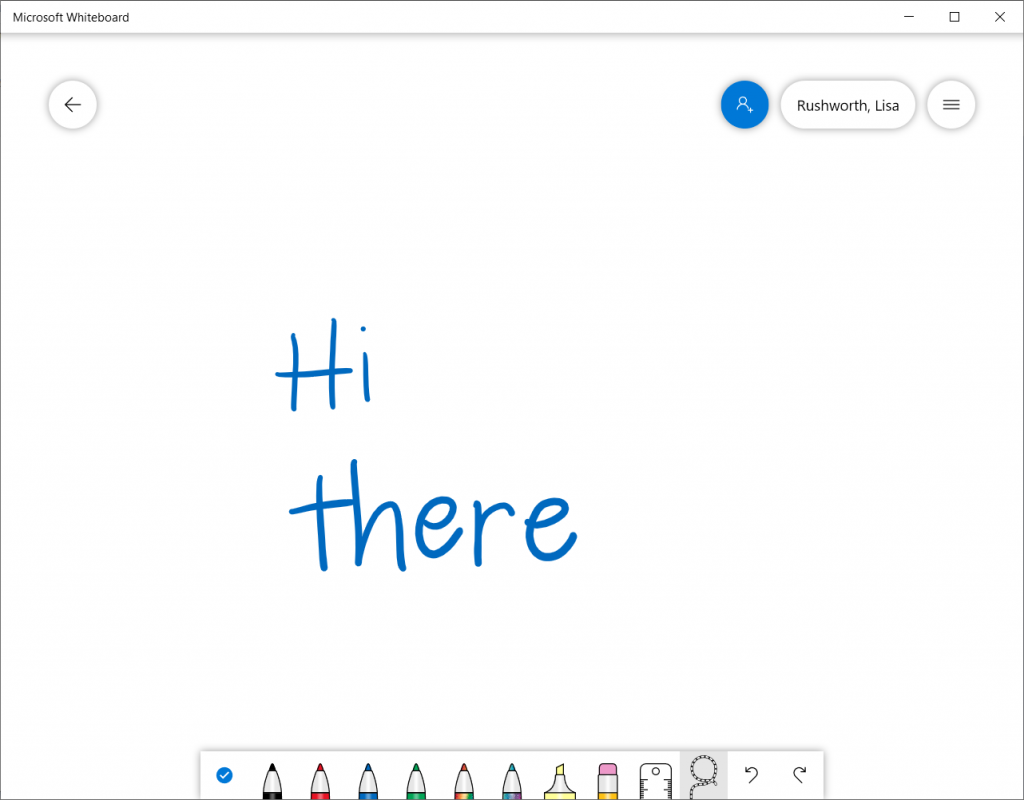
Voila, more legible text!

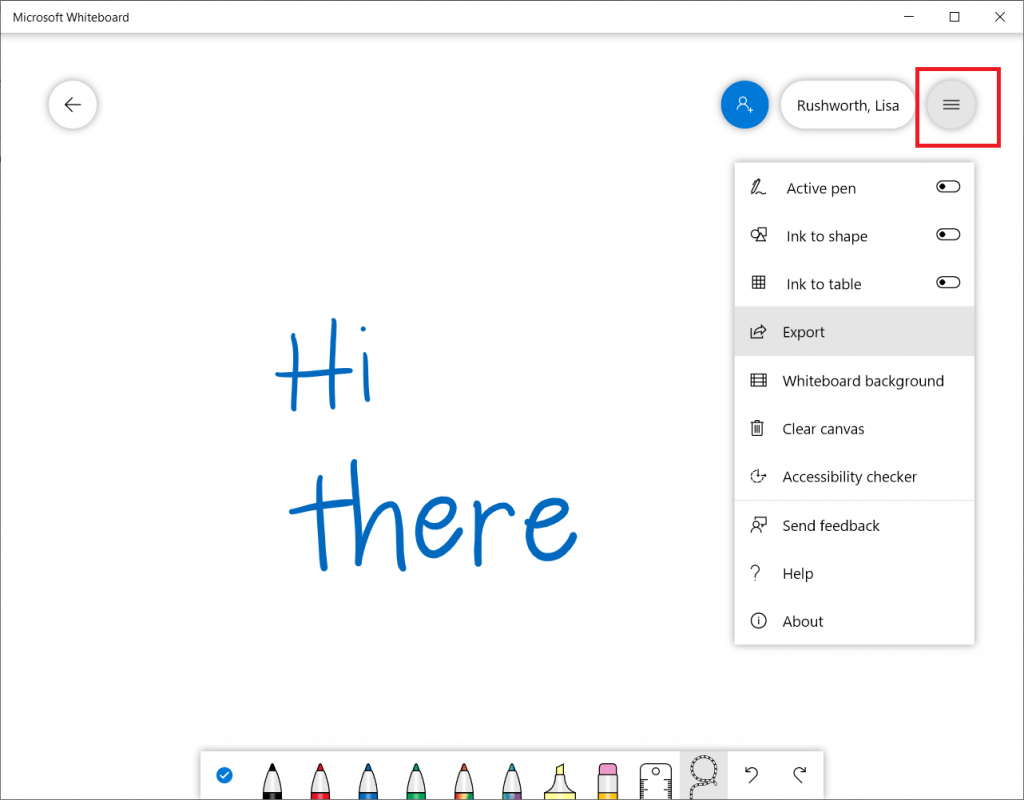
Click the hamburger menu in the upper right-hand corner of the screen for additional options — including “Export” which will create a PNG or SVG image from your Whiteboard data.