Tag: Crafts

Blindly Following Instructions

I purchased a table runner kit after the holidays. I’ve never done paper piecing, but I like the Mariner’s Compass patterns. It’s a technique I wanted to learn; and I wanted a clean, modern table runner for our dining room. I didn’t see a whole lot of modern-looking quilted table runners.

I’ve watched a couple of online videos showing the paper piecing process, and thought I was ready to give it a try. Traced the A variant of the block four times, cut all of the fabric pieces, and got ready to sew. I was halfway done the first block when I realized that the instructions have a point made of a blue piece and a yellow piece. Not a darker and lighter blue or a darker and lighter yellow. Checked the B variant of the block – same thing.

Well, that’s not right! I can see the intended result and it’s clearly got points that have a shadow effect created by using a darker and lighter shade of the same color. And if you combine two of the block units, you’ll have nothing but yellow/blue points.

I ended up re-writing the fabric to be used – and realized that there isn’t actually a B variant of the block anywhere in the thing. It is 8 identical blocks. A dark blue, light yellow/dark yellow, then a light blue. That light blue connects to the dark blue on the next block.

One of the challenges of working on something new … I don’t know enough about what I’m doing to question the instructions. Until it becomes obvious (and I have to cut new pieces to re-do an entire block!)

Overlaying Fabrics

I played around with overlaying fabrics – I used an organza with a silver snowflake design over a deep blue satin. The resulting color is a much lighter icy blue (pretty much what I was going for).

I had a lot of trouble handling the fabric – I cut the circles and basted the two pieces together at the waist and hem. I then used the lower baste-line to fold and hem the skirt. That worked well. For some reason, though, I could NOT get the waistband to attach. I ended up catching the skirt in the serger and slicing the fabric. There’s a fairly large (3/4″ wide by 3″ long) gash that I had to patch up right along the band. Not something you notice when Anya is wearing it, I didn’t have enough fabric to cut new circles, and it would look worse if I spliced in an entire wedge of the skirt.

The organza material is a little plastic-y, and difficult to work with. My original idea was to do a rolled hem on the bottom of both materials. Couldn’t get a nice rolled hem on a straight piece of sample fabric … so that was out. Once the organza was combined with the satin, it was pretty easy to work with. It doesn’t drape like cotton, though (hence my problem with the serger).

The end result, however, looks really awesome. And Anya loves having a glittery silver snowflake skirt.

Anya’s Easter Dress (2017) – Almost Finished

In fitting this dress, I decided to split the dress into a top and skirt to produce an outfit Anya can put on herself. As a dress, it was a little tricky to get into. I considered putting a zipper in the back, but she wouldn’t be able to dress herself.

Since the skirt is basically a circle skirt, I added a wide waistband with 2″ elastic. Done.

I’ve extended the lining (attached a strip of cream Bemberg lining material to the navy fabric which stops at the top of the white fabric).

Anya’s Easter Dress (2017) – Getting Started

I started making Anya’s Easter dress using the Kinley Cascading Flounce Dress pattern from Simple Life Sewing Company. I’m using a bright-ish blue main fabric with white Fairy Frost (glittery silver on white) as the underskirt. I have a navy blue Bemberg lining on the bodice – it’s a little dark, but it was something I already owned 🙂

I’ve got the pieces cut and am ready to start assembling the dress tomorrow.

Fabric Panels

Since I started sewing, I have seen “fabric panels” which are basically a large picture printed on fabric. Never ‘got’ it … for what purpose does one get a picture on a piece of fabric? After Christmas, I was shopping clearance sales and found a quilt kit that used the fabric panel. Oooooh! That is how you use a fabric panel.

I’ve now got two new blanket projects for Anya (tied quilts) — one with construction trucks that I know she is going to love with a minky yellow fabric for the back. And gravel print fabric for the binding

The second is a Northcott print with woodland animals looking up at a star. I’ve got a minky ice blue backing for this one.

I made Anya’s sleeping bag with two layers of Quilter’s Dream Puff batting – that’s almost too warm (but good for sleeping outdoors). I’m thinking a single layer of the Dream Puff batting should give us a couple of cozy blankets.

Magic Pillowcase

I got a “magic pillowcase” kit during a pre-Christmas sale. I finally got around to making it — it’s literally a two hour project with a tiny person disrupting the process the entire time.

You lay three pieces of fabric together, roll the main body up and fold the cuff over. Pin together & stitch. Then turn it right side out and have a long piece of three fabrics – a main body, an accent strip, and a cuff. Fold it in half, and voila it looks just like a pillowcase. Fold it in half inside out (right sides together) – instead of using a French seam, I just used the serger to stitch along the bottom and side of the pillow. Knotted off the tails and it was done. Tiny person loves her pillow and blanket.

This is a pretty cool way of making pillowcases – might make some custom pillowcases for our bedroom and the guest bedroom.

Circle Skirts

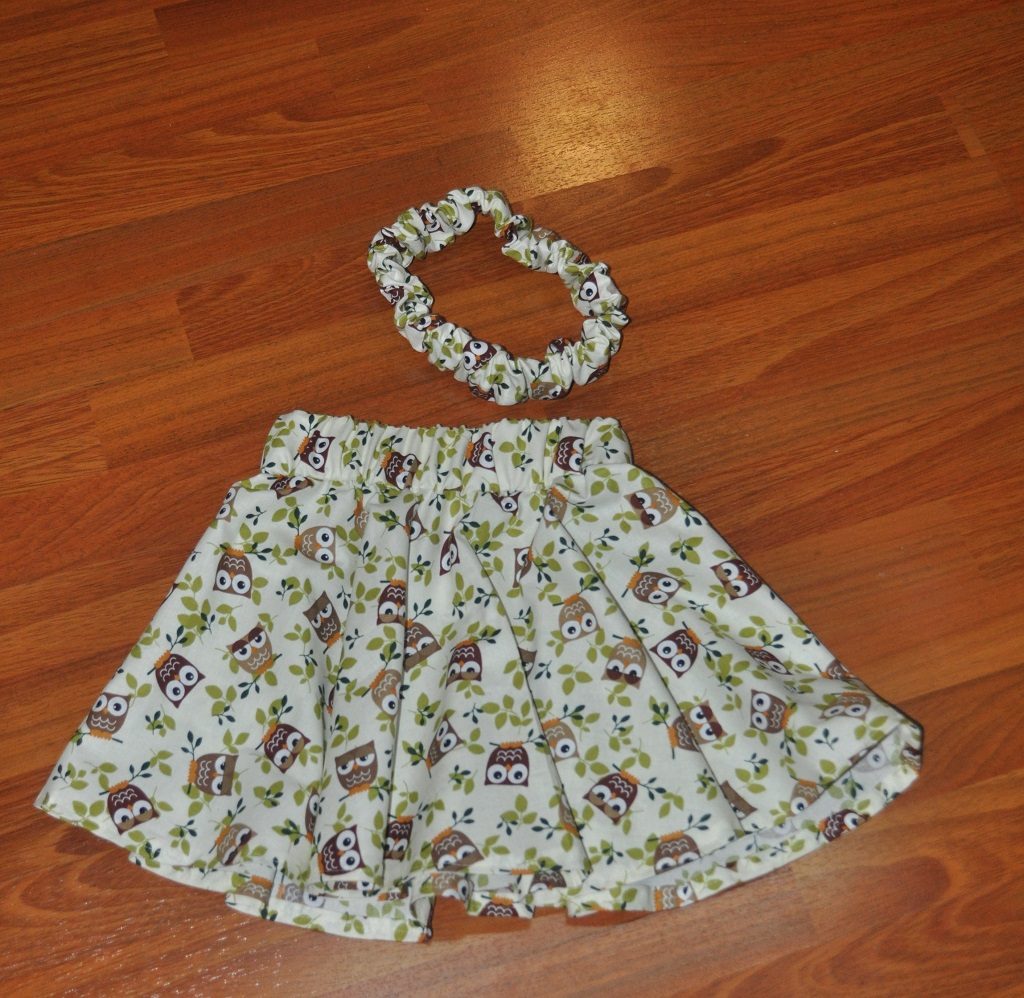
I’ve been making a lot of quick circle skirts and matching headbands for Anya. The first step to making a circle skirt for a tiny person is to select a fabric that looks the same from any direction (i.e. you can turn it upside down, at 45 degrees, etc). Solid colors are an easy pick, or a marbled pattern. A “tossed” pattern (the components are at all different orientations) works too. If you have a pattern that doesn’t look the same from all directions, you cannot use a single circle to make the skirt. Well, you CAN … but you’ll also have part of your skirt where the pattern is sideways and another part where it is upside down. Being able to cut a single circle is what makes circle skirts so quick and easy 🙂

I have a reusable pattern that I made myself. I’ve seen a lot of people bemoaning the maths required to figure out the pattern dimensions. I guess a theoretical physicist’s view of “a lot of complex math” is a little different 🙂 But, really, you need to measure the waist size and how long you want the skirt to be. The maths to forming the circles — the circle radius = waistSize / (2 * π) . A skirt for a growing child does not demand precision here. You could use 3 instead of pi – which makes your circle radius close to the waist size divided by 6 — the exact “close to” is not a linear function. In the waist size I’m dealing with, it is about an inch. If I want a 22″ waist for her skirt, I could divide 21/6 for the radius and come up with a 21.99″ waist.

Since I want a stretchy waistband that allows her to pull the skirt on herself, I want something larger than her actual waist size. Depending on how much fullness / gathering I want, 22-25″ is a good circumference for the waist – which is a radius between 3.5″ and 4″. The next thing you need to decide is the length of the skirt – you’ll have two inches at the top for the waistband, but you’ll also lose about an inch to seam allowances.

To draft a pattern, use a trammel set in conjunction with an 18″ aluminum ruler. Draw the inner circle (radius calculated for the waist), then draw the inner circle (waist radius + skirt length) – leaving the pin of the trammel set in the same location as the pencil part was adjusted. Cut the two circles and you’ve got a pattern.

To cut, you can fold the pattern in half or in quarters (along with the fabric) or lay the fabric out and pin the unfolded pattern to the fabric. I align the pattern along two perpendicular sides of the fabric. This leaves me with a very long strip of uncut fabric. Cut a 5″ wide rectangle the length of the calculated waist circumference. I also cut a 2″ or 3″ wide rectangle a few inches longer than Anya’s head size to make a coordinating headband. For the waistband, 2″ strip of non-roll elastic to her actual waist size (plus half an inch or so) and another one to a little less than her head size. The head-sized one I then cut in half lengthwise (so I have two 1″ strips of elastic the length of her head size).

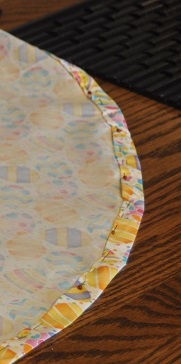
Fold the outside edge of the circle over 1/4″ and press. Then fold it over another 1/4″ and press. Stitch – this will be the bottom hem.

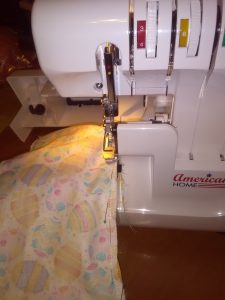
With the serger, finish off all four edges of the waistband fabric. Finish the short ends of the headband. The headband, fold in half lengthwise with the rights sides together and serge the long sides together to make a tube – which then has to be turned the right way around. Attach a safety pin to the 1″ wide elastic band and feed it through the strip. Sew the two ends of the elastic together, fold the ends of the fabric under and insert one side of the tube into the other side and stitch the two sides together. Voila, headband.

Pin the 5″ wide strip to the outside of the skirt, wrong sides together. I use the serger to sew these together – it finishes the top edge of the circle.

Sew the two short ends of the rectangle together. Sew the short ends of the 2″ wide elastic band together. Pull the skirt band through the elastic and pull the skirt band around the elastic. Fold the waistband over to the circle top is sandwiched between the two long edges of the waistband and start sewing. As you get toward the end of the circle, you have to gather the already-sewn waistband casing along the elastic. Done!

dsc_0160

Project Stack

Quick Projects:
Owl skirt – a quick circle skirt using a tossed owl print that Anya liked – we cut the circle, need to hem it and make the waistband

Underwear – I found a pattern to make underwear for Anya. I also happened across a place with  fold over elastic on super sale for Black Friday. I’ve got a lifetime supply of FOE.

Christmas season circle skirt – same as the Halloween one … nice to have but not essential.


Long Projects:
Christmas dress – I’ve got a basic plan courtesy of the Oliver & S Block Dress pattern drafting book, I’ve got the fabric ready to go (although I may be using some lace trim).

Oliver & S Pinwheel dress – I have the pieces cut and the bias tape made, need to stitch everything together. This is a summery dress, so not a high priority.

Table runners – I got a couple of quilt table runner kits that I want to make. A modern one for every day use, a Christmas one that probably won’t get done in time for this Christmas. A birthday one that definately won’t get made in time for this coming year’s birthdays, and a Halloween one.

Quilts — Anya’s tulip quilt and star quilt are very long term projects. I’d also like to make a quilt for my bed and our guest room.


Wrap-Up:
Blanket – still working on tying it

Sleeping bag – I’ve got the zipper stitched in (double-stitched for strength) and the batting cut. Still need to get the batting stitched in place and the edge sewn.


Completed:
Owl packpack – Finished and in use

Halloween bag – Finished and used
Halloween costume – Finished and used
Halloween circle skirt – Finished and used
Art smock – Finished and awaiting a non-sleeping bean to test it out

Art Smock!!

Anya’s art smock is finally done!  One yard of the laminated fabric (54″ wide) was enough for the interior of her owl backpack  and this smock. I learnt to fold bias tape properly — unfortunately too late for this project. I had always seen it folded very carefully in half and then each raw edge folded in half toward the middle. You actually want one side to be a little longer than the other. The shorter side is stitched to the front of the fabric, folded over the raw edge, and then you top-stitch just off of the edge of the bias tape (and since the portion on the back is a little bit wider, these stitches catch the back of the fabric. The top-stitching is barely visible (depending on how well you can sew along a defined line). This should save a LOT of time applying bias tape in the future.

img_20161203_000536


Art Smock

I am about halfway through constructing Anya’s art smock using the pattern I found on thediymommy.com.  I had quite a bit of the laminated fabric from making her backpack, and searched for something that would use it. We happened across this smock and it looked like it would use almost all of the remaining fabric. (Wasn’t wrong – from the one yard of fabric, I have a 16″square).

Other than my inability to machine-stitch bias tape, this is a really quick project. Couple hours – even with a tiny helper. I find it easier to cut fabric to a pattern if the paper pattern isn’t cut right along the line, so I leave a half inch overhang around the pattern. It works just as well, though, to have overhang that continually varies from 1/8″ up to an inch. And Anya loves that she can do some of the cutting for our crafts.

Once we printed and cut the paper pattern, I cut the two pieces of laminated cotton. Sewed the two pieces together at the shoulder – since laminate does not seem fray, I used a simple straight stitch instead of the serger. I had cut quite a lot of bias strips to make piping for the bag. Double folded the strips to create bias tape for the edging and started pinning it in place.img_20161111_195246

The front of the bias tape is stitched on, and now I’m hand-stitching the back of the bias tape. Some day I’ll learn this “stitch in the ditch” technique 🙂

img_20161111_230842